Welcome back to the series of Deploying On AWS Cloud Using Terraform 👨🏻💻. In this entire series, we will focus on our core concepts of Terraform by launching important basic services from scratch which will take your infra-as-code journey from beginner to advanced. This series would start from beginner to advance with real life Usecases and Youtube Tutorials.
If you are a beginner for Terraform and want to start your journey towards infra-as-code developer as part of your devops role buckle up 🚴♂️ and lets get started and understand core Terraform concepts by implementing it…🎬
🔎Basic Terraform Configurations🔍
As part of basic configuration we are going to setup 3 terraform files
1. Providers File:- Terraform relies on plugins called “providers” to interact with cloud providers, SaaS providers, and other APIs.
Providers are distributed separately from Terraform itself, and each provider has its own release cadence and version numbers.
The Terraform Registry is the main directory of publicly available Terraform providers, and hosts providers for most major infrastructure platforms. Each provider has its own documentation, describing its resource types and their arguments.
We would be using AWS Provider for our terraform series. Make sure to refer Terraform AWS documentation for up-to-date information.
Provider documentation in the Registry is versioned; you can use the version menu in the header to change which version you’re viewing.
provider "aws" { region = "var.AWS_REGION" shared_credentials_file = "" }
2. Variables File:- Terraform variables lets us customize aspects of Terraform modules without altering the module’s own source code. This allows us to share modules across different Terraform configurations, reusing same data at multiple places.
When you declare variables in the root terraform module of your configuration, you can set their values using CLI options and environment variables. When you declare them in child modules, the calling module should pass values in the module block.
variable "AWS_REGION" { default = "us-east-1" } data "aws_vpc" "GetVPC" { filter { name = "tag:Name" values = ["CustomVPC"] } } data "aws_subnet" "GetPublicSubnet" { filter { name = "tag:Name" values = ["PublicSubnet1"] } }
3. Versions File:- It’s always a best practice to maintain a version file where you specific version based on which your stack is testing and live on production.
terraform { required_version = ">= 0.12" }
🎨 Diagrammatic Representation 🎨
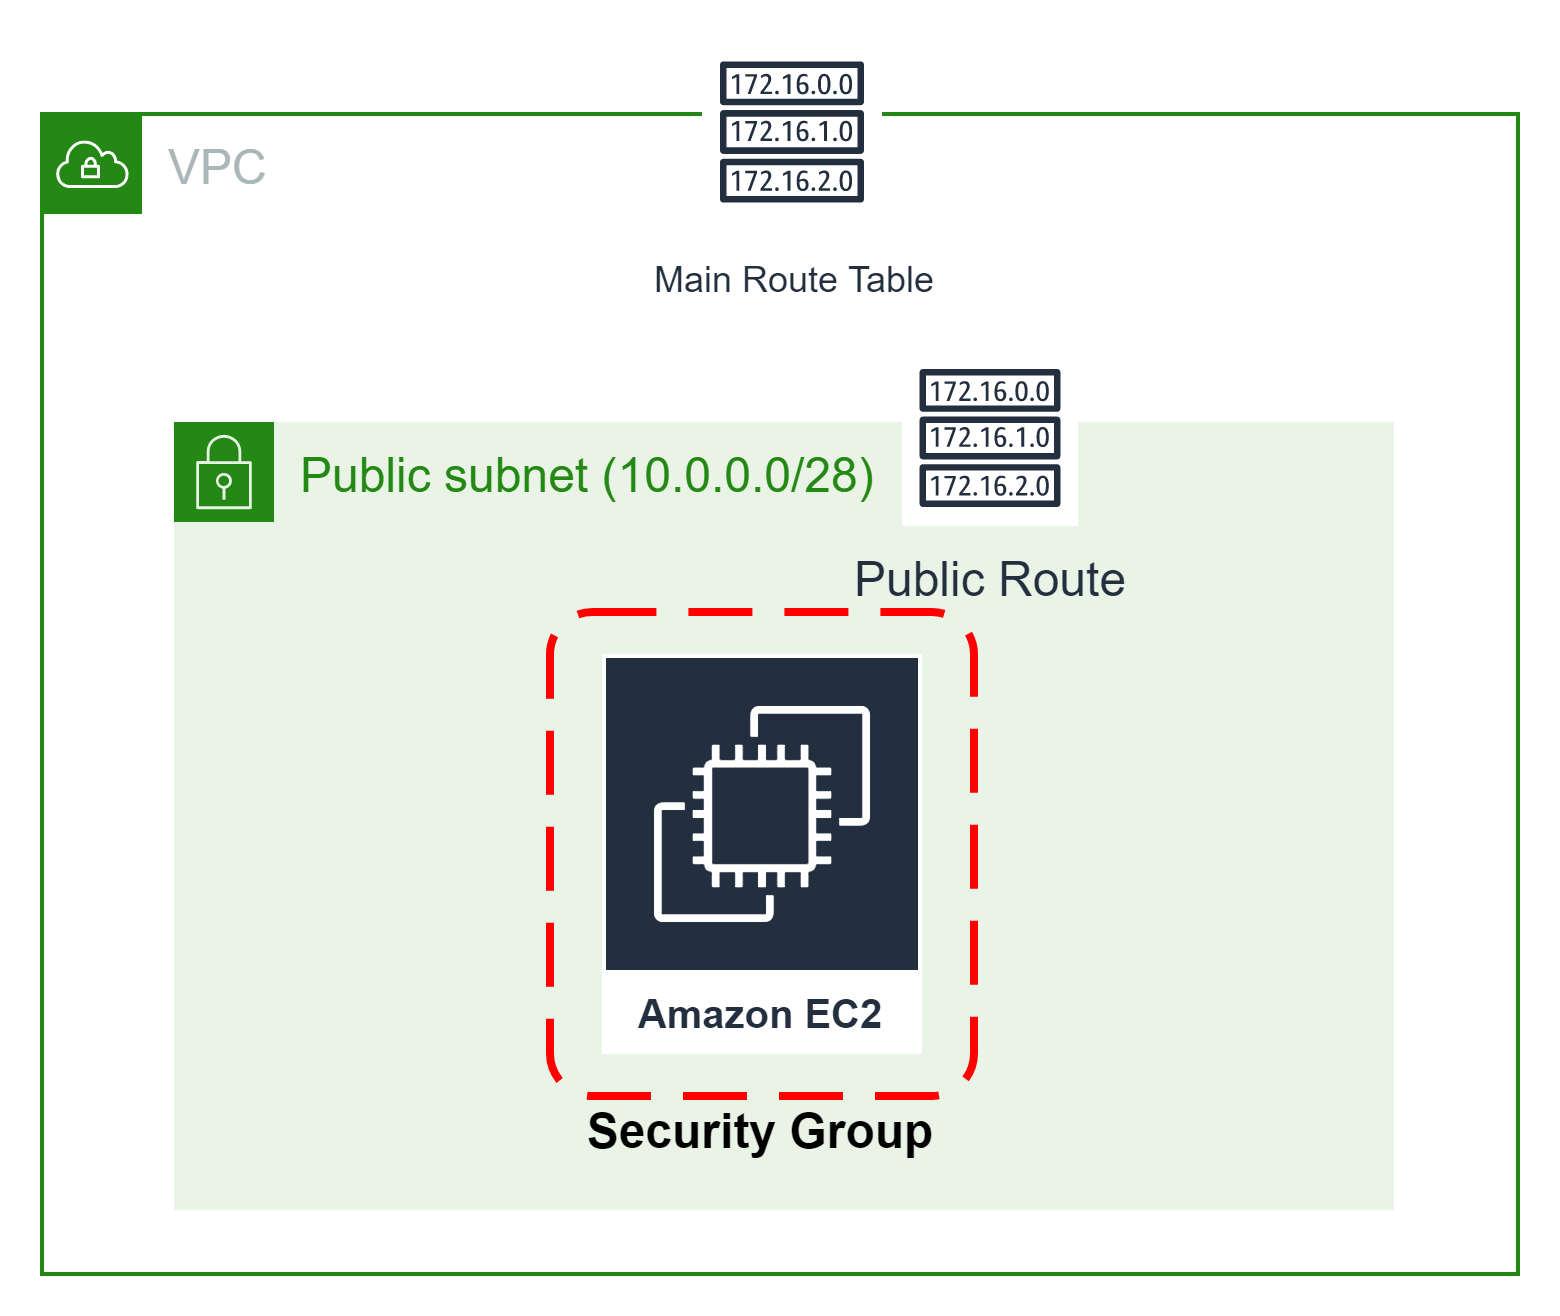
Configure AWS Key Pair For EC2
Let’s start with creating AWS Key Pair using terraform. First, let’s create a file called “ec2_key_pair.tf”, and add the following code.
# Below Code will generate a secure private key with encoding resource "tls_private_key" "key_pair" { algorithm = "RSA" rsa_bits = 4096 } # Create the Key Pair resource "aws_key_pair" "key_pair" { key_name = "linux-key-pair" public_key = tls_private_key.key_pair.public_key_openssh } # Save file resource "local_file" "ssh_key" { filename = "${aws_key_pair.key_pair.key_name}.pem" content = tls_private_key.key_pair.private_key_pem }
Configure Security Group For EC2
This method acts as a virtual firewall to control your inbound and outbound traffic flowing to your EC2 instances inside a subnet.
🔳 Resource
✦ aws_security_group:- This resource is define traffic inbound and outbound rules on the subnet level.
🔳 Arguments
✦ name:- This is an optional argument to define name of the security group.
✦ description:- This is an optional argument to mention details about security group that we are creating.
✦ vpc_id:- This is a mandatory argument and refers to id of a VPC to which it would be associated.
✦ tags:- One of the most important property used in all resources. Always make sure to attach tags for all your resources.
EGRESS & INGRESS are processed in attribute-as-blocks mode.
resource "aws_security_group" "ec2_sg" { name = "allow_http" description = "Allow http inbound traffic" vpc_id = data.aws_vpc.GetVPC.id ingress { from_port = 443 to_port = 443 protocol = "tcp" cidr_blocks = ["0.0.0.0/0"] } ingress { from_port = 80 to_port = 80 protocol = "tcp" cidr_blocks = ["0.0.0.0/0"] } egress { from_port = 0 to_port = 0 protocol = "-1" cidr_blocks = ["0.0.0.0/0"] } tags = { Name = "terraform-ec2-security-group" } }
Configure EC2 Instance With Security Group & Key Pair
🔳 Resource
✦ aws_instance:- This resource is define traffic inbound and outbound rules on subnet level.
🔳 Arguments
✦ ami:- This is a mandatory argument to mention ami id based on which EC2 instance will be launched.
✦ instance_type:- This is a mandatory argument to mention instance type for the EC2 instances like t2.small, t2.micro etc.
✦ security_groups:- This is an optional argument to mention which controls your inbound and outbound traffic flowing to your EC2 instances inside a subnet.
✦ subnet_id:- This is an optional argument to mention EC2 will part of which subnet.
✦ key_name:- This is an optional argument to define to enable ssh connection to your EC2 instance.
✦ tags:- One of the most important property used in all resources. Always make sure to attach tags for all your resources.
resource "aws_instance" "webservers" { ami = "ami-0742b4e673072066f" instance_type = "t2.micro" security_groups = [aws_security_group.ec2_sg.id] subnet_id = [data.aws_subnet.GetSubnet] key_name = aws_key_pair.key_pair.key_name tags = { Name = "Linux" Env = "Dev" } }
Configure EC2 Instance With Security Group & Userdata
🔳 Resource
✦ aws_instance:- This resource is define traffic inbound and outbound rules on the subnet level.
🔳 Arguments
✦ ami:- This is a mandatory argument to mention ami id based on which EC2 instance will be launched.
✦ instance_type:- This is a mandatory argument to mention instance type for the EC2 instances like t2.small, t2.micro etc.
✦ security_groups:- This is an optional argument to mention that control your inbound and outbound traffic flowing to your EC2 instances inside a subnet.
✦ subnet_id:- This is an optional argument to mention EC2 will part of which subnet.
✦ key_name:- This is an optional argument to define to enable ssh connection to your EC2 instance.
✦ user_data:- This is an optional argument to provide commands or scripts to be executed during the launch of the EC2 instance.
✦ tags:- One of the most important property used in all resources. Always make sure to attach tags for all your resources.
resource "aws_instance" "webservers" { ami = "ami-0742b4e673072066f" instance_type = "t2.micro" security_groups = [aws_security_group.ec2_sg.id] subnet_id = [data.aws_subnet.GetSubnet] key_name = aws_key_pair.key_pair.key_name user_data = <Deployed EC2 With Terraform" | sudo tee /var/www/html/index.html EOF tags = { Name = "Linux" Env = "Dev" } }
Configure EC2 Instance With Userdata & Variable Mapping
First, let’s create a variable with a type map where we will define for which region we are going to use which specific AMI[Amazon Machine Image]. Define this configuration in vars.tf
variable "AWS_REGION" { default = "us-east-1" } variable "ami" { type = map default = { "us-east-1" = "ami-04169656fea786776" "us-west-1" = "ami-006fce2a9625b177f" } }
Now let’s see how we can perform a lookup on this map based on region.
resource "aws_instance" "webservers" { ami = lookup(var.ami,var.AWS_REGION) instance_type = "t2.micro" security_groups = [aws_security_group.ec2_sg.id] subnet_id = [data.aws_subnet.GetSubnet] key_name = aws_key_pair.key_pair.key_name user_data = <Deployed EC2 With Terraform" | sudo tee /var/www/html/index.html EOF tags = { Name = "Environment" Env = "Dev" } }
1️⃣ The terraform fmt command is used to rewrite Terraform configuration files to a canonical format and style👨💻.
terraform fmt
2️⃣ Initialize the working directory by running the command below. The initialization includes installing the plugins and providers necessary to work with resources. 👨💻
terraform init
3️⃣ Create an execution plan based on your Terraform configurations. 👨💻
terraform plan
4️⃣ Execute the execution plan that the terraform plan command proposed. 👨💻
terraform apply --auto-approve
👁🗨👁🗨 YouTube Tutorial 📽
❗️❗️Important Documentation❗️❗️
⛔️ Hashicorp Terraform
⛔️ AWS CLI
⛔️ Hashicorp Terraform Extension Guide
⛔️ Terraform Autocomplete Extension Guide
⛔️ AWS Security Group
⛔️ AWS Key Pair
⛔️ AWS EC2
🥁🥁 Conclusion 🥁🥁
In this blog, we have configured the below resources
✦ AWS Key Pair.
✦ AWS Security Group for the EC2 instances which need to be provisioned inside subnets we have launched.
✦ AWS EC2 With User Data.
✦ AWS EC2 With Mapping Variable.
I have also referenced what arguments and documentation we are going to use so that while you are writing the code it would be easy for you to understand terraform official documentation. Stay with me for the next blog where we will be doing deep dive into Target Group, Elastic Load Balancer & ELB Listener Using Terraform.
📢 Stay tuned for my next blog…..
So, did you find my content helpful? If you did or like my other content, feel free to buy me a coffee. Thanks.
Author - Dheeraj Choudhary
RELATED ARTICLES
Automate S3 Data ETL Pipelines With AWS Glue Using Terraform
Discover how to automate your S3 data ETL pipelines using AWS Glue and Terraform in this step-by-step tutorial. Learn to efficiently manage and process your data, leveraging the power of AWS Glue for seamless data transformation. Follow along as we demonstrate how to set up Terraform scripts, configure AWS Glue, and automate data workflows.
Automating AWS Infrastructure with Terraform Functions
IntroductionManaging cloud infrastructure can be complex and time-consuming. Terraform, an open-source Infrastructure as Code (IaC) tool, si ...
28r756
vdPmZGeYJFVECla
Andes Saviahde
Firaya Hayem
jk0c8s
Gaila Jessiman
Ryeleigh Tesla
Duston Hareim
Taijanae Vananda
Jaydean Bolino sass
dQMPRKAVjTYIJg
OgeyuoSZlJw
Eudella Karzai
Danajia Berley
XVxJcqpBzdFsMZnf
SdcuDJLbBfWhqte
Hi there, just became alert to your blog through Google, and found
that it is really informative. I’m gonna watch out for brussels.
I’ll be grateful if you continue this in future.
Lots of people will be benefited from your writing.
Cheers! Najlepsze escape roomy
Tejal Kirova
Very interesting subject, regards for putting up.!
Jequetta Volynets
Kamrey Borotha
Very excellent info can be found on website.Money from blog
Lavaria Svacha
After I initially left a comment I appear to have clicked on the -Notify me when new comments are added- checkbox and now each time a comment is added I get 4 emails with the same comment. Is there an easy method you are able to remove me from that service? Thanks a lot.
I really like it when folks come together and share thoughts. Great site, keep it up.
I would like to thank you for the efforts you have put in writing this website. I am hoping to check out the same high-grade blog posts from you later on as well. In fact, your creative writing abilities has encouraged me to get my very own website now 😉
MyXClpiGKNYdxQLF
Can I simply say what a relief to find somebody who truly knows what they’re talking about on the net. You certainly know how to bring a problem to light and make it important. More and more people have to check this out and understand this side of the story. I was surprised that you are not more popular since you surely possess the gift.
My site Webemail24 covers a lot of topics about SEO and I thought we could greatly benefit from each other. Awesome posts by the way!