Deploy AWS Public Subnet,  Route Table & Associate Using Terraform

Deploy AWS Public Subnet, Route Table & Associate Using Terraform

Welcome back to the series of Deploying On AWS Cloud Using Terraform 👨🏻‍💻. In this entire series we will focus on our core concepts of Terraform by launching important basic services from scratch which will take your infra-as-code journey from beginner to advanced. This series would start from beginner to advance with real life Usecases and Youtube Tutorials.

If you are a beginner for Terraform and want to start your journey towards infra-as-code developer as part of your devops role buckle up 🚴‍♂️ and lets get started and understand core Terraform concepts by implementing it...🎬

❗️❗️Pre-Requisite❗️❗️

1️⃣ Deploying On AWS Cloud Using Terraform Series Pre-Requisites

2️⃣ Deploy VPC, IGW & Associate [Mandatory]

3️⃣ Terraform Naming Conventions & Best Practices

🎨 Diagrammatic Representation🎨

image.png

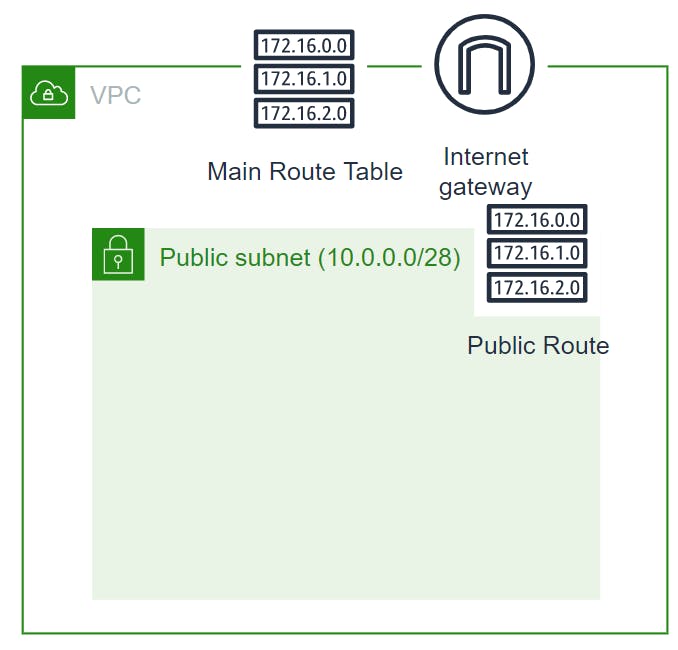
🔎Basic Terraform Configurations🔍

As part of basic configuration we are going to setup 3 terraform files

  1. Providers File:- Terraform relies on plugins called "providers" to interact with cloud providers, SaaS providers, and other APIs.
    Providers are distributed separately from Terraform itself, and each provider has its own release cadence and version numbers.
    The Terraform Registry is the main directory of publicly available Terraform providers, and hosts providers for most major infrastructure platforms. Each provider has its own documentation, describing its resource types and their arguments.
    We would be using AWS Provider for our terraform series. Make sure to refer Terraform AWS documentation for up-to-date information.
    Provider documentation in the Registry is versioned; you can use the version menu in the header to change which version you're viewing.

     provider "aws" { 
     region = "var.AWS_REGION" 
     shared_credentials_file = "<Your AWS Credentials File path>" 
     }
    
  2. Variables File:- Terraform variables lets us customize aspects of Terraform modules without altering the module's own source code. This allows us to share modules across different Terraform configurations, reusing same data at multiple places.
    When you declare variables in the root terraform module of your configuration, you can set their values using CLI options and environment variables. When you declare them in child modules, the calling module should pass values in the module block.

     variable "AWS_REGION" { 
     default = "us-east-1" 
     } 
     data "aws_vpc" "GetVPC" { 
     filter { name = "tag:Name" values = ["CustomVPC"] } 
     } 
     data "aws_internet_gateway" "GetIGW" { 
     filter { name = "tag:Name" values = ["IGW"] } 
     }
    
  3. Versions File:- Its always a best practice to maintain a version file where you specific version based on which your stack is testing and live on production.

     terraform { 
     required_version = ">= 0.12" 
     }
    

Configure Public Subnet

As a part of this code block we are going to create 2 subnets in 2 different availability zone as part of this region.

🔳 Resource

aws_subnet:- This resource is used to launch a subnet associated with a vpc and tied up with availability zone. This subnet is nothing but segregation of the IP address range of your VPC.

🔳 Arguments

vpc_id:- Refers to id of a VPC to which it would be associate to utilize its cidr IP range.
cidr_block- This IPv4 CIDR block for the VPC is an optional argument. CIDR can be explicitly set or it can be derived from IPAM using ipv4_netmask_length.
availability_zone - This is an optional argument to mention AZ for the subnet for a specific region under which it is launched.
map_public_ip_on_launch - This is an optional argument that indicates that instances launched into the subnet should be assigned a public IP address.
tags:- One of the most important properties used in all resources. Always make sure to attach tags for all your resources.

resource "aws_subnet" "PublicSubnet1" {
  vpc_id     = data.aws_vpc.GetVPC.id
  cidr_block = "10.0.0.0/18"
  availability_zone = "us-east-1a"
  map_public_ip_on_launch = true

  tags = {
    Name = "PublicSubnet1"
    Type = "Public"
  }
}
resource "aws_subnet" "PublicSubnet2" {
  vpc_id     = data.aws_vpc.GetVPC.id
  cidr_block = "10.0.64.0/18"
  availability_zone = "us-east-1b"
  map_public_ip_on_launch = true

  tags = {
    Name = "PublicSubnet2"
    Type = "Public"
  }
}

Configure Public Route Table & Associate

Let's first focus on the code to create a custom route table and add an internet gateway route to that table.

🔳 Resource

aws_route_table:- This resource is to define create route tables and define routes within it.

🔳 Arguments

vpc_id:- Refers to id of a VPC to which it would be associated.
route:- This is an optional argument which to define list of routes to be added in the route table we are creating.
tags:- One of the most important properties used in all resources. Always make sure to attach tags for all your resources.

resource "aws_route_table" "PublicRouteTable" {
  vpc_id = data.aws_vpc.GetVPC.id

  route {
    cidr_block = "0.0.0.0/0"
    gateway_id = data.aws_internet_gateway.GetIGW.id
  }
  tags = {
    Name = "PublicRouteTable"
  }
}

As you can see above we have create our custom route table and also added routes to that custom route table. Now we have to associate this route table to our subnets to make these subnets as public.

🔳 Resource

aws_route_table_association:- This resource is used to create an association between the route table and a subnet/internet gateway.

🔳 Arguments

subnet_id:- Refers to id of a subnet to which it needs to be associated.
route_table_id:- Refers to route table id to which we have to associate our subnet.

resource "aws_route_table_association" "PublicSubnetRouteTableAssociation1" {
  subnet_id      = aws_subnet.PublicSubnet1.id
  route_table_id = aws_route_table.PublicRouteTable.id
}

resource "aws_route_table_association" "PublicSubnetRouteTableAssociation2" {
  subnet_id      = aws_subnet.PublicSubnet2.id
  route_table_id = aws_route_table.PublicRouteTable.id
}

🔳 Output File

Output values make information about your infrastructure available on the command line, and can expose information for other Terraform configurations to use. Output values are similar to return values in programming languages.

output "PublicSubnet1" {
  value       = aws_subnet.PublicSubnet1.id
  description = "This is first public subnet id."
}
output "PublicSubnet2" {
  value       = aws_subnet.PublicSubnet2.id
  description = "This is first second subnet id."
}

output "PublicRouteTable" {
  value       = aws_route_table.PublicRouteTable.id
  description = "Customu public route table id."
}

🔊To view the entire GitHub code click here

1️⃣ The terraform fmt command is used to rewrite Terraform configuration files to a canonical format and style👨‍💻.

 terraform fmt

2️⃣ Initialize the working directory by running the command below. The initialization includes installing the plugins and providers necessary to work with resources. 👨‍💻

terraform init

3️⃣ Create an execution plan based on your Terraform configurations. 👨‍💻

terraform plan

4️⃣ Execute the execution plan that the terraform plan command proposed. 👨‍💻

terraform plan -auto-approve

👁‍🗨👁‍🗨 YouTube Tutorial 📽

destroy.png

❗️❗️Important Documentation❗️❗️

⛔️ Hashicorp Terraform
⛔️ AWS CLI
⛔️ Hashicorp Terraform Extension Guide
⛔️ Terraform Autocomplete Extension Guide
⛔️ AWS Subnet
⛔️ AWS Route Table
⛔️ AWS Route Table Association

🥁🥁 Conclusion 🥁🥁

In this blog, we have launched below AWS resources
✦ AWS Subnet and associated that subnet to our VPC.
✦ AWS Custom Route Table and added our Internet Gateway route to this table.
✦ AWS Route Table Association to link out custom route tables and subnets we have created.
I have also referenced what arguments and documentation we are going to use so that while you are writing the code it would be easy for you to understand terraform official documentation. Stay with me for the next blog where we will be doing deep dive into private subnets and NAT gateway.

📢 Stay tuned for my next blog.....

🎊**So, did you find my content helpful? If you did or like my other content, feel free to buy me a coffee. Thanks. **🎊

![](https://img.buymeacoffee.com/button-api/?text=Buy me a coffee&emoji=&slug=Dheeraj3&button_colour=5F7FFF&font_colour=ffffff&font_family=Cookie&outline_colour=000000&coffee_colour=FFDD00 align="left")

Did you find this article valuable?

Support Dheeraj Choudhary by becoming a sponsor. Any amount is appreciated!