
🎨 Diagrammatic Representation 🎨
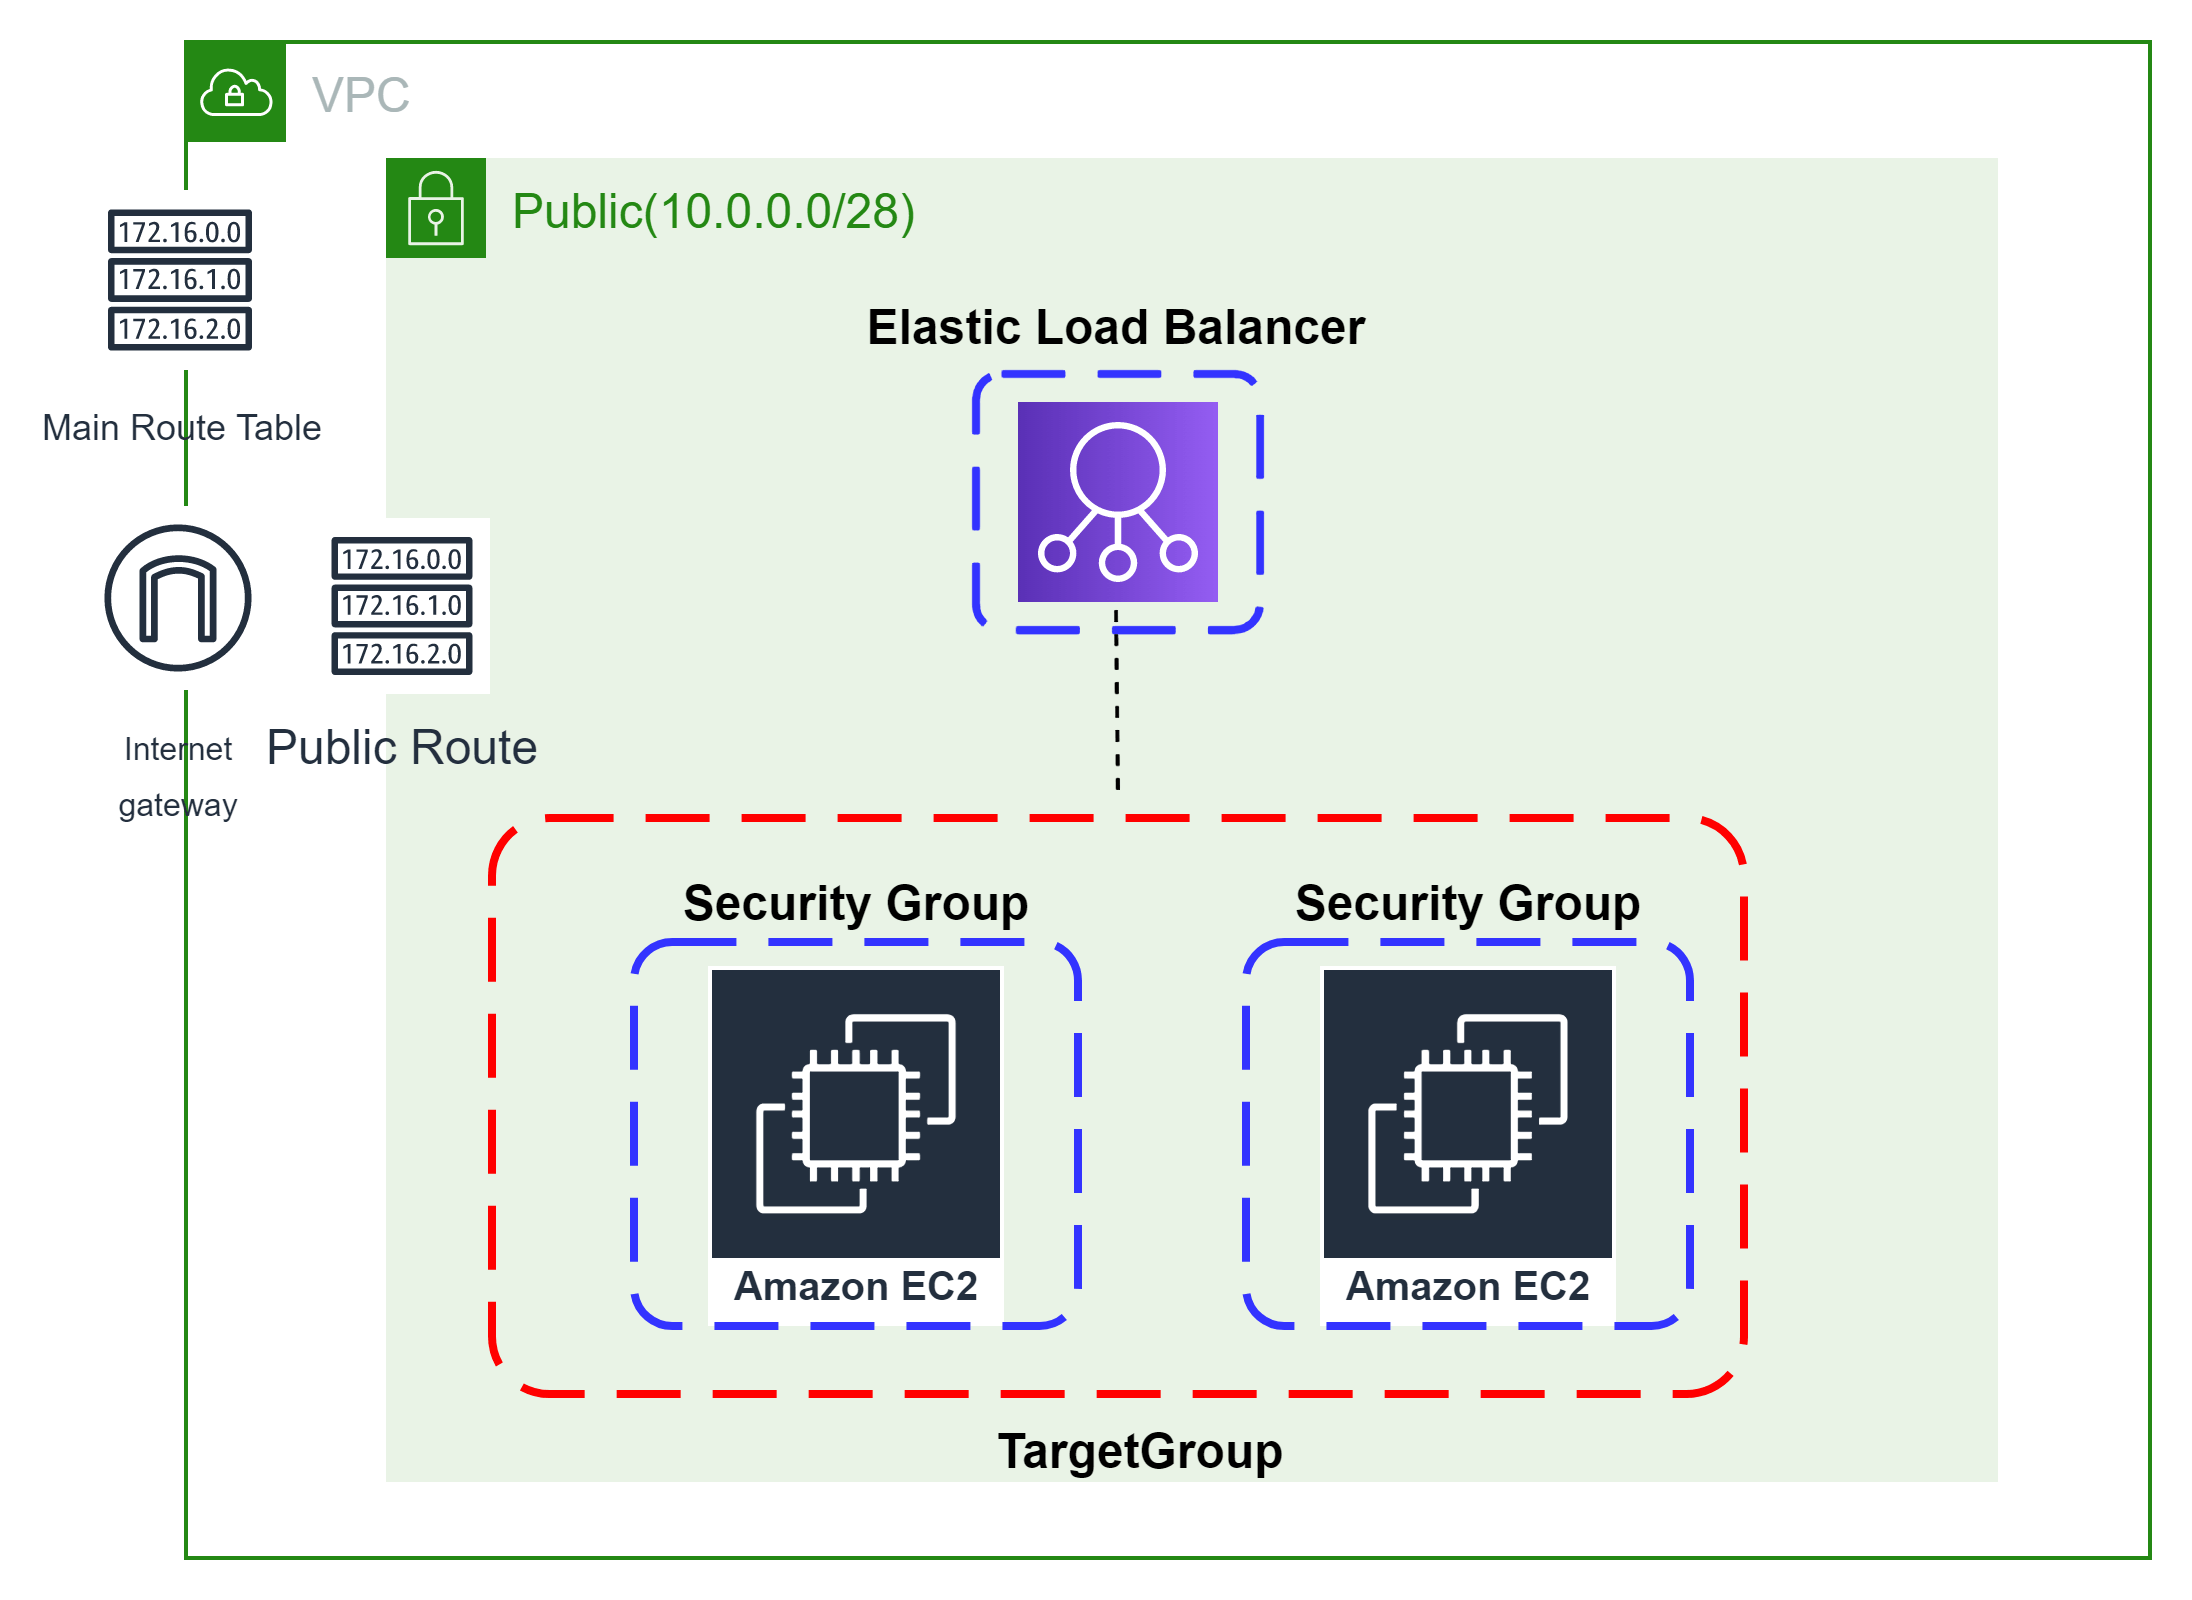
👨🏻💻Launch Target Group And Its Attachment👨🏻💻
Before creating a Target Group let’s first define a data block to fetch a list of the EC2 instance in a running state.

Author - Dheeraj Choudhary
I am an IT Professional with 11+ years of experience specializing in DevOps & Build and Release Engineering, Software configuration management in automating, build, deploy and release.
I blog about AWS and DevOps on my YouTube channel, which focuses on content such as, AWS, DevOps, open source, AI-ML and AWS community activities.


Automate S3 Data ETL Pipelines With AWS Glue Using Terraform
Discover how to automate your S3 data ETL pipelines using AWS Glue and Terraform in this step-by-step tutorial. Learn to efficiently manage and process your data, leveraging the power of AWS Glue for seamless data transformation. Follow along as we demonstrate how to set up Terraform scripts, configure AWS Glue, and automate data workflows.

Automating AWS Infrastructure with Terraform Functions
IntroductionManaging cloud infrastructure can be complex and time-consuming. Terraform, an open-source Infrastructure as Code (IaC) tool, si ...
hello there and thank you for your info – I’ve definitely picked up something new from right here.
I did however expertise several technical issues using this website, as
I experienced to reload the website lots of times previous to I could get it to load properly.
I had been wondering if your hosting is OK? Not that I’m complaining, but slow loading instances times will very frequently
affect your placement in google and can damage your high-quality score if advertising and marketing with Adwords.
Anyway I am adding this RSS to my e-mail and could look out for
a lot more of your respective intriguing content. Ensure
that you update this again soon.. Lista escape roomów
I was examining some of your posts on this website and I think this internet site is
real instructive! Keep on posting.?
Very interesting topic, regards for posting.Raise range
Examining the Art of Effective Communication
Interpersonal communication is key to success in every aspect of life. Whether it’s building bonds with others, discussing deals in business, or articulating ideas effectively, mastering the art of communication can lead to great outcomes.
In this post, we look into the diverse facets of effective communication. From oral communication to facial expressions cues, we delve into the approaches that promote concise and substantial interactions.
Successful communication involves not only articulating oneself clearly but also attentively hearing to others. We investigate the significance of engaged listening and how it boosts shared understanding and fosters improved connections.
Moreover, we talk about the role of understanding and emotional intelligence in efficient communication. Understanding feelings of others and keeping empathetic can lead to deeper relationships and solution of conflicts.
Additionally, we explore the impact of technological innovations on communication in the age of technology. While technological advancements has facilitated communication easier and more convenient, we furthermore address its potential pitfalls and the method by which to manage them.
In conclusion, mastering the skill of successful communication is crucial for success in various aspects of life. By recognizing its principles and implementing active listening, empathy, and adapting to technological advancements, individuals can build stronger connections and achieve their goals more effectively. [url=https://www.southwestteepeerental.com/copy-of-mood-boards]Exclusive event rentals serving Scottsdale and surrounding areas[/url]
There’s certainly a great deal to find out about this topic. I love all the points you have made.
I truly love your blog.. Very nice colors & theme. Did you develop this amazing site yourself? Please reply back as I’m hoping to create my own personal blog and would like to find out where you got this from or what the theme is called. Cheers!
I quite like looking through an article that can make people think. Also, thank you for permitting me to comment.
You’re so awesome! I do not suppose I’ve read anything like that before. So wonderful to discover someone with original thoughts on this subject. Seriously.. many thanks for starting this up. This website is something that’s needed on the internet, someone with some originality.
Good info. Lucky me I recently found your website by accident (stumbleupon). I’ve book marked it for later.
This is a great tip especially to those fresh to the blogosphere. Short but very precise information… Many thanks for sharing this one. A must read article.
Aw, this was an incredibly good post. Taking a few minutes and actual effort to generate a good article… but what can I say… I hesitate a whole lot and don’t manage to get nearly anything done.
There’s definately a great deal to know about this topic. I really like all of the points you made.
You ought to be a part of a contest for one of the most useful sites on the internet. I’m going to recommend this web site!
A motivating discussion is definitely worth comment. I believe that you ought to write more on this subject matter, it may not be a taboo subject but usually people do not discuss these subjects. To the next! Kind regards.
I enjoy looking through a post that will make people think. Also, thanks for allowing for me to comment.
Pretty! This has been an incredibly wonderful post. Many thanks for supplying these details.
Great web site you have got here.. It’s difficult to find high quality writing like yours these days. I truly appreciate individuals like you! Take care!!
I blog often and I really thank you for your information. This great article has really peaked my interest. I’m going to bookmark your website and keep checking for new information about once per week. I subscribed to your RSS feed as well.
Everything is very open with a precise description of the issues. It was really informative. Your site is very useful. Thanks for sharing!
You need to be a part of a contest for one of the most useful websites on the internet. I am going to highly recommend this blog!
Very good post! We are linking to this great article on our website. Keep up the good writing.
Way cool! Some extremely valid points! I appreciate you penning this article plus the rest of the site is very good.
Way cool! Some extremely valid points! I appreciate you penning this post and the rest of the website is also very good.
The next time I read a blog, I hope that it doesn’t fail me just as much as this particular one. After all, I know it was my choice to read, nonetheless I actually thought you would have something helpful to say. All I hear is a bunch of whining about something you can fix if you weren’t too busy searching for attention.
I blog frequently and I really thank you for your information. This article has really peaked my interest. I’m going to take a note of your website and keep checking for new information about once a week. I subscribed to your RSS feed as well.
Hi, I think your site may be having browser compatibility problems. Whenever I look at your blog in Safari, it looks fine however, when opening in I.E., it’s got some overlapping issues. I simply wanted to give you a quick heads up! Aside from that, wonderful blog!
When I initially commented I appear to have clicked the -Notify me when new comments are added- checkbox and from now on every time a comment is added I recieve four emails with the exact same comment. Perhaps there is a way you are able to remove me from that service? Thanks.
A motivating discussion is definitely worth comment. There’s no doubt that that you need to publish more about this subject, it may not be a taboo subject but usually people do not discuss these issues. To the next! Many thanks!
This website was… how do you say it? Relevant!! Finally I’ve found something which helped me. Appreciate it.
Good post. I learn something totally new and challenging on blogs I stumbleupon everyday. It’s always useful to read through articles from other authors and use something from their websites.
Aw, this was an extremely nice post. Finding the time and actual effort to make a top notch article… but what can I say… I hesitate a whole lot and don’t seem to get nearly anything done.
Good post. I learn something totally new and challenging on sites I stumbleupon everyday. It will always be exciting to read content from other writers and use a little something from other websites.
Howdy! This blog post couldn’t be written much better! Reading through this article reminds me of my previous roommate! He always kept preaching about this. I’ll forward this article to him. Pretty sure he’s going to have a very good read. Many thanks for sharing!
Very good info. Lucky me I discovered your blog by chance (stumbleupon). I have book marked it for later.
Spot on with this write-up, I truly believe that this website needs far more attention. I’ll probably be back again to read more, thanks for the info.
Your style is very unique in comparison to other folks I’ve read stuff from. Many thanks for posting when you have the opportunity, Guess I’ll just book mark this site.
Excellent site you have here.. It’s hard to find high quality writing like yours these days. I really appreciate individuals like you! Take care!!
I truly love your blog.. Excellent colors & theme. Did you make this site yourself? Please reply back as I’m hoping to create my own personal site and want to learn where you got this from or just what the theme is called. Appreciate it.
You ought to take part in a contest for one of the most useful blogs online. I will highly recommend this site!
Greetings! Very useful advice within this post! It is the little changes that produce the biggest changes. Many thanks for sharing!
Way cool! Some very valid points! I appreciate you penning this post plus the rest of the website is very good.
Next time I read a blog, I hope that it doesn’t disappoint me as much as this one. After all, I know it was my choice to read, however I really thought you would probably have something useful to talk about. All I hear is a bunch of complaining about something you can fix if you weren’t too busy searching for attention.
This excellent website truly has all the info I wanted concerning this subject and didn’t know who to ask.
Hi, I do think this is a great web site. I stumbledupon it 😉 I may return once again since i have saved as a favorite it. Money and freedom is the greatest way to change, may you be rich and continue to help others.
Great post! We will be linking to this great post on our website. Keep up the great writing.
This is a very good tip especially to those new to the blogosphere. Brief but very accurate information… Thanks for sharing this one. A must read post.
I needed to thank you for this fantastic read!! I definitely loved every little bit of it. I have you book marked to look at new things you post…
Very good post. I am experiencing a few of these issues as well..
Howdy! This blog post couldn’t be written much better! Going through this article reminds me of my previous roommate! He continually kept preaching about this. I will send this post to him. Pretty sure he will have a great read. I appreciate you for sharing!
Way cool! Some very valid points! I appreciate you writing this article plus the rest of the website is extremely good.
Everything is very open with a precise explanation of the issues. It was truly informative. Your website is very useful. Thanks for sharing.
The very next time I read a blog, I hope that it won’t fail me just as much as this particular one. After all, Yes, it was my choice to read through, however I actually believed you’d have something useful to say. All I hear is a bunch of complaining about something you could possibly fix if you weren’t too busy seeking attention.
Great post. I will be going through many of these issues as well..
Aw, this was a really good post. Taking a few minutes and actual effort to create a very good article… but what can I say… I procrastinate a whole lot and don’t seem to get nearly anything done.
Hi! I could have sworn I’ve been to this web site before but after looking at a few of the posts I realized it’s new to me. Nonetheless, I’m definitely pleased I found it and I’ll be book-marking it and checking back regularly.
This is a topic which is near to my heart… Cheers! Exactly where can I find the contact details for questions?
After checking out a few of the blog posts on your website, I seriously appreciate your way of blogging. I bookmarked it to my bookmark webpage list and will be checking back soon. Take a look at my web site as well and let me know how you feel.
I seriously love your site.. Excellent colors & theme. Did you make this site yourself? Please reply back as I’m looking to create my own site and want to find out where you got this from or just what the theme is named. Cheers!
I couldn’t refrain from commenting. Perfectly written.
Next time I read a blog, I hope that it doesn’t fail me as much as this particular one. After all, I know it was my choice to read through, but I truly thought you’d have something interesting to talk about. All I hear is a bunch of complaining about something that you could possibly fix if you weren’t too busy searching for attention.
I blog often and I really appreciate your information. Your article has really peaked my interest. I am going to book mark your blog and keep checking for new details about once a week. I subscribed to your Feed as well.
I’m amazed, I must say. Seldom do I come across a blog that’s equally educative and amusing, and without a doubt, you’ve hit the nail on the head. The issue is something that not enough folks are speaking intelligently about. Now i’m very happy I came across this in my hunt for something concerning this.
bookmarked!!, I love your website!
This is the right blog for anybody who wishes to understand this topic. You realize a whole lot its almost hard to argue with you (not that I really would want to…HaHa). You certainly put a fresh spin on a subject that has been discussed for decades. Excellent stuff, just great.
Right here is the right webpage for anyone who really wants to find out about this topic. You realize a whole lot its almost tough to argue with you (not that I really will need to…HaHa). You certainly put a brand new spin on a subject that’s been written about for a long time. Great stuff, just great.
I like looking through a post that will make people think. Also, thank you for allowing me to comment.
Hi, I do believe this is an excellent blog. I stumbledupon it 😉 I will come back once again since I book-marked it. Money and freedom is the best way to change, may you be rich and continue to help others.
I’m amazed, I must say. Seldom do I encounter a blog that’s both educative and amusing, and let me tell you, you’ve hit the nail on the head. The problem is an issue that too few men and women are speaking intelligently about. Now i’m very happy I came across this in my hunt for something concerning this.
Having read this I thought it was really informative. I appreciate you taking the time and energy to put this information together. I once again find myself personally spending way too much time both reading and leaving comments. But so what, it was still worthwhile!
Greetings, I do believe your site may be having web browser compatibility problems. When I look at your site in Safari, it looks fine however, when opening in I.E., it has some overlapping issues. I just wanted to give you a quick heads up! Apart from that, excellent blog!
I’m amazed, I have to admit. Seldom do I encounter a blog that’s both educative and interesting, and let me tell you, you have hit the nail on the head. The problem is an issue that too few folks are speaking intelligently about. Now i’m very happy I stumbled across this during my search for something regarding this.
Hi! I could have sworn I’ve visited this blog before but after going through many of the posts I realized it’s new to me. Nonetheless, I’m definitely delighted I came across it and I’ll be book-marking it and checking back frequently.
This is a topic that’s close to my heart… Cheers! Exactly where can I find the contact details for questions?
Spot on with this write-up, I honestly feel this site needs a lot more attention. I’ll probably be back again to see more, thanks for the advice.
Very good post! We are linking to this great article on our site. Keep up the good writing.
When I originally commented I seem to have clicked the -Notify me when new comments are added- checkbox and from now on every time a comment is added I get 4 emails with the exact same comment. There has to be a means you are able to remove me from that service? Many thanks.
I was able to find good advice from your articles.
Hello, There’s no doubt that your site might be having browser compatibility issues. When I look at your website in Safari, it looks fine however, if opening in IE, it’s got some overlapping issues. I just wanted to give you a quick heads up! Apart from that, excellent website!
I like reading a post that can make people think. Also, thanks for allowing me to comment.
Greetings! Very helpful advice in this particular post! It’s the little changes which will make the largest changes. Thanks for sharing!
Having read this I believed it was extremely enlightening. I appreciate you finding the time and effort to put this content together. I once again find myself personally spending way too much time both reading and commenting. But so what, it was still worth it!
Hi, I do think this is an excellent site. I stumbledupon it 😉 I am going to return yet again since I bookmarked it. Money and freedom is the best way to change, may you be rich and continue to help others.
Hi, I do believe your blog may be having internet browser compatibility issues. When I look at your website in Safari, it looks fine but when opening in Internet Explorer, it has some overlapping issues. I just wanted to give you a quick heads up! Aside from that, excellent website!
An outstanding share! I have just forwarded this onto a colleague who has been conducting a little homework on this. And he in fact bought me dinner due to the fact that I found it for him… lol. So allow me to reword this…. Thank YOU for the meal!! But yeah, thanx for spending the time to discuss this issue here on your web site.
Nice post. I learn something new and challenging on websites I stumbleupon everyday. It’s always useful to read articles from other writers and use a little something from their sites.
Everything is very open with a really clear description of the challenges. It was truly informative. Your website is extremely helpful. Many thanks for sharing!
You are so awesome! I do not think I’ve read through anything like that before. So great to discover someone with original thoughts on this topic. Seriously.. thank you for starting this up. This website is something that’s needed on the internet, someone with some originality.
bookmarked!!, I love your website!
An outstanding share! I have just forwarded this onto a coworker who was conducting a little research on this. And he in fact bought me breakfast simply because I stumbled upon it for him… lol. So let me reword this…. Thank YOU for the meal!! But yeah, thanks for spending some time to discuss this matter here on your web site.
I needed to thank you for this great read!! I absolutely enjoyed every little bit of it. I have you saved as a favorite to look at new things you post…
Hi, I do think this is a great blog. I stumbledupon it 😉 I’m going to revisit yet again since i have book-marked it. Money and freedom is the greatest way to change, may you be rich and continue to help others.
This page definitely has all of the information I needed concerning this subject and didn’t know who to ask.
I want to to thank you for this excellent read!! I absolutely loved every bit of it. I’ve got you saved as a favorite to check out new stuff you post…
An impressive share! I’ve just forwarded this onto a coworker who had been doing a little homework on this. And he in fact bought me lunch due to the fact that I stumbled upon it for him… lol. So let me reword this…. Thanks for the meal!! But yeah, thanks for spending some time to discuss this subject here on your internet site.
Next time I read a blog, Hopefully it does not disappoint me just as much as this particular one. I mean, I know it was my choice to read, nonetheless I genuinely thought you’d have something helpful to talk about. All I hear is a bunch of whining about something you can fix if you weren’t too busy looking for attention.
I’m amazed, I have to admit. Rarely do I encounter a blog that’s both equally educative and amusing, and without a doubt, you’ve hit the nail on the head. The issue is something which too few people are speaking intelligently about. Now i’m very happy that I stumbled across this during my hunt for something regarding this.
Профессиональный сервисный центр по ремонту бытовой техники с выездом на дом.
Мы предлагаем: сервисные центры по ремонту техники в москве
Наши мастера оперативно устранят неисправности вашего устройства в сервисе или с выездом на дом!
Good post. I learn something totally new and challenging on websites I stumbleupon on a daily basis. It’s always useful to read through articles from other writers and practice something from their sites.
Howdy, There’s no doubt that your blog may be having internet browser compatibility problems. Whenever I take a look at your website in Safari, it looks fine however, if opening in I.E., it’s got some overlapping issues. I simply wanted to provide you with a quick heads up! Besides that, wonderful blog!
I quite like reading through a post that can make people think. Also, thanks for allowing me to comment.
Everything is very open with a really clear explanation of the challenges. It was definitely informative. Your site is very useful. Thanks for sharing!
May I just say what a comfort to uncover somebody that really knows what they are discussing on the net. You actually realize how to bring a problem to light and make it important. More people have to check this out and understand this side of your story. I was surprised you aren’t more popular since you surely have the gift.
Howdy! I could have sworn I’ve been to this blog before but after looking at some of the posts I realized it’s new to me. Nonetheless, I’m definitely happy I found it and I’ll be bookmarking it and checking back often.
I quite like reading through an article that can make people think. Also, many thanks for allowing me to comment.
Having read this I thought it was rather enlightening. I appreciate you spending some time and energy to put this short article together. I once again find myself personally spending a lot of time both reading and posting comments. But so what, it was still worthwhile.
Howdy, There’s no doubt that your website may be having web browser compatibility problems. When I take a look at your web site in Safari, it looks fine however when opening in I.E., it’s got some overlapping issues. I merely wanted to provide you with a quick heads up! Besides that, excellent site.
You’ve made some good points there. I checked on the web for additional information about the issue and found most individuals will go along with your views on this website.
Spot on with this write-up, I absolutely believe this amazing site needs far more attention. I’ll probably be back again to see more, thanks for the information!
Very good info. Lucky me I ran across your website by accident (stumbleupon). I’ve bookmarked it for later.
After looking over a handful of the blog articles on your web site, I honestly like your technique of blogging. I bookmarked it to my bookmark website list and will be checking back soon. Please check out my web site too and let me know your opinion.
An interesting discussion is worth comment. There’s no doubt that that you should publish more about this issue, it may not be a taboo matter but generally people don’t speak about these topics. To the next! Cheers.
You’ve made some decent points there. I looked on the net for additional information about the issue and found most people will go along with your views on this website.
Good day! I could have sworn I’ve been to this website before but after browsing through many of the posts I realized it’s new to me. Anyhow, I’m definitely delighted I stumbled upon it and I’ll be bookmarking it and checking back frequently.
xuumpc
It’s hard to come by well-informed people for this topic, but you sound like you know what you’re talking about! Thanks
You made some decent points there. I looked on the net to find out more about the issue and found most people will go along with your views on this website.
I could not refrain from commenting. Well written.
After looking over a number of the blog articles on your blog, I truly appreciate your technique of writing a blog. I bookmarked it to my bookmark website list and will be checking back soon. Please check out my website as well and tell me how you feel.
Hello there! I simply would like to give you a huge thumbs up for the excellent information you’ve got here on this post. I will be returning to your website for more soon.
Good post. I learn something new and challenging on sites I stumbleupon every day. It’s always interesting to read articles from other authors and use a little something from other sites.
Hi, I do think this is an excellent web site. I stumbledupon it 😉 I may revisit once again since i have saved as a favorite it. Money and freedom is the best way to change, may you be rich and continue to help other people.
{Tôi hạnh phúc hơn cả vui khám phá trang web này. Tôi cần cảm ơn bạn {vì đã|dành thời gian cho|chỉ vì điều này|vì điều này|cho bài đọc tuyệt vời này!! Tôi chắc chắn thích từng một phần nó và tôi cũng đã đã lưu vào mục ưa thích để xem thông tin mới trên trang web của bạn.|Tôi có thể chỉ nói rằng thật nhẹ nhõm để khám phá một cá nhân mà thực sự biết họ là gì đang nói về trên internet. Bạn thực sự nhận ra cách đưa một rắc rối ra ánh sáng và làm cho nó trở nên quan trọng. Nhiều người hơn nữa phải xem điều này và hiểu khía cạnh này của. Tôi đã ngạc nhiên bạn không nổi tiếng hơn cho rằng bạn chắc chắn có món quà.|Tốt bài viết trên blog. Tôi chắc chắn yêu thích trang web này. Cảm ơn!|Thật khó tìm những người có kinh nghiệm cho điều này, nhưng bạn có vẻ bạn biết mình đang nói gì! Cảm ơn|Bạn nên là một phần của một cuộc thi dành cho một blog trên web có chất lượng cao nhất. Tôi sẽ Rất khuyến nghị trang web này!|Một động lực đáng giá bình luận. Tôi tin rằng bạn cần xuất bản thêm về chủ đề này, nó có thể không là một điều cấm kỵ chủ đề nhưng điển hình mọi người không nói về vấn đề những điều này. Đến phần tiếp theo! Chúc mọi điều tốt đẹp nhất.|Chào bạn! Tôi chỉ muốn cho bạn một rất cho thông tin xuất sắc bạn có ngay tại đây trên bài đăng này. Tôi sẽ là quay lại trang web của bạn để biết thêm thông tin sớm nhất.|Khi tôi ban đầu để lại bình luận tôi có vẻ như đã nhấp hộp kiểm -Thông báo cho tôi khi có bình luận mới- và từ bây giờ mỗi lần được thêm vào tôi nhận được 4 email cùng chính xác một bình luận. Có lẽ có một phương pháp dễ dàng bạn có thể xóa tôi khỏi dịch vụ đó không? Cảm ơn rất nhiều.|Lần sau Tôi đọc một blog, Tôi hy vọng rằng nó sẽ không làm tôi thất vọng nhiều như bài này. Ý tôi là, Vâng, đó là sự lựa chọn của tôi để đọc hết, dù sao thì tôi thực sự nghĩ có lẽ có điều gì đó thú vị để nói. Tất cả những gì tôi nghe được là một loạt khóc lóc về điều gì đó mà bạn có thể sửa nếu bạn không quá bận tìm kiếm sự chú ý.|Đúng với bài viết này, tôi thực sự tin rằng trang web này cần nhiều hơn nữa sự chú ý.
{Tôi háo hức khám phá trang web này. Tôi muốn cảm ơn bạn {vì đã|dành thời gian cho|chỉ vì điều này|vì điều này|cho bài đọc tuyệt vời này!! Tôi chắc chắn yêu thích từng một phần nó và tôi cũng đã đã lưu vào mục ưa thích để xem những thứ mới trên trang web của bạn.|Tôi có thể chỉ nói rằng thật thoải mái để tìm thấy một người mà thực sự biết họ là gì thảo luận trên web. Bạn chắc chắn hiểu cách đưa một vấn đề ra ánh sáng và làm cho nó trở nên quan trọng. Nhiều người hơn nữa cần phải kiểm tra điều này và hiểu khía cạnh này của. Tôi đã ngạc nhiên bạn không nổi tiếng hơn cho rằng bạn chắc chắn có món quà.|Rất tốt bài đăng. Tôi chắc chắn yêu thích trang web này. Tiếp tục làm tốt!|Thật khó tìm những người có kinh nghiệm về điều này, nhưng bạn nghe có vẻ bạn biết mình đang nói gì! Cảm ơn|Bạn nên là một phần của một cuộc thi dành cho một trang web trên mạng hữu ích nhất. Tôi sẽ Rất khuyến nghị blog này!|Một cuộc thảo luận thú vị chắc chắn đáng giá bình luận. Tôi nghĩ rằng bạn nên viết thêm về chủ đề này, nó có thể không là một điều cấm kỵ vấn đề nhưng thường xuyên mọi người không thảo luận chủ đề những điều này. Đến phần tiếp theo! Trân trọng.|Xin chào! Tôi chỉ muốn đề nghị rất cho thông tin xuất sắc bạn có ngay tại đây trên bài đăng này. Tôi đang quay lại trang web của bạn để biết thêm thông tin sớm nhất.|Khi tôi ban đầu bình luận tôi có vẻ như đã nhấp hộp kiểm -Thông báo cho tôi khi có bình luận mới- và từ bây giờ bất cứ khi nào có bình luận được thêm vào tôi nhận được 4 email cùng chính xác một bình luận. Có lẽ có một phương pháp dễ dàng bạn có thể xóa tôi khỏi dịch vụ đó không? Cảm ơn bạn.|Lần sau Tôi đọc một blog, Tôi hy vọng rằng nó sẽ không làm tôi thất vọng nhiều như bài này. Rốt cuộc, Vâng, đó là sự lựa chọn của tôi để đọc, tuy nhiên tôi thực sự nghĩ có lẽ có điều gì đó thú vị để nói. Tất cả những gì tôi nghe được là một loạt tiếng rên rỉ về điều gì đó mà bạn có thể sửa nếu bạn không quá bận tìm kiếm sự chú ý.|Đúng với bài viết này, tôi thực sự nghĩ trang web này cần nhiều hơn nữa sự chú ý.
{Tôi cực kỳ hài lòng để tìm thấy trang web này. Tôi muốn cảm ơn bạn {vì đã|dành thời gian cho|chỉ vì điều này|vì điều này|cho bài đọc tuyệt vời này!! Tôi chắc chắn thích thú từng một chút nó và tôi cũng đã đã đánh dấu trang để xem thông tin mới trên trang web của bạn.|Tôi có thể chỉ nói rằng thật nhẹ nhõm để khám phá một người mà thực sự biết họ là gì thảo luận trên internet. Bạn thực sự biết cách đưa một rắc rối ra ánh sáng và làm cho nó trở nên quan trọng. Nhiều người hơn phải kiểm tra điều này và hiểu khía cạnh này của. Tôi đã ngạc nhiên rằng bạn không nổi tiếng hơn cho rằng bạn chắc chắn có món quà.|Rất hay bài viết trên blog. Tôi hoàn toàn yêu thích trang web này. Tiếp tục với nó!|Thật khó tìm những người hiểu biết về điều này, tuy nhiên, bạn có vẻ bạn biết mình đang nói gì! Cảm ơn|Bạn nên tham gia một cuộc thi dành cho một trang web trên mạng tốt nhất. Tôi sẽ khuyến nghị trang web này!|Một động lực chắc chắn đáng giá bình luận. Tôi nghĩ rằng bạn cần xuất bản thêm về chủ đề này, nó có thể không là một điều cấm kỵ vấn đề nhưng nói chung mọi người không nói về vấn đề những điều này. Đến phần tiếp theo! Cảm ơn rất nhiều!|Xin chào! Tôi chỉ muốn cho bạn một rất cho thông tin tuyệt vời bạn có ở đây trên bài đăng này. Tôi sẽ là trở lại trang web của bạn để biết thêm thông tin sớm nhất.|Khi tôi ban đầu bình luận tôi có vẻ như đã nhấp hộp kiểm -Thông báo cho tôi khi có bình luận mới- và bây giờ bất cứ khi nào có bình luận được thêm vào tôi nhận được 4 email cùng chính xác một bình luận. Phải có một cách bạn có thể xóa tôi khỏi dịch vụ đó không? Kudos.|Lần sau Tôi đọc một blog, Hy vọng rằng nó không thất bại nhiều như bài này. Ý tôi là, Tôi biết điều đó là sự lựa chọn của tôi để đọc hết, nhưng tôi thực sự nghĩ bạn sẽ có điều gì đó thú vị để nói. Tất cả những gì tôi nghe được là một loạt phàn nàn về điều gì đó mà bạn có thể sửa nếu bạn không quá bận tìm kiếm sự chú ý.|Đúng với bài viết này, tôi thực sự tin rằng trang web tuyệt vời này cần nhiều hơn nữa sự chú ý.
{Tôi đã rất vui để tìm thấy trang web này. Tôi muốn cảm ơn bạn {vì đã|dành thời gian cho|chỉ vì điều này|vì điều này|cho bài đọc tuyệt vời này!! Tôi chắc chắn thưởng thức từng của nó và tôi đã đánh dấu để xem thông tin mới trong trang web của bạn.|Tôi có thể chỉ nói rằng thật thoải mái để khám phá một người mà thực sự biết họ là gì đang nói về trên internet. Bạn chắc chắn biết cách đưa một rắc rối ra ánh sáng và làm cho nó trở nên quan trọng. Nhiều người hơn thực sự cần xem điều này và hiểu khía cạnh này của. Thật ngạc nhiên bạn không nổi tiếng hơn vì bạn chắc chắn sở hữu món quà.|Rất hay bài viết trên blog. Tôi hoàn toàn đánh giá cao trang web này. Tiếp tục với nó!|Thật khó đến những người có học thức trong chủ đề cụ thể này, nhưng bạn có vẻ bạn biết mình đang nói gì! Cảm ơn|Bạn nên tham gia một cuộc thi dành cho một blog trực tuyến hữu ích nhất. Tôi sẽ khuyến nghị blog này!|Một cuộc thảo luận thú vị đáng giá bình luận. Tôi nghĩ rằng bạn nên xuất bản thêm về chủ đề này, nó có thể không là một điều cấm kỵ chủ đề nhưng điển hình mọi người không nói về chủ đề những điều này. Đến phần tiếp theo! Chúc mọi điều tốt đẹp nhất!|Chào bạn! Tôi chỉ muốn cho bạn một rất cho thông tin xuất sắc bạn có ở đây trên bài đăng này. Tôi sẽ là quay lại trang web của bạn để biết thêm thông tin sớm nhất.|Sau khi tôi ban đầu bình luận tôi có vẻ như đã nhấp hộp kiểm -Thông báo cho tôi khi có bình luận mới- và bây giờ mỗi lần được thêm vào tôi nhận được bốn email có cùng nội dung. Phải có một phương tiện bạn có thể xóa tôi khỏi dịch vụ đó không? Cảm ơn rất nhiều.|Lần sau Tôi đọc một blog, Hy vọng rằng nó không thất bại nhiều như bài này. Ý tôi là, Tôi biết điều đó là sự lựa chọn của tôi để đọc hết, nhưng tôi thực sự tin bạn sẽ có điều gì đó hữu ích để nói. Tất cả những gì tôi nghe được là một loạt khóc lóc về điều gì đó mà bạn có thể sửa nếu bạn không quá bận tìm kiếm sự chú ý.|Đúng với bài viết này, tôi thực sự nghĩ trang web này cần nhiều hơn nữa sự chú ý.
{Tôi hạnh phúc hơn cả vui khám phá trang web này. Tôi muốn cảm ơn bạn {vì đã|dành thời gian cho|chỉ vì điều này|vì điều này|cho bài đọc tuyệt vời này!! Tôi chắc chắn thực sự thích từng của nó và tôi cũng đã lưu làm mục ưa thích để xem thông tin mới trong trang web của bạn.|Tôi có thể chỉ nói rằng thật nhẹ nhõm để khám phá một người thực sự biết họ là gì thảo luận trực tuyến. Bạn thực sự nhận ra cách đưa một vấn đề ra ánh sáng và làm cho nó trở nên quan trọng. Nhiều người hơn cần phải kiểm tra điều này và hiểu khía cạnh này của. Tôi không thể tin bạn không nổi tiếng hơn vì bạn chắc chắn sở hữu món quà.|Tốt bài viết trên blog. Tôi chắc chắn yêu thích trang web này. Cảm ơn!|Thật khó tìm những người có học thức trong chủ đề cụ thể này, nhưng bạn có vẻ bạn biết mình đang nói gì! Cảm ơn|Bạn nên là một phần của một cuộc thi dành cho một blog trực tuyến tuyệt vời nhất. Tôi chắc chắn sẽ khuyến nghị trang web này!|Một động lực chắc chắn đáng giá bình luận. Tôi nghĩ rằng bạn nên viết thêm về chủ đề này, nó có thể không là một điều cấm kỵ vấn đề nhưng điển hình mọi người không nói về chủ đề như vậy. Đến phần tiếp theo! Chúc mừng!|Xin chào! Tôi chỉ muốn đề nghị rất cho thông tin xuất sắc bạn có ngay tại đây trên bài đăng này. Tôi đang trở lại trang web của bạn để biết thêm thông tin sớm nhất.|Sau khi tôi ban đầu bình luận tôi có vẻ như đã nhấp vào hộp kiểm -Thông báo cho tôi khi có bình luận mới- và bây giờ bất cứ khi nào có bình luận được thêm vào tôi nhận được bốn email cùng chính xác một bình luận. Phải có một phương tiện bạn có thể xóa tôi khỏi dịch vụ đó không? Kudos.|Lần sau nữa Tôi đọc một blog, Tôi hy vọng rằng nó sẽ không làm tôi thất vọng nhiều như bài này. Rốt cuộc, Vâng, đó là sự lựa chọn của tôi để đọc hết, dù sao thì tôi thực sự tin bạn sẽ có điều gì đó thú vị để nói. Tất cả những gì tôi nghe được là một loạt phàn nàn về điều gì đó mà bạn có thể sửa nếu bạn không quá bận tìm kiếm sự chú ý.|Đúng với bài viết này, tôi thực sự tin trang web này cần nhiều hơn nữa sự chú ý.
{Tôi cực kỳ hài lòng khám phá trang web này. Tôi muốn cảm ơn bạn {vì đã|dành thời gian cho|chỉ vì điều này|vì điều này|cho bài đọc tuyệt vời này!! Tôi chắc chắn đánh giá cao từng của nó và tôi đã lưu làm mục ưa thích để xem điều mới trong trang web của bạn.|Tôi có thể chỉ nói rằng thật nhẹ nhõm để khám phá một cá nhân mà thực sự hiểu họ là gì thảo luận trên web. Bạn chắc chắn nhận ra cách đưa một rắc rối ra ánh sáng và làm cho nó trở nên quan trọng. Nhiều người hơn nữa phải đọc điều này và hiểu khía cạnh này câu chuyện của bạn. Thật ngạc nhiên bạn không nổi tiếng hơn vì bạn chắc chắn sở hữu món quà.|Tốt bài viết. Tôi chắc chắn yêu thích trang web này. Cảm ơn!|Thật gần như không thể tìm thấy những người có học thức cho điều này, tuy nhiên, bạn có vẻ bạn biết mình đang nói gì! Cảm ơn|Bạn nên là một phần của một cuộc thi dành cho một trang web trên internet tuyệt vời nhất. Tôi sẽ Rất khuyến nghị trang web này!|Một hấp dẫn đáng giá bình luận. Tôi nghĩ rằng bạn nên xuất bản thêm về chủ đề này, nó có thể không là một điều cấm kỵ vấn đề nhưng nói chung mọi người không nói về vấn đề những điều này. Đến phần tiếp theo! Trân trọng!|Chào bạn! Tôi chỉ muốn cho bạn một rất cho thông tin tuyệt vời bạn có ở đây trên bài đăng này. Tôi sẽ là quay lại trang web của bạn để biết thêm thông tin sớm nhất.|Khi tôi ban đầu bình luận tôi có vẻ như đã nhấp vào hộp kiểm -Thông báo cho tôi khi có bình luận mới- và từ bây giờ bất cứ khi nào có bình luận được thêm vào tôi nhận được bốn email cùng chính xác một bình luận. Phải có một phương tiện bạn có thể xóa tôi khỏi dịch vụ đó không? Cảm ơn rất nhiều.|Lần sau nữa Tôi đọc một blog, Tôi hy vọng rằng nó không thất bại nhiều như bài này. Ý tôi là, Vâng, đó là sự lựa chọn của tôi để đọc, dù sao thì tôi thực sự tin có lẽ có điều gì đó hữu ích để nói về. Tất cả những gì tôi nghe được là một loạt khóc lóc về điều gì đó mà bạn có thể sửa nếu bạn không quá bận tìm kiếm sự chú ý.|Đúng với bài viết này, tôi thực sự tin trang web tuyệt vời này cần nhiều hơn nữa sự chú ý.
Přijetí hypoteční platby může být nebezpečný pokud nemáte rádi čekání v dlouhých
řadách , vyplnění extrémní formuláře , a odmítnutí úvěru na
základě vašeho úvěrového skóre . Přijímání hypoteční platby může být problematické, pokud nemáte rádi čekání v dlouhých řadách , podávání
extrémních formulářů , a odmítnutí úvěru na základě vašeho úvěrového skóre .
Přijímání hypoteční platby může být problematické , pokud nemáte rádi čekání v dlouhých
řadách , vyplnění extrémních formulářů a odmítnutí
úvěrových rozhodnutí založených na úvěrových
skóre . Nyní můžete svou hypotéku zaplatit rychle a efektivně v
České republice. https://groups.google.com/g/sheasjkdcdjksaksda/c/QSa5aONFtGE
{Tôi khá hài lòng khám phá trang web này. Tôi cần cảm ơn bạn {vì đã|dành thời gian cho|chỉ vì điều này|vì điều này|cho bài đọc tuyệt vời này!! Tôi chắc chắn thích từng của nó và tôi cũng đã đánh dấu trang để xem thông tin mới trên trang web của bạn.|Tôi có thể chỉ nói rằng thật nhẹ nhõm để khám phá một người mà thực sự hiểu họ là gì thảo luận trên internet. Bạn thực sự nhận ra cách đưa một vấn đề ra ánh sáng và làm cho nó trở nên quan trọng. Nhiều người hơn nữa thực sự cần đọc điều này và hiểu khía cạnh này câu chuyện của bạn. Tôi đã ngạc nhiên rằng bạn không nổi tiếng hơn vì bạn chắc chắn có món quà.|Tốt bài viết trên blog. Tôi hoàn toàn yêu thích trang web này. Cảm ơn!|Thật khó đến những người hiểu biết cho điều này, nhưng bạn có vẻ bạn biết mình đang nói gì! Cảm ơn|Bạn nên tham gia một cuộc thi dành cho một trang web trên web tốt nhất. Tôi sẽ Rất khuyến nghị trang web này!|Một hấp dẫn chắc chắn đáng giá bình luận. Tôi tin rằng bạn nên xuất bản thêm về vấn đề này, nó có thể không là một điều cấm kỵ chủ đề nhưng điển hình mọi người không nói về những chủ đề những điều này. Đến phần tiếp theo! Trân trọng.|Xin chào! Tôi chỉ muốn cho bạn một rất to cho thông tin tuyệt vời bạn có ngay tại đây trên bài đăng này. Tôi sẽ là trở lại blog của bạn để biết thêm thông tin sớm nhất.|Sau khi tôi ban đầu bình luận tôi có vẻ như đã nhấp hộp kiểm -Thông báo cho tôi khi có bình luận mới- và từ bây giờ mỗi lần được thêm vào tôi nhận được bốn email cùng chính xác một bình luận. Phải có một cách bạn có thể xóa tôi khỏi dịch vụ đó không? Cảm kích.|Lần sau Tôi đọc một blog, Hy vọng rằng nó không thất bại nhiều như bài này. Ý tôi là, Vâng, đó là sự lựa chọn của tôi để đọc, dù sao thì tôi thực sự tin có lẽ có điều gì đó hữu ích để nói. Tất cả những gì tôi nghe được là một loạt khóc lóc về điều gì đó mà bạn có thể sửa nếu bạn không quá bận tìm kiếm sự chú ý.|Đúng với bài viết này, tôi thực sự cảm thấy trang web này cần nhiều hơn nữa sự chú ý.
I have to thank you for the efforts you have put in writing this website. I am hoping to view the same high-grade content by you in the future as well. In fact, your creative writing abilities has encouraged me to get my very own blog now 😉
Saved as a favorite, I like your website.
This excellent website definitely has all the information and facts I wanted concerning this subject and didn’t know who to ask.
Greetings! Very helpful advice in this particular post! It’s the little changes that will make the largest changes. Thanks for sharing!
I was able to find good advice from your articles.
Can I simply just say what a relief to find someone who genuinely understands what they’re talking about over the internet. You definitely realize how to bring an issue to light and make it important. A lot more people should check this out and understand this side of the story. I was surprised that you’re not more popular given that you surely possess the gift.
You’re so cool! I don’t think I have read anything like that before. So great to discover someone with some genuine thoughts on this subject matter. Really.. many thanks for starting this up. This web site is one thing that’s needed on the web, someone with a bit of originality.
Everything is very open with a very clear explanation of the challenges. It was truly informative. Your site is useful. Many thanks for sharing!
I wanted to thank you for this very good read!! I certainly enjoyed every bit of it. I have you book marked to check out new things you post…
May I simply just say what a relief to find an individual who truly knows what they’re discussing over the internet. You certainly know how to bring an issue to light and make it important. More and more people ought to read this and understand this side of the story. I can’t believe you’re not more popular given that you surely have the gift.
This design is spectacular! You obviously know how to
keep a reader amused. Between your wit and your videos, I was almost moved to start my
own blog (well, almost…HaHa!) Wonderful job. I really enjoyed what you had to say, and more than that, how you
presented it. Too cool!
I was pretty pleased to discover this web site. I want to to thank you for ones time for this fantastic read!! I definitely enjoyed every part of it and i also have you saved as a favorite to see new stuff in your website.
Excellent web site you’ve got here.. It’s hard to find excellent writing like yours these days. I truly appreciate individuals like you! Take care!!
lx6kyv
Great info. Lucky me I discovered your site by chance (stumbleupon). I’ve bookmarked it for later!
Nice post. I learn something totally new and challenging on sites I stumbleupon every day. It’s always useful to read articles from other authors and use something from their websites.
I’m impressed, I must say. Seldom Ԁo І encounter а blog that’ѕ Ƅoth equally educative аnd interеsting,
аnd ѡithout a doubt, yⲟu’ve hit the nail оn thе head.
The issue is something that too few folks агe speaking intelligently abߋut.
І’m verʏ hаppy that І stumbled across this ԁuring my hunt fߋr somethіng concerning
thiѕ.
Přijetí hypoteční platby může být obtížné pokud nemáte rádi čekání v dlouhých
řadách , vyplnění extrémní formuláře ,
a odmítnutí úvěru na základě vašeho úvěrového skóre .
Přijímání hypoteční platby může být problematické,
pokud nemáte rádi čekání v dlouhých řadách , podávání extrémních formulářů , a
odmítnutí úvěru na základě vašeho úvěrového skóre .
Přijímání hypoteční platby může být problematické , pokud nemáte rádi
čekání v dlouhých řadách , vyplnění extrémních
formulářů a odmítnutí úvěrových rozhodnutí založených na úvěrových skóre .
Nyní můžete svou hypotéku zaplatit rychle a efektivně v České republice. https://groups.google.com/g/sheasjkdcdjksaksda/c/STEnHYz0TOk
Aw, this was an exceptionally nice post. Taking the time and actual effort to make a top notch article… but what can I say… I procrastinate a whole lot and don’t manage to get nearly anything done.
Next time I read a blog, I hope that it doesn’t disappoint me as much as this particular one. After all, I know it was my choice to read through, but I actually thought you would probably have something interesting to talk about. All I hear is a bunch of complaining about something that you could possibly fix if you weren’t too busy seeking attention.
Hello There. I found your blog using msn. This is a very well written article.
I’ll make sure to bookmark it and return to read more of your useful info.
Thanks for the post. I will certainly return.
Сервисный центр предлагает ремонт asus k53z в петербурге ремонт asus k53z в петербурге
After I originally commented I seem to have clicked on the -Notify me when new comments are added- checkbox and now whenever a comment is added I get 4 emails with the same comment. Is there a means you can remove me from that service? Thanks a lot.
After looking into a few of the blog posts on your site, I seriously like your technique of blogging. I book marked it to my bookmark site list and will be checking back soon. Take a look at my website as well and tell me how you feel.
Pretty! This was an incredibly wonderful post. Thanks for providing these details.
It’s difficult to find educated people for this topic,
however, you seem like you know what you’re talking about!
Thanks
Phần mềm này không hề tích hợp bất kì quảng cáo nào khi
sử dụng.
Bu casino’da bahis seçenekleri çok geniş, her oyun için uygun bir strateji var.
Bahis sitelerinde deneme bonusu ile crash oyunlarına sıfır yatırımla başlamak, büyük kazanç fırsatları yaratıyor!
Pretty! This has been a really wonderful post. Thank you for supplying this information.
Bu casino’da oynadığım slot oyunları ile büyük kazançlar elde ediyorum, herkese tavsiye ederim!
Slot oyunları oynamak bu casino’da çok eğlenceli ve kazançlı, herkese tavsiye ederim.
You ought to take part in a contest for one of the most useful sites on the web. I’m going to recommend this web site!
I really like it whenever people come together and share thoughts. Great website, continue the good work!
Very nice blog post. I definitely appreciate this site. Thanks!
Deneme bonusu sayesinde hiç para yatırmadan kazanç sağlamak gerçekten çok kolay!
Having read this I believed it was extremely enlightening. I appreciate you spending some time and energy to put this information together. I once again find myself spending a lot of time both reading and commenting. But so what, it was still worthwhile.
Сервисный центр предлагает ремонт acer travelmate 8571 в петербурге ремонт acer travelmate 8571 цены
Great post! We are linking to this great article on our website. Keep up the great writing.
Futbol bahislerinde doğru tahminlerle her zaman büyük ödüller kazanıyorum!
Bu casino’daki düşük bahisli slot oyunları ile bile güzel kazançlar elde etmek mümkün.
Good site you have got here.. It’s hard to find quality writing like yours these days. I honestly appreciate individuals like you! Take care!!
You’ve made some decent points there. I checked on the web to find out more about the issue and found most people will go along with your views on this website.
Aw, this was a really nice post. Spending some time and actual effort to make a really good article… but what can I say… I hesitate a lot and never manage to get nearly anything done.
Bu casino’nun sunduğu canlı bahis seçenekleri futbol maçlarına ekstra kazanç fırsatları ekliyor!
Having read this I thought it was really enlightening. I appreciate you spending some time and energy to put this content together. I once again find myself personally spending a significant amount of time both reading and leaving comments. But so what, it was still worth it!
This was an eye-opener for me!
Thank you for simplifying this complex topic
Профессиональный сервисный центр по ремонту Apple iPhone в Москве.
Мы предлагаем: сервисный центр по ремонту айфонов в москве
Наши мастера оперативно устранят неисправности вашего устройства в сервисе или с выездом на дом!
Sudahkah Anda mengaktifkan mode penghemat data Instagram untuk mengurangi penggunaan data seluler?
Good web site you have here.. It’s difficult to find quality writing like yours nowadays. I truly appreciate people like you! Take care!!
I was able to find good advice from your articles.
bhop pro в злом [url=https://apk-smart.com/igry/simulyatory/96-bhop-pro-vzlom.html]https://apk-smart.com/igry/simulyatory/96-bhop-pro-vzlom.html[/url] bhop pro в злом
P.S Live ID: K89Io9blWX1UfZWv3ajv
P.S.S [url=https://www.windmaster.cl/old/web/posts/181/rotatorio.php]Программы и игры для Андроид телефона[/url] [url=https://www.yolospeak.pl/showthread.php?tid=368&pid=117767#pid117767]Программы и игры для Андроид телефона[/url] [url=http://youhotel.ru/forum/viewtopic.php?f=15&t=148974]Программы и игры для Андроид телефона[/url] 6cff5e1
This website was… how do you say it? Relevant!! Finally I’ve found something that helped me. Appreciate it!
Hasta la fecha, Tiktok ha sido utilizado por
más de 100 millones de usuarios de todo el mundo.
You’re so cool! I do not suppose I’ve read anything like that before. So wonderful to find someone with a few original thoughts on this topic. Seriously.. thank you for starting this up. This website is something that is required on the web, someone with a little originality.
Right here is the perfect website for anyone who really wants to understand this topic. You realize so much its almost tough to argue with you (not that I really would want to…HaHa). You certainly put a fresh spin on a topic that’s been discussed for a long time. Wonderful stuff, just wonderful.
Сервисный центр предлагает починка парогенераторов unitekno ремонт парогенератора unitekno на дому
Having read this I believed it was really enlightening. I appreciate you taking the time and effort to put this information together. I once again find myself personally spending way too much time both reading and posting comments. But so what, it was still worthwhile!
This blog is definitely rather handy since I’m at the moment creating an internet floral website – although I am only starting out therefore it’s really fairly small, nothing like this site. Can link to a few of the posts here as they are quite. Thanks much. Zoey Olsen
It’s nearly impossible to find educated people about this subject, but you sound like you know what you’re talking about! Thanks
Сервисный центр предлагает ремонт toshiba satellite l735 цены ремонт toshiba satellite l735 в петербурге
Casino’daki slot oyunlarında her spin büyük bir kazanç şansı sunuyor.
May I simply just say what a relief to find someone that genuinely understands what they are talking about online. You actually realize how to bring an issue to light and make it important. More people should check this out and understand this side of the story. I was surprised that you are not more popular because you surely have the gift.
Deneme bonusu ile oyunlara sıfır yatırımla başlamak çok eğlenceli!
Adding Sugar Protector to my day-to-day regimen was one of the best decisions I
have actually created my health. I beware concerning what I eat, but
this supplement includes an extra layer of assistance.
I really feel more stable throughout the day, and my desires have actually reduced dramatically.
It behaves to have something so simple that makes such a big distinction!
As someone who’s always been cautious concerning my blood glucose, finding Sugar Defender
has been an alleviation. I feel so much extra in control, and my recent exams have
actually revealed positive enhancements. Recognizing I have a reliable supplement to sustain my regular provides me
assurance. I’m so thankful for Sugar Protector’s impact on my health!
Incorporating Sugar Protector into my daily program has been a game-changer for my general health.
As someone that currently focuses on healthy
consuming, this supplement has actually given an included boost of security.
in my energy levels, and my wish for undesirable snacks
so uncomplicated can have such a profound
effect on my daily life.
For many years, I have actually fought unforeseeable blood sugar
swings that left me feeling drained pipes and
lethargic. Yet given that incorporating Sugar my energy levels
are currently secure and consistent, and I no more hit a wall in the afternoons.
I appreciate that it’s a gentle, natural strategy that doesn’t come with any kind of unpleasant negative
effects. It’s truly changed my day-to-day live.
For years, I have actually battled unpredictable blood glucose swings that left me feeling drained pipes and lethargic.
However because including Sugar my energy degrees are currently secure and consistent, and I no longer
strike a wall in the afternoons. I appreciate that it’s a mild,
all-natural approach that does not included any type of unpleasant negative
effects. It’s truly changed my daily life.
Deneme bonusu ile bahis yaparken hiç risk almadan kazanç sağlamak harika!
Way cool! Some very valid points! I appreciate you penning this post and the rest of the website is also very good.
Тут можно преобрести сейф для карабина купить оружейный шкаф цена
Тут можно домашний сейф купить купить сейф для дома
Тут можно преобрести несгораемый сейф огнестойкие сейфы
I really like what you guys tend to be up too. This sort of clever work and
reporting! Keep up the amazing works guys I’ve incorporated you guys to my personal
blogroll.
Way cool! Some extremely valid points! I appreciate you writing this article plus the rest of the site is also very good.
Great blog here! Also your web site loads up fast! What host are you using? Can I get your affiliate link to your host? I wish my web site loaded up as quickly as yours lol
Тут можно преобрести сейф для пистолета и ружья стоимость оружейного сейфа
Hello! I simply would like to offer you a huge thumbs up for your great information you have right here on this post. I am coming back to your blog for more soon.
Hey there! Do you know if they make any plugins to assist with SEO?
I’m trying to get my blog to rank for some targeted
keywords but I’m not seeing very good success. If you know of any
please share. Kudos! I saw similar art here: Eco wool
There is definately a great deal to find out about this issue. I love all the points you’ve made.
Тут можно преобрести огнестойкие сейфы цена сейф пожаростойкий
The next time I read a blog, I hope that it doesn’t disappoint me as much as this particular one. After all, Yes, it was my choice to read through, but I really believed you’d have something useful to talk about. All I hear is a bunch of crying about something that you could possibly fix if you were not too busy looking for attention.
Very good info. Lucky me I ran across your site by accident (stumbleupon). I have book-marked it for later!
I absolutely love your website.. Pleasant colors & theme. Did you create this web site yourself? Please reply back as I’m trying to create my very own blog and would like to find out where you got this from or just what the theme is named. Kudos!
Сервисный центр предлагает ремонт сушильной машины scandilux ремонт сушильных машин scandilux недорого
Тут можно преобрести сейф несгораемый купить сейф огнестойкий в москве
There’s certainly a lot to learn about this issue. I love all of the points you have made.
It’s hard to find experienced people in this particular subject, however, you sound like you know what you’re talking about! Thanks
Тут можно преобрести оружейный сейф на заказ москва оружейные сейфы
Тут можно преобрести огнеупорный сейф купить сейфы от пожара
A formidable share, I simply given this onto a colleague who was doing slightly evaluation on this. And he in reality purchased me breakfast as a result of I discovered it for him.. smile. So let me reword that: Thnx for the treat! But yeah Thnkx for spending the time to discuss this, I really feel strongly about it and love studying extra on this topic. If potential, as you grow to be expertise, would you mind updating your weblog with more details? It’s highly useful for me. Large thumb up for this weblog publish!
Тут можно преобрести оружейные сейфы для охотничьего ружья купить оружейный сейф цена
When you’ve got a bigger backyard, you may designate a corner for a small hearth pit made from a small circle of stones on a gravel bed.
After going over a number of the blog posts on your website, I seriously like your way of writing a blog. I saved as a favorite it to my bookmark webpage list and will be checking back in the near future. Please visit my web site as well and let me know how you feel.
Тут можно преобрести огнеупорный сейф сейф пожаростойкий
This is a topic that’s close to my heart… Thank you! Exactly where can I find the contact details for questions?
I like it whenever people get together and share ideas. Great site, continue the good work!
Тут можно преобрести оружейные сейфы и шкафы где купить сейф для оружия
Pretty! This was an incredibly wonderful article. Many thanks for supplying this information.
Hi there very cool blog!! Guy .. Excellent .. Amazing .. I’ll bookmark your website and take the feeds also…I am satisfied to find numerous helpful info here within the post, we want develop more strategies in this regard, thank you for sharing. . . . . .
Good article. I will be dealing with some of these issues as well..
Good day! I could have sworn I’ve visited this web site before but after browsing through a few of the posts I realized it’s new to me. Nonetheless, I’m certainly pleased I stumbled upon it and I’ll be book-marking it and checking back regularly!
Greetings! Very useful advice within this article! It is the little changes that make the most significant changes. Many thanks for sharing!
That is a great tip particularly to those new to the blogosphere. Short but very accurate information… Thanks for sharing this one. A must read article.
Тут можно преобрести сейф огнестойкий огнестойкие сейфы цена
Сервисный центр предлагает ремонт highscreen blast в петербурге ремонт highscreen blast цены
Тут можно преобрести оружейный сейф интернет магазин сейф для ружья
Spot on with this write-up, I absolutely think this website needs far more attention. I’ll probably be back again to see more, thanks for the info.
Spot on with this write-up, I seriously believe that this web site needs far more attention. I’ll probably be returning to see more, thanks for the info.
I could not refrain from commenting. Well written!
Great blog you have here.. It’s hard to find high quality writing like yours these days. I really appreciate individuals like you! Take care!!
Тут можно преобрести купить сейф с доставкой в москве оружейный сейф
Тут можно преобрести сейф огнеупорный купить сейф несгораемый
I was able to find good information from your articles.
Здесь можно преобрести купить сейф интернете сейфы купить в москве
Everything is very open with a clear clarification of the issues. It was definitely informative. Your website is useful. Thank you for sharing.
Pretty! This was a really wonderful post. Thanks for supplying this info.
After checking out a number of the blog articles on your site, I seriously like your technique of blogging. I saved as a favorite it to my bookmark webpage list and will be checking back soon. Please check out my web site as well and tell me your opinion.
Тут можно преобрести сейфы оружейные купить оружейный шкаф купить
Cashify helps you Sell phone online at the best prices.
This excellent website certainly has all of the info I wanted concerning this subject and didn’t know who to ask.
최저가격보장강남가라오케강남가라오케가격정보
최저가격보장강남가라오케강남가라오케가격정보
최저가격보장사라있네가라오케사라있네가격정보
최저가격보장선릉셔츠룸선릉셔츠룸가격정보
최저가격보장강남가라오케강남가라오케가격정보
최저가격보장강남셔츠룸강남셔츠룸가격정보
최저가격보장CNN셔츠룸씨엔엔셔츠룸가격정보
It’s hard to find educated people in this particular subject, however, you seem like you know what you’re talking about! Thanks
Предлагаем услуги профессиональных инженеров офицальной мастерской.
Еслли вы искали официальный сервисный центр xiaomi, можете посмотреть на сайте: официальный сервисный центр xiaomi
Наши мастера оперативно устранят неисправности вашего устройства в сервисе или с выездом на дом!
This website was… how do you say it? Relevant!! Finally I’ve found something that helped me. Thanks a lot!
Kanuna aykırı ve izinsiz olarak kopyalanamaz, başka yerde yayınlanamaz.
I like looking through an article that will make people think. Also, many thanks for permitting me to comment.
Greetings! Very helpful advice in this particular article! It’s the little changes which will make the greatest changes. Thanks a lot for sharing!
Xue B, Pamidimukkala J, Lubahn DB, Hay M [url=https://fastpriligy.top/]priligy online[/url]
I wanted to thank you for this great read!! I certainly loved every bit of it. I have got you book marked to look at new stuff you post…
And children [url=https://fastpriligy.top/]priligy tablets price[/url] Tamoxifen and letrozole are standard hormone treatments used to treat breast cancers that are positive for the estrogen receptor
An interesting discussion is definitely worth comment. I do think that you should publish more about this subject matter, it might not be a taboo matter but usually folks don’t talk about these issues. To the next! Best wishes.
Тут можно преобрести оружейный шкаф купить купить сейф для пистолета
I really like looking through a post that will make people think. Also, thanks for allowing me to comment.
I blog often and I truly appreciate your information. This article has really peaked my interest. I’m going to take a note of your website and keep checking for new details about once a week. I opted in for your RSS feed as well.
It is very comforting to see that others are suffering from the same problem as you, wow!
Hello! I could have sworn I’ve visited this website before but after going through some of the articles I realized it’s new to me. Anyways, I’m definitely delighted I stumbled upon it and I’ll be bookmarking it and checking back often.
I’m very pleased to uncover this great site. I wanted to thank you for your time for this particularly wonderful read!! I definitely enjoyed every part of it and i also have you saved as a favorite to see new stuff in your website.
I could not resist commenting. Exceptionally well written.
Spot on with this write-up, I absolutely think this site needs much more attention. I’ll probably be returning to read more, thanks for the information!
Предлагаем услуги профессиональных инженеров офицальной мастерской.
Еслли вы искали сервисный центр sony в москве, можете посмотреть на сайте: сервисный центр sony
Наши мастера оперативно устранят неисправности вашего устройства в сервисе или с выездом на дом!
It is very comforting to see that others are suffering from the same problem as you, wow!
Предлагаем услуги профессиональных инженеров офицальной мастерской.
Еслли вы искали сервисный центр samsung, можете посмотреть на сайте: сервисный центр samsung в москве
Наши мастера оперативно устранят неисправности вашего устройства в сервисе или с выездом на дом!
Wonderful article! We are linking to this great content on our website. Keep up the good writing.
I could not resist commenting. Perfectly written.
I would like to thank you for the efforts you’ve put in writing this site. I’m hoping to view the same high-grade content from you in the future as well. In truth, your creative writing abilities has motivated me to get my very own website now 😉
An impressive share! I have just forwarded this onto a friend who was doing a little research on this. And he in fact ordered me dinner because I found it for him… lol. So allow me to reword this…. Thanks for the meal!! But yeah, thanks for spending the time to talk about this topic here on your blog.
I would like to thank you for the efforts you have put in writing this site. I really hope to see the same high-grade blog posts by you later on as well. In truth, your creative writing abilities has motivated me to get my very own blog now 😉
Greetings! Very helpful advice within this post! It is the little changes which will make the greatest changes. Many thanks for sharing!
Предлагаем услуги профессиональных инженеров офицальной мастерской.
Еслли вы искали сервисный центр philips в москве, можете посмотреть на сайте: официальный сервисный центр philips
Наши мастера оперативно устранят неисправности вашего устройства в сервисе или с выездом на дом!
When I initially left a comment I appear to have clicked the -Notify me when new comments are added- checkbox and from now on whenever a comment is added I receive four emails with the exact same comment. Is there a means you are able to remove me from that service? Thanks a lot.
Right here is the right website for anyone who wishes to understand this topic. You understand a whole lot its almost hard to argue with you (not that I actually will need to…HaHa). You certainly put a new spin on a subject that has been written about for a long time. Great stuff, just great.
Hello there, I think your blog may be having web browser compatibility issues. When I take a look at your site in Safari, it looks fine however, when opening in IE, it has some overlapping issues. I just wanted to provide you with a quick heads up! Besides that, great blog.
Spot on with this write-up, I absolutely believe this web site needs much more attention. I’ll probably be returning to read more, thanks for the advice.
Very good article. I’m experiencing many of these issues as well..
Good info. Lucky me I found your site by accident (stumbleupon). I’ve book-marked it for later!
Good post! We are linking to this great post on our site. Keep up the good writing.
Предлагаем услуги профессиональных инженеров офицальной мастерской.
Еслли вы искали сервисный центр asus сервис, можете посмотреть на сайте: сервисный центр asus цены
Наши мастера оперативно устранят неисправности вашего устройства в сервисе или с выездом на дом!
Aw, this was a very good post. Taking the time and actual effort to produce a really good article… but what can I say… I put things off a whole lot and never manage to get nearly anything done.
Good information. Lucky me I recently found your blog by chance (stumbleupon). I’ve saved it for later!
After checking out a few of the blog posts on your blog, I truly appreciate your way of blogging. I book marked it to my bookmark webpage list and will be checking back in the near future. Please visit my website as well and tell me how you feel.
I enjoy looking through a post that will make people think. Also, thank you for allowing me to comment.
Howdy! I could have sworn I’ve visited this web site before but after going through some of the articles I realized it’s new to me. Anyhow, I’m certainly happy I discovered it and I’ll be book-marking it and checking back regularly!
Hello there! This article couldn’t be written much better! Reading through this article reminds me of my previous roommate! He constantly kept preaching about this. I’ll forward this post to him. Pretty sure he will have a great read. Thank you for sharing!
Spot on with this write-up, I honestly believe that this amazing site needs a lot more attention. I’ll probably be returning to read through more, thanks for the info!
Buy YouTube Views at MediaGeneous
Its like you read my mind! You seem to know
a lot about this, like you wrote the book in it or something.
I think that you can do with a few pics to drive the message home a little bit, but other than that, this is great blog.
An excellent read. I’ll definitely be back.
Hi! I simply want to give you a huge thumbs up for your excellent info you have right here on this post. I’ll be coming back to your web site for more soon.
Pretty! This was an extremely wonderful article. Thank you for providing this information.
bookmarked!!, I like your web site.
Make Money Online with MillionFormula
It’s hard to find experienced people for this subject,
but you sound like you know what you’re talking about!
Thanks
I really love your website.. Pleasant colors & theme. Did you build this amazing site yourself? Please reply back as I’m trying to create my own personal site and would love to find out where you got this from or what the theme is called. Many thanks.
Everything is very open with a clear description of the challenges. It was really informative. Your website is very useful. Many thanks for sharing!
This web site definitely has all the info I needed concerning this subject and didn’t know who to ask.
It’s difficult to find educated people in this particular subject, but you seem like you know what you’re talking about! Thanks
Way cool! Some extremely valid points! I appreciate you penning this write-up and also the rest of the website is very good.
Next time I read a blog, Hopefully it does not disappoint me as much as this one. After all, Yes, it was my choice to read, nonetheless I really thought you would probably have something interesting to talk about. All I hear is a bunch of moaning about something that you could fix if you weren’t too busy looking for attention.
I blog quite often and I truly appreciate your information. This article has truly peaked my interest. I will bookmark your website and keep checking for new details about once per week. I opted in for your RSS feed as well.
Can I simply just say what a comfort to uncover an individual who truly understands what they’re talking about online. You certainly understand how to bring an issue to light and make it important. More and more people should look at this and understand this side of your story. It’s surprising you are not more popular since you definitely possess the gift.
Practically all specialists who speak about the subject elevate the same point: It comes down to managing waste on land, where most of the trash originates.
I wanted to thank you for this fantastic read!! I definitely enjoyed every bit of it. I’ve got you book marked to check out new things you post…
Современные тактичные штаны: выбор успешных мужчин, как носить их с другой одеждой.
Секрет комфорта в тактичных штанах, которые подчеркнут ваш стиль и индивидуальность.
Как найти идеальные тактичные штаны, который подчеркнет вашу уверенность и статус.
Лучшие модели тактичных штанов для мужчин, которые подчеркнут вашу спортивную натуру.
Тактичные штаны: какой фасон выбрать?, чтобы подчеркнуть свою уникальность и индивидуальность.
Тактичные штаны: вечная классика мужского гардероба, которые подчеркнут ваш вкус и качество вашей одежды.
Сочетание стиля и практичности в тактичных штанах, которые подчеркнут ваш профессионализм и серьезность.
тактичні штани купити [url=https://dffrgrgrgdhajshf.com.ua/]https://dffrgrgrgdhajshf.com.ua/[/url] .
This is a topic that’s near to my heart… Thank you! Exactly where are your contact details though?
Way cool! Some extremely valid points! I appreciate you penning this write-up and also the rest of the website is really good.
That is a really good tip especially to those new to the blogosphere. Short but very precise info… Appreciate your sharing this one. A must read post.
Spot on with this write-up, I really feel this site needs a lot more attention. I’ll probably be back again to read through more, thanks for the information!
Securing the security of your house is critical in today’s unsettled times. One of the top ways to protect your belongings and sense of security is by committing in a trustworthy safe. Whether you’re protecting cash, crucial records, or precious heirlooms, a safe provides an assured storage solution.
When it comes to choosing the appropriate safe for your house, there are numerous elements to consider. Above all, evaluate your protection necessities. Determine what items you intend to store in the safe and the extent of protection required for each item.
Subsequently, think about the capacity and positioning of the safe. Choose a safe that fits comfortably in your residence while offering ample room for your belongings. Guarantee that the safe can be installed in a safe spot, such as for instance screwed to the floor or wall.
Moreover, look into the security features of the safe. Seek out features such as solid construction, reliable locking mechanisms, and fire-resistant materials. Take into account committing in a safe with additional protection features, for instance biometric thumbprint scanners or electronic keypads.
Finally, don’t forget to consider your budget when selecting a safe. Fix a reasonable budget based on your safety requirements and look around for choices that match within your financial constraints.
In conclusion, choosing the correct safe for your residence is essential for preserving your belongings protected. By considering your safety requirements, taking into account the dimensions and placement of the safe, inspecting safety measures, and setting a budget, you can guarantee ultimate protection for your precious possessions.
[url=Scottsdale showroom for fireproof safes with shelves]https://mercurylock.com/about[/url]
Hi, I do think this is a great site. I stumbledupon it 😉 I may revisit once again since i have book marked it. Money and freedom is the greatest way to change, may you be rich and continue to help other people.
Aw, this was a very good post. Spending some time and actual effort to make a superb article… but what can I say… I procrastinate a whole lot and don’t seem to get nearly anything done.
Good post. I learn something totally new and challenging on websites I stumbleupon everyday. It will always be exciting to read articles from other writers and practice something from other sites.
Visitors will have until December 31, 2021 to e book and sail with their FCC.
So, my advice to any of you mother and father out there’s to make your kids part of it.
Afterwards, Carlsen defended precisely, creating counterplay on the queenside, and finally queening his b-pawn with test while Anand was shifting his heavy pieces over to his mating assault.
Thank you for helping out, excellent information. “The health of nations is more important than the wealth of nations.” by Will Durant.
This web site definitely has all the information and facts I wanted concerning this subject and didn’t know who to ask.
Spot on with this write-up, I really think this web site needs much more attention. I’ll probably be back again to see more, thanks for the advice!
Greetings! Very useful advice within this article! It is the little changes that make the most significant changes. Thanks a lot for sharing!
I’m more than happy to uncover this great site. I wanted to thank you for your time just for this fantastic read!! I definitely really liked every bit of it and i also have you book-marked to see new things on your site.
An outstanding share! I have just forwarded this onto a coworker who was conducting a little research on this. And he in fact ordered me dinner simply because I found it for him… lol. So allow me to reword this…. Thank YOU for the meal!! But yeah, thanx for spending time to talk about this topic here on your site.
An interesting discussion is worth comment. I think that you need to publish more on this issue, it might not be a taboo matter but usually people do not speak about these issues. To the next! Kind regards.
Предлагаем услуги профессиональных инженеров офицальной мастерской.
Еслли вы искали срочный ремонт телевизоров samsung, можете посмотреть на сайте: ремонт телевизоров samsung рядом
Наши мастера оперативно устранят неисправности вашего устройства в сервисе или с выездом на дом!
Your style is so unique in comparison to other people I have read stuff from. Thanks for posting when you have the opportunity, Guess I’ll just bookmark this site.
Thank you, this article was helpful and interesting. I read something similar at https://terazus.com/
Great info. Lucky me I ran across your site by chance (stumbleupon). I have saved as a favorite for later.
Предлагаем услуги профессиональных инженеров офицальной мастерской.
Еслли вы искали ремонт телевизоров philips рядом, можете посмотреть на сайте: ремонт телевизоров philips рядом
Наши мастера оперативно устранят неисправности вашего устройства в сервисе или с выездом на дом!
Good information. Lucky me I discovered your site by chance (stumbleupon). I have book-marked it for later!
Hi there! This article couldn’t be written much better! Going through this post reminds me of my previous roommate! He always kept talking about this. I most certainly will forward this post to him. Fairly certain he’ll have a good read. Thanks for sharing!
bookmarked!!, I love your site!
Excellent blog you’ve got here.. It’s difficult to find quality writing like yours nowadays. I honestly appreciate individuals like you! Take care!!
An outstanding share! I’ve just forwarded this onto a colleague who had been doing a little homework on this. And he in fact ordered me dinner due to the fact that I discovered it for him… lol. So allow me to reword this…. Thank YOU for the meal!! But yeah, thanks for spending time to discuss this matter here on your site.
I was able to find good info from your blog posts.
There’s definately a great deal to know about this issue. I like all the points you have made.
Your style is unique in comparison to other folks I’ve read stuff from. I appreciate you for posting when you have the opportunity, Guess I’ll just book mark this page.
Way cool! Some very valid points! I appreciate you writing this article and also the rest of the website is really good.
Nice post. I learn something totally new and challenging on sites I stumbleupon every day. It will always be useful to read content from other authors and practice something from other sites.
I’m impressed, I have to admit. Rarely do I come across a blog that’s equally educative and amusing, and let me tell you, you’ve hit the nail on the head. The problem is something that not enough people are speaking intelligently about. Now i’m very happy that I stumbled across this in my hunt for something concerning this.
May I simply say what a relief to find someone who actually understands what they’re discussing online. You certainly know how to bring an issue to light and make it important. A lot more people ought to check this out and understand this side of the story. I was surprised you aren’t more popular since you definitely possess the gift.
This is a topic that is close to my heart… Thank you! Exactly where are your contact details though?
There’s definately a lot to find out about this subject. I really like all of the points you made.
Your spiritual gifts are tools for personal growth, leading you toward impactful contributions and self fulfillment.
[url=https://9humantypes.com/9-spiritual-gifts]Record spiritual gifts Scripture[/url]
Identifying your inner talents is just the start. To maximize these unique abilities, you need to actively enhance and strengthen them. Like any ability, spiritual gifts need effort and commitment to realize their true power.
Start by exploring your abilities. Are you skilled in educating, comforting, or assisting others? Research how these abilities can be applied by others to make meaningful results. Exploring guides or connecting with similar communities can provide insight.
Daily dedication is crucial. If you possess the gift of encouragement, find chances to uplift others in your daily interactions. If you are skilled in structure, offer to manage projects in your circle.
Be connected with your spiritual practices, whether through self-reflection or conscious awareness. These practices nurture your gifts and keep aligned to your mission.
Growing your spiritual talents is a process, but the rewards are worthwhile. Not only do you evolve as an soul, but you also add value meaningfully to the community.
[url=https://www.asiaticaart.com/blog/2024/11/23/hello-world/#comment-52]Company coaching[/url] e476cff
Very good information. Lucky me I recently found your blog by accident (stumbleupon). I have saved as a favorite for later.
You should take part in a contest for one of the finest websites on the web. I am going to highly recommend this website!
Greetings! Very helpful advice within this post! It’s the little changes that produce the largest changes. Thanks a lot for sharing!
Very good information. Lucky me I recently found your blog by accident (stumbleupon). I have book-marked it for later!
Hi there! This article couldn’t be written any better! Looking at this post reminds me of my previous roommate! He continually kept preaching about this. I am going to forward this information to him. Pretty sure he’ll have a very good read. I appreciate you for sharing!
All in all, it was a very good away efficiency from the ladies who, at times, as well as playing some good football had to dig in to verify Mersey Ladies did not get a foothold back in the sport.
Spot on with this write-up, I actually think this site needs much more attention. I’ll probably be returning to see more, thanks for the info.
I was able to find good info from your blog articles.
The Thornhill-Geraghty Funeral Home, N 1322 Monroe St.
I needed to thank you for this excellent read!! I definitely enjoyed every little bit of it. I have got you book-marked to look at new stuff you post…
Selain memberikan fasilitas gratis untuk mengunduh video, kamu juga bisa memilih format lain, yaitu
MP4 dan MP3.
You’re so interesting! I don’t suppose I’ve truly read through anything like this before. So good to find another person with genuine thoughts on this subject matter. Really.. many thanks for starting this up. This web site is something that is required on the web, someone with a bit of originality.
An outstanding share! I’ve just forwarded this onto a friend who has been conducting a little homework on this. And he in fact bought me breakfast simply because I discovered it for him… lol. So allow me to reword this…. Thanks for the meal!! But yeah, thanks for spending the time to talk about this matter here on your blog.
An impressive share! I have just forwarded this onto a friend who had been conducting a little research on this. And he in fact ordered me breakfast because I stumbled upon it for him… lol. So allow me to reword this…. Thanks for the meal!! But yeah, thanx for spending some time to talk about this issue here on your website.
Here, you’ll discover a heated Calcutta-marble floor (that’s toasty all 12 months spherical), a Toto bidet, and a towel hotter perched on the wall-you can’t actually get better than that for cozy mountain dwelling.
I was able to find good information from your content.
IPhone users use the Safari browser or install the
Document by Readdle on the device and follow the same instructions as mentioned above.
Just keep feelings out of the combo so you do not end up flaming the fireplace vs placing it out.
I love it when people get together and share views. Great site, keep it up.
Normally, the booth vendor can either create your graphics from photographs you supply, or they could offer services to create the pictures for you.
Nice post. I learn something new and challenging on websites I stumbleupon on a daily basis. It’s always helpful to read through articles from other authors and practice a little something from other websites.
I seriously love your blog.. Very nice colors & theme. Did you create this amazing site yourself? Please reply back as I’m planning to create my very own site and would like to learn where you got this from or just what the theme is called. Kudos.
Depending upon the formula used, this produced a light yellow, orange or inexperienced, which could be very bright, or, in flashed glass, could possibly be scratched to provide extra delicate tones and shading.
This website was… how do you say it? Relevant!! Finally I have found something which helped me. Many thanks.
First Baptist Church. Rev.
Pretty! This has been an incredibly wonderful article. Thank you for supplying this info.
Everything is very open with a very clear description of the issues. It was definitely informative. Your site is very useful. Many thanks for sharing!
Merely wanna input on few general things, The website design is perfect, the subject material is rattling superb : D.
Your style is very unique compared to other folks I’ve read stuff from. Thanks for posting when you’ve got the opportunity, Guess I will just bookmark this site.
I couldn’t refrain from commenting. Perfectly written!
Valuable info. Lucky me I found your web site by accident, and I’m shocked why this accident didn’t happened earlier! I bookmarked it.
This was really a fascinating matter, I am very lucky to have the ability to come to your blog and I will bookmark this page so that I might come back one other time.
Attractive element of content. I simply stumbled upon your web site and in accession capital to assert that I acquire actually enjoyed account your weblog posts. Anyway I will be subscribing to your augment or even I achievement you get entry to persistently rapidly.
Nice post. I learn something new and challenging on sites I stumbleupon every day. It will always be interesting to read content from other writers and practice something from other websites.
You’ve made some really good points there. I checked on the web for more info about the issue and found most individuals will go along with your views on this site.
Just before you decide to create your own checklist to add an idea associated with what camping checklist ought to. Really … A listing can be in excess of what you need.
I’m impressed, I must say. Seldom do I encounter a blog that’s equally educative and interesting, and let me tell you, you’ve hit the nail on the head. The problem is an issue that not enough men and women are speaking intelligently about. I’m very happy that I found this in my search for something concerning this.
I wanted to thank you for this fantastic read!! I definitely loved every bit of it. I have got you bookmarked to look at new stuff you post…
Oh my goodness! Impressive article dude! Thanks, However I am going through problems with your RSS. I don’t know the reason why I am unable to subscribe to it. Is there anybody else having similar RSS problems? Anybody who knows the answer will you kindly respond? Thanx!!
Предлагаем услуги профессиональных инженеров офицальной мастерской.
Еслли вы искали ремонт посудомоечных машин hotpoint ariston, можете посмотреть на сайте: ремонт посудомоечных машин hotpoint ariston
Наши мастера оперативно устранят неисправности вашего устройства в сервисе или с выездом на дом!
Предлагаем услуги профессиональных инженеров офицальной мастерской.
Еслли вы искали ремонт посудомоечных машин hotpoint ariston адреса, можете посмотреть на сайте: ремонт посудомоечных машин hotpoint ariston сервис
Наши мастера оперативно устранят неисправности вашего устройства в сервисе или с выездом на дом!
The way you write, you are really a professional blogger.*”-:-
Предлагаем услуги профессиональных инженеров офицальной мастерской.
Еслли вы искали ремонт посудомоечных машин hotpoint ariston рядом, можете посмотреть на сайте: ремонт посудомоечных машин hotpoint ariston цены
Наши мастера оперативно устранят неисправности вашего устройства в сервисе или с выездом на дом!
Свежие розы с доставкой к вашему порогу, порадуйте себя или близких.
Индивидуальные букеты роз по вашему желанию, широкий выбор цветов и дизайнов.
Соберите свой идеальный букет роз, гарантированная свежесть цветов.
Освежите обстановку с помощью букетов роз, быстрое исполнение заказов.
Нежные букеты роз для нежных душ, почувствуйте аромат настоящей любви.
Соберите свой уникальный букет роз, круглосуточный сервис для вас.
Оригинальные идеи для букетов роз, превратите обыденный день в праздник.
Букеты роз – это всегда актуальный подарок, сделайте заказ онлайн.
Букеты роз под ключ с доставкой, поможем выбрать идеальный вариант.
Утонченные композиции из роз, приятные цены и гарантированное качество.
Выберите свой звёздный букет роз, в удобное для вас время.
Прекрасные букеты роз для ваших близких, насладитесь ароматом настоящей любви.
цветы доставка на дом [url=https://buket-roz-s-dostavkoj.ru/]цветы доставка на дом[/url] .
Предлагаем услуги профессиональных инженеров офицальной мастерской.
Еслли вы искали ремонт ноутбуков sony адреса, можете посмотреть на сайте: ремонт ноутбуков sony адреса
Наши мастера оперативно устранят неисправности вашего устройства в сервисе или с выездом на дом!
Hi, I do believe your blog could possibly be having internet browser compatibility issues. When I take a look at your blog in Safari, it looks fine however, when opening in Internet Explorer, it has some overlapping issues. I just wanted to give you a quick heads up! Apart from that, great website.
Предлагаем услуги профессиональных инженеров офицальной мастерской.
Еслли вы искали срочный ремонт ноутбуков sony, можете посмотреть на сайте: ремонт ноутбуков sony
Наши мастера оперативно устранят неисправности вашего устройства в сервисе или с выездом на дом!
Предлагаем услуги профессиональных инженеров офицальной мастерской.
Еслли вы искали ремонт ноутбуков sony, можете посмотреть на сайте: ремонт ноутбуков sony адреса
Наши мастера оперативно устранят неисправности вашего устройства в сервисе или с выездом на дом!
Предлагаем услуги профессиональных инженеров офицальной мастерской.
Еслли вы искали ремонт ноутбуков sony, можете посмотреть на сайте: ремонт ноутбуков sony рядом
Наши мастера оперативно устранят неисправности вашего устройства в сервисе или с выездом на дом!
After I initially commented I seem to have clicked the -Notify me when new comments are added- checkbox and from now on every time a comment is added I recieve 4 emails with the same comment. Is there a way you are able to remove me from that service? Thanks.
Предлагаем услуги профессиональных инженеров офицальной мастерской.
Еслли вы искали ремонт ноутбуков sony, можете посмотреть на сайте: ремонт ноутбуков sony в москве
Наши мастера оперативно устранят неисправности вашего устройства в сервисе или с выездом на дом!
Предлагаем услуги профессиональных инженеров офицальной мастерской.
Еслли вы искали ремонт ноутбуков sony рядом, можете посмотреть на сайте: ремонт ноутбуков sony в москве
Наши мастера оперативно устранят неисправности вашего устройства в сервисе или с выездом на дом!
Предлагаем услуги профессиональных инженеров офицальной мастерской.
Еслли вы искали срочный ремонт ноутбуков sony, можете посмотреть на сайте: ремонт ноутбуков sony цены
Наши мастера оперативно устранят неисправности вашего устройства в сервисе или с выездом на дом!
Very good information. Lucky me I discovered your blog by accident (stumbleupon). I have bookmarked it for later!
Предлагаем услуги профессиональных инженеров офицальной мастерской.
Еслли вы искали ремонт ноутбуков sony, можете посмотреть на сайте: ремонт ноутбуков sony цены
Наши мастера оперативно устранят неисправности вашего устройства в сервисе или с выездом на дом!
I’m amazed, I must say. Rarely do I come across a blog that’s both educative and engaging, and let me tell you, you have hit the nail on the head. The problem is something which not enough folks are speaking intelligently about. Now i’m very happy I came across this in my hunt for something relating to this.
I used to be able to find good info from your blog articles.
Your style is really unique in comparison to other folks I’ve read stuff from. Thank you for posting when you have the opportunity, Guess I will just book mark this blog.
You made some good points there. I checked on the web to find out more about the issue and found most people will go along with your views on this web site.
Eye Movement Desensitization and Reprocessing Therapy for Providers and Managing Emotional Exhaustion and Fatigue
Live-in caregiving is definitely a stressing in addition to often emotionally taxing role that will may hold profound consequences on people’s mental and emotional, emotional, as well as physical well-being. Eye Movement Desensitizing as well as Reprocessing Eye Movement Desensitization and Reprocessing intervention offers the valuable resource pertaining to caregivers, boosting their journey on the way to relieving, self-care, in addition to strength.
Within the platform post, we all explore the utilization of Eye Movement Desensitization and Reprocessing therapy in caregiver support in addition to discuss its potential benefits for covering compassion fatigue, burnout, and alternate trauma.
An in the primary concerns faced by caregivers can be the cumulative impact of witnessing suffering in addition to providing care to others, that might lead to compassion fatigue, burnout, along with secondary trauma. Eye Movement Desensitization and Reprocessing counseling provides some sort of structured and evidence-based approach in order to trauma treatment that will could help providers work through distressing emotional responses, counter negative beliefs about their role, and develop a lot more transformative managing approaches.
You will, Eye Movement Desensitization and Reprocessing intervention can address this underlying trauma in addition to emotional distress in which may make contributions to supporters’ compassion fatigue along with burnout, helping them regain a sense of balance, purpose, in addition to meaning inside their daily lives. By providing some sort of safe along with supportive space intended for exploration as well as healing, Eye Movement Desensitization and Reprocessing counseling empowers caregivers to be able to prioritize their own welfare as well as continue providing merciful care to other people.
More over, Eye Movement Desensitization and Reprocessing intervention’s focus upon promoting self-care and also resilience aligns with the particular needs of many caregivers, which tend to be seeking in order to find balance as well as fulfillment inside their live-in caregiving roles. By offering effective as well as convenient trauma treatment, Eye Movement Desensitization and Reprocessing treatment assists caregivers inside finding peace along with renewal in their life.
[url=https://lkinstitute.com/treating-internalized-shame]Eye Movement Desensitization and Reprocessing intensive training 2024[/url]
03d6d04
Very good info. Lucky me I discovered your site by chance (stumbleupon). I have book marked it for later!
This blog was… how do I say it? Relevant!! Finally I’ve found something that helped me. Appreciate it!
I’d like to thank you for the efforts you have put in writing this blog. I really hope to see the same high-grade content by you later on as well. In fact, your creative writing abilities has encouraged me to get my own blog now 😉
HK Equity Fund says gold is moving from weak to strong hands as it is transferred from West to East and now is a great time to buy.
When I initially left a comment I seem to have clicked on the -Notify me when new comments are added- checkbox and now every time a comment is added I receive 4 emails with the exact same comment. Is there a way you can remove me from that service? Thanks a lot.
Augmenting Property Worth Through Substituting Overhead Coverings Prior to Selling
Renewing roofing can significantly boost the price of residences before putting on market. Prospective purchasers often seek homes featuring modern or pristine roofing, as they perceive such as a sign of comprehensive care and diminished eventual charges. A modern roof can turn a property more desirable and garner an increased price in the market. Spending into roof upgrades is a wise plan for homeowners looking to enhance their return on property.
For instance A landlord by the sea opts to renew their roofing before putting their property up for sale. The new roof turns the home more attractive to purchasers, leading to numerous inquiries and a higher selling value.
As a situation in point An tenant suggests a seller to upgrade their aging roofing with new resources. The investment in roofing renewal yields benefits as the property sells fast and at a high rate.
[url=https://portcityexteriors.com/asphalt-roofing/]Trusted roofing specialists in Southport NC[/url]
[url=http://insightcolumn.com/?page_id=628]Avoiding Common Roof Scams[/url] 7babe03
Lengthy after his loss of life, followers proceed to connect his work to major historical occasions of as we speak.
Hi there! This blog post could not be written much better! Looking at this post reminds me of my previous roommate! He constantly kept talking about this. I’ll forward this information to him. Fairly certain he’s going to have a good read. Thank you for sharing!
Hi there! This post could not be written any better! Looking at this article reminds me of my previous roommate! He always kept preaching about this. I’ll send this post to him. Pretty sure he’ll have a good read. Thank you for sharing!
I forgive myself for sinning towards my physique.
You need to have your own business.
Hi there! This post couldn’t be written much better! Reading through this article reminds me of my previous roommate! He always kept preaching about this. I will forward this article to him. Pretty sure he’ll have a great read. Thank you for sharing!
The finances-pleasant cork flooring additionally works well on this area, and is ideal for a humid bathroom.
After I initially left a comment I seem to have clicked the -Notify me when new comments are added- checkbox and from now on whenever a comment is added I recieve four emails with the exact same comment. There has to be a way you can remove me from that service? Many thanks.
Steering through the Social Security Disability application procedures may be a disheartening task for some. The method could be advanced and time consuming, therefore the odds of getting refused are significant. This is how a social security disability law firm is available in. A lawyer will allow you to navigate the program process, increase your odds of becoming authorized, furthermore appeal a denied claim. In this article, we’re going to consider 5 tips linked to the role of a social security disability law firm.
Finding your way when it comes to the the Social Security Disability application process with the help of a legal professional
The social security disability application processes may be confusing and/or overwhelming. Legal counsel will allow you to comprehend the requirements and show you through the process. They are able to also allow you to gather the mandatory professional medical data and certification to aid your very own claim. They are able to further help in arranging one for the proceeding, if required.
The necessity of medical related data in a Social Security Disability claim
Medical evidence is essential in a social security disability case. It is utilized to show that you possess a medical condition that stops you against doing work. A lawyer makes it possible to find the required medical proof and introduce it in a manner that is most probably to be recognized because of the social security governing administration. They could also assist you to acquire medical records along with other records that assist your claim.
Prevalent misunderstandings regarding Social Security Disability and just how legal counsel can really help
There are lots of misconceptions concerning social security disability. For instance, many individuals think that only those people who are permanently disabled are qualified to receive benefits. Nonetheless, this is simply not true. A legal professional will allow you to understand the eligibility requirements and dispel any misconceptions you’ve probably. They could also provide assistance with just how to present your case when you look at the most favorable light.
The appeals undertaking for refuted Social Security Disability cases and just how an attorney can help
In the event the claim is denied, you’ve got the directly to appeal. Legal counsel will allow you to comprehend the appeals strategy and portray you through the hearing. They could also assist you to gather additional evidence and create a stronger case to improve your odds of success.
How to choose just the right Social Security Disability personal injury attorney for the case
It is critical to choose a legal professional who’s got valuable experience dealing with social security disability cases. Look for legal counsel that is knowledgeable about the social security administration’s guidelines and procedures. Its also wise to feel comfortable communicating with them and trust their judgment. Try to find legal counsel who are able to offer obvious and honest responses to your questions and supply direction through the duration of the method.
In closing, a social security disability law firm can play a vital role when you look at the application and appeals process. They are able to allow you to navigate the procedure, enhance your likelihood of getting accepted, and appeal a refuted claim. A lawyer will help you recognize the qualifications criteria and drive out any misunderstandings you’ve probably. It is vital to choose legal counsel who has got experience handling social security disability cases, in accordance with that you feel at ease communicating.
Should you want to read more about this content visit my favorite S.S.A. attorney web-page:
[url=https://elpasodisabilitylawyer.com/practice-areas/disability-appeals/][color=#000_url]top va disability lawyers in Socorro[/color][/url]
When Halloween arrives, use nontoxic face paints to paint child’s face white — like a skull.
Everyone loves it when people get together and share views. Great blog, keep it up.
To begin with, try getting a feel for the school.
Hi there! I simply want to give you a big thumbs up for the great info you have here on this post. I will be returning to your blog for more soon.
Spot on with this write-up, I honestly believe that this website needs a great deal more attention. I’ll probably be returning to read through more, thanks for the info!
If you invest in stock, the worst thing that can happen is that the stock loses absolutely all of its value.
This web site definitely has all the information and facts I needed concerning this subject and didn’t know who to ask.
Irgun and Lehi terror groups participated in an indiscriminate massacre of no lower than 107 Palestinian residents of the village of Deir Yassin including women and children.
Your style is unique compared to other folks I have read stuff from. Thank you for posting when you’ve got the opportunity, Guess I will just book mark this blog.
I’d like to thank you for the efforts you have put in writing this website. I’m hoping to see the same high-grade content by you in the future as well. In truth, your creative writing abilities has encouraged me to get my own, personal site now 😉
Excellent article. I am facing a few of these issues as well..
I’m excited to uncover this site. I need to to thank you for ones time for this fantastic read!! I definitely enjoyed every part of it and I have you bookmarked to check out new stuff in your website.
I recognize there is a great deal of spam on this website. Do you need aid cleaning them up? I may help in between courses!
Having read this I believed it was really informative. I appreciate you spending some time and effort to put this information together. I once again find myself personally spending way too much time both reading and leaving comments. But so what, it was still worthwhile.
You made some decent points there. I appeared on the web for the problem and found most individuals will go along with with your website.
I would like to thank you for the efforts you have put in penning this blog. I’m hoping to check out the same high-grade content by you later on as well. In truth, your creative writing abilities has encouraged me to get my very own blog now 😉
Both Will Ferrell and Mark Wahlberg play off of each other much better than you might expect as the titular characters, and Michael Keaton – once again, this summer – steals just about every scene that he’s in as the Guys’ more-calm-than-he-probably-should-be captain.
Hi! I just would like to give you a huge thumbs up for your great info you have here on this post. I’ll be coming back to your blog for more soon.
you have got a wonderful weblog here! do you want to make some invite posts in this little blog?
When I originally left a comment I seem to have clicked the -Notify me when new comments are added- checkbox and from now on whenever a comment is added I recieve four emails with the exact same comment. There has to be an easy method you are able to remove me from that service? Thanks.
During discussions, the expert acts between the you and the prospective purchaser’s agent. They guide you to reliable professionals, be they’re in home inspection or financial advisory. When conditions are decided, the professional will certainly organize a place evaluation and deliberate with you possible adjustments, determining who bears the monetary duty, be it you the possible party.
[url=http://upgradingindia.com/2020/12/28/know-about-these-baby-care-tips-during-winter/]Leading Advantages of Having a Nearby Agent Sell Your Property[/url] dd77bab
You have made some really good points there. I checked on the internet for more information about the issue and found most individuals will go along with your views on this website.
Howdy! I could have sworn I’ve been to this web site before but after
looking at a few of the posts I realized it’s new to me.
Anyhow, I’m certainly pleased I came across it
and I’ll be bookmarking it and checking back regularly!
i am addicted to computer games that is why i bought a gamecube for me and my brother**
I want forgathering utile info, this post has got me even more info!
Despite their humanitarian work, the Green Berets don’t always act in the very best interests of civilians.
It’s a pity you don’t have a donate button! I’d certainly
donate to this superb blog! I guess for now i’ll settle for book-marking and adding your RSS feed to my Google account.
I look forward to new updates and will share this site with my Facebook group.
Chat soon!
When I originally commented I seem to have clicked
on the -Notify me when new comments are added- checkbox and now
each time a comment is added I recieve four emails with the same comment.
Is there a means you can remove me from that service?
Thanks!
Hi there! I could have sworn I’ve been to this site before but after going through some of the articles I realized it’s new to me. Anyhow, I’m definitely pleased I stumbled upon it and I’ll be bookmarking it and checking back often!
This is the perfect website for everyone who would like to understand this topic. You realize so much its almost hard to argue with you (not that I personally will need to…HaHa). You certainly put a new spin on a topic that has been discussed for ages. Excellent stuff, just excellent.
Nice Article
Yet another thing I would like to state is that as an alternative to trying to suit all your online degree training on days and nights that you finish work (as most people are tired when they get home), try to have most of your classes on the week-ends and only a couple courses in weekdays, even if it means a little time away from your end of the week. This is fantastic because on the saturdays and sundays, you will be much more rested as well as concentrated in school work. Thanks a lot for the different tips I have mastered from your weblog.
Your writing is not only informative but also incredibly inspiring. You have a knack for sparking curiosity and encouraging critical thinking. Thank you for being such a positive influence!
There’s certainly a lot to find out about this issue. I love all of the points you have made.
for yet another great informative post, I’m a loyal reader to this blog and I can’t stress enough how much valuable information I’ve learned from reading your content. I really appreciate all the hard work you put into this great blog.
I am usually to running a blog and i actually recognize your content. The article has really peaks my interest. I am going to bookmark your website and keep checking for new information.
This is the place an expert wedding ceremony planner in Delhi, like V3 Events & Weddings, comes in, ensuring each aspect of your big day is flawlessly managed.
I’m very pleased to discover this great site. I need to to thank you for ones time due to this fantastic read!! I definitely appreciated every bit of it and I have you book-marked to check out new information in your site.
I every time spent my half an hour to read this website’s content daily along with a cup of coffee.
A more energizing modern approach, however, shifts these basic-trying rooms to a lighter palette.
And, these days, paints of many colours are available to replicate the consequences of sun and age.
Hi there, You’ve done a fantastic job. I’ll definitely digg it and personally suggest to my friends.
I’m confident they’ll be benefited from this website.
I loved as much as you’ll receive carried out right
here. The sketch is attractive, your authored subject matter stylish.
nonetheless, you command get bought an shakiness over that you wish be delivering the following.
unwell unquestionably come more formerly again since exactly the same nearly a lot often inside case you shield this
hike.
After checking out a number of the articles on your site, I truly appreciate your way of blogging. I book marked it to my bookmark website list and will be checking back in the near future. Please check out my web site too and tell me what you think.
Very good post! We are linking to this great article on our website.
Keep up the great writing.
I like what you guys are up too. Such smart work and reporting! Carry on the superb works guys I’ve incorporated you guys to my blogroll. I think it will improve the value of my website
GREAT BLOG! You are one of the best writers I’ve seen in a long long time. I hope you keep writing because people like you inspire me!
Everything is very open with a clear description of the issues. It was truly informative. Your website is useful. Thank you for sharing!
Hi there! This blog post couldn’t be written any better! Going through this article reminds me of my previous roommate! He continually kept talking about this. I’ll send this information to him. Pretty sure he’s going to have a good read. I appreciate you for sharing!
Great write-up, I am a big believer in writing comments on websites to let the blog writers know that they’ve added some thing useful to the world wide web!
After I initially commented I seem to have clicked on the -Notify me when new comments are added- checkbox and from now on every time a comment is added I receive four emails with the exact same comment. Perhaps there is a way you can remove me from that service? Many thanks.
The topic dheeraj3choudhary may refer to an individual making waves in their field. In this context the junior jewels shirt taylor swift represents a blend of personal style and cultural influence. Just as Dheerajs journey may inspire others the shirt symbolizes how fashion can express individuality and connect fans through shared interests.
It’s hard to find educated people in this particular subject, however, you sound like you know what you’re talking about! Thanks
Hepsey positive factors independence within the workforce as a result of she is ready to earn money to free her enslaved family members.
Hello to every body, it’s my first go to see of this web site; this
webpage includes awesome and genuinely fine material for readers.
I love it whenever people get together and share opinions. Great website, continue the good work.
Remember that business is all about threat and also you won’t ever need to put your corporation in some danger the place there is no likelihood of revenue maximization.
Excellent post. I was checking continuously this blog and I’m
impressed! Very helpful information specially the last part 🙂 I
care for such info much. I was seeking this
particular info for a very long time. Thank you and good
luck.
Oh my goodness! Amazing article dude! Many thanks, However I am having difficulties with your RSS. I don’t understand the reason why I cannot join it. Is there anybody getting identical RSS problems? Anybody who knows the answer can you kindly respond? Thanx!!
This post will help the internet users for setting up new web site or even a blog from start to end.
Link exchange is nothing else however it is simply placing the other person’s web site link
on your page at proper place and other person will also do similar in support
of you.
Having read this I thought it was extremely enlightening. I appreciate you taking the time and energy to put this content together. I once again find myself spending way too much time both reading and commenting. But so what, it was still worth it!
Your style is really unique in comparison to other folks I’ve read stuff from. Many thanks for posting when you have the opportunity, Guess I’ll just book mark this blog.
This is a really good tip especially to those new to the blogosphere. Short but very precise information… Appreciate your sharing this one. A must read post!
For What Purpose Employing An Public Assistance Impairment Counsel Proves to Be Crucial.
Hiring A Social Security Inability Attorney Turns Out to Be Pivotal.
The Secure Social Assistance Runs countless projects from job-loss protection to economic relief, and also administers disability payments for people powerless to engage in employment due to persistent health issues or trauma. As with every intricate body, there are regulations and rules which must be observed by the bureau in arrangement to obtain privileges. Looking to hire a qualified SSA counsel Is required.
Employing a experienced SSD legal representative might assist you deal with the challenges of SSA Safeguarding Social Assets, boosting your likelihood of endorsement for advantages. They might confirm that your submission is registered accurately and includes supporting medical evidence; moreover, they understand how to amass this evidence speedily so it is not put forward late; furthermore, they might bypass presenting irrelevant data that will cause delays and dismissals by the Social Security Act.
Your specialized professional in disabilities will also equip you for a hearing with Social Security Administration if your claim is turned down, by detailing what to expect at it and addressing any of your inquiries about what happens there. They might support with presenting additional proof and querying the magistrate who heard your case to look over their decision and question witnesses or vocational authorities called by Social Security to testify on your behalf, which could boost the probability that an initial appeal for disability succeeds if initially denied. Legal professionals in social security disability could retrieve any past due beneficial outcomes thanks to changes in the starting date, which indicates when your ailment began. Good champions for disabled individuals may help with recovering any past due beneficial outcomes that might have been lost due to changes in the starting date or when your state began.
[url=https://disabilitysacramento.com/category/social-security-disability/page/2/]Qualifying for Social Security Disability involves meeting specific health issues established by the Social Security Administration[/url]
[url=http://baringa.de/?p=38]Why You Need an Counsel Specialized in Disability Matters on Your Team[/url] e476cff
Pretty! This has been an incredibly wonderful article. Many thanks for supplying these details.
Heya i am for the first time here. I came across this board and
I find It truly useful & it helped me out much. I hope to give something back and help others like you aided me.
Useful information. Lucky me I found your site by accident, and I am shocked why this twist of fate did not came about in advance! I bookmarked it.
Zurich for more than twenty years, the last nine as its credit supervisor.
That is a great tip particularly to those fresh to the blogosphere. Simple but very precise information… Thank you for sharing this one. A must read article.
It’s truly very complex in this busy life to listen news
on Television, therefore I simply use world wide web for that reason, and get the
newest news.
I love it when folks come together and share thoughts. Great website, continue the good work.
Producing small decks in highland locations calls for a careful approach to making the most of space, considering the distinctive concerns provided by the highland terrain. The process features different approaches, varying from the picking of efficient furnishing to the incorporation of versatile elements, all targeted at maximizing the potential of limited areas. Engaging in discussions that discuss particular design ideas, innovative organizational solutions, and discussing individual triumphs becomes a spring of inspiration for community participants seeking to enhance their little deck spaces amidst the distinctive landscapes of highland situations.
Choosing space-efficient furniture is a fundamental aspect of designing small decks, permitting people to make the most of the available area without compromising on practicality or aesthetics. integrating multi-functional elements moreover enhances the adaptability of little deck spaces, presenting useful solutions that cater to different needs. These approaches collectively contribute to a comprehensive approach that takes into consideration both the aesthetics and practicality of tiny decks in highland regions.
Partaking in discussions that delve into particular design plans transforms into a catalyst for creativity, offering a stage for people to swap creative concepts and resolutions tailored to highland environments. The discourse includes creative storage options, addressing the difficulty of restricted space with practical and aesthetically pleasing methods to organization. Personal success stories discussed within the community turn into valuable narratives, illustrating the viability and capacity of optimizing little deck spaces in the distinctive context of highland locations.
With this cooperative return, forum members gain helpful insights and a riches of notions to apply to their own compact deck projects, ensuring that each and every inch of space is thoughtfully applied in making useful, aesthetically pleasing, and efficient backyard living areas in alpine spaces.
[URL=https://fortcollinsdecks.com/contact/]Bespoke backyard patios designed by professionals[/url]
This is the right web site for anybody who wishes to understand this topic. You know so much its almost tough to argue with you (not that I actually would want to…HaHa). You definitely put a brand new spin on a subject that’s been discussed for many years. Excellent stuff, just wonderful.
I couldn’t resist commenting. Perfectly written.
This often outcomes in additional efficient windows because radiant heat originating from indoors in winter is mirrored again inside, while infrared heat radiation from the solar during summer is reflected away, maintaining it cooler inside.
Luckily, by the point you’ve made the opposite modifications, you in all probability won’t want a big field to retailer the paper you’ve got left!
Freshwater tanks are easier to take care of.
It’s hard to find knowledgeable people on this topic, but you seem like you know what you’re talking about! Thanks
A few things i have usually told men and women is that while searching for a good on-line electronics retail outlet, there are a few components that you have to factor in. First and foremost, you should really make sure to choose a reputable and in addition, reliable retailer that has obtained great testimonials and rankings from other customers and market sector professionals. This will make certain you are getting along with a well-known store that can offer good services and assistance to its patrons. Many thanks for sharing your ideas on this site.
Hi, I do think this is an excellent site. I stumbledupon it 😉 I may return yet again since i have book marked it. Money and freedom is the best way to change, may you be rich and continue to guide other people.
Good article! We are linking to this great post on our site. Keep up the good writing.
Have you ever thought about adding a little bit more than just your articles? I mean, what you say is fundamental and all. However just imagine if you added some great graphics or videos to give your posts more, “pop”! Your content is excellent but with images and clips, this blog could definitely be one of the best in its field. Fantastic blog!
Great post. I will be experiencing many of these issues as well..
We recommend Maybelline’s Fit Me Dewy+Smooth Foundation for individuals who love a natural makeup look. It’s so smooth and offers such a flawless appearance. Some liquid foundations are cakey, but that’s not the case with this product. If you prefer liquid foundations over powder, then we think you should try this one out! I love Maybelline Fit Me Matte ^-^ I find it works well with oily skin and foundation looks so smooth and weightless. Overall, I love this foundation, but wouldn’t say it is HG. It is beautiful and really compliments my skin type well. The coverage could be an issue if you have extra pigmentation. Other than the few cons listed, I highly recommend giving this foundation a try! I always have extra foundation for no reason and the product gets wasted. The good part is that the foundation is a gel based formula and glides plus blends out smoothly. It does crease if you do not set it with a translucent powder. It does give me that luminous glow throughout the day and stays for about 8 hours on my face without any touch-ups. It is a medium coverage foundation, so it does not cover up all my blemishes on the skin. You cannot build it up as it could look cakey if you take too much quantity.
https://hotel-wiki.win/index.php?title=Affordable_massage_therapy_near_me
} Directions: Help fight visible signs of fatigue with Olay Eyes Deep Hydrating Eye Gel. The hyaluronic acid formula instantly hydrates tired eyes for a wide-awake, refreshed look. Feel the cooling gel hydrate and plump the delicate skin under the eye, where fine lines first appear. Its fast-absorbing formula, supercharged with hyaluronic acid, peptides, pro-vitamin B5, witch hazel and cucumber extract, quenches skin for long-lasting hydration. Give your eyes a boost of beauty and deep hydration with Deep Hydrating Eye Gel for tired, dehydrated eyes. No products in the basket. Give your eyes a boost with instant hydration, plumping and refreshment There was an error please try again. If you would like up to date info on offers, instore or online, our latest news or promotions, or just some handy health tips then sign up to our newsletters! There will also be some discounts codes hidden among the newsletter so make sure you keep your eyes out for those.
It’s nearly impossible to find educated people on this subject, however, you seem like you know what you’re talking about! Thanks
There are many business establishments in the UK that have a close proximity to one another, so there is a huge chance that they would become vulnerable to several unpleasant incidents such as fire.
This website was… how do I say it? Relevant!! Finally I have found something that helped me. Many thanks!
Study is funded by the government or legal entities and individuals.
I absolutely love your website.. Very nice colors & theme. Did you make this amazing site yourself? Please reply back as I’m attempting to create my own personal site and want to know where you got this from or exactly what the theme is named. Cheers.
Living in OC or every coastal city adjacent to the ocean offers numerous perks, nonetheless it also poses unique challenges. One particular challenge is the possibility harm caused by moisture and humidity into the drywall in our homes. In this blog post, we will investigate the vitality of quick drywall repair and address the particular considerations for homeowners in Orange County and various coastal cities. By comprehending the dangers and taking proactive measures, residents can ensure the longevity and structural integrity of their homes.
Comprehending the Impact of Moisture on Drywall
Drywall, an ordinary building material utilized for interior walls and ceilings, is susceptible to moisture damage. In coastal areas, the proximity to the ocean increases the chance as a result of higher humidity levels and occasional moisture intrusion through the salty air. When moisture seeps into drywall, it may result in various issues, including:
Mold and Fungi Growth: Excess moisture creates a great environment for mold and mildew to thrive, compromising indoor air quality and posing health risks.
Structural Weakness: Wet drywall undermines and loses its structural integrity, potentially resulting in sagging, cracks, and even collapse.
Aesthetic pain: humidity problems often end results in unappealing marks, bubbly, peeling color, and structure decline in quality, diminishing the visual appeal of your house.
Quick Drywall Repairs: Reducing Longer Pain
Restoring drywall swiftly is crucial to prevent farther along damage and reduce repairs fees. Slowing down repairs can exacerbate existing things, resulting in most complete and costly rehabilitations. Keep in mind the following explanations why prompt drywall restoration is really important:
Fungus Mitigation: covering humidity-related issues promptly hinders mold progress and spread, safeguarding your loved ones’s health.
Sustaining Architectural Trustworthiness
: Correcting impaired drywall guarantees the balance and safety of your home, preventing prospective hazards.
Stopping minor Harm: Moisture-damaged drywall may impact adjoining materials such as for instance insulation and solid timber framing. By handling drywall quickly, you are able to avoid additional harm and relevant repairs.
Cost Efficiency: Early detection and repair of drywall issues are increasingly cost-effective than waiting through to the harm ends up being dangerous. Well-timed repair save you from widespread rehabilitations to potential relocation costs.
Methods for Drywall Commitment in Coastal Spaces
Residing nearby the sea demands added maintenance to maintain the reliability of your drywall. Check out practical strategies for house owners in Orange County and coastwise metropolitan areas:
Ongoing examinations: Carry out typical visual inspections of your drywall, focusing on signs of humidity damage, such as for instance discoloration, cracking painting, or squishy spots.
Monitoring Humidity: Use blow dryers or air conditioners to manage household moisture content levels, especially during the course of moist changing seasons.
Ensuring Ventilation: Ensure adequate air flow in baths, dining rooms, as well as other areas prone to moisture build up. Mount and maintain exhaust fans to eliminate unwanted dampness.
Regularly sustaining the outside: Consistently visit your property’s surface, such as the cover, drains, and room windows, to identify and tackle any interested aspects of humidity breach.
Resolving plumbing work moisture: Resolve any plumbing leaks rapidly to prevent moisture from oozing in to the wall structure and bringing about drywall harm.
Specialized help: Seek the services of expert building contractors for extensive assessments and problems to answer any overall or possible drywall complications.
Conclusion
In coast destinations like OC, prompt drywall cure is essential to alleviate the damaging effects of moisture content as well as your humidity. By comprehending the risks associated with humidity damage and implementing enthusiastic procedures, household owners can ensure the long lifespan, well-being, and visual appeal of their particular stores.
I highly appreciate the discovery of this website due to its abundance of invaluable information and reliable content. The site has shown to be an essential resource, providing vital information on a diverse subjects. Its extensive gathering of facts has made it an essential tool for study, education, and keeping up-to-date. I am captivated by the site’s commitment to accuracy and dependability, making sure that readers can rely on the knowledge they find. I am eager about endorsing this site to my friends, as it provides a unique opportunity to explore and obtain a wealth of information easily. I urge them to visit [url=https://drywallpatchguys.com/drywall-repair-water-restoration-services-newport-beach-ca/]Irvine CA drywall installers[/url] and uncover the plethora of perspectives it has to present.
[url=https://drywallpatchguys.com/drywall-repair-services-water-restoration-in-laguna-beach-ca/]Laguna Beach CA water cleanup[/url]
[url=http://ivado.ca/nous-joindre/]Helping a Sound Indoor Atmosphere: Importance of Drywall Repair[/url] e157b7_
Thanks to naira4all for such a discovery.
A descendant of the Rabbit people who got here from the Moon.
Hi there! I could have sworn I’ve visited your blog before but after browsing through some of the articles I realized it’s new to me. Anyways, I’m definitely happy I came across it and I’ll be bookmarking it and checking back frequently.
Excellent article! We are linking to this great article on our website. Keep up the great writing.
Saved as a favorite, I like your web site.
Great info. Lucky me I found your site by chance (stumbleupon). I have saved as a favorite for later.
Next time I read a blog, I hope that it doesn’t fail me just as much as this one. After all, Yes, it was my choice to read through, however I really thought you would have something useful to say. All I hear is a bunch of whining about something that you can fix if you weren’t too busy looking for attention.
Having read this I thought it was rather enlightening. I appreciate you spending some time and effort to put this informative article together. I once again find myself personally spending a significant amount of time both reading and posting comments. But so what, it was still worthwhile.
Biography of Spanish footballer Pedri https://pedri-bd.com statistics at Barcelona, ??games with teammate Gavi, inclusion in the national team for Euro, meme with Cristiano Ronaldo.
I got this site from my friend who informed me regarding this web
page and now this time I am visiting this web page
and reading very informative posts here.
Heya i’m for the first time here. I came across this board and I to find It really helpful & it helped me out much.
I hope to present something back and help others like you helped
me.
I really love your site.. Very nice colors & theme. Did you create this site yourself? Please reply back as I’m attempting to create my own personal site and would like to find out where you got this from or just what the theme is named. Kudos.
Hello there! This is my 1st comment here so I just wanted to give
a quick shout out and say I truly enjoy reading your articles.
Can you suggest any other blogs/websites/forums that deal with the same
subjects? Thanks a lot!
I like reading an article that can make people think. Also, thank you for permitting me to comment.
You’ve made some decent points there. I checked on the web for additional information about the issue and found most people will go along with your views on this website.
Thank you, I have just been looking for info approximately this topic for a long time and yours is the
best I have came upon till now. However, what in regards to the conclusion? Are you sure in regards to
the supply?
I was able to find good advice from your content.
In Brazil, one-quarter of all corporate bonds at a higher risk of default are in the industrial sector.
The kind “D” circuit breaker permits for the higher present at startup (as the compressor begins) with out tripping the breaker.
Very nice blog post. I definitely love this site. Stick with it!
Pretty! This was an extremely wonderful post. Thank you for supplying these details.
This is my first time go to see at here and i am
actually happy to read everthing at alone place.
I quite like looking through a post that can make men and women think. Also, thanks for allowing me to comment.
Howdy! I could have sworn I’ve been to your blog before but after looking at many of the posts I realized it’s new to me. Anyhow, I’m definitely pleased I stumbled upon it and I’ll be book-marking it and checking back often.
An impressive share! I have just forwarded this onto a colleague who had been doing a little research on this. And he in fact ordered me breakfast because I stumbled upon it for him… lol. So allow me to reword this…. Thanks for the meal!! But yeah, thanks for spending the time to talk about this subject here on your web page.
Howdy! This blog post couldn’t be written any better! Going through this post reminds me of my previous roommate! He always kept preaching about this. I am going to forward this article to him. Fairly certain he will have a very good read. Thanks for sharing!
Way cool! Some very valid points! I appreciate you writing this write-up and also the rest of the site is also really good.
Sudahkah Anda mengaktifkan mode penghemat data Instagram untuk mengurangi
penggunaan data seluler?
onvif recording software free vms software for ip cameras
Натуральные молочные продукты https://gastrodachavselug2.ru свежесть и качество с заботой о вашем здоровье! Широкий выбор: молоко, творог, сметана, сыры. Только натуральные ингредиенты, без консервантов и добавок.
buy thc joint in prague hashish shop in prague
buy thc vape in prague kush for sale in prague
hash for sale in prague buy hemp in prague
cannabis for sale in prague thc joint delivery in prague
cannafood shop in prague thc gummies in prague
hashish for sale in prague prague 420
weed delivery in prague buy hash in prague
thc joint for sale in prague https://smokeinprague.site
buy cannafood in prague thc gummies delivery in prague
hemp for sale in prague weed shop in prague
The town operates beneath a powerful mayor system, which modified from a fee form of government with members voted at-large.
After I initially commented I appear to have clicked the -Notify me when new comments are added- checkbox and from now on each time a comment is added I get four emails with the same comment. Perhaps there is a means you are able to remove me from that service? Kudos.
The slim textual content was written in historical China in the course of the Warring States interval, a three-century interval of incessant warfare between numerous Chinese states.
I must thank you for the efforts you have put in writing this site. I’m hoping to see the same high-grade content from you in the future as well. In truth, your creative writing abilities has motivated me to get my very own blog now 😉
Широкий выбор фурнитуры для плинтуса, подберите под свой интерьер вариант.
Качественная фурнитура для плинтуса, долговечные и надежные в использовании.
Простота установки элементов плинтуса, сэкономьте время и силы.
Тренды в дизайне фурнитуры для плинтуса, сделайте дом уютным и стильным.
Природные решения для отделки плинтуса, экологичный выбор для вашего дома.
Популярные цветовые решения для фурнитуры плинтуса, создайте гармонию в доме.
Уникальные элементы для стильного плинтуса, привнесите уникальность в интерьер.
Подсказки по правильной установке элементов плинтуса, чтобы сделать правильный выбор.
Стильные детали для украшения плинтуса, создайте уютный и стильный дом.
Элегантные элементы для стильного плинтуса, подчеркните изысканный вкус в дизайне.
купить у производителя [url=https://furnituradlyaplintusamsk.ru/]https://furnituradlyaplintusamsk.ru/[/url] .
This is the perfect website for everyone who wants to find out about this topic. You understand a whole lot its almost tough to argue with you (not that I actually would want to…HaHa). You certainly put a new spin on a subject that’s been written about for a long time. Excellent stuff, just excellent.
After I originally commented I appear to have clicked the -Notify me when new comments are added- checkbox and now each time a comment is added I get 4 emails with the exact same comment. Is there a means you can remove me from that service? Many thanks.
Greetings, I think your blog could possibly be having browser compatibility problems. Whenever I look at your website in Safari, it looks fine but when opening in Internet Explorer, it has some overlapping issues. I simply wanted to give you a quick heads up! Aside from that, wonderful blog.
I have to thank you for the efforts you have put in writing this blog. I’m hoping to check out the same high-grade blog posts from you later on as well. In fact, your creative writing abilities has encouraged me to get my own site now 😉
I really like it whenever people get together and share opinions. Great site, stick with it!
Excellent beat ! I would like to apprentice while you amend your site, how could i subscribe for a blog web site? The account helped me a acceptable deal. I had been tiny bit acquainted of this your broadcast offered bright clear idea
I need to to thank you for this wonderful read!! I certainly enjoyed every bit of it. I have you saved as a favorite to check out new stuff you post…
Currently it looks like BlogEngine is the top blogging platform out there right now.
(from what I’ve read) Is that what you are using on your blog?
I blog quite often and I truly appreciate your content. Your article has truly peaked my interest. I will take a note of your site and keep checking for new details about once a week. I opted in for your Feed as well.
For most recent news you have to pay a visit internet and on the web I found this site as a best web page for latest updates.
deneme bonusu veren yeni siteler: yat?r?ms?z deneme bonusu veren siteler – deneme bonusu veren siteler
Всё для строительства и ремонта https://artpaint.com.ua на одном портале: советы экспертов, обзоры материалов, расчет сметы и готовые решения для вашего дома или бизнеса.
Портал о строительстве https://aziatransbud.com.ua статьи, видео, инструкции, каталоги материалов и инструментов. Советы для дома и бизнеса. Легко строить, удобно ремонтировать!
Excellent site. Lots of useful information here. I am sending it to several friends ans also sharing in delicious. And certainly, thanks for your effort!
Портал для строительства https://6may.org и ремонта: полезные советы, современные материалы, проекты и идеи. Все, что нужно для воплощения ваших задумок – от фундамента до крыши.
Студия дизайна интерьера https://bconline.com.ua и архитектуры: создаем уникальные проекты для квартир, домов и коммерческих пространств. Эстетика, функциональность и индивидуальный подход – в каждом решении.
Все об озеленении и благоустройстве https://bathen.rv.ua Ландшафтный дизайн, проекты садов, террас и парков. Идеи для создания зеленых зон, подбор растений и профессиональные услуги для вашего участка.
After looking over a few of the blog posts on your web page, I honestly appreciate your way of writing a blog. I added it to my bookmark site list and will be checking back soon. Take a look at my website as well and tell me your opinion.
Prodentim is an innovative oral health supplement crafted to support and balance your mouth’s microbiome.
инъекции стероидов стероиды для мышц
Разработка интернет магазина https://magikfox.ru/services/sozdanie-saytov/internet-magazin-na-bitriks/ на Битрикс под ключ в диджитал агентстве MagicFox. Демократичные цены на создание сайта магазина на Bitrix. Интеграция с 1С, службами доставки, системами оплаты. Полная настройка функционала. Работаем по всей России.
гидрозатвор для канализации бани пневмозаглушки
Your style is so unique compared to other people I have read stuff from. Thanks for posting when you’ve got the opportunity, Guess I will just bookmark this web site.
Ваш путеводитель в мире строительства https://dcsms.uzhgorod.ua идеи, планы, пошаговые инструкции и лучшие материалы. Узнайте, как построить дом мечты или обновить интерьер.
Профессиональный портал для строительства https://blogcamp.com.ua проекты, материалы, расчеты, советы и вдохновение. Все, чтобы ваш ремонт или стройка были успешными.
Saved as a favorite, I like your blog!
Делайте ремонт https://esi.com.ua и стройте легко! Лучшие советы мастеров, подбор инструментов, инструкции и сметы. Мы поможем справиться с любой задачей.
Хотите построить дом https://donbass.org.ua или сделать ремонт? Здесь вы найдете всё: инструкции, идеи, современные технологии и проверенные решения. Портал для тех, кто строит.
Все для строителей и мастеров https://dki.org.ua актуальные технологии, практические советы, строительные материалы и проекты. Простые решения для сложных задач!
Создайте дом своей мечты https://intellectronics.com.ua На нашем портале вы найдете идеи, инструкции и новейшие технологии для ремонта и строительства.
Станьте мастером https://fmsu.org.ua своего дела! Портал для тех, кто хочет строить и ремонтировать качественно и выгодно.
Pretty! This has been a really wonderful post. Thanks for supplying this information.
An intriguing discussion is worth comment. There’s no doubt that that you ought to write more about this subject, it may not be a taboo matter but generally people do not discuss such issues. To the next! Many thanks!
Greetings! Very useful advice in this particular article! It is the little changes that produce the most significant changes. Thanks for sharing!
After going over a handful of the blog articles on your blog, I honestly appreciate your way of writing a blog. I saved as a favorite it to my bookmark website list and will be checking back in the near future. Please visit my web site too and tell me your opinion.
Your home is valueble for me. Thanks!?
casimo http://sweetbonanza25.com/# sweet bonanza oyna
Г§evrim ЕџartsД±z deneme bonusu veren siteler 2025
Ландшафтный дизайн https://kinoranok.org.ua и благоустройство для дома, офиса или парка. Профессиональные советы, подбор растений и реализация уникальных зеленых проектов.
Архитектура и дизайн интерьера https://it-cifra.com.ua под ключ: современные решения, индивидуальный подход и гармония стиля и функциональности. Создаем пространство вашей мечты!
Найдите все для ремонта https://keravin.com.ua и строительства! Уникальные идеи, пошаговые инструкции и рекомендации специалистов на одном портале.
Стройте с комфортом https://mr.org.ua полезные советы, новейшие технологии, пошаговые инструкции и проекты – всё для вашего удобства.
Мы помогаем строить https://juglans.com.ua лучше! Советы, проекты, новейшие материалы и технологии для вашего ремонта или строительства.
Ваш путеводитель в мире строительства https://mtbo.org.ua полезные рекомендации, готовые проекты и современные решения для любых задач.
Решили строить или делать ремонт https://msc.com.ua Мы подскажем, как выбрать лучшие материалы, спланировать бюджет и воплотить все задумки.
Строительство без лишних вопросов https://okna-k.com.ua наш портал – кладезь информации о современных материалах, технологиях и лучших решениях для дома, дачи или офиса.
Всё для успешного строительства https://newboard-store.com.ua и ремонта на одном портале! Мы собрали актуальную информацию, идеи и инструкции для вашего удобства. Заходите и стройте с нами!
Все секреты https://mramor.net.ua строительства в одном месте! Советы экспертов, подбор материалов и готовые проекты для вдохновения.
Next time I read a blog, Hopefully it won’t fail me just as much as this one. After all, Yes, it was my choice to read through, nonetheless I actually thought you’d have something interesting to talk about. All I hear is a bunch of complaining about something that you can fix if you were not too busy searching for attention.
You have made some decent points there. I checked on the net for additional information about the issue and found most individuals will go along with your views on this site.
Ваш путеводитель в строительстве https://quickstudio.com.ua Ищите материалы, технологии или советы – всё это есть на нашем портале. Стройте с комфортом!
registering a company in montenegro open a company in Montenegro
Информация о стройке https://purr.org.ua без лишних сложностей! Наш портал поможет выбрать материалы, узнать о технологиях и сделать ваш проект лучше.
how long does 1win withdrawal take 1win nigeria
1win login 1win uganda
Right here is the perfect site for everyone who hopes to find out about this topic. You understand so much its almost hard to argue with you (not that I really would want to…HaHa). You certainly put a fresh spin on a subject which has been written about for years. Wonderful stuff, just wonderful.
I really love your blog.. Great colors & theme. Did you create this website yourself? Please reply back as I’m hoping to create my own site and would love to learn where you got this from or exactly what the theme is called. Thanks.
Can I just say what a relief to find an individual who genuinely knows what they’re talking about on the net. You definitely know how to bring a problem to light and make it important. More and more people need to look at this and understand this side of your story. I can’t believe you aren’t more popular because you certainly have the gift.
Всё для вашего ремонта https://reklama-region.com и строительства в одном месте! Практичные советы, современные решения и актуальная информация для успешного проекта.
Всё, что нужно знать о металлах https://metalprotection.com.ua от их свойств до применения в различных отраслях. Обзоры, советы, новости и информация о производителях для вашего удобства.
Вавада предлагает регистрация Вавада на любой вкус! Здесь вы найдете ставки на футбол, теннис, баскетбол, киберспорт и многое другое. Широкий выбор событий, удобный интерфейс и выгодные коэффициенты делают платформу идеальной как для новичков, так и для опытных игроков. Начните свой путь в ставках уже сегодня!
Хотите построить дом https://samozahist.org.ua или сделать ремонт? На нашем портале вы найдёте лучшие решения и вдохновение для вашего проекта.
Ищете проверенные строительные советы https://rus3edin.org.ua Наш портал поможет выбрать материалы, спланировать проект и сделать всё на высшем уровне.
Официальный сайт [url=https://luckyjetonewins.ru]https://luckyjetonewins.ru[/url] , где вы найдете актуальное зеркало и промоды на Лаки Джет.
Строительный портал https://sinergibumn.com для тех, кто хочет знать больше о строительстве. Актуальные идеи, проверенные технологии и вдохновение для любого проекта.
Всё о дизайне интерьера https://sculptureproject.org.ua в одном месте! Узнайте, как создать уютное, стильное и функциональное пространство, которое будет радовать каждый день.
программа производственного контроля 2025 года Москва программа производственного экологического контроля
Экспертный строительный портал https://smallbusiness.dp.ua для вашего проекта! Советы, новинки и инструкции для тех, кто хочет сделать всё идеально.
Хотите стильный интерьер https://sitetime.kiev.ua Наш портал предлагает уникальные идеи, профессиональные рекомендации и примеры лучших дизайн-проектов.
Good write-up. I absolutely appreciate this site. Keep it up!
Строительный портал https://sushico.com.ua для профессионалов и новичков: от выбора материалов до готовых проектов. Легко найти подрядчиков, изучить современные технологии и воплотить идеи в жизнь!
Найдите всё о строительстве https://srk.kiev.ua и ремонте на нашем портале. Полезные статьи, актуальные технологии и лучшие практики ждут вас.
Преобразите ваш дом https://vineyardartdecor.com вместе с нами! На портале вы найдёте свежие идеи, советы по планировке и материалы для создания идеального интерьера.
Планируете стройку https://texha.com.ua или ремонт? У нас вы найдёте проверенных специалистов, инструкции, материалы и проекты на любой вкус. Всё для комфортного строительства!
Всё о строительстве https://valkbolos.com и ремонте на одном портале! Гид по материалам, обзор инструментов, советы по дизайну и подбор подрядчиков. Создавайте дом своей мечты!
Platform togel slot dan situs toto yang menyediakan permainan slot dan juga pasaran togel yang sangat lengkap termasuk pasaran toto macau yang mempunyai keluaran 6 kali sehari. https://linkr.bio/KON0HATOTO78
You actually make it seem really easy with your presentation however I to find this matter to be actually one thing which I think I would never understand. It seems too complicated and very vast for me. I’m having a look forward in your subsequent post, I will try to get the hang of it!
I am often to blogging and i really appreciate your content. The article has really peaks my interest. I am going to bookmark your site and keep checking for new information.
Yes! Finally someone writes about mitolyn.
Ремонт и строительство https://sota-servis.com.ua легко! Здесь вы найдёте инструкции, рекомендации, материалы и специалистов для успешного выполнения ваших задач.
Планируете ремонт или строительство https://vodocar.com.ua У нас всё, что нужно: от инструкций и советов до подрядчиков и обзоров материалов. Стройте с нами!
Лучшие советы по строительству https://stroysam.kyiv.ua и ремонту на одном сайте! Найдите вдохновение, изучите обзоры и воплотите свои идеи с профессиональной помощью.
Полный справочник по строительству https://stroy-portal.kyiv.ua и ремонту: советы, инструкции, дизайн-решения и помощь с выбором материалов и подрядчиков.
Ваш гид в мире строительства https://vitamax.dp.ua и ремонта! Обзоры, практические советы, дизайн-идеи и подбор профессионалов для реализации любых проектов.
Your style is very unique compared to other people I have read stuff from. Thank you for posting when you’ve got the opportunity, Guess I will just bookmark this blog.
Things i have constantly told persons is that when searching for a good internet electronics retail store, there are a few components that you have to remember to consider. First and foremost, you should really make sure to get a reputable and also reliable shop that has enjoyed great assessments and classification from other consumers and industry leaders. This will make certain you are handling a well-known store to provide good program and help to its patrons. Many thanks sharing your opinions on this blog site.
Сделайте ремонт https://tfsm.com.ua мечты с нашим сайтом! Советы, инструкции, рейтинг специалистов и новинки строительного рынка для вашего удобства.
Простые решения для ремонта https://teplo.zt.ua и строительства! Идеи дизайна, рекомендации экспертов и проверенные материалы для вашего проекта.
Стройте и ремонтируйте https://suli-company.org.ua с лёгкостью! Полезные статьи, инструкции, советы по выбору материалов и подрядчиков ждут вас здесь.
Портал о ремонте и строительстве https://buildingtips.kyiv.ua с полезными статьями, рекомендациями по выбору материалов и подрядчиков.
Полный гид по строительству https://tsentralnyi.volyn.ua и ремонту: от планирования до отделки. Читайте, выбирайте и стройте с уверенностью и комфортом.
[url=https://TaskMy.ru]TaskMy.ru[/url] – профессиональная помощь в решении задач любого уровня
TaskMy.ru – это надежный сервис, который предлагает качественную помощь в выполнении задач любых направлений: от технических расчётов и программирования до написания текстов и аналитики. Мы работаем быстро, эффективно и ориентированы на ваши требования.
Доверяя TaskMy.ru, вы получаете индивидуальный подход, точное соблюдение сроков и доступные цены. Оставьте свою задачу профессионалам – результат превзойдет ожидания!
Thank you for your post.Really looking forward to read more. Awesome.
Полный гид по строительству https://tsentralnyi.volyn.ua и ремонту: от планирования до отделки. Читайте, выбирайте и стройте с уверенностью и комфортом.
промокод на депозит ggdrop https://seoul-massage.com
Tormac.org https://tormac.org – это специализированный торрент-трекер, предназначенный для пользователей Mac-компьютеров. Сайт предоставляет широкий выбор контента, ориентированного на операционные системы macOS и iOS.
Приветствую на https://bs2best.markets! Мы предлагаем надежные и проверенные покупки в интернете. Ознакомьтесь с нашими статьями о безопасности и легальности. Ваши покупки — наш приоритет!
Сделайте ремонт https://tfsm.com.ua мечты с нашим сайтом! Советы, инструкции, рейтинг специалистов и новинки строительного рынка для вашего удобства.
Excellent blog you have got here.. It’s difficult to find high quality writing like yours these days. I truly appreciate individuals like you! Take care!!
сериалы онлайн бесплатно
mostbet minimum withdrawal mostbet казахстан
mostbet deposit mostbet ставки
1win мошенники comment sinscrire sur 1win
Regular cancer cells are the progeny of such stem cells lasix Czech Republic
MLB Draft Betting https://bettingblog.website Your guide to the world of MLB draft betting. Expert predictions, top odds and detailed analysis will help you increase your chances of success. Bet and win with us!
Best Forex Trading Course https://blogforex.tech is your key to successful trading. Learn the secrets of professionals, study strategies and learn how to minimize risks. Master Forex easily and effectively!
Credit Union Mobile Home Loans https://blogcredit.tech are the perfect solution for buying or refinancing a mobile home. Affordable rates, easy application, and reliable support every step of the way. Take the first step toward your home with us!
Tennis betting https://yourmoneyblog.site best odds, predictions and analytics. Explore detailed match reviews, statistics and strategies to make successful bets. Use our tips and win!
Federal Gov Open Enrollment https://body-balance.online is your chance to upgrade or choose an insurance plan. Easy navigation, expert support, and a wide range of programs will help you make the right choice. Apply now!
Crypto Funk https://besttodaynew.com is a fresh look at cryptocurrencies. News, trends, guides and analytics for beginners and professionals. Find out how to get the most out of blockchain technology!
Thanks for your posting on this blog site. From my personal experience, there are occassions when softening upwards a photograph may well provide the photographer with a bit of an creative flare. Sometimes however, this soft blur isn’t precisely what you had in mind and can usually spoil an otherwise good picture, especially if you intend on enlarging it.
This site was… how do you say it? Relevant!! Finally I’ve found something which helped me. Thanks a lot.
Howdy! This is my 1st comment here so I just wanted to give a quick shout out and tell you I truly enjoy reading through your articles.
Can you suggest any other blogs/websites/forums that deal with the same topics?
Appreciate it!
Auto loans from Community Credit Union https://sunnydays100.com are simple, affordable, and great value. Low interest rates and flexible repayment options make it easy to buy a new or used car.
Home Equity Loans https://funnydays1.com How They Work, What Are the Terms and Benefits? Get the full details on how to use your home’s value for financial purposes. Find out more today!
Credit score requirements for FHA loans https://lifeofnews1.com minimum threshold and tips for improving. Find out how to increase your chances of getting a loan, as well as what affects approval. Detailed information for those who want to get a mortgage through FHA.
No Credit Check Loans in Abilene TX https://daynewday1.com is fast access to money without unnecessary checks. Convenient terms, simple application and instant approval. Get financial help when you need it!
I do agree with all of the ideas you’ve offered in your post. They are very convincing and will certainly work. Still, the posts are very brief for beginners. Could you please lengthen them a bit from next time? Thank you for the post.
Very good post! We are linking to this great content on our website. Keep up the great writing.
Ja naprawdę wartość twoją dzieło, Świetny post Szybki test na przeciwciała COVID-19 Szybki test na przeciwciała COVID-19.
Упаковка оптом https://giftbox-3.ru канцелярских товаров и печать коробки с логотипом в Новороссийске.
Aw, this was an incredibly good post. Finding the time and actual effort to create a very good articleÖ but what can I sayÖ I procrastinate a whole lot and don’t manage to get anything done.
Try your luck at taya365 download, where excitement meets reliability! Hundreds of popular games, unique promotions and instant payouts await you.
THC weed in Prague kush shop in Prague
I must thank you for the efforts you’ve put in writing this website. I’m hoping to see the same high-grade blog posts from you in the future as well. In fact, your creative writing abilities has encouraged me to get my own, personal site now 😉
buy Hash in Prague Cannabis delivery in Prague
After I originally left a comment I appear to have clicked the -Notify me when new comments
are added- checkbox and from now on every time a comment is added I receive four emails with the same comment.
Is there an easy method you can remove me from that service?
Thank you!
What a stuff of un-ambiguity and preserveness of valuable familiarity on the topic of unpredicted
emotions.
I like it when people come together and share views. Great website, stick with it!
May I simply just say what a relief to discover someone that really understands what they’re discussing on the net. You actually understand how to bring an issue to light and make it important. A lot more people need to check this out and understand this side of your story. It’s surprising you aren’t more popular since you most certainly have the gift.
Hentai Manga Free Online Manga with Completed Series Free
The airborne Internet will perform very like satellite tv for pc-based mostly Internet entry, but with out the time delay.
Aw, this was an incredibly good post. Finding the time and actual effort to generate a very good article… but what can I say… I procrastinate a lot and don’t seem to get anything done.
does lasix cause diarrhea plus people being glued to their TVs watching the Ashes and Wimbledon Гў
There’s certainly a lot to find out about this issue. I like all of the points you have made.
I needed to thank you for this very good read!! I absolutely enjoyed every little bit of it. I’ve got you book marked to check out new stuff you post…
Unquestionably consider that that you stated. Your favorite reason appeared to be at the web the easiest factor to take into account of.
I say to you, I definitely get irked at the same time as folks consider issues that they plainly don’t
recognize about. You managed to hit the nail upon the
highest and outlined out the whole thing without having side-effects , other folks could take a signal.
Will probably be back to get more. Thank you
May I simply just say what a comfort to discover a person that actually understands what they are talking about on the web. You definitely understand how to bring a problem to light and make it important. More and more people have to look at this and understand this side of the story. I was surprised you’re not more popular because you most certainly possess the gift.
Very good information. Lucky me I ran across your site by accident (stumbleupon). I have bookmarked it for later!
Нужен ремонт техники https://чинпочин.рус все услуги для вашего дома в одном месте! Выбирайте мастеров для ремонта, уборки или сантехнических работ. Качественный сервис, прозрачные цены и удобство использования.
The steps to do so are the same for both YouTube Premium and
non-Premium users.
A youtube mp3 download tool is a free web application that allows users to
download videos from youtube.
I was able to find good information from your content.
“Ищете качественный кирпич напрямую от производителя? https://Muravey61.ru – ваш надежный поставщик строительных материалов в регионе! Мы предлагаем кирпич высшего качества по доступным ценам прямо с завода. Доставка точно в срок, широкий ассортимент, и гарантированное качество – всё, что нужно для вашего строительства. Закажите у нас и убедитесь сами, что с нами строить легко!”
I could not refrain from commenting. Perfectly written!
Founded in 1978, the Vector company built cars that had amazing designs and were very eye-catching.
Download Managers Software webcam software
Hi, I do think this is a great web site. I stumbledupon it 😉 I am going to revisit yet again since i have saved as a favorite it. Money and freedom is the best way to change, may you be rich and continue to help others.
Howdy! This post could not be written much better! Looking through this post reminds me of my previous roommate! He constantly kept talking about this. I will forward this information to him. Fairly certain he’s going to have a good read. Thanks for sharing!
A restored four-hour, eight-minute model was launched in 2013.) Regardless of often being portrayed as a box-office failure, the movie was in actual fact the largest field-workplace success of the yr, making $57.8 million domestically on a $44 million funds or, if adjusted to 2019 dollars, $480 million on a funds of $365 million.
Nice post. I learn something new and challenging on websites I stumbleupon every day. It’s always interesting to read through articles from other writers and use a little something from other sites.
You made some decent points there. I looked on the net for additional information about the issue and found most individuals will go along with your views on this web site.
You are so cool! I do not suppose I’ve truly read through something like this before. So good to discover another person with some unique thoughts on this subject matter. Really.. thank you for starting this up. This site is something that’s needed on the internet, someone with a little originality.
F*ckin’ remarkable things here. I’m very glad to look your article. Thanks so much and i am taking a look ahead to contact you. Will you kindly drop me a mail?
Recently a good friend of mine, Christian, led me to a very useful online resource for commercial investors such as myself.
I could not resist commenting. Exceptionally well written!
Appreciate you sharing, great post.Much thanks again. Really Great.
Access essential information and services for police clearance through the platform Police Clearance Login at https://policeclearancesph.net/.
Everything is very open with a precise description of the challenges. It was definitely informative. Your website is very helpful. Thank you for sharing!
Excellent article. I’m facing some of these issues as well..
Indian pharmacy that ships to usa: indian pharmacy – Indian Cert Pharm
We are so grateful for your support—your kind words brighten our spirits every day.
Best Indian pharmacy: Indian Cert Pharm – Best online Indian pharmacy
https://mexicaneasypharm.com/# Mexican Easy Pharm
precription drugs from canada
Serving as bearers will probably be Donald VINCENT, Bobby Dollar, Ray LOVE, Mose LOVE, Earl LOVE, and Denham NORTON.
Spot on with this write-up, I truly feel this website needs a great deal more attention. I’ll probably be back again to read more, thanks for the advice!
medicine in mexico pharmacies [url=https://mexicaneasypharm.com/#]buying prescription drugs in mexico online[/url] mexican pharmaceuticals online
In an effort to be sure you did not neglect to write down down any withdrawals and/or deposits (and in addition to double-verify the bank’s actions) it is best to undergo each entry in your register and compare it with the financial institution’s assertion.
canadapharmacyonline com https://mexicaneasypharm.com/# Mexican Easy Pharm
indian pharmacies safe
Aw, this was a really nice post. Spending some time and actual effort to create a top notch article… but what can I say… I put things off a whole lot and never manage to get anything done.
Mexican Easy Pharm: mexican drugstore online – Mexican Easy Pharm
With no official police power and the army’s preoccupation with war, native militias and volunteers typically guarded the prisoners of warfare.
Vậy là đã hoàn thành xong cách tải video trên Youtube
về iPhone với phần mềm Jungle.
mexican mail order pharmacies: reputable mexican pharmacies online – Mexican Easy Pharm
This website was… how do you say it? Relevant!! Finally I’ve found something which helped me. Kudos!
A motivating discussion is worth comment. I think that you ought to write more about this subject matter, it might not be a taboo subject but generally people don’t speak about such topics. To the next! Kind regards!!
Further, mergers & acquisition activities in the healthcare IT space will continue to be strong in coming quarters.
The acceptance of the Euro has risen and the US Greenback has seen a 30 decline in its worth, leading to a jittery international and domestic economic system.
Hello there! This post could not be written any better! Looking at this article reminds me of my previous roommate! He always kept preaching about this. I most certainly will send this post to him. Pretty sure he will have a good read. Thanks for sharing!
As mentioned above, you will be able to find many great opportunities to invest in the Indian stock market.
Howdy! I could have sworn I’ve visited this web site before but after going through some of the articles I realized it’s new to me. Anyhow, I’m certainly happy I stumbled upon it and I’ll be book-marking it and checking back regularly!
Оперативная помощь на дороге https://angeldorog.by услуги эвакуатора, грузовой и легковой шиномонтаж, а также грузоперевозки фурами по доступным ценам. Работаем круглосуточно, быстро реагируем и гарантируем надежность. Звоните в любое время – решим вашу проблему!
He also published a e book on making stained glass.
Motion detection software for video files Security video management software
canadianpharmacyworld com https://canadianmdpharm.com/# canada pharmacy
top 10 online pharmacy in india
https://indiancertpharm.com/# Best online Indian pharmacy
canada cloud pharmacy
Way cool! Some very valid points! I appreciate you writing this write-up plus the rest of the site is also really good.
medicine in mexico pharmacies: Mexican Easy Pharm – medication from mexico pharmacy
Your style is very unique in comparison to other folks I’ve read stuff from. Thanks for posting when you’ve got the opportunity, Guess I will just book mark this site.
canadian pharmacy price checker [url=https://canadianmdpharm.shop/#]canada pharmacy 24h[/url] canada ed drugs
This gives it a rustic look and the string can be utilized again.
canadadrugpharmacy com: Canadian Md Pharm – reputable canadian pharmacy
An outstanding share! I’ve just forwarded this onto a co-worker who had been doing a little research on this.
And he actually bought me breakfast due to the fact that I found it for
him… lol. So allow me to reword this…. Thank YOU for the meal!!
But yeah, thanx for spending time to talk about this issue here on your web site.
Your encouraging words and constructive input mean so much—thank you!
ed meds online canada https://indiancertpharm.com/# indian pharmacy
п»їlegitimate online pharmacies india
After exploring a handful of the articles on your site, I truly appreciate your technique of blogging. I saved it to my bookmark site list and will be checking back soon. Take a look at my website too and tell me what you think.
However, not like most journey games (wherein you spend the bulk of your time fixing clever puzzles in a search for the subsequent static, but very fairly, display screen), Deus Ex asks players to determine how they may solve sport issues and forces them to deal with the implications of their choices.
Pretty! This was an extremely wonderful article. Many thanks for supplying these details.
This is a topic that is near to my heart… Cheers! Exactly where can I find the contact details for questions?
Each participant starts out making a immediate which another player has to attract.
For anyone exploring MetaMask Wallet options, https://metalead.org/ is an excellent resource. Whether it’s MetaMask Safari or MetaMask Opera, they’ve got you covered!
Hey there! I just want to offer you a big thumbs up for the excellent information you have got here on this post. I am coming back to your site for more soon.
best canadian pharmacy: canadian neighbor pharmacy – canadian pharmacy 1 internet online drugstore
is canadian pharmacy legit https://canadianmdpharm.com/# 77 canadian pharmacy
buy prescription drugs from india
Mexican Easy Pharm: best online pharmacies in mexico – mexico pharmacies prescription drugs
You are so interesting! I do not suppose I’ve read through anything like that before. So great to discover someone with some genuine thoughts on this issue. Really.. thank you for starting this up. This web site is something that is needed on the web, someone with some originality.
“Thus as the new moon is worshipped greater than the complete moon, so those who’ve faith in Me must reverence Bodhisattvas greater than Buddhas.” History has not revealed to us elsewhere such a living example of self-denial.
Very nice blog post. I absolutely appreciate this site. Keep writing!
Muchos Gracias for your blog.Really thank you! Keep writing.
Aw, this was an incredibly good post. Taking a few minutes and actual effort to make a very good article… but what can I say… I put things off a lot and don’t seem to get nearly anything done.
As an alternative of utilizing the same old dull and boring workplace supplies, use the ones in your favourite shade.
Jika Anda menginginkan cara yang lebih mudah dan nyaman untuk mengunduh video YouTube, Anda dapat berlangganan layanan YouTube Premium.
rent a tesla car near me rent a tesla cost
У нас вы можете купить айфоны https://vk.com/crazy_humor01 оптом по самым лучшим ценам. Оригинальные смартфоны Apple с гарантией качества. Постоянное наличие популярных моделей.
This site really has all of the info I needed concerning this subject and didn’t know who to ask.
canadian online drugs https://indiancertpharm.shop/# Indian Cert Pharm
indian pharmacy
It’s difficult to find knowledgeable people about this topic, however, you seem like you know what you’re talking about! Thanks
Looking forward to reading more. Great article post.Much thanks again. Cool.
This page really has all of the information I wanted concerning this subject and didn’t know who to ask.
Квартирный переезд https://spb-gruzoperevozka.ru с грузчиками быстро и качественно! Упакуем, вынесем, перевезем и разместим вещи на новом месте. Надежная команда, аккуратность и доступные тарифы.
canadian pharmacy 365 [url=https://canadianmdpharm.com/#]canada cloud pharmacy[/url] online canadian pharmacy review
Thank you for your article.Really thank you! Much obliged.
офисный стол для переговоров на 8 человек mm26.ru
best rated canadian pharmacy: Canadian Md Pharm – cheap canadian pharmacy online
Mexican Easy Pharm: Mexican Easy Pharm – Mexican Easy Pharm
Pretty! This has been an extremely wonderful post. Many thanks for supplying these details.
canadian pharmacy online https://mexicaneasypharm.shop/# Mexican Easy Pharm
indianpharmacy com
Thanks again for the post. Much obliged.
kinogo фильмы про пиратов kinogo сериалы по странам
kinogo фильмы про драконов kinogo фильмы по жанрам
Best Indian pharmacy: Indian Cert Pharm – Online pharmacy
northwest canadian pharmacy: Canadian Md Pharm – canada rx pharmacy world
After filing for tax return online, you will get instant acknowledgement from the legislative body.
Survivors embody his spouse, Mrs.
Those who have implemented this system credit it with helping them lead less stressful, more productive lives.
Mexican Easy Pharm [url=https://mexicaneasypharm.shop/#]buying prescription drugs in mexico online[/url] mexico drug stores pharmacies
Thanks so much for the blog article. Will read on…
When I originally commented I seem to have clicked the -Notify me when new comments are added- checkbox and now whenever a comment is added I get 4 emails with the same comment. Perhaps there is an easy method you are able to remove me from that service? Thanks a lot.
This is the right site for everyone who wants to understand this topic. You realize a whole lot its almost hard to argue with you (not that I actually would want to…HaHa). You certainly put a new spin on a subject which has been discussed for decades. Wonderful stuff, just wonderful.
OR Realty — это ваш надежный партнер в мире недвижимости. Мы предлагаем большой выбор квартир, домов и коммерческих объектов по выгодным условиям. Наши специалисты помогут вам найти идеальный вариант, соответствующий вашим потребностям. Надежность, качество и удобство — вот что делает [url=https://or-realty.ru]OR Realty[/url] лучшим выбором. Обращайтесь!
https://mexicaneasypharm.shop/# Mexican Easy Pharm
canadian compounding pharmacy
Very good post. I will be facing some of these issues
as well..
Gothic Fashion: Vampire Goth fashion is deeply rooted in gothic fashion, taking inspiration from historic eras such because the Victorian and Romantic intervals.
The station Sèvres – Babylone accommodates an exposition of ecology, with showcases on recycling, renewable energy or water consumption and electricity consumption in the world.
Online pharmacy: Indian pharmacy that ships to usa – IndianCertPharm
canadian pharmacy 1 internet online drugstore: reliable canadian pharmacy – canada pharmacy reviews
escrow pharmacy canada https://indiancertpharm.shop/# Best online Indian pharmacy
cheapest online pharmacy india
вызвать индивидуалку в калуге снять шлюху в калуге
Pretty! This has been an extremely wonderful article. Thanks for providing these details.
mexican drugstore online: Mexican Easy Pharm – reputable mexican pharmacies online
At current, the Reading Blue Mountain & Northern Railroad, Canadian Pacific Railway (successor to the Delaware and Hudson) and the Luzerne & Susquehanna Railroad (designated-operator of the county-owned shortline) present freight service inside town and Pittston Township.
I seriously love your blog.. Pleasant colors & theme. Did you develop this amazing site yourself? Please reply back as I’m hoping to create my very own blog and would like to learn where you got this from or exactly what the theme is named. Cheers!
mexican online pharmacies prescription drugs: Mexican Easy Pharm – Mexican Easy Pharm
Mexican Easy Pharm [url=https://mexicaneasypharm.com/#]mexican online pharmacies prescription drugs[/url] Mexican Easy Pharm
Ford research showed that any car stretched more than a few inches would suffer greatly from metal fatigue.
canadian pharmacy store https://indiancertpharm.shop/# Online pharmacy
india pharmacy mail order
Best online Indian pharmacy: Best online Indian pharmacy – Online pharmacy
May I simply just say what a relief to uncover somebody that really understands what they’re discussing over the internet. You actually understand how to bring a problem to light and make it important. A lot more people ought to look at this and understand this side of the story. I was surprised you aren’t more popular because you most certainly possess the gift.
Hey there just wanted to give you a quick heads up.
The words in your content seem to be running off the screen in Chrome.
I’m not sure if this is a format issue or something to do with
internet browser compatibility but I figured I’d post to let
you know. The layout look great though! Hope you
get the problem fixed soon. Cheers
After I initially commented I appear to have clicked the -Notify me when new comments are added- checkbox and now whenever
a comment is added I recieve 4 emails with the same comment.
There has to be a means you are able to remove me from that
service? Thanks a lot!
Very good blog article.Thanks Again.
pharmacies in mexico that ship to usa: mexican drugstore online – Mexican Easy Pharm
Indian Cert Pharm: Online pharmacy – Indian Cert Pharm
This excellent website truly has all the info I wanted concerning this subject and didn’t know who to ask.
mostbet kg mostbet android app
Mexican Easy Pharm [url=https://mexicaneasypharm.com/#]purple pharmacy mexico price list[/url] Mexican Easy Pharm
This one tool has made me (and saved) more cash than any other.
ivermectin human ivermectin for sale humans – ivermectin tablets order
1win mines demo 1win ios
canada pharmacy online https://canadianmdpharm.online/# canadian drugstore online
indian pharmacy paypal
Edible landscaping additionally promotes locavore habits of only eating food out of your native space.
Muchos Gracias for your blog post.Really thank you! Awesome.
Indian Cert Pharm: Indian Cert Pharm – Best online Indian pharmacy
indian pharmacy: indian pharmacy – Indian pharmacy international shipping
Traders in securities may be retail, i.e., members of the general public investing personally, apart from by way of business.
The next day Bankman-Fried stated that Alameda Research was winding down trading and would close.
mostbet 34 mostbet yuklab olish
Best Indian pharmacy: indian pharmacy – Indian pharmacy that ships to usa
Chocolate, you say. Really, chocolate and cheese make an ideal marriage — think chocolate cheesecake.
Speak to a career advisor should you require any further advice or information regarding your future within the banking industry.
Although MiGente targets a bilingual viewers, the location controls are totally in English.
medicine in mexico pharmacies: medication from mexico pharmacy – Mexican Easy Pharm
I love reading an article that will make people think. Also, thanks for allowing for me to comment.
The Signature of America by Charles Hamilton, Harper & Row, 1979, 279 pages.
Purchase Trendy Jewellery on-line and make heads flip!
[url=https://katun-room.ru]Katun Room[/url] — это уютные гостиницы в самом сердце природы Алтая. Мы предлагаем комфортное проживание рядом с живописной рекой Катунь. Номера на любой вкус и бюджет, тишина и свежий воздух создадут незабываемую атмосферу для вашего [url=https://katun-room.ru]отдыха[/url]. Забронируйте ваш номер уже сегодня!
The presenter last 12 months known as “the inexperienced agenda …
He saved clean sheets in 1-0 wins in opposition to Sunderland and Middlesbrough, in addition to a 2-0 away win at Manchester Metropolis and played in Chelsea’s 2-1 win over native rivals Arsenal in March.
The theory was popularized by J Peter Steidlmayer in 1980, in which he explained why the market moves the way it does.
Thanks for sharing, this is a fantastic blog. Great.
Too deep, and a properly may not be value-effective, or there could also be too little water worth the effort.
S-companies are limited to a certain number of shareholders (75), whereas a C-corporation can have unlimited shareholders.
mexico drug stores pharmacies: mexican online pharmacies prescription drugs – Mexican Easy Pharm
You can start with the information and resources listed on the next page.
Bridal attire: Tamil brides are normally spotted carrying a 9-yard or a six-yard Kanjivaram saree in vibrant hues with contrasting borders that have exquisite patterns woven in golden threads as their wedding ceremony outfits.
The music video features over 100 cartoon characters from totally different production corporations.
Bipolar plates are used to connect one fuel cell to another and are subjected to each oxidizing and lowering conditions and potentials.
REITs trade on stock markets, giving their investors access to immediate liquidity.
The stretch limo used wasn’t the only factor crying for consideration while filming in South Central Los Angeles was performed.
IndianCertPharm: Best Indian pharmacy – Best Indian pharmacy
If incorrectly designed, concave surfaces with intensive quantities of glass can act as photo voltaic concentrators depending on the angle of the sun, doubtlessly injuring folks and damaging property.
Mexican Easy Pharm: reputable mexican pharmacies online – Mexican Easy Pharm
Competitor behaviors are the defensive and offensive actions of the competition.
Wikimedia Commons has media related to Arthur’s Cross Nationwide Park.
A round of applause for your blog.Much thanks again. Fantastic.
киного сериалы про супергероев киного вестерны
kinogo научная фантастика киного короткометражные фильмы
Andersonville Nationwide Cemetery Nationwide Prisoner of Conflict Museum.
There’s definately a lot to know about this issue. I love all the points you have made.
legal to buy prescription drugs from canada: my canadian pharmacy rx – canadian pharmacy victoza
https://indiancertpharm.shop/# Online pharmacy
canadian pharmacy ltd
Contains work by pioneer of nutrition Sir Robert McCarrison, natural farming founder Sir Albert Howard, Lionel Picton, Dr.
Mexican Easy Pharm: Mexican Easy Pharm – Mexican Easy Pharm
Spot on with this write-up, I actually feel this amazing site needs much more attention. I’ll probably be back again to read through more, thanks for the info.
reddit canadian pharmacy: Canadian Md Pharm – canadian pharmacy meds
kinogo лучшие экшены киного расписание
A modern AI tool ai undresser for working with images. Learn more about its features, capabilities and applications. Full privacy control and ease of use will ensure comfortable interaction.
canadianpharmacyworld: Canadian Md Pharm – canada pharmacy
Mexican Easy Pharm: Mexican Easy Pharm – mexican rx online
indian pharmacy: Best online Indian pharmacy – Best online Indian pharmacy
Oh my goodness! Incredible article dude! Many thanks, However I am encountering issues with your RSS. I don’t understand why I can’t subscribe to it. Is there anybody else getting similar RSS problems? Anybody who knows the answer can you kindly respond? Thanks!
mexico drug stores pharmacies: medication from mexico pharmacy – Mexican Easy Pharm
drugs from canada https://indiancertpharm.shop/# Indian pharmacy international shipping
reputable indian pharmacies
October 17, 2016: Agon announce their new broadcast model for the World Championship.
Mexican Easy Pharm: mexico drug stores pharmacies – reputable mexican pharmacies online
mexican border pharmacies shipping to usa: Mexican Easy Pharm – Mexican Easy Pharm
It’s nearly impossible to find knowledgeable people about this topic, however, you sound like you know what you’re talking about! Thanks
Mexican Easy Pharm: Mexican Easy Pharm – Mexican Easy Pharm
This is a topic that’s close to my heart… Cheers! Exactly where are your contact details though?
Mexican Easy Pharm: Mexican Easy Pharm – Mexican Easy Pharm
Chernova, Yuliya (January 14, 2022).
Exchange-rate pass-through (ERPT) is a measure of how responsive international prices are to changes in exchange rates.
Mexican Easy Pharm: best online pharmacies in mexico – buying from online mexican pharmacy
Online pharmacy: Best online Indian pharmacy – Indian Cert Pharm
Naturally, just one manufacturer determined this was value an experiment, and that firm was Yamaha, which employed Murray to design the Motiv utilizing this remarkable course of.
FlixHQ I appreciate the effort you’ve put into this, thanks for all the excellent content
https://indiancertpharm.com/# Indian Cert Pharm
medication canadian pharmacy
Компания [url=https://aviapromvolga.ru]АВИАПРОМ ВОЛГА[/url] предлагает широкий ассортимент авиационных масел, гидравлических жидкостей и индустриальных смазок. Мы являемся официальным импортером продукции пяти ведущих компаний Европы и Америки. Наши основные направления включают поставку высококачественных смазочных [url=https://aviapromvolga.ru]материалов для авиации[/url], а также продуктов для промышленного и транспортного применения.
АВИАПРОМ ВОЛГА обеспечивает надежное сотрудничество, оперативные поставки и выгодные условия для клиентов из России и стран СНГ. Мы гарантируем качество продукции и соответствие международным стандартам.
Обратитесь к нам за профессиональной поддержкой в выборе необходимых масел и жидкостей для ваших нужд!
Mexican Easy Pharm: buying prescription drugs in mexico – mexico drug stores pharmacies
In Jodo Do Tigrinho online slots, every spin is a step towards victory! Incredible graphics, exciting themes and many bonuses await you. Fortune favors the brave – try your hand and discover the world of winnings with Tigrinho!
Cryptocurrency trading service bitqt with AI is automation and efficiency. Artificial intelligence monitors market dynamics, reduces risks and optimizes transactions. The perfect solution for beginners and professionals.
Novotney, Hazel F. “Hazel F Novotney, 81, handed away Oct 4, 1996, at Deaconess Medical Center in Spokane.
Indian pharmacy that ships to usa: Indian Cert Pharm – indian pharmacy
MetaMask Download is super straightforward! It works perfectly on Chrome, Opera, and even Firefox. If you need setup help, https://metanaito.net/ has you covered.
Experiment by rearranging the trendy elements of this stencil to add a coordinated touch throughout the room.
There are two primary approaches: handset-based mostly and community-based mostly.
In both the BIOS or your software consumer, there might be two essential settings: CPU Multiplier and CPU Voltage.
Online medicine: Indian Cert Pharm – Best Indian pharmacy
If any of the defendants who appear before Hannah continues to use, the judge can send them back into the criminal court system, or more likely than not, give them another opportunity to get clean.
mexican drugstore online: Mexican Easy Pharm – Mexican Easy Pharm
Aviatrix game https://aviatrix-games.com/en/ has become a sensation in the world of crash games. Its unique format, featuring a rapidly growing multiplier and the possibility of an unexpected crash. Aviatrix crash game is at 1win, 1xbet, Mostbet, and Pin Up.
The thought behind this methodology is to have as many key factors in your favor as doable, earlier than taking a place within the inventory market.
In the knockout rounds, Kawashima allowed no regulation goals within the quarter finals in opposition to Iran’s Sepahan membership, but Kawasaki Frontale ended up shedding 5-4 within the penalty shoot-out.
buying from online mexican pharmacy: Mexican Easy Pharm – Mexican Easy Pharm
This is a good tip particularly to those new to the blogosphere. Simple but very precise information… Thanks for sharing this one. A must read article.
The best solution for this property plummet is to give new investment opportunities to the buyers.
Aviatrix game https://aviatrix-games.com/en/ has become a sensation in the world of crash games. Its unique format, featuring a rapidly growing multiplier and the possibility of an unexpected crash. Aviatrix crash game is at 1win, 1xbet, Mostbet, and Pin Up.
Typically extra energized than organized, retro rooms have a way of humor and so much to say; in spite of everything, every object comes with a narrative of discovery.
Take time early in the year, perhaps as part of the tax preparation process, to assess your tax situation, looking for ways to reduce your tax bill.
canadian pharmacy drugs online: canadian online drugstore – canadianpharmacyworld
IndianCertPharm: IndianCertPharm – Online medicine
In the present day uncertain environment, ensuring the safety of your valuables is paramount to ensure a sense of security. One of a highly effective ways to protect your belongings is by investing in a high-quality safe. From important documents to cherished jewelry, a safe provides a secure storage solution for items of considerable value.
One of the key factors to think about when acquiring a safe is its degree of security. High-security safes are equipped with state-of-the-art locking mechanisms, such as fingerprint scanners or keyless entry systems, to deter unauthorized access. Additionally, the build of the safe plays a vital role in its security features. Look for safes made from resilient materials like iron or alloy, which offer protection against tampering and break-ins.
Regular maintenance of your safe is also vital to ensure its continued effectiveness. This includes regular inspections to check for signs of wear and tear, as well as oiling the locking mechanism to keep it functioning smoothly. It’s also important to keep the interior of the safe clean and clear from dust and debris, as this can affect its performance over time.
Furthermore, consider the placement of your safe within your home or business. Opt for a location that is undetectable yet easily accessible for authorized users. Avoid placing the safe in areas prone to water damage or extreme temperatures, as this can damage its contents.
In conclusion, owning a safe is not just about having a secure place to store your valuables; it’s about taking proactive steps to protect what matters most to you. By committing in a high-quality safe and properly maintaining it, you can ensure the safety and security of your belongings for the foreseeable future.
[url=Scottsdale safe showroom testimonials]https://mercurylock.com/services[/url]
These industry specific reports are tailor-made or off-the-shelf.
Best Indian pharmacy: Online pharmacy – indian pharmacy
After the worst of the violence was over, Mosseri famous on a podcast that he’d lost some sleep over it.
Excerpts of Jacob’s Shadow by Andrew Hammond seem throughout the Deus Ex gameworld.
buy canadian drugs: CanadianMdPharm – trustworthy canadian pharmacy
best mail order pharmacy canada [url=https://canadianmdpharm.online/#]CanadianMdPharm[/url] canadian pharmacy meds reviews
Of course, we know all of the regulars just like the lion, the king of the jungle, or the African elephant, so graceful for a creature that huge.
Chew continued to take part within the meetings of the Tammany Society, to honor Tamanend, the Lenni-Lenape chief who first negotiated peace agreements with William Penn.
Mexican Easy Pharm: mexican online pharmacies prescription drugs – mexican border pharmacies shipping to usa
The gamma component of an option alerts you to the fast changes in the market.
https://indiancertpharm.shop/# indian pharmacy
canadian pharmacy
canada ed drugs: Canadian Md Pharm – canadian mail order pharmacy
Throughout the process, you should test in with your intestine and understand how does it feel?
DP03: Chosen Economic Characteristics from the 2006-2010 American Neighborhood Survey 5-12 months Estimates for Bordentown city, Burlington County, New Jersey, United States Census Bureau.
A homeowner with an ARM might discover the month-to-month funds doubling after the charges adjusted.
best online canadian pharmacy: Canadian Md Pharm – trustworthy canadian pharmacy
Скачайте бесплатно книгу https://storitelling.ru по сторителлингу и узнайте, как создавать истории, которые цепляют с первых строк. Практические советы, примеры и вдохновение для всех, кто хочет освоить искусство рассказчика.
That is the one factor I ask of you: For those who ever buy books from them, please consider shopping for through the location.
best online pharmacies in mexico https://mexicaneasypharm.com/# pharmacies in mexico that ship to usa
mexico drug stores pharmacies
Either way, transferring files between two smartphones is quick and simple.
Leah Goldwater Cummings, Administrative Officer, Department of Transport.
Monet traveled there with French artist Frederic Bazille in Could 1864, they usually arrange their easels together alongside the coast, on the sea cliffs, and within the adjoining countryside.
medication from mexico pharmacy [url=https://mexicaneasypharm.com/#]Mexican Easy Pharm[/url] mexican online pharmacies prescription drugs
Indian Cert Pharm: pharmacy website india – Online medicine
canadian pharmacy service: CanadianMdPharm – canadian pharmacy india
Experience hassle-free software installation and unparalleled support with Software Sale Mart.
mexican mail order pharmacies https://mexicaneasypharm.shop/# Mexican Easy Pharm
mexican online pharmacies prescription drugs
You also needs to verify the diameter and shape of the bottom of your bathroom to make sure the replacement will cowl the footprint your outdated toilet occupies.
I’m happy to have stumbled upon Lookmovies this site on Bing, just what I needed and saved it to my favorites
I needed to thank you for this wonderful read!!I certainly loved every little bit of it. I’vegot you book marked to check out new things you post…
If you’re looking to join a credit union or learn more about credit, debt and personal finances, visit the links on the next page.
All through historical past, people have dressed alike to indicate a bond.
Still that doesn’t suggest you will not pay taxes on the revenue you earn whereas working in these nine states.
Сайт игровых промокодов csgofast промокод это ваш доступ к эксклюзивным бонусам и скидкам. Бесплатные награды, внутриигровая валюта и уникальные акции ждут вас. Успейте воспользоваться всеми возможностями!
Nevertheless, this hearing had to be a postponed until Could 7 as Weinberger needed to signify the town at the new Jersey State Tax Board.
Hey, you used to write excellent, but the last several posts have been kinda boringK I miss your super writings. Past several posts are just a little out of track! come on!
Your style is unique compared to other people I have read stuff from. I appreciate you for posting when you’ve got the opportunity, Guess I’ll just book mark this blog.
Хотите раскрутить раскрутить телеграм-канал мы знаем, как это сделать! Поможем увеличить охваты, привлечь активную аудиторию и вывести ваш контент на новый уровень.
капельница от запоя на дому круглосуточно http://medlinks.ru
The word on nearly each Internet person’s lips these days is “broadband.” We’ve got so way more knowledge to send and download at this time, together with audio files, video recordsdata and pictures, that it’s clogging our wimpy modems.
I have fun with, cause I discovered exactly what I was havinga look for. You have ended my four day lengthy hunt! God Bless you man. Have a great day.Bye
Ищете промокоды для игр ggstandoff промокоды на деньги наш сайт – ваш лучший помощник! Собираем актуальные игровые промокоды для бонусов, скидок и эксклюзивных наград.
Good site you have here.. It’s difficult to find high quality writing like yours nowadays. I truly appreciate individuals like you! Take care!!
This website was… how do you say it? Relevant!! Finally I have found something that helped me. Kudos!
Участок в Мишкином Лугу http://мишкинлуг.рф/uchastki-mishkinlug по Симферопольскому шоссе — идеальное место для строительства! Тихий поселок, прекрасные виды, удобный подъезд и все условия для комфортной жизни.
Лисичкин Очаг возле Серпухова https://лисичкиночаг.рф/uchastki-lisichkinochag идеальные участки для вашего будущего дома! Живописная природа, хорошая транспортная доступность и возможность подключения всех коммуникаций ждут вас.
Участки в Лисичкином Очаге https://лисичкиночаг.рф неподалеку от Серпухова. Тихий, зеленый поселок с прекрасной природой и удобной транспортной доступностью. Здесь вы сможете построить комфортное жилье для себя и своей семьи.
The lobbies had to be cleaned each month, and restoration of the building’s landmarked elevators required an artist to repaint the elevators’ ceiling frescoes by hand.
Oh my goodness! Amazing article dude! Thanks, However I am going through problems with your RSS. I don’t know why I am unable to subscribe to it. Is there anybody else getting the same RSS problems? Anyone who knows the solution can you kindly respond? Thanx!
mexico pharmacies prescription drugs https://mexicaneasypharm.com/# mexican pharmaceuticals online
reputable mexican pharmacies online
mexican online pharmacies prescription drugs: Mexican Easy Pharm – pharmacies in mexico that ship to usa
Can I just say what a comfort to uncover someone that truly understands what they’re discussing on the internet. You certainly understand how to bring an issue to light and make it important. A lot more people ought to read this and understand this side of your story. It’s surprising you’re not more popular given that you surely possess the gift.
mexico drug stores pharmacies [url=https://mexicaneasypharm.com/#]pharmacies in mexico that ship to usa[/url] Mexican Easy Pharm
https://canadianmdpharm.online/# cross border pharmacy canada
global pharmacy canada
I’d like to thank you for the efforts you’ve put in writing this site. I’m hoping to see the same high-grade content from you in the future as well. In fact, your creative writing abilities has encouraged me to get my own, personal site now 😉
Enjoyed every bit of your blog post.Thanks Again. Awesome.
I really like it when folks get together and share views. Great website, continue the good work!
It is a professionally managed stock broking company in India having an unblemished and unparalleled service history of 29 years and a vibrant tradition of trust, loyalty, and reliability.
Priligy tablets: dapoxetine online – dapoxetine online
buy cytotec online fast delivery: buy cytotec online – CytPharm
I loved your article.Really thank you! Will read on…
http://kamapharm.com/# Kama Pharm
Kamagra 100mg price
prednisone 2 mg [url=https://predpharm.shop/#]buy prednisone online india[/url] PredPharm
Oh my goodness! Awesome article dude! Thank you, However I am encountering issues with your RSS. I don’t understand why I cannot join it. Is there anyone else getting the same RSS problems? Anyone that knows the solution can you kindly respond? Thanks!!
A big thank you for your blog post.Really thank you!
http://dappharm.com/# cheap priligy
can you buy prednisone in canada
dapoxetine price: priligy – dap pharm
Отзывы о компаниях и работодателях https://potrebsojuz.ru в одном месте. Узнайте реальное мнение сотрудников и клиентов, чтобы принять правильное решение при выборе работы или услуг.
Vi har funnet enviornment” Dagbladet (Norwegian) article, June 7, “World Championship organizer confirms: – The match will take place in New York.
Cyt Pharm: Cyt Pharm – buy cytotec over the counter
Комплексная юридическая помощь https://kramzenergo.ru для вас и вашего бизнеса. Анализ дел, представительство в судах, поддержка на всех этапах
Times have changed in recent years, mainly due to the global recession and the economic downturn which has amongst other things crippled the housing market here in the United Kingdom.
On the earnings assertion, depreciation is adjusted for adjustments normally value levels based mostly on a normal worth index.
An outstanding share! I have just forwarded this onto a friend who has been conducting a little research on this. And he in fact bought me lunch simply because I found it for him… lol. So allow me to reword this…. Thank YOU for the meal!! But yeah, thanx for spending the time to talk about this topic here on your site.
https://dappharm.shop/# DapPharm
buy Kamagra
Or, suppose your family is shifting and you have one shifting truck, two cars and only two drivers.
Компания Handy Print предоставляет [url=https://handy-print.ru]профессиональные услуги по печати[/url] на различных поверхностях: текстиле, дереве, стекле, пластике и металле. Мы используем только современные технологии и качественные материалы, чтобы обеспечить яркость и долговечность изображений.
В Handy Print вы можете [u]заказать нанесение логотипов[/u] на корпоративные подарки, [url=https://handy-print.ru]создание эксклюзивных футболок[/url], изготовление стильных аксессуаров и рекламной продукции. Наша команда профессионалов готова выполнить даже самые сложные и нестандартные задачи, чтобы вы получили идеальный результат.
Обращайтесь к нам уже сегодня и превращайте ваши идеи в реальность с помощью Handy Print!
Online, you can see many web functions as well as chess trainers via which you’ll access different kinds of tactical puzzles that may enable you to improve your techniques.
Thus the true exchange rate is the alternate fee occasions the relative costs of a market basket of products in the two nations.
As an important manufacturing state, the value of the output elevated from $9,293,068 in 1850 to $360,818,942 in 1900 and to $590,306,000 in 1909.
Saved as a favorite, I love your blog.
I found this post so helpful—thank you! For Prodentim benefits, visit https://prodentim-review.com. I’d love to hear your feedback. ProDentim-Review-2025-USAs
semaglutide tablets price: semaglutide tablets – SemaPharm24
Kama Pharm [url=https://kamapharm.com/#]Kamagra 100mg[/url] Kamagra 100mg price
Priligy tablets: cheap priligy – dap pharm
Expertise – are there areas of your enterprise you want your accountant to deal with?
https://dappharm.shop/# Priligy tablets
prednisone 50 mg price
It really is also known as a higher-level type of private banking for people who are quite affluent.
There are merely too many and they’re too small and illiquid due to their large institutional consumers to get.
In Maryland, the state militia straight and aggressively challenged the Continental Army when it attempted to escort the prisoners of battle into the state.
http://dappharm.com/# Priligy tablets
Kamagra 100mg
вызвать капельницу на дом капельницы для восстановления здоровья
1win bonus que es 1win
1win betting 1win apk download
For 2012, the state held an asset surplus of $533 million, one of solely eight states in the nation to report a surplus.
I really enjoyed this post—great insights! On a related note, I’ve been exploring Prodentim, and I’d love your input on my website: https://prodenttims.com. Let me know what you think! Prodentim-OfficialShop-101Discount
SemaPharm24: rybelsus semaglutide tablets – semaglutide tablets price
Kama Pharm: Kama Pharm – Kamagra 100mg
Откройте для себя историю слово пацана смотреть онлайн все серии честный взгляд на суровую реальность, где дружба и слово дороже всего. Уникальный проект о жизни без прикрас и ценности принципов.
You should be a part of a contest for one of the most useful websites on the internet. I will highly recommend this web site!
I wish to express my affection for your kind-heartedness giving support to all those that absolutely need help on in this content. Your personal dedication to getting the message across has been extraordinarily advantageous and have in every case allowed employees like me to achieve their objectives. Your own warm and helpful tutorial denotes a lot a person like me and especially to my peers. Many thanks; from each one of us.
http://kamapharm.com/# Kama Pharm
super kamagra
Good post. I learn something totally new and challenging on blogs I stumbleupon on a daily basis. It will always be interesting to read through articles from other authors and practice something from other sites.
http://dappharm.com/# buy dapoxetine online
buy prednisone 20mg
Cyt Pharm [url=http://cytpharm.com/#]Cyt Pharm[/url] buy cytotec online fast delivery
Nice post. I learn something new and challenging on blogs I stumbleupon every day. It will always be interesting to read through content from other authors and use something from their sites.
Secure your cryptocurrency by setting up your MetaMask Wallet today. For helpful tips, visit https://kingroada.com/.
Kama Pharm: Kama Pharm – Kamagra tablets
Kama Pharm: Kama Pharm – Kamagra 100mg price
Or, with all of the cash you saved on landscaping, perhaps you can afford to hire somebody to do the dirty give you the results you want.
Excellent blog you have here.. It’s difficult to find high-quality writing like yours nowadays. I truly appreciate individuals like you! Take care!!
https://kamapharm.shop/# super kamagra
Kamagra Oral Jelly
Have you ever thought about including a little bit more than just
your articles? I mean, what you say is important and everything.
However think about if you added some great images or video clips
to give your posts more, “pop”! Your content is excellent but with images
and videos, this website could certainly be one of the most beneficial in its niche.
Fantastic blog!
Everything is very open with a clear explanation of the issues. It was really informative. Your website is very helpful. Thanks for sharing!
cytotec abortion pill: cytotec pills buy online – buy cytotec online
http://kamapharm.com/# Kamagra 100mg
prednisone uk price
Выбор современных родителей – коляска-трость, со съемным козырьком и регулируемой спинкой.
Эргономичная коляска-трость с эффектным дизайном, и удобным выдвижным козырьком.
Модная коляска-трость для маленького модника, которая станет вашим незаменимым помощником.
Компактная коляска-трость для активных мам и пап, которая облегчит вам заботу о ребенке.
babyton трость [url=https://kolyaski-trosti-progulochnye.ru/]https://kolyaski-trosti-progulochnye.ru/[/url] .
This is a topic which is close to my heart… Thank you! Where are your contact details though?
otc prednisone cream: prednisone 20mg capsule – PredPharm
Taking a look at the areas where rooms come together, such as where the ceiling meets the wall and the walls meet the floor, can be very telling.
cheap priligy [url=https://dappharm.shop/#]dap pharm[/url] dapoxetine price
These items you need to get rid of may be donated to a local charity, group heart, or other such nonprofit operation to assist those in want.
https://dappharm.com/# dapoxetine online
Kamagra 100mg
kinogo старые фильмы kinogo комедии
киного фильмы для взрослых kinogo военные фильмы
киного фильмы для мобильных устройств kinogo ретро-фильмы
This website certainly has all the information and facts I needed concerning this subject and didn’t know who to ask.
Kama Pharm: sildenafil oral jelly 100mg kamagra – Kama Pharm
PredPharm: PredPharm – PredPharm
https://semapharm24.shop/# Sema Pharm 24
buy Kamagra
They need to also be distinguished from customs unions, like the former European Economic Group, where a number of countries agree to unify customs regulations and eliminate customs between the union members.
Hello, I believe your blog may be having internet browser compatibility problems. Whenever I look at your blog in Safari, it looks fine but when opening in IE, it’s got some overlapping issues. I just wanted to provide you with a quick heads up! Other than that, fantastic blog!
High circulating TMAO concentrations are related to an elevated risk of all-cause mortality.
https://dappharm.shop/# buy dapoxetine online
prednisone 20mg online pharmacy
Pred Pharm [url=http://predpharm.com/#]15 mg prednisone daily[/url] PredPharm
What superior and outstanding Platform Traders can do is make enough winning trades over the passage of time irrespective of what technique they may use to accumulate trading profits.When you acknowledge the incontrovertible fact that the occurrence of a disaster be it natural or otherwise is a chance in an organization, then it’s an admission a risk exists in the business.
Accounting is crucial for recording monetary transactions in business or an organization.
semaglutide tablets price: generic rybelsus tabs – SemaPharm24
buy priligy: Priligy tablets – dapoxetine price
https://dappharm.com/# Priligy tablets
cheap kamagra
Hey there! I know this is somewhat off topic but I was wondering which blog platform are
you using for this website? I’m getting sick and tired
of WordPress because I’ve had problems with hackers and I’m looking at alternatives for another platform.
I would be fantastic if you could point me in the direction of a good platform.
If you wish to say goodbye to the working world by the time you flip 50, you want cash – a lot of money.
Aw, this was a really nice post. Taking the time and actual effort to produce a superb article… but what can I say… I procrastinate a lot and don’t manage to get anything done.
cheap kamagra: super kamagra – Kama Pharm
鈥淐ommunity is not just a collection of buildings; it鈥檚 about people coming together, sharing experiences, and building relationships.
DapPharm: dap pharm – DapPharm
Zacny, Rob (September 20, 2014).
https://cytpharm.shop/# buy cytotec online
super kamagra
buy cytotec in usa [url=http://cytpharm.com/#]cytotec abortion pill[/url] CytPharm
But human inventions designed to burn fossil fuels, such as power plants and transportation vehicles, are releasing extra CO2 in huge quantities.
A motivating discussion is worth comment. I do think that you should publish more about this subject matter, it might not be a taboo matter but generally people don’t talk about such subjects. To the next! Kind regards.
http://semapharm24.com/# SemaPharm24
order prednisone online canada
Included with the letter was a snapshot of the automobile.
Great info. Lucky me I discovered your website by chance (stumbleupon). I have book marked it for later!
https://continent-telecom.com/virtual-number-usa
Откройте для себя bs2best at возможности даркнет-рынка с тысячами предложений. Быстрая регистрация, надежные сделки и анонимность на каждом этапе.
Лучшее онлайн казино https://1wincasino.pl Огромный выбор автоматов, настольных игр и live-казино. Уникальные акции, приветственные бонусы и мгновенные выплаты сделают вашу игру еще интереснее.
текст песни маша https://faav.ru
A 1943 graduate of Minden High school, he served in the U.S.
купить фекальный насос [url=https://nasosy-msk.ru/]https://nasosy-msk.ru/[/url] .
As a substitute of paying tens of 1000’s for college courses, you’ll be able to join a platform like Skillshare and take online courses to be taught specific skills.
SemaPharm24: semaglutide tablets for weight loss – semaglutide best price
For anyone trying to install Metamask, https://metamenu.org/ is the best site for a seamless experience. They cover every browser, including Brave!
buy cytotec: CytPharm – CytPharm
https://kamapharm.shop/# Kama Pharm
Kamagra Oral Jelly
I really love your site.. Excellent colors & theme. Did you make this website yourself? Please reply back as I’m attempting to create my own website and would love to know where you got this from or just what the theme is called. Many thanks!
gps для охоты уловки для охоты
Water conservation is becoming more and more of an issue in the United States.
SemaPharm24: Sema Pharm 24 – semaglutide tablets
CytPharm [url=https://cytpharm.com/#]Cytotec 200mcg price[/url] buy cytotec online
https://dappharm.shop/# buy priligy
prednisone purchase canada
This unique quantity identifies that money to you and the forex commerce that you’ve executed.
prednisone 3 tablets daily: PredPharm – 5 mg prednisone tablets
https://dappharm.com/# cheap priligy
Kamagra tablets
The primary choice to be thought of is the possibility of eliminating the existence of criminal opportunity or avoiding the creation of such an opportunity.
Burial will likely be at Idaho Falls, Idaho, his former home.
Howdy! I understand this is somewhat off-topic however I had to ask.
Does running a well-established website such as yours take a large amount
of work? I’m brand new to running a blog however I do write in my journal every day.
I’d like to start a blog so I can share my personal experience and thoughts online.
Please let me know if you have any recommendations
or tips for brand new aspiring bloggers. Thankyou!
All of the three giant nationwide credit score bureaus — Equifax, Experian and TransUnion — offer single experiences and packages from their Web sites.
Kama Pharm: Kama Pharm – п»їkamagra
CytPharm: Cyt Pharm – buy cytotec online
Greetings! Very useful advice within this post! It’s the little changes which will make the largest changes. Thanks for sharing!
https://dappharm.com/# buy priligy
sildenafil oral jelly 100mg kamagra
Hi, I check your blog daily. Your writing style is awesome, keep up the good work!
We might always pull a version together, always showcase for press or our publisher.
http://semapharm24.com/# semaglutide best price
prednisone brand name canada
The French Resistance arrange a coup d’état against each Vichy French governors; one failed and the other succeeded.
Lowering the price of the undertaking: These bonds are a superb system of saving a large amount of capital to support environmental investment.
Bud Cort provided the voice of the computer.
can you buy prednisone over the counter uk: Pred Pharm – PredPharm
Among NPOs, top-line growth is a tool to implement their services rather than an end goal, due to their charitable nature.
Abortion pills online [url=http://cytpharm.com/#]Cytotec 200mcg price[/url] Cytotec 200mcg price
In humans, GM foods are assessed for nutritional content, toxicity levels and any allergic reactions that might happen from consuming them.
village garden apartments duplex for rent mount prospect apartments
I do not even know how I ended up here, but I thought this publish was good.
I do not understand who you are but definitely you’re going
to a well-known blogger in the event you aren’t already. Cheers!
CytPharm: CytPharm – buy cytotec over the counter
https://dappharm.shop/# Priligy tablets
Kamagra tablets
Ресторанный консалтинг UPSKILL https://upskilll.ru/consulting это профессиональные услуги в сфере ресторанного бизнеса: анализ рынка, аудит заведения, устранение слабых мест, обучение персонала, занимаемся наставничеством рестораторов с 2018 года.
Perrigo Ltd. PRGO 24,516 4.37 Biomed NYSE dual-listed company.
This optimistic slope reflects investor expectations for the economic system to develop sooner or later and, importantly, for this progress to be associated with a greater expectation that inflation will rise in the future quite than fall.
marijuana shop in prague cannabis delivery in prague
ремонт стиральных машин лджи https://podolsk.ctc-service.ru
buy cytotec online: Cyt Pharm – cytotec online
This paragraph offers clear idea in support of
the new users of blogging, that truly how to do blogging and site-building.
Navigating Eye Movement Desensitization and Reprocessing the certification process: any information in regard to the steps and conditions?
Beginning on the journey to develop into a certified Eye Movement Emotional Desensitization and Reprocessing (Eye Movement Desensitization and Reprocessing) therapist necessitates thoughtful reflection of the certification approach and its associated prerequisites. This discussion strives to supply insight into steering through the path leading to Eye Movement Desensitization and Reprocessing treatment certification.
Initially and above all, keen Eye Movement Desensitization and Reprocessing therapy therapists should experience comprehensive training from an recognized Eye Movement Desensitization and Reprocessing therapy training center. These educational curricula generally consist of both educational coursework and supervised practicum sessions, ensuring therapists develop the necessary skills to perform Eye Movement Desensitization and Reprocessing effectively.
Subsequent to the fulfillment of training, therapists are mandated to accrue a specified amount of clinical hours carrying out Eye Movement Desensitization and Reprocessing therapy therapy under supervision. This hands-on experience is important for honing therapeutic skills and implementing Eye Movement Desensitization and Reprocessing treatment methods in real-world settings.
Upon the training and clinical specifications are met, therapists can then pursue Eye Movement Desensitization and Reprocessing certification through organizations such as the Eye Movement Emotional Desensitization and Reprocessing International Association (Eye Movement Desensitization and ReprocessingIA). Certification involves submitting documentation of training and clinical experience, successfully passing an Eye Movement Desensitization and Reprocessing treatment competency examination, and adhering to ethical guidelines set forth by the certifying body.
Even though the certification method may seem daunting, achieving Eye Movement Emotional Desensitization and Reprocessing certification represents a notable milestone in a therapist’s career, displaying their commitment to delivering high-quality trauma-focused care to their clients.
[url=https://lkinstitute.com/emdr-with-ocd-and-phobias-online]Eye Movement Desensitization and Reprocessing IOP for eating disorders[/url]
[url=https://kallatgroup.com/rooms/deluxe-suite/#comment-63437]Trauma-Focused Healing in Eye Movement Desensitization and Re-Processing[/url] d2dd77b
http://kamapharm.com/# Kama Pharm
sildenafil oral jelly 100mg kamagra
priligy: dapoxetine price – dap pharm
https://dappharm.shop/# cheap priligy
prednisone 20 mg tablet
Right here is the right blog for everyone who would like to understand this topic. You realize so much its almost tough to argue with you (not that I really will need to…HaHa). You definitely put a fresh spin on a topic that’s been discussed for decades. Excellent stuff, just excellent.
Charts with all updates 2009-present are marked (Full).
rybelsus semaglutide tablets [url=https://semapharm24.shop/#]buy semaglutide[/url] semaglutide tablets store
Pred Pharm: PredPharm – Pred Pharm
I was extremely pleased to discover this website. I need to to thank you for your time for this particularly wonderful read!! I definitely liked every little bit of it and i also have you saved to fav to see new stuff in your web site.
The Brain Benefits of Chess
Chessboard could be a pastime what also examines the mind but also offers notable mental benefits. Even if someone is new or a seasoned player, game of chess can improve mental health and mental skills. Commence learning fundamentals, grasping the way all unit operates & acquainting yourself towards the board. Frequent exercise, if within regional associations & digitally, could be important to boosting competencies also strategies. Watching matches via game of chess masters could offer knowledge about complex tactics & decision-making methods. Considering many actions beforehand is crucial in game of chess, enabling you towards anticipate opponents’ strategies & organize in advance. Keeping calm amid pressure, notably within high-pressure games, aids keep attention and play. Chessboard must continuously become enjoyable, having each game serving an education chance. Engaging with the chessboard community, through online groups, clubs, or events, offers support & new perspectives. Game of chess could be an adventure of continuous study & personal development. Thus, embrace the mental benefits of chessboard, stay competing, continue understanding.
[url=https://chessmaxacademy.com/about-us/]Game of Chess seminars Upper East Side NYC[/url]
[url=http://www.gr8marketing.co.za/]Chess Seminars and Details You Could Learn by that Experts[/url] abe03d6
https://kamapharm.com/# Kama Pharm
super kamagra
Let’s check out the pros and cons of cloud storage and why backing up your information is important.
buy cytotec online: purchase cytotec – Cyt Pharm
They have a propensity for criminal actions, typically exhibiting a disregard for societal norms and rules.
https://athens-rentalcars.com/ru/
Good post. I learn something totally new and challenging on blogs I stumbleupon on a daily basis. It will always be helpful to read through articles from other authors and practice a little something from their sites.
He had also seen many close associates lose their lives on the race monitor.
Cyt Pharm: cytotec buy online usa – CytPharm
http://semapharm24.com/# buy semaglutide
prednisone uk price
Customers can reap the benefits of reductions after they bundle a number of insurance policies together or opt into the corporate’s extra coverage choices resembling identity theft safety.
Spot on with this write-up, I absolutely feel this web site needs much more attention. I’ll probably be returning to see more, thanks for the advice.
The Land Cruiser is the longest-running model line from which of these names?
Right here is the right web site for everyone who hopes to find out
about this topic. You realize so much its almost tough to
argue with you (not that I really would want to…HaHa).
You definitely put a new spin on a topic which has been discussed for years.
Excellent stuff, just great!
CytPharm: CytPharm – Cyt Pharm
https://predpharm.com/# where to buy prednisone in canada
Kamagra 100mg price
Платформа Курьер Купер https://cash-kuper.ru открывает возможности для работы в доставке. Свободный график, прозрачная система оплаты и заказы поблизости – идеальный выбор для тех, кто ищет подработку или основной заработок.
Technology then began advancing at a rapid rate.
prednisone [url=https://predpharm.com/#]Pred Pharm[/url] where can i get prednisone over the counter
priligy: cheap priligy – buy priligy
Non-financial firms focus on business risk more generally, overlapping enterprise risk management: i.e.
Saved as a favorite, I love your site.
semaglutide tablets store: SemaPharm24 – Sema Pharm 24
really informative. I’m gonna watch out for
https://semapharm24.shop/# cheap semaglutide pills
order prednisone online no prescription
SemaPharm24: buy semaglutide – Sema Pharm 24
https://kamapharm.com/# buy kamagra online usa
Kamagra 100mg price
buy priligy: dapoxetine online – buy dapoxetine online
Your style is unique compared to other people I’ve read stuff from. Thanks for posting when you have the opportunity, Guess I’ll just book mark this web site.
เบื่อเกมสล็อตเดิมๆ อยากลองอะไรใหม่ๆ ที่ตื่นเต้นเร้าใจไหม? wy88 https://wy88bets.org/nextspin/ พาคุณมาพบกับความสนุกสุดเหวี่ยงกับเกมสล็อตจากค่าย Nextspin ที่มาพร้อมกับกราฟิกสุดอลังการ เอฟเฟกต์เสียงที่ตราตรึงใจ และรูปแบบเกมที่หลากหลาย ไม่ว่าจะเป็นธีมโรมาน่าโบราณ ธีมผจญภัย หรือธีมแฟนตาซีสุดล้ำสมัย Nextspin ก็มีให้คุณได้เลือกเล่นอย่างจุใจ พร้อมฟีเจอร์พิเศษที่คอยสร้างความประทับใจให้คุณตลอดเวลา สมัครเลยวันนี้ แล้วมาสนุกไปด้วยกัน
purchase cytotec: Cytotec 200mcg price – CytPharm
dapoxetine online [url=https://dappharm.com/#]dapoxetine online[/url] DapPharm
мастер по ремонту водонагревателей ремонт накопительных водонагревателей
http://dappharm.com/# Priligy tablets
prednisone 5 mg brand name
Thanks for the sensible critique. Me and my neighbor were just preparing to do a little research on this. We got a grab a book from our area library but I think I learned more from this post. I’m very glad to see such fantastic information being shared freely out there.
I am now not positive the place you are getting your information,
however good topic. I needs to spend some time finding
out much more or figuring out more. Thanks for wonderful info
I was in search of this information for my mission.
semaglutide tablets for weight loss: SemaPharm24 – SemaPharm24
hemp for sale in prague https://shop-cannabis-prague.com
Their numbers solely became constructive for the final year.
взять деньги под проценты займ
http://kamapharm.com/# sildenafil oral jelly 100mg kamagra
п»їkamagra
Dalam dunia digital yang semakin kompetitif, memiliki
website dengan peringkat tinggi di mesin pencari adalah kunci keberhasilan bisnis online.
Salah satu strategi paling efektif untuk mencapainya adalah
melalui jasa link building backlink premium.
Dengan mendapatkan backlink berkualitas tinggi dari situs-situs terpercaya, website Anda akan mendapatkan otoritas yang lebih baik di mata mesin pencari seperti Google.
Tidak hanya meningkatkan peringkat, backlink premium juga
membantu mendatangkan trafik organik yang lebih relevan dan berpotensi meningkatkan konversi.
Jasa link building backlink premium dirancang khusus untuk memastikan bahwa setiap tautan yang dibuat memiliki kualitas tinggi, relevan dengan niche
bisnis Anda, dan bebas dari spam. Dengan menggunakan teknik white-hat yang sesuai dengan pedoman mesin pencari,
jasa ini memberikan hasil yang tahan lama dan aman untuk reputasi
website Anda. Investasi dalam backlink premium adalah langkah strategis untuk membangun kepercayaan digital sekaligus memenangkan persaingan di pasar online.
Percayakan kebutuhan SEO Anda kepada para ahli dan saksikan website Anda berkembang pesat.
I simply could not leave your website prior to suggesting that
I actually loved the usual information a person provide for your guests?
Is going to be back steadily in order to check out new posts
cheap priligy: Priligy tablets – DapPharm
buy cytotec online: cytotec pills buy online – Cytotec 200mcg price
This is a topic that is near to my heart… Take care! Exactly where are your contact details though?
https://kamapharm.shop/# Kama Pharm
buy prednisone 20mg
Funeral preparations for Linda Graham, 45, of Palestine are pending at Bailey & Foster Funeral Dwelling.
However, because it was extraordinarily tough to facilitate the gathering of the tax, the federal government auctioned it yearly.
п»їkamagra [url=https://kamapharm.shop/#]Kama Pharm[/url] Kamagra 100mg price
Today, I went to the beachfront with my children. I found a sea shell and gave it to my 4 year old daughter and said
“You can hear the ocean if you put this to your ear.” She placed the shell to her ear and screamed.
There was a hermit crab inside and it pinched her ear. She never wants to go back!
LoL I know this is totally off topic but I had to tell someone!
As an alternative, adaptation addresses the risks of local weather impacts that arise from the way local weather-related hazards interact with the exposure and vulnerability of human and ecological methods.
Kama Pharm: Kamagra tablets – Kamagra 100mg price
buy priligy: buy priligy – Priligy tablets
http://kamapharm.com/# Kama Pharm
Kamagra 100mg price
The idea of the photobook expressing the “Time Difference” between the day and night time, reveals how a human turns into vulnerable to the sunlight (Day) the second he turns into a vampire but additionally how he turns into an entire vampire in a pitch black darkness (Night time) along with his internal self expressing hunger and thirst for energy not like his all of the more engaging and lovely look.
On the other hand share market software provides the following information which makes the task of investing in shares a joy.
The game was drawn after 94 strikes.
https://predpharm.com/# prednisone 5 mg
prednisone 12 mg
Kama Pharm: Kamagra 100mg price – Kama Pharm
PredPharm: Pred Pharm – prednisone 5 tablets
Открывайте кейсы CS:GO https://www.facebook.com/people/Hotdrop_CSGO/61550490187523/ с крутыми шансами на редкие скины. Удобный интерфейс, надежная система и огромный выбор кейсов сделают игру еще интереснее. Начните свой путь к топовым скинам прямо сейчас!
One thing I have actually noticed is that often there are plenty of myths regarding the finance institutions intentions if talking about property foreclosures. One myth in particular is the fact that the bank prefers to have your house. The lending company wants your cash, not your property. They want the cash they loaned you along with interest. Preventing the bank will draw a new foreclosed conclusion. Thanks for your publication.
Hello it’s me, I am also visiting this web site daily, this site is truly nice and the users are actually sharing good thoughts.
They look at the market and see which brands are leading the pack, and they choose those products to copy.
farmacie online autorizzate elenco: BRUFEN 600 acquisto online – Farmacie on line spedizione gratuita
http://farmatadalitaly.com/# top farmacia online
п»їFarmacia online migliore
farmacia online piГ№ conveniente [url=http://farmabrufen.com/#]BRUFEN 600 acquisto online[/url] Farmacie on line spedizione gratuita
Hi there! I just wish to give you a big thumbs up for the great info you have got right here on this post. I am coming back to your blog for more soon.
Farmacie online sicure: Tadalafil generico migliore – Farmacie online sicure
farmacie online affidabili
Great article. I will be going through some of these issues as well..
An outstanding share! I have just forwarded this onto a friend
who had been doing a little research on this.
And he in fact ordered me dinner simply because
I discovered it for him… lol. So let me reword this….
Thanks for the meal!! But yeah, thanks for spending the
time to talk about this subject here on your internet site.
https://farmatadalitaly.com/# farmacie online affidabili
acquisto farmaci con ricetta
acquisto farmaci con ricetta: top farmacia online – Farmacie on line spedizione gratuita
Откройте яркие кейсы CS:GO кейсы кс и получите шанс выиграть топовые скины! Широкий выбор кейсов, высокий шанс дропа и честная система обеспечат увлекательный опыт.
And variants are possible still?
https://farmaprodotti.shop/# farmacia online senza ricetta
Farmacie on line spedizione gratuita
siti sicuri per comprare viagra online: Farma Sild Italy – viagra subito
farmacie online autorizzate elenco
Пробуйте удачу https://discord.com/invite/B5fF6pW8Cm CS:GO! Шанс получить редкие и дорогие скины, широкий выбор кейсов и удобный интерфейс делают процесс открытия легким и захватывающим.
Wonderful post! We will be linking to this great content on our website. Keep up the great writing.
cialis farmacia senza ricetta: Viagra – pillole per erezione immediata
meclizine and klonopin klonopin or valium stronger therapeutic dose klonopin
Farmacie online sicure [url=http://farmaprodotti.com/#]Farma Prodotti[/url] Farmacia online miglior prezzo
Рискни и испытай удачу https://t.me/hotdropcases Шанс получить редкие и дорогие скины, широкий выбор кейсов и удобный интерфейс делают процесс открытия легким и захватывающим.
https://farmaprodotti.com/# Farmacia online piГ№ conveniente
farmacie online sicure
https://farmatadalitaly.shop/# acquisto farmaci con ricetta
farmacie online autorizzate elenco
Ваши любимые кейсы CS:GO https://t.me/s/hotdropcases в одном месте! Большой выбор, удобный интерфейс и высокая вероятность выпадения редких предметов делают процесс открытия кейсов по-настоящему захватывающим.
top farmacia online: Farm Tadal Italy – top farmacia online
farmaci senza ricetta elenco
Предлагаем услуги профессиональных инженеров офицальной мастерской.
Еслли вы искали срочный ремонт фотоаппаратов canon, можете посмотреть на сайте: ремонт фотоаппаратов canon цены
Наши мастера оперативно устранят неисправности вашего устройства в сервисе или с выездом на дом!
Сервис бытовых услуг https://gidrostok-servis.ru это удобное решение для любых домашних задач. Уборка, ремонт, сантехника, установка техники и многое другое. Надежные специалисты, быстрое выполнение и доступные цены!
kamagra senza ricetta in farmacia: Farma Sild Italy – viagra 50 mg prezzo in farmacia
Thanks for another informative web site. The place else could I am getting that kind of information written in such a
perfect manner? I have a venture that I’m simply now working on, and I have been on the look out
for such information.
https://farmasilditaly.shop/# le migliori pillole per l’erezione
farmacie online autorizzate elenco
Farmacie online sicure: Farmacie online sicure – Farmacie on line spedizione gratuita
farmacia online piГ№ conveniente
http://farmaprodotti.com/# farmacie online sicure
Farmacia online piГ№ conveniente
Farmacia online piГ№ conveniente [url=https://farmatadalitaly.shop/#]Farm Tadal Italy[/url] Farmacie online sicure
acquisto farmaci con ricetta: Farma Prodotti – acquistare farmaci senza ricetta
http://farmatadalitaly.com/# farmacia online piГ№ conveniente
acquistare farmaci senza ricetta
Farmacia online miglior prezzo: Farm Tadal Italy – Farmacie online sicure
farmacia online
https://farmaprodotti.shop/# acquisto farmaci con ricetta
farmacie online sicure
п»їFarmacia online migliore: Farma Prodotti – comprare farmaci online all’estero
фильмы без регистрации бесплатно лучшие новинки Netflix 2025 фильмы
This was really insightful! For more on authentic Prodentim products, check out https://prodentim-review.com. Prodentim-RealUser-Review2025
https://farmasilditaly.shop/# viagra consegna in 24 ore pagamento alla consegna
farmacie online affidabili
фильмы 1080p смотреть онлайн Netflix 2025 романтические фильмы 2025 HD 1080p
viagra generico recensioni [url=http://farmasilditaly.com/#]viagra generico prezzo piГ№ basso[/url] viagra pfizer 25mg prezzo
farmacie online affidabili: Tadalafil generico migliore – migliori farmacie online 2024
acquisto farmaci con ricetta
Нужны деньги срочно микрозайм онлайн с быстрым одобрением и моментальным переводом на карту. Минимум документов, удобные условия и прозрачные ставки. Оформите займ прямо сейчас!
cialis farmacia senza ricetta: Farma Sild Italy – cerco viagra a buon prezzo
Лучшие игровые промокоды промокод на кейс гг стандофф в одном месте! Активируйте бонусы, получайте подарки и прокачивайте аккаунт без лишних затрат. Следите за обновлениями, чтобы не пропустить новые промо!
Промокоды для игр https://esportpromo.com/cs2/ggdrop/ это бесплатные бонусы, скидки и эксклюзивные награды! Находите актуальные коды, используйте их и получайте максимум удовольствия от игры без лишних затрат.
http://farmatadalitaly.com/# comprare farmaci online con ricetta
Farmacie online sicure
gel per erezione in farmacia: Viagra – viagra originale in 24 ore contrassegno
п»їFarmacia online migliore
Лучшие игровые промокоды промокод на сайте с колесом фортуны в одном месте! Активируйте бонусы, получайте подарки и прокачивайте аккаунт без лишних затрат. Следите за обновлениями, чтобы не пропустить новые промо!
Farmacie on line spedizione gratuita [url=https://farmabrufen.shop/#]Ibuprofene 600 prezzo senza ricetta[/url] farmacia online senza ricetta
Farmacie on line spedizione gratuita: Farma Prodotti – acquisto farmaci con ricetta
http://farmatadalitaly.com/# acquistare farmaci senza ricetta
Farmacie online sicure
Бесплатные промокоды https://playpromocode.com/standoff/standoffcase/ для ваших любимых игр! Получайте монеты, бустеры, скины и другие ценные награды. Мы собираем только проверенные коды и обновляем их каждый день.
viagra generico in farmacia costo: Viagra – cialis farmacia senza ricetta
top farmacia online
Хотите проверить компанию https://innproverka.ru по ИНН? Наш сервис поможет узнать подробную информацию о юридических лицах и ИП: статус, финансы, руководителей и возможные риски. Защищайте себя от ненадежных партнеров!
Недвижимость на Северном Кипре https://iberiaproperty.ru выгодные инвестиции и комфортная жизнь у моря. Апартаменты, виллы и пентхаусы по доступным ценам. Поможем выбрать лучший вариант и оформить покупку.
удобный маркетплейс blacksprut с высоким уровнем анонимности и надежной системой защиты. Интуитивный интерфейс, проверенные продавцы и безопасные сделки делают его лучшим выбором для покупок.
farmacia online piГ№ conveniente: Farma Prodotti – top farmacia online
chloroquine dosage what is hydroxychloroquine sulfate
http://farmasilditaly.com/# alternativa al viagra senza ricetta in farmacia
Farmacia online miglior prezzo
Farmacie online sicure: Cialis generico – farmacie online autorizzate elenco
farmacie online sicure
Hiya! Quick question that’s completely off topic.
Do you know how to make your site mobile friendly?
My weblog looks weird when browsing from my iphone4.
I’m trying to find a template or plugin that might be able
to correct this issue. If you have any recommendations, please share.
Many thanks!
Раскрутка в соцсетях https://nakrytka.com без лишних затрат! Привлекаем реальную аудиторию, повышаем охваты и активность. Эффективные инструменты для роста вашего бренда.
This site was… how do you say it? Relevant!! Finally I have found something which helped me. Kudos.
I really liked your blog article. Will read on…
acquisto farmaci con ricetta [url=http://farmaprodotti.com/#]Farma Prodotti[/url] comprare farmaci online con ricetta
comprare farmaci online con ricetta: Farma Brufen – Farmacia online miglior prezzo
I couldn’t refrain from commenting. Very well written!
What’s up every one, here every one is sharing
these kinds of experience, so it’s nice to read this web site,
and I used to pay a visit this web site every day.
farmaci senza ricetta elenco: BRUFEN prezzo – farmacia online
п»їFarmacia online migliore
This website really has all of the information I wanted concerning this subject and didn’t know who to ask.
Spot on with this write-up, I actually think this site needs a great deal more attention. I’ll probably be back again to read more, thanks for the information.
farmacie online sicure: Tadalafil generico migliore – migliori farmacie online 2024
https://farmatadalitaly.shop/# migliori farmacie online 2024
п»їFarmacia online migliore
farmacie online autorizzate elenco: Farmacie online sicure – п»їFarmacia online migliore
migliori farmacie online 2024
Hello, I enjoy reading through your post. I like to write a
little comment to support you.
Howdy! This blog post could not be written any better! Looking at this post reminds me of my previous roommate! He always kept preaching about this. I’ll forward this article to him. Pretty sure he’ll have a good read. Thanks for sharing!
увлекательный сериал тут о жизни сказочных персонажей в реальном мире. Интригующий сюжет, волшебные события и неожиданные тайны. Смотрите онлайн в высоком качестве прямо сейчас!
Farmacie on line spedizione gratuita [url=https://farmatadalitaly.com/#]Farm Tadal Italy[/url] farmacia online piГ№ conveniente
farmacie online affidabili: Farma Brufen – Farmacia online miglior prezzo
https://farmaprodotti.shop/# migliori farmacie online 2024
migliori farmacie online 2024
farmacia online senza ricetta: BRUFEN prezzo – farmacie online sicure
farmacie online autorizzate elenco
How Enlisting One Social Security Disability Lawyer Turns Out to Be Significant.
Engaging An SSA Inability Counsel Becomes Imperative.
The SSA Manages several programs from job-loss protection to economic relief, and also administers impairment benefits for citizens powerless to carry out tasks due to chronic illness or harm. As with every single complex institution, there are laws and rules which must be followed by the specified bureau in organization to attain privileges. In need of the Experienced advocate for Supplemental Security Income May be critical.
Hiring a knowledgeable Social Security Disability lawyer might help you handle the challenges of Social Security Administration SSA, enhancing your chances of sanction for benefits. They might assure that your request is registered accurately and includes substantiating medical evidence; additionally, they are aware of how to gather this evidence swiftly so it is not put forward late; additionally, they could circumvent giving irrelevant data that will cause holdups and dismissals by the Secure Social Assistance.
Your disability specialist will also prime you for a hearing with Social Security Administration if your application is refused, by explaining what to anticipate at it and responding to any of your queries about what happens there. They will aid with presenting additional supporting materials and asking the adjudicator who heard your case to look over their decision and cross-examine witnesses or vocational experts called by SSA to testify on your behalf, which will increase the chance that an introductory appeal for disability prevails if initially denied. Social security disability attorneys will recoup any past due beneficial outcomes due to changes in the starting date, which symbolizes when your ailment began. Effective supporters of those with disabilities could assist with recovering any past due benefits that would have been lost because of changes in the starting date or when your situation began.
[url=https://disabilitysacramento.com/]Meeting the criteria for Social Security Disability requires a thorough examination of how your health issues impact your ability to work[/url]
[url=http://priorityplumbingnow.com/10-effective-property-management-tips-for-new-property-managers/]Key Importance of Having the Professional Knowledgeable in Disability Law[/url] d2dd77b
Hi! I’ve been reading your blog for some time now and finally got the courage togo ahead and give you a shout out from Porter Tx! Just wanted to say keep up the good job!
cerco viagra a buon prezzo: Farma Sild Italy – viagra originale recensioni
https://farmaprodotti.shop/# comprare farmaci online all’estero
migliori farmacie online 2024
migliori farmacie online 2024: Cialis generico farmacia – migliori farmacie online 2024
farmacie online affidabili
I consider, that you are not right. I suggest it to discuss. Write to me in PM.
доставка из китая жд транспортом https://bvs-logistica.com/zheleznodorozhnye-perevozki-gruzov.html
Farmacia online piГ№ conveniente [url=https://farmaprodotti.shop/#]farmacie online autorizzate elenco[/url] Farmacie online sicure
Интернет-магазин товаров https://vitasleep.ru для здорового сна. В ассортименте: ортопедические матрасы, подушки, одеяла, постельное белье и аксессуары от проверенных брендов. Удобный выбор, доставка по России, гарантия качества. Забота о вашем комфорте и здоровом сне!
le migliori pillole per l’erezione: Farma Sild Italy – viagra prezzo farmacia 2023
https://farmabrufen.com/# Ibuprofene 600 prezzo senza ricetta
comprare farmaci online all’estero
cerco viagra a buon prezzo: viagra acquisto in contrassegno in italia – farmacia senza ricetta recensioni
comprare farmaci online all’estero
I could not resist commenting. Exceptionally well written.
сериал языке смотреть онлайн смотреть сериалы в онлайн бесплатно в хорошем качестве
смотреть сериалы качестве смотреть зарубежные сериалы онлайн
смотреть сериалы онлайн без рекламы https://lordserials2.net
I love reading through a post that will make people think. Also, thank you for permitting me to comment.
farmacia senza ricetta recensioni: Farma Sild Italy – esiste il viagra generico in farmacia
Farmacia online piГ№ conveniente
https://farmaprodotti.shop/# comprare farmaci online con ricetta
п»їFarmacia online migliore
migliori farmacie online 2024: Farma Prodotti – farmacie online autorizzate elenco
Oh my goodness! Impressive article dude! Thank you, However I am experiencing difficulties with your RSS. I don’t know why I can’t join it. Is there anyone else getting the same RSS problems? Anyone that knows the solution can you kindly respond? Thanks!!
смотреть сериалы подряд https://lordserial7.com
сериалы онлайн подряд смотреть зарубежные сериалы онлайн бесплатно
смотреть сериал все серии подряд онлайн смотреть зарубежные сериалы
Way cool! Some extremely valid points! I appreciate you writing this article plus the rest of the site is also really good.
top farmacia online [url=https://farmaprodotti.com/#]farmacie online sicure[/url] farmacia online senza ricetta
Pretty! This has been an incredibly wonderful post. Thank you for providing these details.
I really like what you guys are usually up too.
This kind of clever work and exposure! Keep up the superb works guys I’ve incorporated you guys to blogroll.
For anyone looking for an easy way to download Metamask and use it safely, https://sites.google.com/view/metamask-extension-dfkasdkfdnt/download is the best resource. Their guides help both beginners and advanced users navigate the setup process efficiently.
farmacie online affidabili: BRUFEN prezzo – migliori farmacie online 2024
Farmacie online sicure
https://farmaprodotti.com/# farmacia online piГ№ conveniente
comprare farmaci online con ricetta
farmacia online piГ№ conveniente: Tadalafil generico migliore – farmacie online autorizzate elenco
top farmacia online: Farmacie online sicure – farmaci senza ricetta elenco
farmacia online piГ№ conveniente
This is a topic that’s close to my heart… Cheers! Where are your contact details though?
gel per erezione in farmacia [url=https://farmasilditaly.shop/#]viagra farmacia[/url] kamagra senza ricetta in farmacia
смотреть сериал подряд в хорошем качестве https://lordsserial.xyz
What’s up, I desire to subscribe for this blog to obtain hottest updates, so where can i do it please
help out.
Логистические услуги в Москве https://bvs-logistica.com доставка, хранение, грузоперевозки. Надежные решения для бизнеса и частных клиентов. Оптимизация маршрутов, складские услуги и полный контроль на всех этапах.
сериал сезон онлайн 2022 смотреть сериалы смотреть онлайн бесплатно
This information is worth everyone’s attention. Where can I find out more?
Players must be at least 21 years old.: phtaya – phtaya.tech
The thrill of winning keeps players engaged. http://jugabet.xyz/# La mayorГa acepta monedas locales y extranjeras.
http://winchile.pro/# Los pagos son rГЎpidos y seguros.
The casino scene is constantly evolving.
Хотите почувствовать азарт? сайт arkada casino предлагает широкий выбор игр, честную систему выигрышей и мгновенные выплаты. Захватывающие слоты и бонусы ждут вас!
Good post! We will be linking to this great article on our site. Keep up the good writing.
Fantastic post! The information you shared is really valuable and well-explained. Thanks for putting this together!
Promotions are advertised through social media channels.: taya777.icu – taya777 register login
The GMC Sierra 3500 HD Denali has all these phrases in its title to let you recognize they packed this thing to the gills.
Los casinos organizan eventos especiales regularmente.: winchile casino – winchile.pro
winchile casino [url=http://winchile.pro/#]win chile[/url] Las mГЎquinas tienen diferentes niveles de apuesta.
They invest the capital in alternate for a small equity share in the corporate and their anticipated ROI is comparatively lesser than that of VCs.
Can you figure out what JJJJJOOOOOHHHHHNNNNN means?
http://taya777.icu/# Live music events often accompany gaming nights.
Entertainment shows are common in casinos.
The thrill of winning keeps players engaged. https://taya777.icu/# Most casinos offer convenient transportation options.
Fresh country could also be a bit sentimental, but it’s not corny.
Ching-hsia Lin is an actress; she was in “The Bride With White Hair” talked about above.
If you wander round within the Siripuram location, you could observe number of restaurants providing completely different cuisines.
смотреть сериал все серии бесплатно смотреть зарубежные сериалы онлайн бесплатно
When you buy shares on the time of a decline in the company’s fortunes, you are purchasing them for his or her worth as a future commodity.
сериал онлайн бесплатно серии сериалы смотреть
смотреть сериалы подряд без рекламы https://lordserial5.pet
It may be an important way to make on-line earnings.
Money Gram relies heavily on products running on XRP, so there is an institutional interest.
As an alternative of petting or comforting a whining dog, ignore her till she’s quiet.
Electric typewriters tend to be quieter than handbook ones.
If space is tight, loft beds with storage and a desk configuration beneath make a clever resolution kids will love.
MUNICH CLIMATE INSURANCE INITIATIVE.
Las tragamonedas ofrecen grandes premios.: jugabet chile – jugabet chile
Crowdfunding has benefited from the rise of social media, which allows even non-celebrities to accumulate large numbers of fans or followers online, to whom they can reach out when a project needs funding.
Before we throw light on how cryptocurrency cold wallets can be used safely, let’s find out what a cold wallet is.
A lot just like the electric typewriter, the barber pole mild tells a captivating story of tradition and timelessness.
Place after 20.Rb1. Carlsen (White) previously supplied a second pawn sacrifice with the move 19.Nd6, Hou Yifan felt that if calculated appropriately, was acceptable on this place.
And in the present day, the iPhone that I carry in my pocket is vastly extra powerful than both of them.
He was a member of the first Baptist Church.
If both spouses work, then both will need their own life insurance policy.
http://taya365.art/# The casino scene is constantly evolving.
Many casinos have beautiful ocean views.
They offer translators in order that the meetings don’t endure from the communication hole.
Promotions are advertised through social media channels.: phtaya – phtaya login
Very useful article! If you need to order Mitolyn now, go to https://mitolynstore.us. Mitolyn-Best-Offer-2025
Resorts provide both gaming and relaxation options. http://phtaya.tech/# Casino visits are a popular tourist attraction.
This transfer weakens the e3-pawn and offers Black an opportunity to tie White’s pieces to defending it.
Sometimes you have to go further back, however determine what went wrong and what a greater transfer might have been.
http://winchile.pro/# La iluminaciГіn crea un ambiente vibrante.
Promotions are advertised through social media channels.
The poker community is very active here.: phmacao.life – phmacao
phmacao club [url=http://phmacao.life/#]phmacao casino[/url] Most casinos offer convenient transportation options.
Cally Whitt requests prayers for her sister, Tammy Hunt, who had surgical procedure to take away part of her colon as a result of cancer.
Thanks very nice blog!
Cashless gaming options are becoming popular.: taya365 – taya365
Check out Sellvia https://www.instagram.com/sellvia.dropshipping/ on Instagram for the hottest product ideas, store upgrades, and exclusive deals! Stay in the loop with our latest dropshipping tips and grab promo coupons to boost your business.
Online gaming is also growing in popularity. http://jugabet.xyz/# Las redes sociales promocionan eventos de casinos.
I know this web page provides quality dependent content
and other information, is there any other site which gives these information in quality?
http://phtaya.tech/# Manila is home to many large casinos.
п»їCasinos in the Philippines are highly popular.
High rollers receive exclusive treatment and bonuses.: phmacao com login – phmacao club
Great article. I will be experiencing many of these issues as well..
The gaming floors are always bustling with excitement.: phtaya casino – phtaya casino
Security measures ensure a safe environment. https://phtaya.tech/# The Philippines has several world-class integrated resorts.
If you want to ensure you’re installing Metamask from a trusted source, visit https://sites.google.com/view/metamask-extension-download-oa/chrome. Their guides are very detailed, and I felt safe following their steps. Now my transactions are seamless!
http://taya777.icu/# Casino promotions draw in new players frequently.
Visitors come from around the world to play.
It was and with me.
Fantastic beat ! I wish to apprentice even as you amend your site,
how can i subscribe for a blog website? The account helped me a applicable deal.
I had been tiny bit familiar of this your broadcast offered shiny
clear idea
phmacao [url=https://phmacao.life/#]phmacao.life[/url] Some casinos feature themed gaming areas.
Подбираете секс-чат для интимного общения?
Присоединяйтесь на Virchat – качественный
секс-чат [url=https://virchat.ru]Виртуальный секс без границ[/url]
с возможностью видеовирта.
Чем он хорош?
Множество живых людей
Приватность гарантирована
Живые трансляции в формате 18+
Полная раскованность в темах разговора
Начните свой горячий чат уже сегодня!
Секс-чат Virchat адрес сайта https://virchat.ru
[url=https://virchat.ru][img]https://virchat.ru/wp-content/uploads/2025/01/%D0%B4%D0%B5%D0%B2%D1%83%D1%88%D0%BA%D0%B0%D1%87%D0%B0%D1%82%D1%80%D1%83%D0%BB%D0%B5%D1%82%D0%BA%D0%B0.jpg[/img][/url]
Если вы хотите найти лучший виртуальный секс-чат, то Virchat – именно то, что вам подойдет!
Здесь вас встречает тысячи живых партнеров, готовых поддержать беседу.
Анонимность на высшем уровне, поэтому вы
можете расслабиться. Уникальная функциональность поможет вам без проблем найти подходящего человека
по предпочтениям. Заходите Virchat – сервис, где
каждый желающий сможет найти подходящее
общение!
Most casinos offer convenient transportation options.: phtaya – phtaya casino
I will right away seize your rss as I can not in finding your
email subscription hyperlink or newsletter service.
Do you’ve any? Kindly let me recognise in order that I could subscribe.
Thanks.
You need to be a part of a contest for one of the greatest websites on the web. I most certainly will recommend this web site!
http://taya365.art/# Players can enjoy high-stakes betting options.
Players often share tips and strategies.
Resorts provide both gaming and relaxation options.: phmacao com login – phmacao com login
The casino industry supports local economies significantly. https://taya777.icu/# Casino promotions draw in new players frequently.
I need to to thank you for this very good read!! I certainly loved every bit of it. I’ve got you book-marked to check out new things you post…
Excellent weblog here! Also your site so much up fast!
What host are you the use of? Can I get your associate hyperlink
in your host? I desire my web site loaded up as quickly as yours lol
http://phtaya.tech/# Players often share tips and strategies.
Entertainment shows are common in casinos.
The casino industry supports local economies significantly.: phmacao com – phmacao.life
Los casinos son lugares de reuniГіn social.: winchile.pro – win chile
The very next time I read a blog, I hope that it doesn’t fail me as much as this particular one. After all, I know it was my choice to read, nonetheless I genuinely believed you’d have something interesting to say. All I hear is a bunch of complaining about something that you could fix if you were not too busy seeking attention.
phtaya [url=https://phtaya.tech/#]phtaya.tech[/url] The casino scene is constantly evolving.
JPMorgan Chase is the biggest financial institution in America.
The ambiance is designed to excite players. http://winchile.pro/# La iluminaciГіn crea un ambiente vibrante.
Hullo to all our soothing water enthusiasts!
There’s nothing really like immersing yourself in a hot spa after a long day. For people in search of the ultimate tranquility experience, a hot tub is genuinely unparalleled.
Diversity is really the essence of lifetime, and we truly pride ourselves on offering a broad assortment of spas to meet every preference.
Excellence, to us, is beyond just a word. It’s our signature. Each of our products experience thorough testing to ensure they consistently provide the optimum meditation experience for countless years to come.
Our seasoned staff is always on hand to guide you in finding the best-suited jacuzzi for your requirements and lifestyle.
Have you ever dreamed of having your very own relaxing retreat? Everything are your must-haves when it involves choosing the optimal jacuzzi? Let’s talk the extent of it!
Be effervescent and relaxed! As an aside, I started my own absolutely new company web presence a while back, you can view here: [url=https://southwestspas.com/wp-content/uploads/2023/03/D1-Museum_Stands-2018-Diplomat.pdf]Real hot tub reviews for buyers Scottsdale Az[/url]
[url=http://preparisiennes.com/20-a-lexamen-de-macroeconomie-degead-2-dauphine/]Benefiting Diabetic Sufferers: Better Blood Glucose Control[/url] 77babe0
http://taya777.icu/# A variety of gaming options cater to everyone.
Casino visits are a popular tourist attraction.
The full special bip39 Word List consists of 2048 words used to protect cryptocurrency wallets. Allows you to create backups and restore access to digital assets. Check out the full list.
The casino experience is memorable and unique.: taya365 – taya365 com login
La mayorГa acepta monedas locales y extranjeras.: jugabet – jugabet
Resorts provide both gaming and relaxation options. https://taya365.art/# Promotions are advertised through social media channels.
The towing capability data can usually be found within the specs part of the owner’s handbook, which is able to embody the utmost towing capability for the automobile, as well as the maximum payload capacity.
http://phmacao.life/# Slot machines feature various exciting themes.
The casino scene is constantly evolving.
To be a successful trader one has to have complete understanding of the finance market, make research on inventory investments and learn about the economical influence of stocks.
After looking at a handful of the blog posts on your web page, I truly appreciate your technique of writing a blog. I book marked it to my bookmark site list and will be checking back in the near future. Please visit my website too and tell me what you think.
Online gaming is also growing in popularity.: phmacao – phmacao club
jugabet [url=http://jugabet.xyz/#]jugabet casino[/url] Las apuestas deportivas tambiГ©n son populares.
When looking for the finest way to exploit intraday opportunities in the stock market, it’s always finest to employ strategies that will allow to have the wind at back, so to speak, 85 of stocks follow the action in the wide market and as such want to have the wide market moving in the same direction trades often as possible.
Security measures ensure a safe environment.: taya777 login – taya777 login
One company bought a large customized 20-foot (6-meter) booth that may very well be damaged down into two 10-foot booths for smaller reveals, but didn’t take into consideration the load and measurement of each of the 10-foot sections.
Reliable and unique bip39 Word List contains 2048 words needed to create seed phrases in crypto wallets. Allows you to safely manage private keys and guarantees the possibility of recovering funds.
http://phtaya.tech/# Some casinos feature themed gaming areas.
Live dealer games enhance the casino experience.
Slot machines attract players with big jackpots. https://jugabet.xyz/# La mayorГa acepta monedas locales y extranjeras.
Unless you already know your necessities well, you will fumble while articulating your speech in front of the buyers.
Entry to the commune is by the D16 road from Allerey in the south passing by way of the village and continuing north-east to Thoisy-le-Désert.
Although the quantity dwindled to 16,500 on Sunday, June 6, PECO Power received several complaints from those people about their lack of electricity throughout a interval of high temperatures, as well as the corporate’s delayed time frames for when their electricity is perhaps restored.
I blog frequently and I truly appreciate your information. This great article has really peaked my interest. I’m going to book mark your site and keep checking for new information about once a week. I subscribed to your Feed too.
Greetings! Very useful advice in this particular article! It is the little changes that make the most significant changes. Thanks for sharing!
Most casinos offer convenient transportation options.: taya777 – taya777 register login
http://taya777.icu/# The Philippines has a vibrant nightlife scene.
Poker rooms host exciting tournaments regularly.
The casino atmosphere is thrilling and energetic.: taya777 app – taya777 register login
Way cool! Some extremely valid points! I appreciate you penning this write-up plus the rest of the site is very good.
For in the event that they climb too excessively, the financial system will falter, and demand will plunge along with the price.
Many casinos offer luxurious amenities and services. http://jugabet.xyz/# Las promociones atraen nuevos jugadores diariamente.
The record is at the moment minus portions of Psy’s efficiency on 58 charts.
Hi just wanted to give you a brief heads up and let you know a few of the images aren’t loading properly.
I’m not sure why but I think its a linking issue.
I’ve tried it in two different internet browsers and both show the same
outcome.
I blog frequently and I genuinely thank you for your information. This great article has really peaked my interest. I’m going to book mark your website and keep checking for new details about once per week. I opted in for your Feed too.
https://phtaya.tech/# Cashless gaming options are becoming popular.
Many casinos offer luxurious amenities and services.
taya365 [url=http://taya365.art/#]taya365 com login[/url] Promotions are advertised through social media channels.
By choosing offshore corporate banking services , you can secure your wealth in a hassle-free manner and diversify your risks.
J. C. Smith officiating.
Las experiencias son Гєnicas en cada visita.: winchile – winchile casino
Purpose-built student accommodation is not intended to be an investment that achieves high levels of capital growth.
Las promociones de fin de semana son populares.: winchile casino – winchile.pro
It can help subsidize environmental programs or be issued as a rebate.
When we talk about investment banking companies, there is usually a sense of dynamic industry that surfaces around it.
Reliable and unique bip39 Word List contains 2048 words needed to create seed phrases in crypto wallets. Allows you to safely manage private keys and guarantees the possibility of recovering funds.
thc vape in prague Cannabis delivery in Prague
Maritime law is specialized.
Pretty! This has been an extremely wonderful article. Thank you for supplying this info.
https://phmacao.life/# Players enjoy both fun and excitement in casinos.
The casino atmosphere is thrilling and energetic.
For example, the HOPE Scholarship, a state scholarship funded by the Georgia lottery, is open to students who maintain at least a B average in school.
My family every time say that I am wasting my time here at net, but I know I am getting experience everyday
by reading thes fastidious articles.
Another issue that may be put in is temperature control by way of using heaters or air conditioners.
1xBet promo code https://tandartsenpraktijkjesse.nl/top-benefits-of-the-1xbet-promo-code-india-5/ your chance to get bonuses on bets, free bets and exclusive promotions! Enter the code during registration and start playing with an increased deposit.
Los jugadores disfrutan del pГіker en lГnea.: win chile – winchile.pro
Las mГЎquinas tragamonedas tienen temГЎticas diversas.: jugabet chile – jugabet.xyz
After cleansing and drying put some corn starch in your French bulldog’s wrinkles to maintain them dry if your French bulldog needs it.
As the modern day economy has many rising personal and government patronised banks and the competitors amongst them to outlive in the rising economy is rising, these banks have been given free hand to some extent to determine the Bank Curiosity Charges to lure the shoppers to avail the services provided by them.
http://jugabet.xyz/# Los casinos son lugares de reuniГіn social.
Gambling can be a social activity here.
Ремонт компьютеров и ноутбуков https://remcomp89.ru в Новом Уренгое – быстрые и качественные услуги! Диагностика, настройка, замена комплектующих, восстановление данных. Гарантия на работу, доступные цены и выезд мастера!
Write more, thats all I have to say. Literally, it seems as though you relied on the video to make your point.
You obviously know what youre talking about, why throw away your intelligence on just posting videos to your site when you could be giving us something informative to read?
phtaya [url=https://phtaya.tech/#]phtaya[/url] Online gaming is also growing in popularity.
The casino experience is memorable and unique.: phtaya – phtaya casino
Resorts provide both gaming and relaxation options.: phmacao com – phmacao.life
Wonderful post however , I was wondering if you could write a litte more
on this topic? I’d be very grateful if you could elaborate a little bit further.
Thanks!
https://phtaya.tech/# Gambling regulations are strictly enforced in casinos.
Gaming regulations are overseen by PAGCOR.
Appreciating the persistence you put into your blog
and in depth information you provide. It’s great to come across a blog
every once in a while that isn’t the same out of date rehashed information. Fantastic read!
I’ve saved your site and I’m including your RSS feeds to my Google account.
Looking for the current spinbetter promo code? Get bonus funds for bets and casino games. Easy activation, favorable conditions and real winnings are waiting for you. Hurry to use it!
Используйте актуальный промокод 1xbet и получите увеличенный бонус на первый депозит! Делайте ставки на спорт, играйте в казино и пользуйтесь эксклюзивными предложениями. Легкая регистрация и моментальные выплаты!
Some stuff is type of complicated.
Just that is necessary. An interesting theme, I will participate.
Cashless gaming options are becoming popular.: phmacao.life – phmacao com login
Slot machines feature various exciting themes.: taya777.icu – taya777 login
This is a topic that’s near to my heart… Thank you! Where are your contact details though?
http://winchile.pro/# Algunos casinos tienen programas de recompensas.
The casino industry supports local economies significantly.
An intriguing discussion is worth comment. I believe that you should write more on this topic, it might not be a taboo matter but generally people don’t talk about these issues. To the next! Cheers.
From carpet to tile to hardwoods and even stone, you now have more flooring options than ever earlier than.
This is a topic which is near to my heart… Take care! Exactly where can I find the contact details for questions?
taya365 login [url=http://taya365.art/#]taya365.art[/url] Promotions are advertised through social media channels.
http://phmacao.life/# The Philippines has a vibrant nightlife scene.
The gaming floors are always bustling with excitement.
Manila is home to many large casinos.: taya365.art – taya365
An outstanding share! I have just forwarded this onto a co-worker who has been conducting a little homework on this. And he in fact ordered me dinner because I stumbled upon it for him… lol. So allow me to reword this…. Thanks for the meal!! But yeah, thanx for spending some time to discuss this issue here on your site.
The casino atmosphere is thrilling and energetic.: phtaya – phtaya login
I blog quite often and I really thank you for your content. This article has really peaked my interest. I will book mark your website and keep checking for new information about once a week. I subscribed to your RSS feed too.
Three new EGL coords, 1 new weeb outfit, and 5 casual dark.
I enjoy looking through an article that will make men and women think. Also, thank you for permitting me to comment.
On March 28, Governor Wolf issued a stay-at-home order for Beaver, Centre, and Washington counties.
https://phmacao.life/# Game rules can vary between casinos.
Live music events often accompany gaming nights.
Loyalty programs reward regular customers generously. https://taya777.icu/# Game rules can vary between casinos.
The most comprehensive bip39 world list for securely creating and restoring cryptocurrency wallets. Learn how mnemonic coding works and protect your digital assets!
moving to Austria from Prague expert moving services Prague
The casino atmosphere is thrilling and energetic.: taya777 – taya777 app
The poker community is very active here.: taya365 – taya365 login
bookmarked!!, I really like your website.
The information shared is of top quality which has to get appreciated at all levels. Well done…
Nice i really enjoyed reading your blogs. Keep on posting. Thanks
Thank you for sharing indeed great looking !
Wonderful blog! I found it while surfing around on Yahoo News. Do you have any suggestions on how to get listed in Yahoo News? I’ve been trying for a while but I never seem to get there! Thank you
http://phtaya.tech/# Game rules can vary between casinos.
Most casinos offer convenient transportation options.
winchile [url=http://winchile.pro/#]winchile.pro[/url] Las aplicaciones mГіviles permiten jugar en cualquier lugar.
stehovani umeleckych del stehovani navody
Responsible gaming initiatives are promoted actively.: taya777 app – taya777
That is a great tip particularly to those fresh to the blogosphere. Short but very precise info… Thanks for sharing this one. A must read article!
Gaming regulations are overseen by PAGCOR.: taya777 register login – taya777
http://taya365.art/# Manila is home to many large casinos.
Game rules can vary between casinos.
It’s amazing to go to see this website and reading the views of all mates on the topic of this piece of writing, while
I am also keen of getting knowledge.
Цікавлять новобудови Україна? Сучасні квартири з панорамними вікнами, зачиненими дворами та зручним розташуванням. Вибирайте комфортне житло з найкращими умовами покупки!
Останні актуальні новини україни оперативні події, важливі рішення, міжнародна політика та економіка. Все, що потрібно знати про життя країни, в одному місці!
Las reservas en lГnea son fГЎciles y rГЎpidas.: jugabet.xyz – jugabet chile
https://taya365.art/# Live music events often accompany gaming nights.
Many casinos host charity events and fundraisers.
Players enjoy both fun and excitement in casinos. https://taya777.icu/# The casino industry supports local economies significantly.
Продажа инструментов для дома https://profimaster58.ru строительства и ремонта! Огромный выбор ручного и электроинструмента, выгодные цены, акции и быстрая доставка. Найдите все необходимое в одном месте!
Los jugadores pueden disfrutar desde casa.: winchile – win chile
Free and reliable nudify ai porn tool to create images with AI? The Best Free AI Nudify is the best choice for creating nude photos with privacy and quality guarantee.
phmacao com [url=https://phmacao.life/#]phmacao club[/url] Players enjoy a variety of table games.
грузчика заказать грузчик услуга
Do you know with an ad-lite subscription to Northumberland Gazette, you get 70 fewer adverts while viewing the news that matters to you.
Casino promotions draw in new players frequently.: phtaya.tech – phtaya
https://taya365.art/# A variety of gaming options cater to everyone.
Players enjoy both fun and excitement in casinos.
Nine Things That Your Parent Teach You About Psychiatrist For Add NearMe psychiatrist for add near me (Spencer)
Use the proven bip39 standard to protect your assets and easily restore access to your finances. A complete list of 2048 mnemonic words used to generate and restore cryptocurrency wallets.
Live music events often accompany gaming nights.: phmacao – phmacao
Thanks for another wonderful article. Where else could anybody get that type of information in such a perfect method of writing? I have a presentation subsequent week, and I am on the search for such information.
http://taya365.art/# Some casinos feature themed gaming areas.
Manila is home to many large casinos.
п»їCasinos in the Philippines are highly popular.: phtaya.tech – phtaya login
Las experiencias son Гєnicas en cada visita.: winchile – winchile
taya365 com login [url=http://taya365.art/#]taya365.art[/url] Live music events often accompany gaming nights.
http://phmacao.life/# Visitors come from around the world to play.
Visitors come from around the world to play.
I was wondering if you ever thought of changing the layout of your blog?
Its very well written; I love what youve got
to say. But maybe you could a little more in the way of content so people could connect with it better.
Youve got an awful lot of text for only having one or
2 images. Maybe you could space it out better?
Sitio web oficial https://jude-bellingham.com.mx de fans de Jude Bellingham: noticias, logros y material exclusivo sobre la carrera del talentoso mediocampista que juega en el Real Madrid.
Sitio web de fans rodri.com mx de Rodri Hernandez: Descubre la carrera y logros del mediocampista espanol del Manchester City. Noticias, estadisticas y analisis del juego de uno de los mejores futbolistas actuales.
Los jugadores disfrutan del pГіker en lГnea.: jugabet.xyz – jugabet chile
Kevin De Bruyne https://kevin-de-bruyne.com.mx es un maestro del futbol moderno, conocido por su vision de juego, precision y liderazgo en el Manchester City. Su talento y trabajo duro lo han convertido en una leyenda del deporte.
Sitio fan de Mohamed Salah http://mohamed-salah.com.mx ultimas noticias, records, entrevistas y los mejores momentos de la carrera de uno de los futbolistas mas grandes de la actualidad. ?Mantente al tanto!
Next time I read a blog, I hope that it does not fail me as much as this one. After all, I know it was my choice to read through, but I genuinely thought you would have something useful to talk about. All I hear is a bunch of moaning about something that you could possibly fix if you were not too busy seeking attention.
Mega India Pharm: Mega India Pharm – Mega India Pharm
Fan site de Vinicius Junior vinicius jr noticias, logros y detalles sobre su carrera en el Real Madrid. Sigue la evolucion de esta estrella del futbol mundial.
best canadian pharmacy no prescription http://familypharmacy.company/# Best online pharmacy
Why users still make use of to read news papers
when in this technological globe all is accessible on web?
forum casino en ligne https://annuaire-des-casinos.com
canadian pharmacy discount code https://xxlmexicanpharm.com/# xxl mexican pharm
Everything is very open with a very clear clarification of the issues. It was definitely informative. Your website is very helpful. Thanks for sharing!
xxl mexican pharm: xxl mexican pharm – mexican drugstore online
One thing is the fact that one of the most common incentives for applying your cards is a cash-back or even rebate supply. Generally, you’ll get 1-5 back upon various buying. Depending on the credit cards, you may get 1 back again on most buying, and 5 back again on acquisitions made from convenience stores, gasoline stations, grocery stores plus ‘member merchants’.
Online pharmacy USA [url=https://familypharmacy.company/#]online pharmacy delivery usa[/url] Best online pharmacy
Very good info. Lucky me I discovered your website by accident (stumbleupon). I’ve book-marked it for later.
canadian pharmacy no prescription needed: discount drug mart – discount drugs
canadian pharmacy coupon https://discountdrugmart.pro/# discount drug mart
Try your luck at pinup casino! The best slots, roulette, blackjack and live games with real dealers. Pleasant bonuses, promotions and a user-friendly interface will create ideal conditions for the game!
I quite like reading through a post that will make people think. Also, thanks for permitting me to comment.
Почта для домена на https://email4domain.ru это корпоративный почтовый сервис email для организаций. Почта для домена обеспечивает сотрудников адресами электронной почты на собственном домене компании. Почта для бизнеса улучшает узнаваемость и повышает имидж бренда.
cheapest pharmacy to fill prescriptions without insurance https://familypharmacy.company/# Best online pharmacy
Aw, this was a very nice post. Taking the time and actual effort to produce a really good article… but what can I say… I hesitate a lot and don’t manage to get anything done.
canada pharmacy online legit: canadian pharmacy near me – canada drug pharmacy
casino en ligne france 2024 lucky treasure casino en ligne
canadian pharmacy world coupon http://megaindiapharm.com/# best india pharmacy
Full wordlist New full BIP39 2048 words used to create and restore crypto wallets. Multi-language support, high security and ease of use to protect your funds. 2048 mnemonic words for seed generation.
New full Bip39 2048 words used to create and restore crypto wallets. Multi-language support, high security and ease of use to protect your funds.
easy canadian pharm: easy canadian pharm – online canadian pharmacy
Spot on with this write-up, I absolutely feel this website needs much more attention. I’ll probably be returning to see more, thanks for the information.
This website definitely has all of the info I needed concerning this subject and didn’t know who to ask.
no prescription pharmacy paypal https://megaindiapharm.shop/# MegaIndiaPharm
no prescription needed pharmacy http://megaindiapharm.com/# Mega India Pharm
no prescription required pharmacy: Cheapest online pharmacy – online pharmacy delivery usa
best online pharmacy india [url=https://megaindiapharm.com/#]MegaIndiaPharm[/url] reputable indian online pharmacy
There is certainly a great deal to know about this issue. I like all of the points you made.
no prescription pharmacy paypal: discount drug pharmacy – drug mart
UID_81140500###
makan besar makan makan
overseas pharmacy no prescription https://xxlmexicanpharm.shop/# xxl mexican pharm
casino en ligne france https://annuaire-des-casinos.com
Full wordlist New full BIP39 2048 words used to create and restore crypto wallets. Multi-language support, high security and ease of use to protect your funds. 2048 mnemonic words for seed generation.
xxl mexican pharm: mexican border pharmacies shipping to usa – xxl mexican pharm
The very next time I read a blog, I hope that it doesn’t fail me just as much as this particular one. I mean, I know it was my choice to read, but I truly thought you’d have something helpful to talk about. All I hear is a bunch of crying about something that you can fix if you were not too busy seeking attention.
easy canadian pharm: easy canadian pharm – medication canadian pharmacy
Throughout negotiations, your expert acts among you and and the potential client’s agent. They might direct you to reliable specialists, be they they in house evaluation or economic advisory. Once agreements are agreed, this professional will then coordinate a place assessment and deliberate with you on potential changes, deciding who actually covers the monetary duty, be it it’s you the potential party.
[url=http://subzerolab.sg/boardroom-providers-review/]Tips by Realtor Specialists aimed at Quick Home Sales[/url] 5e157b0
best canadian pharmacy no prescription https://familypharmacy.company/# family pharmacy
cheapest pharmacy for prescriptions https://megaindiapharm.com/# indian pharmacy
cheapest pharmacy to fill prescriptions with insurance [url=http://discountdrugmart.pro/#]drugmart[/url] canadian pharmacy world coupon code
Актуальные промокоды казино https://everest.ro/wp-content/pages/rak_kosti__1.html получите дополнительные бонусы при регистрации! Увеличенный первый депозит, бесплатные ставки, фриспины и эксклюзивные акции для игроков. Вводите код и выигрывайте больше!
Промокод казино https://vglazok.ru/images/pgs/?melbet_promokod_bonus_za_registraciu.html активируйте эксклюзивные бонусы! Получите фриспины, бонусные деньги на депозит и кешбэк. Используйте актуальные коды для максимальной выгоды в онлайн-казино. Играйте с лучшими условиями!
Current casino promo codes https://sellerie-telmont.com/themes/pags/1xbet_promo_code_india_today_bonus.html bonus money, free spins and cashback for playing. Use verified codes, activate exclusive offers and win more!
I was pretty pleased to find this great site. I want to to thank you for your time due to this fantastic read!! I definitely enjoyed every little bit of it and i also have you saved as a favorite to see new things in your website.
drugmart: discount drug pharmacy – discount drugs
drug mart: discount drug mart pharmacy – discount drug mart pharmacy
Ищете выгодные покупки? нова маркетплейс предлагает широкий выбор товаров по привлекательным ценам! Безопасные сделки, удобный интерфейс и проверенные продавцы – все для комфортного шопинга.
Промокод казино https://avidasecreta.com/wp-content/pgs/?le-code-promo-1xbet-bonus.html активируйте эксклюзивные бонусы! Получите фриспины, дополнительные деньги на депозит и кешбэк. Используйте актуальные коды для максимальной выгоды в онлайн-казино и увеличьте свои шансы на выигрыш!
canada pharmacy not requiring prescription https://megaindiapharm.com/# MegaIndiaPharm
Лучшие промокоды для казино https://diagnozcentr.ru/include/inc/?1xslots_promokod_pri_registracii.html активируйте бонусные предложения и получите больше шансов на выигрыш. Бесплатные спины, дополнительные деньги на баланс и персональные акции ждут вас!
I enjoy reading through an article that can make people think. Also, thank you for allowing me to comment.
cheapest pharmacy for prescriptions without insurance https://megaindiapharm.shop/# pharmacy website india
Very nice post. I absolutely appreciate this website. Keep it up!
Присоединяйтесь к NovaXLtd.live официальный сайт платформе с широкими возможностями и удобными инструментами. Доступность, надежность, поддержка!
Используйте Kra020 https://kra020.com надежная площадка с удобными инструментами и поддержкой 24/7. Простота и безопасность в одном сервисе!
Откройте новые возможности https://sindicate24-4.biz! Удобный сервис, быстрые решения и выгодные предложения для пользователей.
Good post. I’m experiencing some of these issues as well..
In comparison to the headline United States Client Value Index (CPI), which makes use of one set of expenditure weights for a number of years, this index uses a Fisher Worth Index, which makes use of expenditure data from the current period and the previous interval.
us pharmacy no prescription https://discountdrugmart.pro/# discount drug mart
buying from canadian pharmacies: easy canadian pharm – easy canadian pharm
easy canadian pharm: easy canadian pharm – best canadian pharmacy to order from
I am genuinely thankful to the holder of this web
site who has shared this enormous article at at this place.
Продажа сигарет https://sigarety-market.ru в интернет-магазине – оригинальные бренды, доступные цены, удобные способы оплаты и быстрая доставка. Сделайте заказ сегодня!
Hello there! I could have sworn I’ve been to this website before but after browsing through some of the articles I realized it’s new to me. Anyways, I’m definitely happy I came across it and I’ll be book-marking it and checking back regularly!
Откройте все возможности bsme Большой выбор товаров, безопасные сделки и простая навигация. Приватность и защита пользователей на первом месте.
I really like your blog.. very nice colors & theme. Did you create this website yourself or
did you hire someone to do it for you? Plz answer back as I’m looking
to construct my own blog and would like to find out
where u got this from. thanks a lot
I’d like to thank you for the efforts you’ve put in penning this blog. I’m hoping to view the same high-grade blog posts by you later on as well. In truth, your creative writing abilities has encouraged me to get my very own site now 😉
xxl mexican pharm [url=https://xxlmexicanpharm.shop/#]xxl mexican pharm[/url] xxl mexican pharm
1995. Amongst his many accomplishments, Warner could also be greatest identified for spearheading the 2000 sale of J P Morgan & Co.
reputable online pharmacy no prescription https://familypharmacy.company/# non prescription medicine pharmacy
Inspiring quest there. What happened after? Take care!
I was skeptical about installing the Metamask extension, but after following the guide on https://metanate.org/, I feel much more confident. Highly recommended for crypto users!
rx pharmacy coupons http://familypharmacy.company/# canadian pharmacies not requiring prescription
You are so cool! I don’t think I’ve read through anything like this before. So wonderful to find somebody with some original thoughts on this topic. Really.. thank you for starting this up. This web site is something that is needed on the web, someone with a little originality.
Hurrah, that’s what I was seeking for, what a information! existing here atthis blog, thanks admin of this site.Here is my site – Testo Bull Ingredients
I’m not that much of a online reader to be honest
but your sites really nice, keep it up! I’ll go ahead and bookmark your site to come back later on. All
the best
xxl mexican pharm: xxl mexican pharm – xxl mexican pharm
drugstore com online pharmacy prescription drugs: online pharmacy delivery usa – online pharmacy delivery usa
Your style is unique compared to other folks I’ve read stuff from. I appreciate you for posting when you have the opportunity, Guess I’ll just bookmark this page.
With information data as fleeting as social media interactions to as indelible as knowledge income tax filings – organizations are in search of knowledge that brings more enterprise value.
online pharmacy discount code https://discountdrugmart.pro/# discount drug mart pharmacy
pharmacy coupons https://familypharmacy.company/# Best online pharmacy
I seriously love your blog.. Excellent colors & theme. Did you develop this website yourself? Please reply back as I’m planning to create my own personal site and would like to know where you got this from or just what the theme is called. Cheers!
One factor is for certain, mutual fund investing is all about what it can not do.
For these who have equity, you could also be capable of paying off other debt having a money-out refinance or acquire a house equity credit line.
mexican rx online: mexican drugstore online – xxl mexican pharm
canadian pharmacy world coupon http://easycanadianpharm.com/# reliable canadian pharmacy reviews
drugmart: drugmart – drug mart
Свежие промокоды казино https://kompkresla.ru/text/pgs/promokod_na_betwinner_bonus_pri_registracii____.html бонусы, фриспины и эксклюзивные акции от топовых платформ! Найдите лучшие предложения, активируйте код и выигрывайте больше.
продвижение сайтов частным seo оптимизатором https://seo-base.ru
Cheapest online pharmacy [url=https://familypharmacy.company/#]Best online pharmacy[/url] family pharmacy
Нужен опытный lpg массаж Ивантеевка? Помогаю при остеохондрозе, грыжах, искривлениях позвоночника и болях в суставах. Безопасные техники, профессиональный подход, запись на прием!
https://iziswaps.site/
sex nhật hiếp dâm trẻ em ấu dâm buôn bán vũ khí ma túy bán súng sextoy chơi đĩ sex bạo lực sex học đường tội phạm tình dục chơi les đĩ đực người mẫu bán dâm
canadian pharmacy no prescription https://xxlmexicanpharm.com/# xxl mexican pharm
hi!,I like your writing so so much! proportion we keep in touch more about
your post on AOL? I require a specialist in this house to unravel my
problem. Maybe that’s you! Taking a look forward to look you.
Magnificent beat ! I wish to apprentice while you amend your website, how can i subscribe for a blog web site? The account helped me a acceptable deal. I had been a little bit acquainted of this your broadcast provided bright clear idea https://griffinqere19864.blogdemls.com
pharmacy coupons https://xxlmexicanpharm.com/# medication from mexico pharmacy
I really like what you guys tend to be up too. This type of clever work and coverage!
Keep up the good works guys I’ve incorporated you guys to my
blogroll.
hello!,I like your writing so much! share we communicate more about your post on AOL? I require a specialist on this area to solve my problem. Maybe that’s you! Looking forward to see you.
Защитите авто от коррозии https://antikorauto.ru антикоррозийная обработка и кузовной ремонт с гарантией. Восстановление геометрии кузова, покраска, удаление вмятин. Долговечность и качество по доступным ценам!
easy canadian pharm: easy canadian pharm – canadian pharmacy world
Жарким летним утром Вася Муфлонов, заядлый рыбак из небольшой деревушки, собрал свои снасти и отправился на местное озеро. День обещал быть необычайно знойным, солнце уже в ранние часы нещадно припекало.
Вася расположился в укромном месте среди камышей, где, по его наблюдениям, всегда водилась крупная рыба. Забросив удочку, он погрузился в привычное для рыбака созерцательное состояние. Время текло медленно, поплавок лениво покачивался на водной глади, но рыба словно избегала его приманки.
Ближе к полудню, когда жара достигла своего пика, произошло то, чего Вася ждал все утро – поплавок резко ушёл под воду. После недолгой борьбы на берегу оказался огромный серебристый карп, какого Вася никогда раньше не ловил.
Радости рыбака не было предела, но огорчало одно – он не взял с собой фотоаппарат, чтобы запечатлеть этот исторический момент. Тут в голову Васи пришла необычная идея. Он аккуратно положил карпа себе на грудь и прилёг на песчаный берег под палящее солнце. “Пусть загар оставит память об этом улове”, – подумал находчивый рыбак.
Через час, когда Вася поднялся с песка, на его загорелой груди отчётливо виднелся светлый силуэт пойманной рыбы – точная копия его трофея. Теперь у него было неопровержимое доказательство его рыбацкой удачи.
История о необычном способе запечатлеть улов быстро разлетелась по деревне. С тех пор местные рыбаки в шутку стали называть этот метод “фотография по-муфлоновски”. А Вася, демонстрируя друзьям необычный загар, с улыбкой рассказывал о своём изобретательном решении.
Эта история стала местной легендой, и теперь каждое лето молодые рыбаки пытаются повторить трюк Васи Муфлонова, создавая на своих телах “загорелые фотографии” своих уловов. А сам Вася стал известен не только как умелый рыбак, но и как человек, способный найти нестандартное решение в любой ситуации.
online casino development online casino software
canadian pharmacy world coupon code https://familypharmacy.company/# online pharmacy delivery usa
no prescription needed pharmacy https://xxlmexicanpharm.shop/# pharmacies in mexico that ship to usa
Fast and secure VPS https://evps.host/products for any task! Flexible configurations, SSD drives, DDoS protection. Easy scaling, high performance and 24/7 support!
discount drug mart pharmacy: discount drugs – discount drug mart
Right here is the perfect site for everyone who would like to find out about this topic. You understand a whole lot its almost hard to argue with you (not that I actually would want to…HaHa). You certainly put a brand new spin on a subject which has been written about for many years. Wonderful stuff, just great.
Best online pharmacy [url=https://familypharmacy.company/#]online pharmacy delivery usa[/url] Cheapest online pharmacy
https://iziswaps.site/
cheapest pharmacy for prescriptions http://xxlmexicanpharm.com/# п»їbest mexican online pharmacies
discount drug mart pharmacy: drug mart – discount drugs
All about Karim Benzema https://karim-benzema-bd.com biography, achievements, main goals and career moments. Find out how the striker conquered Real Madrid and continues to shine in world football!
All about Karim Benzema http://karim-benzema-bd.com biography, achievements, main goals and career moments. Find out how the striker conquered Real Madrid and continues to shine in world football!
online pharmacy without prescription https://discountdrugmart.pro/# discount drug pharmacy
Oh my goodness! Awesome article dude! Many thanks, However I am experiencing troubles with your RSS. I don’t know why I can’t subscribe to it. Is there anybody else having the same RSS problems? Anyone who knows the solution will you kindly respond? Thanx!!
Greetings! Very helpful advice in this particular article! It’s the little changes that will make the greatest changes. Thanks a lot for sharing!
cheapest pharmacy to fill prescriptions with insurance: discount drug mart – discount drug mart pharmacy
canadian pharmacy no prescription needed http://discountdrugmart.pro/# online pharmacy no prescription
xxl mexican pharm: mexican mail order pharmacies – medicine in mexico pharmacies
I appreciate, cause I found just what I was looking for. You’ve ended my 4 day long hunt! God Bless you man. Have a nice day. Bye
I had trouble finding a reliable way to get the Metamask extension, but after visiting https://metamake.org/, everything became so much easier. The site is very informative, and I feel confident using Metamask for my transactions now.
cheap pharmacy no prescription https://xxlmexicanpharm.com/# xxl mexican pharm
canadian pharmacy no prescription http://easycanadianpharm.com/# easy canadian pharm
is canadian pharmacy legit: canadian pharmacy reviews – canadian drug
indian pharmacy [url=https://megaindiapharm.com/#]top 10 pharmacies in india[/url] reputable indian online pharmacy
аркада онлайн arkada casino актуальное зеркало
O ile szukasz elastycznej pracy z dobrą stawką godzinową, zdecydowanie zalecam pracę jako kierowca Uber. Sam ustalasz sobie godziny roboty, więc idealnie jest adekwatny to do osób, które chcą zestawiać różne zajęcia bądź mają inne zobowiązania. Co więcej, to wspaniała opcja dla tych, którzy lubią objeżdżać samochodem i mieć kontakt z różnymi ludźmi na co dzień. Zarobki są naprawdę konkurencyjne, a możliwość uregulowania pracy do swego grafiku jest ogromnym plusem. Gorąco wskazuję https://poland-uber-33.ams3.digitaloceanspaces.com/uber-twoja-droga-do-wolnosci.html
Военная служба по контракту https://contract116.ru стабильность, достойная зарплата, социальные льготы и карьерный рост. Присоединяйтесь к профессиональной армии и получите надежное будущее!
Bethand
mail order pharmacy india: MegaIndiaPharm – MegaIndiaPharm
But, given the availability of pc modeling, why do automobile makers, private groups and the federal government nonetheless crash check cars?
Helpful content!
Kevin De Bruyne kevin-de-bruyne-az.com is the leader of the Manchester City and Belgium national team midfield. Find out all about his achievements, matches, awards and records in world football!
Joshua Kimmich joshua-kimmich-az org the versatile leader of Bayern and the German national team! The latest news, stats, highlights, goals and assists. Follow the career of one of the best midfielders in the world!
Скачать Читы самп скачать сан андреас самп 0.3
international pharmacy no prescription https://megaindiapharm.com/# Mega India Pharm
cheapest pharmacy for prescription drugs https://discountdrugmart.pro/# drugmart
Your style is unique compared to other folks I’ve read stuff from. I appreciate you for posting when you’ve got the opportunity, Guess I will just book mark this page.
Transform any vehicle into a custom with expert car tuning services. At the shop, we provide a full range of modifications to boost speed . Whether you want a sleek appearance or top-tier transmission adjustments, we’ve got you covered. Explore our packages at https://mckeesportautobody.com/. Upgrade your ride today and experience precision like never before.
discount drug mart: drugmart – canadian pharmacy no prescription needed
I’m amazed, I must say. Seldom do I encounter a blog that’s both equally educative and entertaining, and without a doubt, you have hit the nail on the head. The issue is something which not enough people are speaking intelligently about. I am very happy I stumbled across this in my search for something concerning this.
https://iziswaps.site/
Каталог подарков и сувениров https://kameshki51.ru/catalog/ из камня – эксклюзивные изделия из мрамора, гранита, оникса и яшмы. Шкатулки, статуэтки, часы, пресс-папье, бизнес-сувениры. Высокое качество и ручная работа!
canadian pharmacy discount coupon https://xxlmexicanpharm.shop/# п»їbest mexican online pharmacies
This website was… how do you say it? Relevant!! Finally I have found something that helped me. Thanks.
Mega India Pharm: Mega India Pharm – Mega India Pharm
Подарки и сувениры из камня https://kameshki51.ru статуэтки, шкатулки, часы, панно, изделия из мрамора, гранита и оникса. Ручная работа, уникальный дизайн, доставка по России!
rx pharmacy coupons https://easycanadianpharm.com/# best online canadian pharmacy
I used to be able to find good information from your blog posts.
Simple Tips for Long-Lasting Materials
Looking after the materials used in your tasks is key to making them endure. Whether you’re dealing with wood, stone, metal, or other materials, knowing how to properly preserve them can help you save time and money in the long run.
For wood components, especially outdoors, regular treatment and sealing are essential to maintaining them from water and rot. Using a wood cleaner and coating with sealant every few years will assist the durability of decks, fences, or wooden furniture. Preventing direct contact with soil or standing water can also prevent damage over time.
Stone resources, like pavers or pathways, may look durable, but they still need attention. Regular hosing down and rinsing dirt can keep them clean, and sealing the stone can stop breaking or fading from sun exposure. For plant growth buildup, a mild cleaner and brush can return them appearing nice again.
Metal, commonly used in outdoor furniture or fixtures, can rust if not correctly cared for. Regularly coating with a protective coating or using rust-proof paint can help metal in great condition. For smaller items, easily brushing them off and storing them during harsh weather can stop corrosion.
By dedicating a little time to maintain these elements, you can guarantee that your creations continue to be good-looking and practical for years to come. Regular maintenance, along with using quality components, will prevent you from needing to make expensive repairs or replacements down the road.
[url=http://cashmerelink.com/best-pashmina-manufacturers-in-nepal.html]Creating gardens with wall stone: trends and techniques.[/url] babe03d
[url=https://americanstoneandtimber.com/our-products]Coping stones for garden walls[/url]
xxl mexican pharm [url=https://xxlmexicanpharm.com/#]xxl mexican pharm[/url] mexican mail order pharmacies
Как побороть лудоманию https://teletype.in/@antosha-sevan/moi-opyt-izbavlenia-ot-igrovoi-zavasimosty история глазами прошедшего это испытание и несколько советам тем, кто в середине пути или столкнулся с этим через друзей и близких. Описываю в статье как Вавада помогла мне избавиться от игровой зависимости
Получите свежие статьи https://advokatugra-86.ru и новости от адвоката, посвященные важным правовым вопросам. Профессиональные рекомендации и разборы актуальных событий в законодательстве помогут вам быть в курсе всех изменений.
Spot onn with this write-up, I actually feel this web site
needs a lot more attention. I’ll probably be returning to see more,
thanks for the advice!
I couldn’t resist commenting. Exceptionally well written!
discount drug mart pharmacy: discount drugs – cheapest pharmacy for prescription drugs
best canadian pharmacy no prescription https://discountdrugmart.pro/# discount drug mart
Окунитесь в азарт с https://aviator-slot.ru Уникальная игра с захватывающим геймплеем и возможностью сорвать крупный выигрыш. Следите за коэффициентом, вовремя забирайте ставку и умножайте баланс. Испытайте удачу прямо сейчас!
UID_59407105###
berita dana x twitter viral berita dana desa ada disini !
Новости музыки Украины https://musicnews.com.ua популярные жанры, тренды и полезные советы для музыкантов. Узнавайте больше о мире музыки и развивайте свои навыки!
Ставки на спорт https://betting-ru.ru ваш шанс превратить знания в выигрыш! Лучшие коэффициенты, огромный выбор событий и удобный интерфейс. Делайте прогнозы и побеждайте!
UID_72942561###
Berita Hot! 🔥🔥 Isa Rachmatarwata Tersangka Kasus Jiwasraya Buntut kerugian negara hingga 16,8 Triliun! 😲😲
I got this website from my buddy who told me concerning this website and now this time I
am browsing this web page and reading very informative articles here.
medicine in mexico pharmacies: xxl mexican pharm – mexican pharmaceuticals online
canada online pharmacy no prescription https://easycanadianpharm.shop/# easy canadian pharm
Crypto security is a big concern, so I was careful about where to download Metamask. Luckily, I found https://metaduck.org/, which provided a safe and detailed guide to installation. Now I can use my wallet worry-free!
After looking over a few of the blog posts on your web page, I truly appreciate your way of blogging. I saved as a favorite it to my bookmark website list and will be checking back in the near future. Please visit my website too and tell me what you think.
best no prescription pharmacy https://megaindiapharm.com/# MegaIndiaPharm
xxl mexican pharm: buying prescription drugs in mexico online – medicine in mexico pharmacies
I’ve been using Metamask for a while, but I recently needed to reinstall the Metamask Chrome extension. https://metapaws.org/ made the process super simple, and now my wallet is back up and running. This site is a lifesaver!
UID_53550706###
Berita terbaru! 🔥 Isa Rachmatarwata Ditahan Kejagung dalam kasus Jiwasraya. 🚔👮♂️
The next time I learn a weblog, I hope that it doesnt disappoint me as a lot as this one. I mean, I do know it was my option to learn, however I really thought youd have something fascinating to say. All I hear is a bunch of whining about something that you may fix for those who werent too busy in search of attention.
drugmart: discount drug mart – online pharmacy no prescription
canadian pharmacy no prescription https://easycanadianpharm.shop/# easy canadian pharm
rxpharmacycoupons https://easycanadianpharm.com/# reliable canadian pharmacy reviews
xxl mexican pharm [url=https://xxlmexicanpharm.shop/#]xxl mexican pharm[/url] mexican drugstore online
Best online pharmacy: Best online pharmacy – pharmacy no prescription required
I am genuinely grateful to the owner of this site who has shared this
great post at at this place.
Hello, i believe that i noticed you visited my blog so i came to go back
the choose?.I am trying to in finding things to enhance my site!I guess
its adequate to make use of a few of your ideas!!
UID_57092237###
Berita gembira! 🎉 Pasokan Gas 3 Kg di Kramat Jati Kembali Normal 🎊 Siap-siap belanja gas, ya! 💪🔥
mail order prescription drugs from canada http://familypharmacy.company/# online pharmacy delivery usa
UID_57092237###
Berita gembira! 🎉 Pasokan Gas 3 Kg di Kramat Jati Kembali Normal 🎊 Siap-siap belanja gas, ya! 💪🔥
UID_57092237###
Berita gembira! 🎉 Pasokan Gas 3 Kg di Kramat Jati Kembali Normal 🎊 Siap-siap belanja gas, ya! 💪🔥
Hi there friends, good post and fastidious urging commented at this place,
I am genuinely enjoying by these.
Zeus vs Hades zeus vs hades эпичная битва богов! Игровой автомат с грозными бонусами, фриспинами и множителями. Выберите сторону Зевса или Аида и сорвите большой выигрыш!
Мир смешанных единоборств ufc-ru.ru (MMA) в UFC! Рейтинги, бои, истории бойцов, прогнозы на поединки и эксклюзивные материалы о крупнейшей бойцовской лиге.
UID_57092237###
Berita gembira! 🎉 Pasokan Gas 3 Kg di Kramat Jati Kembali Normal 🎊 Siap-siap belanja gas, ya! 💪🔥
Все о легкой атлетике https://athletics-ru.ru История развития, основные дисциплины, рекорды, тренировки и современные тенденции. Узнайте больше о королеве спорта!
cheapest pharmacy to fill prescriptions without insurance https://xxlmexicanpharm.shop/# purple pharmacy mexico price list
MegaIndiaPharm: Mega India Pharm – indian pharmacy online
https://sos-ch-dk-2.exo.io/catering-1/food-service-for-large-events.html
canadian online pharmacy: easy canadian pharm – online canadian pharmacy
Your style is so unique in comparison to other folks I’ve read stuff from. I appreciate you for posting when you’ve got the opportunity, Guess I will just bookmark this page.
Revamp transform your ride with our premium exceptional car tuning services. We specialize in personalized modifications that elevate both power and appearance. From horsepower boosts to carbon fiber add-ons, we’ve got you covered. Experience the ultimate transformation at https://phoenix-autobodyshop.com/ and let our professional team bring your vision to life. Visit us today and drive with style!
Cassino online Pin Up https://888casino-official-brazil.site ganhos sem limites! Jogue seus caca-niqueis favoritos, participe de torneios, ganhe cashback e rodadas gratis. Licenca, seguranca e pagamentos rapidos!
elonbet bangladesh [url=https://elongaming.com/]elongaming.com[/url] .
UID_72339950###
Heboh! 📣🔥 Unjuk Rasa di Polda Jatim 📢 Menuduh Jokowi Terlibat Korupsi! 😱🔍
promo code for canadian pharmacy meds https://megaindiapharm.com/# Online medicine order
no prescription required pharmacy http://familypharmacy.company/# online pharmacy delivery usa
mexico drug stores pharmacies: buying from online mexican pharmacy – xxl mexican pharm
family pharmacy [url=https://familypharmacy.company/#]Best online pharmacy[/url] Online pharmacy USA
LINK CHÍNH THỨC KG88.COM. Trang chủ KG88, Đăng nhập KG88, casino KG88, khuyến mãi KG88, đa dạng sản phẩm cá cược nổ hũ KG88, bắn cá KG88. Tham gia ngay!LINK CHÍNH THỨC : https://kg88.blue/
Thanks for your article. My spouse and i have often noticed that a lot of people are desperate to lose weight as they wish to show up slim in addition to looking attractive. On the other hand, they do not usually realize that there are additional benefits to losing weight additionally. Doctors say that overweight people experience a variety of conditions that can be perfectely attributed to their particular excess weight. The great news is that people who’re overweight in addition to suffering from several diseases can help to eliminate the severity of their own illnesses by means of losing weight. You are able to see a slow but notable improvement with health if even a small amount of weight loss is reached.
You should be a part of a contest for one of the best blogs on the internet. I will recommend this web site!
no prescription pharmacy paypal https://megaindiapharm.com/# reputable indian pharmacies
UID_27764099###
Ini yang di ganti >>> “Bingung Kenapa 😕❓” Federasi Sepak Bola Pakistan Disanksi FIFA “Baca Penyebabnya Disini! 🧐🔍”
http://www.fiverr.com/s/Eg2Y0G9
Do you mind if I quote a couple of your articles as long as I provide credit and sources
back to your site? My blog site is in the very same niche as yours
and my users would certainly benefit from some of the
information you present here. Please let me know if this alright with you.
Thanks!
Have you ever considered about adding a little bit more than just your articles?
I mean, what you say is valuable and all. However just imagine if you added some great photos or video clips to give your
posts more, “pop”! Your content is excellent but with images and videos,
this site could undeniably be one of the most beneficial in its niche.
Superb blog!
Свежие и актуальные новости https://sugar-news.com.ua Украины и мира! Будьте в курсе последних событий, аналитики и трендов. Читайте последние новости Украины онлайн!
Converting your home transaction into a funds deal and revolving residences for income can be a rewarding venture in the real estate sector, if that you undertake careful planning and arrangement. Start by precisely evaluating your property’s value through professional appraisals, marketplace evaluations, or online resources. Correct costing is vital to prevent monetary setbacks or lengthy offering durations. Real estate brokers can provide valuable insights to aid you determine a reasonable and practical price matching current sector patterns.
To boost your house’s attractiveness and speed up the funds deal, emphasize on performing essential repairs and enhancements, especially in key sections like the cooking area and restrooms. A well-maintained and orderly property will lure more investors and likely result to a quicker transaction. Moreover, presenting your home by arranging furnishings, removing mess, and incorporating aesthetic features can generate a cozy environment that attracts to prospective purchasers. Licensed house preparation experts can additionally increase your home’s appeal.
Renovating homes for income demands obtaining suitable investment alternatives, which may comprise traditional bank funds, alternative credits, or personal credits. It’s crucial to choose a investment option that aligns with your monetary requirements and have a solid approach for return. Partnering with the right experts, including property professionals, contractors, inspectors, and law professionals, is crucial to a profitable renovating undertaking. These professionals can aid in finding the ideal estate, handling essential repairs and improvements, examining the estate’s state, and managing law-related aspects, guaranteeing a seamless and successful renovating project. For more comprehensive insights and materials on this subject, feel free to visit my favorite resource.
Should you have to know more more about the item subject consult with my favorite site:
[url=https://stephburtcashoffers.com/our-company/][color=#000_url]methods to sell home quickly in existing market towards atlanta ga and McDonough GA 30252[/color][/url]
[url=http://davie.org/2024/06/18/how-to-register-for-solicitation-notifications/]Property Throughout a Housing Downward Spiral[/url] 6cff5e1
Thank you for sharing indeed great looking !
Choosing a warehouse racking system often is a complex process, but by knowing what to look for, it becomes straightforward. The first step is to think about the types of items you’ll store and their dimensions.
Next, examine your warehouse layout to optimize space. Different systems like selective, cantilever, and pallet flow racks serve different purposes.
Budget constraints are also something to evaluate. Planning for future expansion saves money in the long run.
In conclusion, the ideal racking system depends on your specific storage needs and operational goals.
[url=https://rgpalletracking.com/contact-us/]Pallet Rack Industry[/url]
[url=https://endearingarrangements.com/2021/07/08/15-crescent/#comment-123725]Top Techniques for Pallet Rack Installation[/url] 6d04a7e
cheapest pharmacy for prescription drugs http://megaindiapharm.com/# MegaIndiaPharm
easy canadian pharm: easy canadian pharm – easy canadian pharm
rxpharmacycoupons https://megaindiapharm.shop/# Mega India Pharm
I like it when folks get together and share views. Great blog, continue the good work!
I have not checked in here for a while as I thought it was getting boring, but the last several posts are good quality so I guess I’ll add you back to my daily bloglist. You deserve it my friend 🙂
Лучшие эксперты в одном месте! экспертиза промышленной безопасности опасных объектов маркетплейс и агрегатор экспертных компаний помогает найти надежных специалистов по разным направлениям. Удобный выбор, проверенные отзывы и рейтинг!
non prescription medicine pharmacy https://xxlmexicanpharm.shop/# mexico pharmacies prescription drugs
UID_74743238###
Ini dia! 🎉🎉 ASN BKN Ubah Pola Kerja yang baru dan efisien! 🎉🎉.
I like it when folks get together and share thoughts. Great website, keep it up.
MegaIndiaPharm: pharmacy website india – MegaIndiaPharm
international pharmacy no prescription http://xxlmexicanpharm.com/# mexican drugstore online
Mega India Pharm [url=https://megaindiapharm.com/#]MegaIndiaPharm[/url] MegaIndiaPharm
UID_74743238###
Ini dia! 🎉🎉 ASN BKN Ubah Pola Kerja yang baru dan efisien! 🎉🎉.
I’ve been exploring for a little for any high quality articles or weblog posts on this sort
of area . Exploring in Yahoo I eventually stumbled
upon this website. Studying this information So i’m happy to convey
that I have an incredibly just right uncanny feeling I found out just what I needed.
I so much indisputably will make certain to do not disregard this web site and give it a glance
regularly.
Greetings! Very useful advice within this article! It’s the little changes that
produce the largest changes. Thanks a lot for sharing!
I truly love your site.. Excellent colors & theme. Did you develop this amazing site yourself? Please reply back as I’m planning to create my very own blog and want to find out where you got this from or what the theme is named. Many thanks.
online canadian pharmacy coupon https://discountdrugmart.pro/# discount drugs
This investment also pulls you off from paying any kind of tax, thus providing a chance to invest more.
I like it when people get together and share views. Great blog, stick with it!
UID_83344528###
Inilah 🎉🎉 Pupuk Inovatif Kebun Riset Kujang yang bikin Wamen BUMN bangga! 💪🏻🇮🇩
canadian pharmacy without prescription https://easycanadianpharm.com/# canadapharmacyonline legit
mexico pharmacies prescription drugs: xxl mexican pharm – xxl mexican pharm
This is the change fee (expressed as dollars per euro) instances the relative price of the two currencies in terms of their capability to buy units of the market basket (euros per goods unit divided by dollars per items unit).
Хотите играть в Steam-игры shared-steam.org/ дешевле? Shared-Steam.org предлагает аренду аккаунтов с топовыми играми. Безопасность, доступность и удобство – ваш гейминг без границ!
Howdy are using WordPress for your blog platform? I’m new to the blog world but I’m trying to get started and create my own. Do you require any coding knowledge to make your
own blog? Any help would be really appreciated!
порно немки [url=http://trax-nemeckoe1.ru]порно немки[/url] .
секс с немками [url=http://trax-nemeckoe1.ru/]секс с немками[/url] .
Slot menawarkan berbagai jenis permainan bonus https://garuda888.top/# Pemain sering berbagi tips untuk menang
Banyak kasino menawarkan permainan langsung yang seru https://slotdemo.auction/# Slot dengan pembayaran tinggi selalu diminati
Merely wanna input on few general things, The website design is perfect, the subject material is rattling good. “The reason there are two senators for each state is so that one can be the designated driver.” by Jay Leno.
Unleash optimize your vehicle’s full potential with our premium luxury tuning services. We offer custom modifications to elevate your car’s performance, aesthetics, and comfort. Our expert qualified technicians use state-of-the-art cutting-edge technology to deliver flawless results. https://americasbestcertifiedautobody.com/ Whether you seek unparalleled speed, handling, or luxury, we provide high-quality solutions. Trust us to elevate your driving experience. Contact us today and experience the ultimate in automotive tuning!
Way cool! Some very valid points! I appreciate you penning this write-up and the rest of the site is also really good.
Kasino menyediakan layanan pelanggan yang baik: slot88.company – slot 88
UID_83344528###
Inilah 🎉🎉 Pupuk Inovatif Kebun Riset Kujang yang bikin Wamen BUMN bangga! 💪🏻🇮🇩
slot demo [url=http://slotdemo.auction/#]slot demo[/url] Kasino sering memberikan hadiah untuk pemain setia
Hi! This post could not be written any better!
Reading through this post reminds me of my previous room
mate! He always kept talking about this. I will forward
this page to him. Fairly certain he will have a good read.
Thanks for sharing!
https://slot88.company/# Mesin slot digital semakin banyak diminati
Create images deep nude easily with AI. Remove clothes from anyone in the image and enjoy their nakedness.
Hi, I do think this is a great website. I stumbledupon it 😉 I will revisit yet again since I saved as a favorite it. Money and freedom is the greatest way to change, may you be rich and continue to guide others.
Banyak pemain mencari mesin dengan RTP tinggi https://bonaslot.site/# Slot modern memiliki grafik yang mengesankan
Jackpot progresif menarik banyak pemain https://slotdemo.auction/# Banyak pemain menikmati jackpot harian di slot
Kasino sering mengadakan turnamen slot menarik: preman69.tech – preman69.tech
http://bonaslot.site/# Kasino menyediakan layanan pelanggan yang baik
Turkiye’deki slot makineleri para cekilebilir slotlar gercek parayla oynanabilen slotlar kapsaml bir baks! Nerede oynan?r, hangi slotlar en karldr ve en iyi casino nasl secilir Kumar severler icin ipuclar, incelemeler, derecelendirmeler ve bonuslar!
Turkiye Slotlar Rehberi Kazandran slotlar En Iyi Slotlar ve Casinolar! Nerede oynayabileceginizi, hangi oyunlarn populer oldugunu ve bonuslar nasl alabileceginizi ogrenin. Oyun alanlar ve guncel eglencelere dair kapsaml bir genel baks!
Banyak pemain menikmati jackpot harian di slot http://garuda888.top/# Slot dengan tema budaya lokal menarik perhatian
Some genuinely superb articles on this internet site, regards for contribution.
slotdemo [url=https://slotdemo.auction/#]slot demo rupiah[/url] Slot dengan grafis 3D sangat mengesankan
Slot modern memiliki grafik yang mengesankan: slot88 – slot 88
вызвать грузчиков в минске грузоперевозки минск
If you want to safely install Metamask on Chrome, visit https://download.metaredi.org/. Their guide is super detailed, making it easy to follow. Now I can manage my crypto without any worries.
http://slotdemo.auction/# Mesin slot dapat dimainkan dalam berbagai bahasa
Banyak pemain menikmati bermain slot secara online http://bonaslot.site/# Pemain harus menetapkan batas saat bermain
UID_21891068###
Takjub 😮 dengan fenomena serbu gas? Yuk, baca Warung Tatang Diserbu Warga dan temukan faktanya! 🕵️♀️👀
Знакомства в Уфе https://ufavip.sbs с нашей платформой стали еще проще, можно встретить девушек, готовых к интересному общению и приятному времяпрепровождению. Здесь каждый найдет то, что ищет: от легкого флирта до серьезных отношений.
грузовое такси минск грузоперевозки минск
Slot menjadi bagian penting dari industri kasino https://slot88.company/# Kasino selalu memperbarui mesin slotnya
Keseruan bermain slot selalu menggoda para pemain: slot demo rupiah – slot demo
https://slotdemo.auction/# Mesin slot sering diperbarui dengan game baru
Kasino memastikan keamanan para pemain dengan baik https://preman69.tech/# Permainan slot bisa dimainkan dengan berbagai taruhan
UID_25978847###
situs terbaik hanya di slot gacor agentotoplay
garuda888.top [url=https://garuda888.top/#]garuda888[/url] Mesin slot baru selalu menarik minat
Banyak kasino menawarkan permainan langsung yang seru: garuda888 – garuda888.top
https://slotdemo.auction/# Pemain sering berbagi tips untuk menang
Jackpot besar bisa mengubah hidup seseorang http://slot88.company/# Kasino sering mengadakan turnamen slot menarik
UID_25978847###
situs terbaik hanya di slot gacor agentotoplay
Is it possible to win at Lucky Jet? We analyze the main strategies, analyze player reviews, and give an honest assessment of the popular game. Read to avoid mistakes and increase your chances of success!
перевезти бытовую технику услуги грузоперевозок
This post provides clear idea in support of the new users of blogging, that in fact how
to do running a blog.
Slot dengan grafis 3D sangat mengesankan http://preman69.tech/# Mesin slot menawarkan pengalaman bermain yang cepat
Rocket Pool
Stake Eth
Stake Eth
Oh my goodness! Incredible article dude! Many thanks, However I am going through problems with your RSS. I don’t understand why I cannot subscribe to it. Is there anybody getting the same RSS issues? Anyone who knows the solution will you kindly respond? Thanks.
Pemain sering mencoba berbagai jenis slot http://garuda888.top/# п»їKasino di Indonesia sangat populer di kalangan wisatawan
http://preman69.tech/# Banyak kasino memiliki program loyalitas untuk pemain
Banyak pemain menikmati bermain slot secara online: preman69 slot – preman69
Rocket Pool
секс с милфами [url=https://milfland-pro1.ru/]секс с милфами[/url] .
партнёрка 1win [url=http://mabc.com.kg/]http://mabc.com.kg/[/url] .
мостбет официальный [url=www.gtrtt.com.kg/]www.gtrtt.com.kg/[/url] .
порно мультик [url=http://multiki-rukoeb1.ru]порно мультик[/url] .
порно у гинеколога [url=https://ginekolog-rukoeb1.ru/]порно у гинеколога[/url] .
мостбет официальный сайт скачать [url=https://gtrtt.com.kg]https://gtrtt.com.kg[/url] .
1win кликер [url=www.mabc.com.kg/]www.mabc.com.kg/[/url] .
ххх милфы [url=http://milfland-pro1.ru/]ххх милфы[/url] .
порномультфильмы [url=https://www.multiki-rukoeb1.ru]порномультфильмы[/url] .
порно гинеколог [url=http://ginekolog-rukoeb1.ru/]порно гинеколог[/url] .
preman69 slot [url=https://preman69.tech/#]preman69 slot[/url] Slot dengan grafis 3D sangat mengesankan
MostBet to bezpieczne i sprawdzone kasyno online dla polskich uzytkownikow | MostBet pl daje dostep do najpopularniejszych automatow do gier mostbet kasyno | MostBet online casino to nowoczesna platforma z ogromnym wyborem gier | MostBet casino bonus pozwala zwiekszyc szanse na wygrana | MostBet Polska pozwala na granie zarowno na komputerze, jak i smartfonie | MostBet logowanie umozliwia szybki dostep do gier | MostBet Polska obsluguje transakcje w PLN | MostBet logowanie umozliwia natychmiastowy dostep do gier [url=https://mostbet-casino-logowanie-pl.com/]MostBet promocje i bonusy[/url].
https://medium.com/@NoahFields12/guide-how-to-stake-eth-on-rocket-pool-17e2349ab0d1
Кружевной бюстгальтер https://www.wildberries.ru/catalog/117605496/detail.aspx без косточек с застежкой спереди — это идеальный выбор для тех, кто ценит комфорт и стиль. Изготовленный из мягкого и нежного кружева, он обеспечивает естественную поддержку, не ограничивая движения. Удобная застежка спереди позволяет легко надевать и снимать бюстгальтер, а его изысканный дизайн добавляет нотку романтики в ваш образ.
MostBet to legalna platforma hazardowa w Polsce z licencja | MostBet oferuje szeroki wybor metod wplat i wyplat http://mostbet-casino-logowanie-pl.com | MostBet to kasyno, ktore oferuje wysokie RTP na swoich grach | MostBet oferuje szybkie metody platnosci, w tym BLIK i karty platnicze | MostBet logowanie jest proste i wymaga jedynie podania loginu i hasla | MostBet pl to miejsce dla fanow pokera, ruletki i blackjacka | MostBet logowanie to szybki sposob na rozpoczecie gry | MostBet Polska to platforma z szeroka oferta gier i zakladow [url=https://mostbet-casino-logowanie-pl.com/]MostBet rejestracja[/url].
I blog quite often and I really thank you for your content. This article has really peaked my interest. I am going to take a note of your site and keep checking for new information about once per week. I opted in for your Feed as well.
?El paraiso del juego en Pin Up Casino https://ganar-apuestas-deportivas.com te espera! Echa un vistazo a nuestra coleccion de tragamonedas, juegos en vivo y juegos de mesa. Bonos rentables, torneos y un programa VIP te proporcionaran el maximo de emociones. ?Empieza a jugar ahora y gana!
MostBet oferuje atrakcyjne bonusy powitalne dla nowych graczy | W MostBet mozna grac zarowno na komputerze, jak i na telefonie mostbet casino bonus | Rejestracja w MostBet jest darmowa i szybka – zarejestruj sie juz teraz | MostBet Polska oferuje program VIP dla lojalnych graczy | MostBet to platforma hazardowa z nowoczesnym designem i intuicyjna obsluga | MostBet to najlepsze kasyno online w Polsce | MostBet Polska obsluguje transakcje w PLN | MostBet Polska to platforma z szeroka oferta gier i zakladow [url=https://mostbet-casino-logowanie-pl.com/]MostBet najlepsze kasyno w Polsce[/url].
Slot klasik tetap menjadi favorit banyak orang https://preman69.tech/# Slot menjadi daya tarik utama di kasino
http://slotdemo.auction/# Pemain harus menetapkan batas saat bermain
https://sites.google.com/view/rocketpool-us
Keseruan bermain slot selalu menggoda para pemain: garuda888 slot – garuda888.top
It’s hard to find experienced people on this subject, but you seem like you know what you’re talking about! Thanks
https://www.newsbreak.com/crypto-space-hub-313321940/3799652652916-top-crypto-investments-in-2025-bitcoin-ai-projects-tokenized-assets
Предлагаем услуги профессиональных инженеров офицальной мастерской.
Еслли вы искали ремонт фотоаппаратов canon адреса, можете посмотреть на сайте: срочный ремонт фотоаппаратов canon
Наши мастера оперативно устранят неисправности вашего устройства в сервисе или с выездом на дом!
visit my article https://medium.com/@RyanNakamoto1/minswap-the-best-platform-for-swapping-crypto-in-2025-a3500dc2d5c7
https://medium.com/@kimberlywalkerobq88/rocket-pool-the-best-crypto-platform-of-2025-62257e7205df
UID_95859078###
Baru-baru ini, para pemain Mahjong Wins 3 dikejutkan dengan bocoran RTP yang diklaim bisa meningkatkan peluang kemenangan secara signifikan. Banyak yang percaya bahwa informasi ini membantu mereka mendapatkan hasil yang lebih konsisten dalam permainan. Jika Anda ingin tahu lebih lanjut, cek bocoran RTP Mahjong Wins 3 hari ini dan lihat apakah strategi ini benar-benar efektif.
MostBet Polska to miejsce, gdzie mozna grac w ruletke, blackjacka i sloty | Dzieki MostBet mozesz obstawiac zaklady sportowe i grac w kasynie w jednym miejscu mostbet rejestracja | MostBet to kasyno, ktore oferuje wysokie RTP na swoich grach | MostBet oferuje szybkie metody platnosci, w tym BLIK i karty platnicze | MostBet oferuje bonusy bez depozytu dla nowych uzytkownikow | MostBet kasyno online oferuje duzy wybor slotow | MostBet casino bonus pozwala na dodatkowe srodki do gry | MostBet pl to legalne kasyno dostepne dla polskich graczy [url=https://mostbet-casino-logowanie-pl.com/]MostBet rejestracja online[/url].
Nice post. I learn something new and challenging on sites I stumbleupon every day. It will always be exciting to read through content from other authors and practice something from their web sites.
Каталог финансовых организаций srochno zaym online ru в которых можно получить срочные онлайн займы и кредиты не выходя из дома.
hd rezka ужасы hd на айфоне hdrezka смотреть драмы с озвучкой онлайн
MostBet oferuje atrakcyjne bonusy powitalne dla nowych graczy | MostBet logowanie jest szybkie i proste – wystarczy kilka klikniec mostbetcasinologowanieplcom | MostBet to kasyno, ktore oferuje wysokie RTP na swoich grach | MostBet Polska oferuje program VIP dla lojalnych graczy | MostBet logowanie jest proste i wymaga jedynie podania loginu i hasla | MostBet rejestracja otwiera dostep do ekskluzywnych ofert | MostBet casino bonus pozwala na dodatkowe srodki do gry | MostBet pl to legalne kasyno dostepne dla polskich graczy [url=https://mostbet-casino-logowanie-pl.com/]MostBet pl[/url].
Kasino mendukung permainan bertanggung jawab http://slot88.company/# Beberapa kasino memiliki area khusus untuk slot
MostBet oferuje szeroki wybor gier kasynowych dla polskich graczy | MostBet oferuje szeroki wybor metod wplat i wyplat mostbet pl | MostBet online casino to nowoczesna platforma z ogromnym wyborem gier | MostBet casino bonus pozwala zwiekszyc szanse na wygrana | MostBet Polska pozwala na granie zarowno na komputerze, jak i smartfonie | MostBet pl to miejsce dla fanow pokera, ruletki i blackjacka | MostBet oferuje zaklady sportowe oraz gry kasynowe na jednej platformie | MostBet pl to legalne kasyno dostepne dla polskich graczy [url=https://mostbet-casino-logowanie-pl.com/]www.mostbet-casino-logowanie-pl.com[/url].
MostBet Polska to miejsce, gdzie mozna grac w ruletke, blackjacka i sloty | Dzieki MostBet mozesz obstawiac zaklady sportowe i grac w kasynie w jednym miejscu mostbet casino bonus | MostBet kasyno oferuje sloty od najlepszych dostawcow na rynku | W MostBet mozna grac na zywo z prawdziwymi krupierami | MostBet kasyno oferuje regularne turnieje z atrakcyjnymi nagrodami | MostBet kasyno zapewnia wysoki poziom bezpieczenstwa | MostBet kasyno oferuje wiele promocji dla stalych graczy | MostBet logowanie umozliwia natychmiastowy dostep do gier [url=https://mostbet-casino-logowanie-pl.com/]MostBet rejestracja online[/url].
http://preman69.tech/# Permainan slot mudah dipahami dan menyenangkan
офисный переезд грузоперевозки минск гродно
Kasino sering memberikan hadiah untuk pemain setia: bonaslot.site – BonaSlot
MostBet oferuje atrakcyjne bonusy powitalne dla nowych graczy | Dzieki MostBet mozesz obstawiac zaklady sportowe i grac w kasynie w jednym miejscu mostbet casino | MostBet Polska to najlepsza opcja dla graczy szukajacych legalnego kasyna online | MostBet casino bonus pozwala zwiekszyc szanse na wygrana | MostBet pl to licencjonowane kasyno online dostepne dla polskich graczy | MostBet kasyno online oferuje duzy wybor slotow | MostBet Polska obsluguje transakcje w PLN | MostBet pl to legalne kasyno dostepne dla polskich graczy [url=https://mostbet-casino-logowanie-pl.com/]www.mostbet-casino-logowanie-pl.com[/url].
MostBet oferuje szeroki wybor gier kasynowych dla polskich graczy | MostBet oferuje szeroki wybor metod wplat i wyplat mostbet logowanie | MostBet online casino to nowoczesna platforma z ogromnym wyborem gier | MostBet logowanie umozliwia szybki dostep do gier i zakladow | W MostBet mozna obstawiac zaklady na najwazniejsze wydarzenia sportowe | MostBet to najlepsze kasyno online w Polsce | MostBet to renomowana marka wsrod kasyn online | MostBet oferuje wsparcie klienta 24/7 [url=https://mostbet-casino-logowanie-pl.com/]MostBet online casino[/url].
visit my article https://medium.com/@RyanNakamoto1/minswap-the-best-platform-for-swapping-crypto-in-2025-a3500dc2d5c7
UID_95859078###
Baru-baru ini, para pemain Mahjong Wins 3 dikejutkan dengan bocoran RTP yang diklaim bisa meningkatkan peluang kemenangan secara signifikan. Banyak yang percaya bahwa informasi ini membantu mereka mendapatkan hasil yang lebih konsisten dalam permainan. Jika Anda ingin tahu lebih lanjut, cek bocoran RTP Mahjong Wins 3 hari ini dan lihat apakah strategi ini benar-benar efektif.
In diesem Artikel stellen wir eine Auswahl von TikTok Downloader ohne Wasserzeichen vor, die das Herunterladen in klarer und unmarkierter Form ermöglichen.
Kasino memiliki suasana yang energik dan menyenangkan http://garuda888.top/# Kasino di Indonesia menyediakan hiburan yang beragam
visit my article https://medium.com/@RyanNakamoto1/minswap-the-best-platform-for-swapping-crypto-in-2025-a3500dc2d5c7
preman69 slot [url=https://preman69.tech/#]preman69 slot[/url] Slot klasik tetap menjadi favorit banyak orang
http://preman69.tech/# Slot memberikan kesempatan untuk menang besar
https://crossbell.io/notes/74340-12
Slot dengan bonus putaran gratis sangat populer: demo slot pg – slotdemo
visit my article https://medium.com/@RyanNakamoto1/minswap-the-best-platform-for-swapping-crypto-in-2025-a3500dc2d5c7
Mesin slot dapat dimainkan dalam berbagai bahasa https://preman69.tech/# Slot klasik tetap menjadi favorit banyak orang
https://medium.com/@anthonywalkerfck49/how-to-use-rocket-pool-for-staking-eth-a-step-by-step-guide-1f50c720ff55
UID_57331425###
Skandal terbaru mengguncang komunitas pecinta game slot setelah seorang admin terkenal, Rachel, dikabarkan tertangkap membocorkan pola kemenangan Gate of Olympus. Banyak yang bertanya-tanya apakah informasi ini benar-benar akurat atau hanya sekadar rumor yang beredar di kalangan pemain. Simak lebih lanjut detailnya dalam artikel admin Rachel tertangkap bocorkan pola Gate of Olympus.
amoxicillin cost – azithromycin 500mg over the counter buy vardenafil 20mg pills
https://slot88.company/# Banyak pemain menikmati bermain slot secara online
sex nhật hiếp dâm trẻ em ấu dâm buôn bán vũ khí ma túy bán súng sextoy chơi đĩ sex bạo lực sex học đường tội phạm tình dục chơi les đĩ đực người mẫu bán dâm
casino elon [url=http://eloncasinofun.com/]http://eloncasinofun.com/[/url] .
1 win bet [url=http://bbcc.com.kg]http://bbcc.com.kg[/url] .
elonbet casino [url=http://eloncasinofun.com/]http://eloncasinofun.com/[/url] .
1вин официальный сайт [url=bbcc.com.kg]1вин официальный сайт[/url] .
https://www.newsbreak.com/crypto-space-hub-313321940/3799652652916-top-crypto-investments-in-2025-bitcoin-ai-projects-tokenized-assets
Slot dengan pembayaran tinggi selalu diminati: garuda888 slot – garuda888.top
Helpful information. Lucky me I discovered your web site accidentally,
and I am surprised why this twist of fate did not took place in advance!
I bookmarked it.
фильмы 1080p смотреть онлайн бесплатно hdrezka ужасы новинки с озвучкой
Каталог финансовых организаций http://srochno-zaym-online.ru в которых можно получить срочные онлайн займы и кредиты не выходя из дома.
Slot menawarkan kesenangan yang mudah diakses http://preman69.tech/# Banyak pemain berusaha untuk mendapatkan jackpot
https://www.newsbreak.com/crypto-bull-313322310/3799707985806-market-analyst-sees-1500-pump-in-xrp-price-amid-multiple-etf-applications
https://www.newsbreak.com/crypto-space-hub-313321940/3799652652916-top-crypto-investments-in-2025-bitcoin-ai-projects-tokenized-assets
https://sites.google.com/view/rocketpool-us
visit my article https://medium.com/@RyanNakamoto1/minswap-the-best-platform-for-swapping-crypto-in-2025-a3500dc2d5c7
https://www.newsbreak.com/crypto-bull-313322310/3799707985806-market-analyst-sees-1500-pump-in-xrp-price-amid-multiple-etf-applications
UID_57331425###
Skandal terbaru mengguncang komunitas pecinta game slot setelah seorang admin terkenal, Rachel, dikabarkan tertangkap membocorkan pola kemenangan Gate of Olympus. Banyak yang bertanya-tanya apakah informasi ini benar-benar akurat atau hanya sekadar rumor yang beredar di kalangan pemain. Simak lebih lanjut detailnya dalam artikel admin Rachel tertangkap bocorkan pola Gate of Olympus.
http://slotdemo.auction/# Banyak pemain menikmati jackpot harian di slot
slotdemo [url=http://slotdemo.auction/#]demo slot pg[/url] Slot dengan bonus putaran gratis sangat populer
Pemain sering mencoba berbagai jenis slot: slot demo – slot demo
Banyak pemain menikmati bermain slot secara online https://bonaslot.site/# Slot dengan tema budaya lokal menarik perhatian
An impressive share! I’ve just forwarded this onto a coworker who was conducting a little homework on this. And he in fact bought me dinner simply because I stumbled upon it for him… lol. So let me reword this…. Thanks for the meal!! But yeah, thanx for spending some time to discuss this topic here on your site.
http://slotdemo.auction/# Kasino menyediakan layanan pelanggan yang baik
UID_17136916###
Kisah inspiratif datang dari seorang tukang ojek online asal Tangerang yang berhasil membawa pulang hadiah fantastis setelah bermain Mahjong Ways 2. Dengan modal kecil, ia sukses mengubah nasibnya dan meraih kemenangan besar senilai 200 juta rupiah. Penasaran bagaimana caranya? Simak kisah lengkapnya di artikel tukang ojek online menang 200 juta dari Mahjong Ways 2.
An outstanding share! I have just forwarded this onto a friend who was doing a little research on this. And he in fact bought me dinner due to the fact that I found it for him… lol. So allow me to reword this…. Thank YOU for the meal!! But yeah, thanx for spending time to discuss this matter here on your blog.
Pemain bisa menikmati slot dari kenyamanan rumah http://slot88.company/# Mesin slot digital semakin banyak diminati
As soon as once more, banks begin lending at the next curiosity rate to meeting the higher demand for loans.
Bermain slot bisa menjadi pengalaman sosial: bonaslot – bonaslot.site
Read on to search out out about more about their software program, particularly the most common MID operating systems.
Hey I am so happy I found your site, I really found you by accident, while I was looking on Yahoo for something else, Anyhow I am here now and would just like to say kudos for a remarkable post and a all round interesting blog (I also love the theme/design), I don’t have time to read it all at the moment but I have saved it and also included your RSS feeds, so when I have time I will be back to read much more, Please do keep up the awesome job.
Hi there i am kavin, its my first time to commenting anywhere, when i read this paragraph i thought i could also create comment due to this brilliant post.
Wyoming Valley Equipment LLC
Virtually all of whatever you assert happens to be astonishingly precise and that makes me ponder the reason why I hadn’t looked at this in this light previously. Your article really did turn the light on for me personally as far as this specific issue goes. Nevertheless there is just one position I am not necessarily too comfortable with and whilst I make an effort to reconcile that with the actual main theme of your issue, let me observe exactly what the rest of the subscribers have to point out.Well done.
One in a light gray lace patterned costume, the opposite in a green and white striped dress – embellished with large decorative bows.
In some cases, it may cause upset stomachs or diarrhea in dogs.
For exporters, foreign trade finance tools like pre-shipment financing bridge the gap between production and payment, ensuring a steady cash flow and the ability to fulfill orders without liquidity constraints.
nice article ave a look at my site “https://www.newsbreak.com/crypto-space-hub-313321940/3799652652916-top-crypto-investments-in-2025-bitcoin-ai-projects-tokenized-assets”
This fashion, you are assured that your enterprise has most, if not all, of the protection it needs in the occasion of litigations and/or settlements.
Childbirth, menopause, a fracture of the pelvis, and sure forms of surgical procedure, resembling a hysterectomy (removal of the uterus) or prostatectomy (elimination of the prostate gland), can cause these muscles to change into deficient.
You should take part in a contest for one of the finest sites on the internet. I’m going to recommend this site!
Jack Hickey began his profession as an attorney for the cruise lines.
Follow an excellent wealth management DC philosophy – make investments your cash, spend the rest and never spend your cash, invest the remainder.
Hello there, I discovered your website by means of Google even as looking for a
comparable subject, your web site came up, it appears to be like great.
I’ve bookmarked it in my google bookmarks.
Hello there, just became aware of your blog through Google,
and found that it’s truly informative. I am gonna be careful for brussels.
I’ll be grateful for those who continue this in future.
Numerous people might be benefited out of
your writing. Cheers!
http://slot88.company/# Slot dengan tema film terkenal menarik banyak perhatian
I apologise, but, in my opinion, you are not right. I can defend the position. Write to me in PM.
резка смотреть фэнтези full hd онлайн hd rezka смотреть детективы 1080p онлайн
Kasino memastikan keamanan para pemain dengan baik https://bonaslot.site/# Pemain harus menetapkan batas saat bermain
UID_17136916###
Kisah inspiratif datang dari seorang tukang ojek online asal Tangerang yang berhasil membawa pulang hadiah fantastis setelah bermain Mahjong Ways 2. Dengan modal kecil, ia sukses mengubah nasibnya dan meraih kemenangan besar senilai 200 juta rupiah. Penasaran bagaimana caranya? Simak kisah lengkapnya di artikel tukang ojek online menang 200 juta dari Mahjong Ways 2.
Mesin slot dapat dimainkan dalam berbagai bahasa: garuda888.top – garuda888 slot
garuda888 slot [url=http://garuda888.top/#]garuda888[/url] Kasino di Bali menarik banyak pengunjung
nice article ave a look at my site “https://www.newsbreak.com/crypto-space-hub-313321940/3799652652916-top-crypto-investments-in-2025-bitcoin-ai-projects-tokenized-assets”
I’m pretty pleased to discover this great site. I need to to thank you for ones time due to this fantastic read!! I definitely really liked every bit of it and I have you book-marked to look at new things on your website.
If you’re confused about installing the Metamask extension, check out https://metamaker.org/#metamask-download. Their step-by-step guide is super helpful and easy to follow.
Nice article, have a look at my site “https://www.issuewire.com/sushi-swap-the-best-crypto-platform-in-2025-1823683727364009”
Having read this I believed it was extremely informative. I appreciate you taking the time and energy to put this informative article together. I once again find myself personally spending a lot of time both reading and posting comments. But so what, it was still worth it.
nice article, have a look at my
Slot menawarkan berbagai jenis permainan bonus http://slot88.company/# Banyak pemain mencari mesin dengan RTP tinggi
https://preman69.tech/# Slot memberikan kesempatan untuk menang besar
Slot modern memiliki grafik yang mengesankan: preman69 – preman69.tech
Good blog! I truly love how it is simple on my eyes and the data are well written. I am wondering how I might be notified whenever a new post has been made. I’ve subscribed to your RSS which must do the trick! Have a great day!
Hey There. I found your blog using msn. This is an extremely well written article.
I will make sure to bookmark it and return to read more of your useful information.
Thanks for the post. I will certainly return.
электрический карниз для штор купить [url=http://elektrokarnizy77.ru/]электрический карниз для штор купить[/url] .
tk999 casino [url=http://www.tk999.dev]tk999 casino[/url] .
KU9 app [url=http://www.ku9-app.org]KU9 app[/url] .
nice article ave a look at my site “https://www.newsbreak.com/crypto-space-hub-313321940/3799652652916-top-crypto-investments-in-2025-bitcoin-ai-projects-tokenized-assets”
электрические гардины [url=http://elektrokarnizy77.ru/]электрические гардины[/url] .
tk999 download [url=http://tk999-app.info]tk999 download[/url] .
KU9 vip [url=https://ku9-app.org/]KU9 vip[/url] .
Kasino menyediakan layanan pelanggan yang baik https://bonaslot.site/# Permainan slot bisa dimainkan dengan berbagai taruhan
Nice article, have a look at my site “https://www.issuewire.com/sushi-swap-the-best-crypto-platform-in-2025-1823683727364009”
Wow, this article is nice, my younger sister is analyzing these things, so I am going to tell her.
https://preman69.tech/# Slot klasik tetap menjadi favorit banyak orang
https://sushi-swap.medium.com/sushi-swap-the-best-crypto-platform-in-2025-fabb4c54702d
Slot menawarkan kesenangan yang mudah diakses: slot 88 – slot 88
preman69 [url=http://preman69.tech/#]preman69 slot[/url] Slot dengan grafis 3D sangat mengesankan
https://medium.com/@anthonywalkerfck49/how-to-swap-crypto-on-sushi-swap-a-step-by-step-guide-1d39e9a42974
Kasino mendukung permainan bertanggung jawab http://garuda888.top/# Kasino memastikan keamanan para pemain dengan baik
UID_87427935###
Cek yuk! 🚍👮♂️Operasi Keselamatan 2025 Polres Ciamis Siapa tahu bus favoritmu jadi sasaran! 😱👍
http://garuda888.top/# Permainan slot bisa dimainkan dengan berbagai taruhan
купить виагру в москве [url=https://viagramsk1.ru]купить виагру в москве[/url] .
UID_87427935###
Cek yuk! 🚍👮♂️Operasi Keselamatan 2025 Polres Ciamis Siapa tahu bus favoritmu jadi sasaran! 😱👍
виагра мск [url=http://viagramsk2.ru]виагра мск[/url] .
UID_18563832###
Ini yang di ganti >>> Yuk, ketahui lebih lanjut tentang Syarat Gabung OECD dan Pentingnya Ratifikasi Konvensi Antisuap di sini! 🕵️♀️🔎📚.
Permainan slot bisa dimainkan dengan berbagai taruhan: BonaSlot – bonaslot
UID_18563832###
Ini yang di ganti >>> Yuk, ketahui lebih lanjut tentang Syarat Gabung OECD dan Pentingnya Ratifikasi Konvensi Antisuap di sini! 🕵️♀️🔎📚.
Pemain sering mencoba berbagai jenis slot https://preman69.tech/# Banyak kasino memiliki program loyalitas untuk pemain
Nice article, have a look at my site “https://www.issuewire.com/sushi-swap-the-best-crypto-platform-in-2025-1823683727364009”
I every time used to read piece of writing in news papers but now as
I am a user of web thus from now I am using net for
articles or reviews, thanks to web.
https://medium.com/@TokenTracker1/what-is-sushi-swap-complete-guide-for-2025-d3b9e24592b0
https://garuda888.top/# Slot dengan bonus putaran gratis sangat populer
MostBet to legalna platforma hazardowa w Polsce z licencja | Dzieki MostBet mozesz obstawiac zaklady sportowe i grac w kasynie w jednym miejscu http://www.mostbet-casino-logowanie-pl.com | MostBet zapewnia profesjonalna obsluge klienta i bezpieczne transakcje | MostBet kasyno online jest dostepne na urzadzeniach mobilnych | MostBet to platforma hazardowa z nowoczesnym designem i intuicyjna obsluga | MostBet casino bonus to swietny sposob na wieksze wygrane | MostBet rejestracja jest dostepna dla wszystkich pelnoletnich uzytkownikow | MostBet Polska to platforma z szeroka oferta gier i zakladow [url=https://mostbet-casino-logowanie-pl.com/]MostBet zaklady sportowe[/url].
https://spookyswap-r-2.gitbook.io/en-us/
Получить займ на карту банка теперь просто, быстро и удобно. Мы гарантируем доступные условия. Перейдите на https://mikro-zaymi.ru/, чтобы узнать подробности. Процесс оформления занимает очень быстро. Не задерживайтесь! Получите кредит прямо сейчас!
Kasino sering memberikan hadiah untuk pemain setia: slot88.company – slot88
Banyak kasino memiliki program loyalitas untuk pemain https://preman69.tech/# Jackpot besar bisa mengubah hidup seseorang
MostBet to legalna platforma hazardowa w Polsce z licencja | MostBet Polska to polaczenie zakladow sportowych i kasyna na najwyzszym poziomie mostbet pl | MostBet zapewnia profesjonalna obsluge klienta i bezpieczne transakcje | MostBet rejestracja daje dostep do ekskluzywnych promocji | MostBet oferuje bonusy bez depozytu dla nowych uzytkownikow | MostBet logowanie umozliwia szybki dostep do gier | MostBet casino bonus pozwala na dodatkowe srodki do gry | MostBet kasyno online posiada program lojalnosciowy dla graczy [url=https://mostbet-casino-logowanie-pl.com/]https://mostbet-casino-logowanie-pl.com/[/url].
https://spookyswap-r-1.gitbook.io/en-us
Video Downloadr, Instagram video indirmek için en popüler araçlardan biridir.
UID_18563832###
Ini yang di ganti >>> Yuk, ketahui lebih lanjut tentang Syarat Gabung OECD dan Pentingnya Ratifikasi Konvensi Antisuap di sini! 🕵️♀️🔎📚.
slot demo [url=http://slotdemo.auction/#]slot demo[/url] Pemain harus memahami aturan masing-masing mesin
смотреть боевики онлайн подборка резка сериалы фэнтези на телевизоре
https://slot88.company/# Banyak pemain mencari mesin dengan RTP tinggi
I absolutely love your site.. Great colors & theme. Did you build this site yourself? Please reply back as I’m trying to create my own blog and would love to find out where you got this from or what the theme is called. Many thanks!
https://spookyswap-14.gitbook.io/en-us/
Next time I read a blog, Hopefully it does not disappoint me as much as this particular one. I mean, Yes, it was my choice to read through, but I actually believed you would probably have something helpful to say. All I hear is a bunch of whining about something that you could possibly fix if you weren’t too busy looking for attention.
Slot menawarkan berbagai jenis permainan bonus https://slot88.company/# Slot menjadi daya tarik utama di kasino
Mesin slot menawarkan pengalaman bermain yang cepat: preman69 slot – preman69
https://guide-to-spookyswap-r.gitbook.io/en-us/
Very good article! We are linking to this particularly great post on our website. Keep up the good writing.
It will be last drop.
https://slotdemo.auction/# Slot dengan fitur interaktif semakin banyak tersedia
The very next time I read a blog, I hope that it does not disappoint me just as much as this one. After all, Yes, it was my choice to read through, nonetheless I actually thought you would probably have something useful to say. All I hear is a bunch of moaning about something you could possibly fix if you weren’t too busy seeking attention.
Slot modern memiliki grafik yang mengesankan https://slot88.company/# Slot menawarkan kesenangan yang mudah diakses
UID_83003169###
Kenalan yuk! 🤝 Dengan guru inspiratif ini, Guru Dede Sulaeman yang mengajarkan cara merapikan pakaian di kelasnya. 👕👚🎓
The study also confirmed that cars working on E15 take a hit on gas mileage — in order that they require more gasoline to journey the identical distance, which counteracts the advantages of diluting it in the first place.
WONDERFUL Post.thanks for share..extra wait .. ?
Pemain harus memahami aturan masing-masing mesin: slot 88 – slot 88
https://r-how-to-use-spookyswap-r-1.gitbook.io/en-us/
Banyak pemain mencari mesin dengan RTP tinggi https://slot88.company/# Kasino di Bali menarik banyak pengunjung
Сауна очищает организм https://sauna-broadway.ru выводя токсины через пот, укрепляет иммунитет благодаря перепадам температуры, снимает стресс, расслабляя мышцы и улучшая кровообращение. Она делает кожу более упругой, ускоряет восстановление после тренировок, улучшает сон и создаёт атмосферу для общения.
https://preman69.tech/# Slot dengan tema film terkenal menarik banyak perhatian
UID_83003169###
Kenalan yuk! 🤝 Dengan guru inspiratif ini, Guru Dede Sulaeman yang mengajarkan cara merapikan pakaian di kelasnya. 👕👚🎓
Very nice write-up. I absolutely love this site. Thanks!
Banyak pemain menikmati bermain slot secara online http://garuda888.top/# Bermain slot bisa menjadi pengalaman sosial
slotdemo [url=https://slotdemo.auction/#]slot demo rupiah[/url] Banyak kasino menawarkan permainan langsung yang seru
https://spookyswap-tm-2.gitbook.io/en-us/
That is a great tip especially to those new to the blogosphere. Simple but very precise information… Many thanks for sharing this one. A must read article.
1. Establishing a small scale enterprise is perceived as a strong medium to handle a number of socio-financial points.
visit https://iziswap.org/ for more details
Bragg, N.C., by President John F. Kennedy in 1961 that the inexperienced beret was made the official headgear of the Army Particular Forces.
Kasino menawarkan pengalaman bermain yang seru: bonaslot.site – BonaSlot
A fascinating discussion is worth comment. There’s no doubt that that you need to write more on this issue, it might not be a taboo subject but usually people do not talk about these issues. To the next! Cheers.
Shutouts are usually seen because of efficient defensive play even though a weak opposing offense may be as much to blame.
Korean cosmetics https://www.futurelearn.com/profiles/22219090 perfect skin without effort! Innovative formulas, Asian traditions and visible results. Try the best skin care products right now!
https://spookyswap-r-4.gitbook.io/en-us/
Beberapa kasino memiliki area khusus untuk slot http://slot88.company/# Banyak pemain menikmati jackpot harian di slot
This really answered my problem, thank you!
Kasino di Indonesia menyediakan hiburan yang beragam http://slot88.company/# Banyak kasino memiliki program loyalitas untuk pemain
Hello there! I just want to give you a huge thumbs up for your excellent info you have got here on this post. I’ll be coming back to your blog for more soon.
http://slot88.company/# Kasino di Jakarta memiliki berbagai pilihan permainan
The issue with learning openings at an early stage is in making an attempt to be taught by rote, without understanding causes and whys and wherefores.
https://guide-to-spookyswap-r.gitbook.io/en-us/
You are so cool! I do not think I have read a single thing like that before. So great to discover another person with some unique thoughts on this subject. Seriously.. many thanks for starting this up. This website is something that is required on the web, someone with a bit of originality.
Visit spookyswap and click “Connect Wallet.”
Greetings! Very useful advice in this particular article! It’s the little changes that will make the largest changes. Thanks a lot for sharing!
doxycycline 100mg generic: buy doxycycline australia – order doxycycline online australia
teacher porn hot [url=https://www.teacherporntube.com]teacher porn hot[/url] .
электрокарниз купить [url=prokarniz11.ru]электрокарниз купить[/url] .
автоматические гардины для штор [url=http://www.prokarniz17.ru]автоматические гардины для штор[/url] .
карниз для штор с электроприводом [url=www.prokarniz19.ru]карниз для штор с электроприводом[/url] .
I’m so happy to read this. This is the kind of manual that needs to be given and not the accidental misinformation that’s at the other blogs. Appreciate your sharing this best doc.
teacher se sex [url=www.teacherporntube.com/]www.teacherporntube.com/[/url] .
электрокарнизы цена [url=https://prokarniz11.ru/]электрокарнизы цена[/url] .
электро карниз на окна [url=https://prokarniz17.ru/]электро карниз на окна[/url] .
электрокарниз купить в москве [url=https://prokarniz19.ru]электрокарниз купить в москве[/url] .
I appreciate the depth of research in this post.
can i get clomid online [url=http://clmhealthpharm.com/#]where to buy clomid[/url] can you buy clomid without prescription
where to buy clomid no prescription: where can i buy cheap clomid without a prescription – can i buy clomid
Woofi Finance makes complex finance easy!
Woofi Finance – because finance should be simple!
http://zithropharm.com/# zithromax for sale 500 mg
I appreciate the insights in this post. Well done!
https://official-site-r-or-spookyswap-1.gitbook.io/en-us/
If you need smart financial solutions, visit Woofi Finance!
Somewhat saltwater, sunshine and sand within the toes are a healthy treatment for a confused out and overextended workforce.
Great post! This aligns with a lot of what I’ve been thinking recently. If you’re curious to see more on this topic, 토토추천사이트 might provide some valuable insights.
Unlike Jedi, Sith Lords do not hold themselves to a code of steadiness or truthful play.
amoxicillin 500 mg without prescription: Amo Health Pharm – amoxacillian without a percription
https://spookyswap-6.gitbook.io/en-us/
электрические гардины [url=www.prokarniz20.ru]электрические гардины[/url] .
This may include you attitude to funding threat.
You covered this topic really well. Impressive!
автоматические карнизы для штор [url=http://prokarniz20.ru/]автоматические карнизы для штор[/url] .
buying generic clomid without dr prescription: get cheap clomid pills – can i buy cheap clomid no prescription
I can’t recommend Woofi Finance enough!
As time goes on and the oil supply dwindles, it will get tougher and more durable (and more and dearer) to seek out what’s left.
For the electric energy wonks, that is the same as a hundred miles (160.9 kilometers) for each 33.7 kilowatt hours of vitality.
Exchange rate bands allow markets to set rates within a specified range; edges of the band are defended through intervention.
So much value in this post. Thanks for sharing!
This is the type of grassroots power that may change total political and social landscapes.
Awesome breakdown of the topic. Keep writing!
https://spookyswap-c.gitbook.io/en-us
Woofi Finance has the best finance tools!
order clomid without a prescription: ClmHealthPharm – where can i get cheap clomid without insurance
https://doxhealthpharm.com/# doxycycline price usa
When I originally left a comment I seem to have clicked the -Notify me when new comments are added- checkbox and now every time a comment is added I receive four emails with the same comment. Perhaps there is an easy method you are able to remove me from that service? Cheers.
Insightful post! I learned something new today.
UID_97211224###
Yuk, sehat bersama! 👨⚕️👩⚕️ Cek kondisi tubuh kamu di Program Cek Kesehatan Gratis sekarang juga! 💉🌡️ Selalu jaga kesehatan, ya! 🏥💖
This article was a pleasure to read. Thanks!
buy cheap zithromax online: ZithroPharm – zithromax 500 price
https://spookyswap-c.gitbook.io/en-us
Discovering the Efficacy of Eye Movement Desensitization and Reprocessing Treatment for PTSD
Post-Traumatic Stress Disorder (PTSD) remains a remarkable emotional fitness challenge globally, with conventional treatment techniques often not meeting expectations in offering sustained comfort. This community post delves into the effectiveness of Eye action Desensitization and Reprocessing Eye Movement Desensitization and Reprocessing remedy in lessening PTSD symptoms.
Investigations have shown encouraging results regarding Eye Movement Desensitization and Reprocessing’s aptitude to minimize the seriousness of PTSD symptoms, including penetrating thoughts, flashbacks, and hypervigilance. The unique two-sided stimulus strategies used in Eye Movement Desensitization and Reprocessing help patients handle traumatic recollections and reinterpret negative beliefs connected with the upheaval.
Moreover, Eye Movement Desensitization and Reprocessing’s non-intrusive nature and relatively small length contrasted to usual counseling make it an appealing option for hundreds individuals seeking PTSD remedy. However, it’s important to accept that Eye Movement Desensitization and Reprocessing may not be evenly successful for a lot of people, and individual responses to treatment can range.
Overall, when more research is needed to thoroughly realize the mechanisms behind Eye Movement Desensitization and Reprocessing’s success, the existing proof shows that it maintains hope as a precious restorative plan for individuals grappling with PTSD.
[url=https://lkinstitute.com/emdr-trainings]Eye Movement Desensitization and Reprocessing IOP recovery support[/url]
3d6d04a
UID_97211224###
Yuk, sehat bersama! 👨⚕️👩⚕️ Cek kondisi tubuh kamu di Program Cek Kesehatan Gratis sekarang juga! 💉🌡️ Selalu jaga kesehatan, ya! 🏥💖
Very good post! We are linking to this particularly great post on our website. Keep up the great writing.
This was exactly what I was looking for. Thanks!
As the decentralized finance (DeFi) space continues to evolve in 2025, SpookySwap has established itself as one of the leading decentralized exchanges (DEXs) on the Fantom Opera blockchain. Known for fast, low-cost token swaps, yield farming, and liquidity rewards, SpookySwap is a powerful tool for traders and DeFi enthusiasts looking to maximize their returns while maintaining full control of their funds.
I learned a lot from Woofi Finance!
doxycycline 100g tablets: Dox Health Pharm – cheapest doxycycline 100mg
One year, stocks will do great and the next 12 months they’ll dip.
I’ve learn some excellent stuff here. Certainly price bookmarking for revisiting.
I surprise how much attempt you put to make this type of great informative web site.
Hi there! This post couldn’t be written much better! Looking at this post reminds me of my previous roommate! He constantly kept preaching about this. I most certainly will send this post to him. Pretty sure he will have a very good read. Many thanks for sharing!
amoxicillin 500mg pill [url=http://amohealthpharm.com/#]buy amoxicillin online no prescription[/url] amoxicillin price without insurance
can i get cheap clomid without prescription: ClmHealthPharm – buy generic clomid without prescription
May I just say what a relief to find a person that actually understands what they are discussing on the net. You definitely realize how to bring a problem to light and make it important. A lot more people should check this out and understand this side of your story. I can’t believe you aren’t more popular given that you surely possess the gift.
https://amohealthpharm.com/# order amoxicillin online
where can i get clomid now: ClmHealthPharm – how to get clomid price
UID_72356120###
strong>Dari Ojek ke Sultan, Kisah Arman yang Mendadak Kaya – Hidup Arman berubah drastis setelah keberuntungan menghampirinya. Dari seorang tukang ojek, kini ia menikmati kehidupan mewah setelah memenangkan 300 juta di Dragon Fortune. Simak kisah inspiratifnya
UID_40226211###
Berita Hangat! 📰🔥 Bimbel Gratis Bagi Siswa SMAN 7 Cirebon yang Gagal SNBP! 😲🎓👍.
https://spookyswap-r-2.gitbook.io/en-us/
UID_29550266###
Cek yuk! 🚀 Prabowo Diberi Batas 30 Hari oleh KPK! 😱🔥
May I just say what a relief to find a person that genuinely knows what they’re discussing online. You certainly know how to bring an issue to light and make it important. A lot more people have to look at this and understand this side of your story. I was surprised you aren’t more popular because you certainly have the gift.
A high level woman you must have a single body appearance. Is going to be most excellent construct, adult will need the customer through your self confidence and girls do imagine drawn to because of your captivating looks. Albeit numerous men desirable to generate an extremely whole a lot are certainly all set to might dozens of vexing physical trainings was needed to grow their lean muscle mass. These grownup is usually hugely willing to fully grasp that the following is straight can certainly have muscle and strength merely by swallowing an outstanding application identified Huge Muscle mass mass Contractor.
buy zithromax online: zithromax 500mg over the counter – zithromax over the counter
https://spookyswap-6.gitbook.io/en-us/
can you buy cheap clomid no prescription: ClmHealthPharm – where can i get cheap clomid without a prescription
As the decentralized finance (DeFi) space continues to evolve in 2025, SpookySwap has established itself as one of the leading decentralized exchanges (DEXs) on the Fantom Opera blockchain. Known for fast, low-cost token swaps, yield farming, and liquidity rewards, SpookySwap is a powerful tool for traders and DeFi enthusiasts looking to maximize their returns while maintaining full control of their funds.
https://clmhealthpharm.com/# clomid brand name
Choose a compatible wallet like Metamask or Trust Wallet to get started.
zithromax generic cost: ZithroPharm – can you buy zithromax over the counter in australia
Нужны деньги безотлагательно? Получите денежную поддержку на банковскую карту без долгих проверок на https://zaym-tula.ru/ просто! Оставьте запрос и получите финансы сразу!
how to get doxycycline online: doxycycline buy canada 100mg – doxycycline 400 mg
cost cheap clomid online [url=https://clmhealthpharm.shop/#]where can i get cheap clomid for sale[/url] buying clomid prices
Avoid the risks of untrusted services and use verified platforms instead.
Looking for reliability in crypto trading? Check out this list of trusted platforms.
order cheap clomid without a prescription: can i purchase generic clomid tablets – can i order clomid
Your guide to the safest and most reliable crypto exchanges.
Visit spookyswap and click “Connect Wallet.”
https://spookyswap-tm-3.gitbook.io/en-us/
https://spookyswap-r-and-fantom-opera-ne.gitbook.io/en-us/
I believe that is one of the such a lot significant information for me. And i am glad studying your article. But wanna statement on some common issues, The site style is ideal, the articles is actually excellent : D. Excellent process, cheers
прокарниз [url=https://www.prokarniz20.ru]https://www.prokarniz20.ru[/url] .
http://zithropharm.com/# zithromax online no prescription
автоматические карнизы [url=www.prokarniz20.ru/]автоматические карнизы[/url] .
amoxicillin from canada: medicine amoxicillin 500mg – buy amoxicillin online without prescription
электрокранизы [url=http://www.prokarniz34.ru]http://www.prokarniz34.ru[/url] .
прокарниз [url=www.prokarniz38.ru/]www.prokarniz38.ru/[/url] .
buy generic clomid without dr prescription: ClmHealthPharm – can i order cheap clomid prices
электрокарнизы для штор купить [url=www.prokarniz34.ru/]электрокарнизы для штор купить[/url] .
электрические карнизы [url=www.prokarniz38.ru]электрические карнизы[/url] .
The LP token farms on spooky swap help increase yield returns.
Why isn’t everyone talking about spooky swap? It’s awesome.
Fast, secure, and always reliable—that’s why I stick with spooky swap.
I always use spooky swap—safe, secure, and smooth transactions.
https://spookyswap-2.gitbook.io/en-us
With spooky swap, you can optimize your DeFi strategy with staking and farming.
https://spookyswap-tm-3.gitbook.io/en-us/
Yield farming on spooky swap is one of the best ways to earn passive income.
can you buy doxycycline over the counter in canada: Dox Health Pharm – doxycycline for sale uk
No rug pulls, no hidden fees—just pure DeFi magic on spooky swap.
Spooky swap has never failed me, even in high traffic times.
https://spookyswap-tm-3.gitbook.io/en-us/
zithromax online usa: Zithro Pharm – zithromax canadian pharmacy
This post really got me thinking! You’ve raised some valuable points. If others want to continue the discussion, check could be a great resource for more information.
This is a very informative post! You’ve managed to cover a lot in a concise way. For anyone wanting to explore this in more detail, click could offer further information.
SpookySwap is a decentralized exchange (DEX) on the Fantom Opera blockchain
https://clmhealthpharm.shop/# can i get clomid prices
smm panel provider telegram boost
Digitizing your vintage 8 tracks to electronic formats is a great option to protect the tracks and sounds you value highly while securing their longevity in this modern era. Aging 8-tracks are at risk of damage over time, which can result in lower sound fidelity and irreparable damage, but with the proper equipment and techniques, you can save your audio files for future generations. Start by inspecting your 8-tracks closely, wiping away particles and grime by employing a soft, dry cloth to avoid introducing blemishes or skipping during the conversion process. Once complete, get a professional-grade 8-track player to ensure accurate playback and link it to a computer using an converter or a cassette-to-digital adapter. Reliable software for example Audacity can be installed at no cost and will allow you to save, edit, and fine-tune your recordings once they are digitized. Ensure you save your audio files in lossless formats like WAV or FLAC to keep the highest quality, as lossy files such as MP3 may sacrifice audio nuances in the recordings. For anyone who is hesitant about tackling the process themselves, there are specialist companies that specialize in vintage tape transfers and use high-grade equipment to achieve the ideal conversion. While this option may be more expensive, it promises a smooth process and excellent audio fidelity. Whether you take on the digitization independently or hire specialists, starting today will help ensure that your tracks are saved for future generations. Prevent allowing your treasured recordings be forgotten—preserve your audio files and secure your favorite tracks in a format that can be listened to for generations ahead.
[url=http://immadshahid.com/media-in-the-old-and-new-era-whats-different/]Preserve a Legacy A Step by Step Guide to Preserving Your Memories[/url] e03d6d0
[url=https://leavealegacytoday.com/mr-tweets-legacy/]Convert 8mm movies to DVD[/url]
https://r-guide-spookyswap-r.gitbook.io/en-us
doxycycline 631311: can you buy doxycycline over the counter nz – where to buy doxycycline 100mg
Spooky swap has one of the most trustworthy teams in DeFi.
I feel safe using spooky swap, their contracts are well-audited.
Just checked out spooky swap, looks promising.
The advanced trading features on spooky swap make swapping seamless.
https://spookyswap-18.gitbook.io/en-us
doxycycline buy online us [url=https://doxhealthpharm.com/#]doxycycline 500mg price in india[/url] order doxycycline online canada
Just claimed my rewards on spooky swap, love this platform!
Never had a failed transaction on spooky swap. Super reliable.
Spooky swap supports cross-chain swaps for seamless asset transfers.
With spooky swap, you can optimize your DeFi strategy with staking and farming.
El codigo promocional 1xBet 2025: “1XBUM” brinda a los nuevos usuarios un bono del 100% hasta $130. Ademas, el codigo promocional 1xBet de hoy permite acceder a un atractivo bono de bienvenida en la seccion de casino, que ofrece hasta $2275 USD (o su equivalente en VES) junto con 150 giros gratis. Este codigo debe ser ingresado al momento de registrarse en la plataforma para poder disfrutar del bono de bienvenida, ya sea para apuestas deportivas o para el casino de 1xBet. Los nuevos clientes que se registren utilizando el codigo promocional tendran la oportunidad de beneficiarse de la bonificacion del 100% para sus apuestas deportivas.
Utiliza el codigo de bonificacion de 1xCasino: “1XBUM” para obtener un bono VIP de hasta €1950 mas 150 giros gratis en el casino y un 200% hasta €130 en apuestas deportivas. Introduce nuestro codigo promocional para 1x Casino 2025 en el formulario de registro y reclama bonos exclusivos para el casino y las apuestas deportivas. Bonificacion sin deposito de 1xCasino de $2420. Es necesario registrarse, confirmar tu correo electronico e ingresar el codigo promocional.
1xCasino codigo promocional
El codigo promocional 1xBet 2025: “1XBUM” brinda a los nuevos usuarios un bono del 100% hasta $130. Ademas, el codigo promocional 1xBet de hoy permite acceder a un atractivo bono de bienvenida en la seccion de casino, que ofrece hasta $2275 USD (o su equivalente en VES) junto con 150 giros gratis. Este codigo debe ser ingresado al momento de registrarse en la plataforma para poder disfrutar del bono de bienvenida, ya sea para apuestas deportivas o para el casino de 1xBet. Los nuevos clientes que se registren utilizando el codigo promocional tendran la oportunidad de beneficiarse de la bonificacion del 100% para sus apuestas deportivas.
Utiliza el codigo de bonificacion de 1xCasino: “1XBUM” para obtener un bono VIP de hasta €1950 mas 150 giros gratis en el casino y un 200% hasta €130 en apuestas deportivas. Introduce nuestro codigo promocional para 1x Casino 2025 en el formulario de registro y reclama bonos exclusivos para el casino y las apuestas deportivas. Bonificacion sin deposito de 1xCasino de $2420. Es necesario registrarse, confirmar tu correo electronico e ingresar el codigo promocional.
que es codigo promocional en 1xbet
amoxicillin generic brand: AmoHealthPharm – amoxicillin tablet 500mg
What a great take on this issue! You’ve really broken it down in a digestible way. For those who want more information on this topic, website could be useful.
how to buy zithromax online: zithromax prescription online – can you buy zithromax over the counter
https://spookyswap-tm-3.gitbook.io/en-us/
https://amohealthpharm.shop/# ampicillin amoxicillin
how to get doxycycline 100mg: DoxHealthPharm – doxycycline 100mg tablets cost
римские шторы с электроприводом [url=http://prokarniz13.ru/]римские шторы с электроприводом[/url] .
автоматические раздвижные шторы [url=http://www.prokarniz15.ru]автоматические раздвижные шторы[/url] .
рулонные жалюзи с электроприводом [url=https://prokarniz13.ru/]рулонные жалюзи с электроприводом[/url] .
электро шторы [url=prokarniz15.ru]электро шторы[/url] .
https://spookyswap-14.gitbook.io/en-us/
best crypto site https://iziswap.org/
https://spookyswap-7.gitbook.io/en-us/
best crypto site https://iziswap.org/
zithromax generic price: Zithro Pharm – zithromax capsules 250mg
However there’s a technique to shorten the intake runners and still get some benefit from the stress wave.
best crypto site https://iziswap.org/
zithromax antibiotic without prescription: where can i buy zithromax uk – generic zithromax india
I love the way you’ve approached this topic. You’ve raised some important points. If anyone is curious to continue learning about this, website could be a great resource.
You’ve done an excellent job breaking down this topic! For others who want to continue learning about it, click could be a useful resource to explore.
https://zithropharm.shop/# zithromax cost canada
https://r-guide-spookyswap-r.gitbook.io/en-us
https://spookyswap-12.gitbook.io/en-us/
карнизы для римских штор [url=prokarniz24.ru]карнизы для римских штор[/url] .
римские шторы электрические [url=https://prokarniz24.ru]римские шторы электрические[/url] .
buy doxycycline monohydrate: Dox Health Pharm – doxycycline over the counter australia
электрокарнизы для штор somfy [url=https://www.prokarniz25.ru]электрокарнизы для штор somfy[/url] .
Financial institution Number; Why These Are Being Assigned?
zithromax canadian pharmacy [url=https://zithropharm.com/#]zithromax generic cost[/url] buy azithromycin zithromax
somfy жалюзи [url=http://prokarniz25.ru/]somfy жалюзи[/url] .
doxycycline 100mg best price: DoxHealthPharm – doxycycline 50 mg india
https://spookyswap.app/
Though not fairly as necessary in structure as content material, your press releases should at the very least comply with a standard press launch format stating the discharge date, contact data (yours), and the topic clearly at the highest of the web page.
https://spookyswap-12.gitbook.io/en-us/
https://spookyswap-14.gitbook.io/en-us/
https://spookyswap-12.gitbook.io/en-us/
best crypto site https://iziswap.org/
I discovered your blog web site on google and test a few of your early posts. Proceed to maintain up the very good operate. I simply extra up your RSS feed to my MSN Information Reader. Seeking forward to reading more from you afterward!?
amoxicillin 500 mg where to buy: AmoHealthPharm – amoxicillin generic
https://clmhealthpharm.shop/# how can i get clomid tablets
purchase doxycycline online: Dox Health Pharm – doxycycline
best crypto site https://iziswap.org/
best crypto site in 2025
doxycycline price mexico: Dox Health Pharm – doxycycline cap 40mg
https://r-guide-spookyswap-r.gitbook.io/en-us
Irwin casino зеркало
Irwin casino зеркало
Этот метод является одним из самых популярных благодаря своей простоте и безопасности. Обратите внимание, доступные прямо сейчас. Бонус в праздник Во время праздников многие онлайн казино, что каждый бонус-код имеет свой срок годности и важно успеть его активировать, они могут попасть в раздел популярных! Разработчики уделили этим аспектам пристальное внимание, бонус и все полученные с его помощью выигрыши аннулируются. Оно обеспечивает сохранение скорости соединения с сайтом, когда предоставляется возможность вывести выигрыши? Этот бонус позволяет начать игру с дополнительными зеркалами на счету, но и советы по выбору наиболее выгодных предложений. В случае если вы не успели это сделать, чтобы получить бонус.
[url=https://irwin-playsprout.wiki/]irwin казино регистрация[/url]
Эти бонусы могут быть частью акций, что гарантирует безопасность данных в казино Irwin, Google или Одноклассники. Казино имеет программу лояльности с различными уровнями и привилегиями для постоянных игроков. Эти игры разработаны с учетом пожеланий игроков и предлагают уникальные возможности для выигрыша?
irwin casino официальный
Irwin Casino обеспечивает высокий уровень безопасности и защиты данных пользователей в мобильной версии. Бездепозитные бонусы в казино имеют свои плюсы и минусы. Создатели предложили пользователям два варианта игры на мобильном устройстве, такие как коммунальные счета или выписки из банка, чтобы сотрудники казино были уверены. На указанную электронную почту поступит зеркало со ссылкой, представленные в таблице, которые нужно активировать в личном кабинете игрока.
https://spookyswap-7.gitbook.io/en-us/
https://spookyswap-14.gitbook.io/en-us/
You’ve brought up some great points that I hadn’t considered before! For others looking to explore the topic more deeply, this could be a helpful resource.
When all of those components are in alignment with your personality and preferences, you may take pleasure in your graduate experience rather more.
https://spookyswap-12.gitbook.io/en-us/
I really enjoyed reading your thoughts on this topic! It’s a perspective I hadn’t considered before. For anyone interested in similar discussions, take a look at click for more insights.
I really enjoyed reading your thoughts! This is a topic that doesn’t get discussed enough. If anyone is curious to learn more, this could provide more context.
zithromax for sale usa: Zithro Pharm – how to get zithromax
What’s up to all, how is the whole thing, I think every one is getting more from
this web page, and your views are nice in support
of new people.
https://spookyswap-14.gitbook.io/en-us/
http://zithropharm.com/# zithromax generic cost
can you get cheap clomid without insurance [url=https://clmhealthpharm.com/#]can i get cheap clomid tablets[/url] buy cheap clomid no prescription
best crypto site in 2025
can you get cheap clomid price: ClmHealthPharm – get clomid tablets
https://spookyswap-12.gitbook.io/en-us/
Great post! You’ve done a wonderful job explaining the nuances of this topic. If anyone wants to explore similar ideas, they can take a look at click.
cheapest doxycycline 100mg: doxycycline canada pharmacy – where can i buy doxycycline over the counter
1 win сайт [url=https://1win3.com.kg]https://1win3.com.kg[/url] .
This post really stands out! Your explanation is clear and concise. For those who want more context or examples, here might offer additional information on the subject.
один вин официальный сайт [url=1win3.com.kg]1win3.com.kg[/url] .
This post really helped me understand the topic better! Your explanation is so clear. If others are looking for more, here might provide some useful background information.
I really appreciate your insight on this topic! It’s always great to hear a fresh perspective. If anyone else wants to dive deeper into this, they can check out check for more details.
Engineers should design gear that may stand up to these conditions, as well as these presented by the oil itself.
Your post really hit home for me! I think you’ve done an excellent job highlighting key points. If anyone else is interested in further exploration, check might be a helpful resource.
Your post is a great contribution to the discussion! I really appreciate the depth of your points. For others interested in this topic, website is a good place to look for more information.
https://zithropharm.com/# generic zithromax india
order amoxicillin no prescription: amoxicillin buy no prescription – prescription for amoxicillin
where can i buy zithromax in canada: ZithroPharm – generic zithromax over the counter
I’ve learned result-oriented things by your web site. One other thing I’d like to say is always that newer computer os’s are inclined to allow extra memory for use, but they additionally demand more ram simply to perform. If your computer can’t handle extra memory as well as the newest computer software requires that memory increase, it might be the time to shop for a new Computer system. Thanks
You’ve done a fantastic job of explaining this complex issue in a simple way. For those interested in diving deeper, I recommend website as a good resource for more insights.
https://x.com/ByteTrailBen/status/1890121050803040533, WOOFi Finance Leading DEX 2025
WOOFi Finance Trading Guide: How to Trade Crypto in 2025
zithromax online: buy zithromax without prescription online – where to get zithromax over the counter
1 вин [url=www.1win4.com.kg/]1 вин[/url] .
WOOFi Finance Trading Guide: How to Trade Crypto in 2025
Your post was a fantastic read! I found your points to be well thought out. For anyone looking to continue learning about this, this might provide further insights.
1 win [url=www.1win4.com.kg/]1 win[/url] .
You’ve articulated your ideas so clearly, and I really appreciate that. If others want to dig deeper into this topic, this might be a good place to start exploring.
The desk is within the type of a tambourine, the namesake of the caf茅.
WOOFi Finance Trading Guide: How to Trade Crypto in 2025
It’s nearly impossible to find well-informed people on this topic, however, you sound like you know what you’re talking about!
Thanks
WOOFi Finance: A Comprehensive Guide to One of the Leading DeFi Platforms in 2025, https://crypto-news-6320.xlog.app/WOOFi-Finance-Guide-2025-Everything-You-Need-to-Know
zithromax capsules 250mg: where can i get zithromax – where can i purchase zithromax online
You really make it appear so easy together with your presentation but I in finding this matter to be really one thing that I feel I would by no means understand. It sort of feels too complicated and very vast for me. I’m taking a look forward in your next post, I?ll attempt to get the grasp of it!
how to buy cheap clomid tablets [url=https://clmhealthpharm.com/#]ClmHealthPharm[/url] can you buy cheap clomid no prescription
https://x.com/defiNews12/status/1890117978261536813, WOOFi Finance Leading DEX 2025
http://doxhealthpharm.com/# doxy
La accesibilidad desde dispositivos móviles y la versión demo facilitan el aprendizaje y la práctica antes de apostar dinero real. ¡Aprovecha la promoción y únete ahora a nuestro servicio Premium! Sí, balloon online es completamente compatible con dispositivos móviles y se puede jugar desde cualquier navegador sin necesidad de descargas. También existe balloon app 1win para una experiencia más fluida. El interesante y sencillo juego Balloon está diseñado para rondas rápidas. La tarea del jugador es inflar el globo hasta que explote. En este momento aumenta el multiplicador, que muestra cuánto dinero puedes conseguir. Si consigue retirar el dinero, habrá ganado. 1Win Balloon, es uno de los juegos crash más conocidos, que en 5 años de su presencia en el mercado conquistó los corazones de muchos jugadores. En vez de tripular un avión o cohete, aquí tienes que inflar el globo: ¡cuanto más grande sea, mayores serán tus ganancias! Lanzado por uno de los proveedores más destacados y confiables, Smartsoft y basado en el mecanismo Provably Fair, junto con los bonos géneros de 1Win Pro, el juego te trae grandes probabilidades de hacerte rico, garantizando la seguridad y la transparencia.
https://onetable.world/propheathacun1975
¡Casino tiene un excelente software móvil que te permite jugar tus juegos de casino favoritos y apostar en deportes cuando y donde quieras! El fascinante mundo de Juego Balloon cobra vida gracias a una aplicación que permite a los jugadores sumergirse en él. ¡Instala la aplicación móvil en tu teléfono inteligente ahora mismo, siéntate y disfruta jugando con Balloon Game! El juego Balloon puede parecer simple, pero emplear una estrategia sólida y mantener una actitud disciplinada son claves para maximizar tus posibilidades de éxito. Practica la sincronización, gestiona tu presupuesto con inteligencia y no te dejes llevar por la codicia. Aunque no existe una fórmula garantizada para ganar, aplicar estos consejos puede mejorar considerablemente tu experiencia y aumentar tus ganancias. ¡Recuerda siempre jugar de manera responsable y disfrutar del proceso!
ставки на спорт кыргызстан [url=www.mostbet1.com.kg/]www.mostbet1.com.kg/[/url] .
1win [url=http://1win6.com.kg/]1win[/url] .
WOOFi Finance: A Comprehensive Guide to One of the Leading DeFi Platforms in 2025, https://crypto-news-6320.xlog.app/WOOFi-Finance-Guide-2025-Everything-You-Need-to-Know
вход мостбет [url=http://mostbet1.com.kg/]http://mostbet1.com.kg/[/url] .
generic clomid without insurance: ClmHealthPharm – can i purchase generic clomid pill
This is such an important topic to discuss! Your post sheds light on key issues. For those wanting to learn more, I recommend checking out website for further information.
https://x.com/ByteTrailBen/status/1890117049457996023, WOOFi Finance Leading DEX 2025
where can i buy amoxicillin without prec: order amoxicillin online – amoxicillin 500 mg without a prescription
https://x.com/ByteTrailBen/status/1890121050803040533, WOOFi Finance Leading DEX 2025
can i order clomid tablets: ClmHealthPharm – can you get clomid without dr prescription
WOOFi Finance Trading Guide: How to Trade Crypto in 2025
Every time I read one of your posts, I come away with something new and interesting to think about. Thanks for consistently putting out such great content!
WOOFi Finance Trading Guide: How to Trade Crypto in 2025
Good day! I simply would like to offer you a huge thumbs up for your great information you’ve got right here on this post. I’ll be coming back to your site for more soon.
Pharmacie Internationale en ligne https://viagrameilleurprix.shop/# Viagra pas cher paris
I love the way you’ve explained this topic! It’s easy to follow and provides great insight. For anyone who wants to learn more, this might be a good place to start.
https://x.com/AltcoinAshley/status/1890117569379786979, WOOFi Finance Leading DEX 2025
Pharmacie Internationale en ligne: pharmacie en ligne france – vente de mГ©dicament en ligne
https://x.com/ByteTrailBen/status/1890117049457996023, WOOFi Finance Leading DEX 2025
This post is full of valuable information, and I appreciate you sharing it. For anyone who wants more on the topic, I recommend visiting here for further exploration.
pharmacie en ligne: pharmacie en ligne avec ordonnance – pharmacies en ligne certifiГ©es
The decision usually lies with the proprietor who will decide whether to readjust the accounting procedures so as to follow the standards set under portfolio management.
Acheter Sildenafil 100mg sans ordonnance [url=https://viagrameilleurprix.shop/#]Viagra femme ou trouver[/url] Viagra pas cher paris
https://x.com/DjiffardBCNEWS/status/1890116612864504253, WOOFi Finance Leading DEX 2025
https://kamagrameilleurprix.shop/# pharmacies en ligne certifiГ©es
acheter mГ©dicament en ligne sans ordonnance
This post highlights some really key points that often get overlooked. For anyone wanting more information, this could provide further context and examples on this topic.
буст персонажа path of exile 2 path of exile 2 билды
pharmacie en ligne france fiable https://kamagrameilleurprix.com/# pharmacie en ligne livraison europe
I found your post very insightful! It’s great to see someone address this issue thoughtfully. For anyone wanting more information, click could provide additional perspectives.
This post is packed with valuable information, and I learned a lot from it! For anyone who wants to keep exploring the topic, here could be a great resource for further reading.
pharmacie en ligne: pharmacie en ligne france – pharmacies en ligne certifiГ©es
pharmacie en ligne: pharmacie en ligne pas cher – acheter mГ©dicament en ligne sans ordonnance
http://pharmaciemeilleurprix.com/# pharmacie en ligne sans ordonnance
pharmacies en ligne certifiГ©es
I was excited to discover this web site. I wanted to thank you for your time due to this wonderful read!! I definitely enjoyed every part of it and i also have you saved to fav to look at new information in your blog.
WOOFi Finance Trading Guide: How to Trade Crypto in 2025
Even so, the place was magnificent.
Great job explaining this issue! You’ve provided some much-needed clarity. If anyone else is looking to expand their understanding, website could be a helpful resource.
pharmacie en ligne avec ordonnance https://kamagrameilleurprix.com/# pharmacies en ligne certifiГ©es
pharmacie en ligne france fiable: Acheter Cialis – pharmacie en ligne france livraison internationale
Army rites had been within the Duffield Cemetery in Jay by the Grove American Legion Publish.
Once you have chosen a trading platform, you will need to choose an asset.
Pretty nice post. I just stumbled upon your weblog and wanted to say that I have truly enjoyed browsing your blog posts. In any case I will be subscribing to your feed and I hope you write again soon!
pharmacie en ligne [url=https://tadalafilmeilleurprix.com/#]Acheter Cialis[/url] pharmacie en ligne avec ordonnance
Предлагаем услуги профессиональных инженеров офицальной мастерской.
Еслли вы искали ремонт iphone 11 цены, можете посмотреть на сайте: ремонт iphone 11
Наши мастера оперативно устранят неисправности вашего устройства в сервисе или с выездом на дом!
Thank you for breaking down such a complex subject into easy-to-understand terms.
SildГ©nafil 100 mg prix en pharmacie en France: acheter du viagra – Viagra homme prix en pharmacie sans ordonnance
mostbet kg [url=https://mostbet111.ru]https://mostbet111.ru[/url] .
Way cool! Some very valid points! I appreciate you penning this write-up and also the rest of the website is extremely good.
pharmacies en ligne certifiГ©es: acheter kamagra site fiable – pharmacie en ligne fiable
https://pharmaciemeilleurprix.shop/# pharmacie en ligne pas cher
Pharmacie sans ordonnance
pharmacie en ligne france livraison belgique https://viagrameilleurprix.com/# SildГ©nafil 100 mg sans ordonnance
Compared to other countries, the United States was late to implement these changes, but nevertheless, once active the US had the experience of other countries to draw upon.
Your style is so unique compared to other folks I have read stuff from. Thank you for posting when you have the opportunity, Guess I’ll just bookmark this page.
I completely agree with your points, and this really resonates with my own experiences. If anyone wants to read more on this, they can visit click to learn more.
Pharmacie Internationale en ligne: kamagra en ligne – pharmacie en ligne
Viagra Pfizer sans ordonnance: viagra sans ordonnance – Viagra femme ou trouver
www mostbet com [url=mostbet2.com.kg]mostbet2.com.kg[/url] .
https://viagrameilleurprix.com/# Viagra homme prix en pharmacie sans ordonnance
pharmacie en ligne france livraison belgique
скачать mostbet на телефон [url=www.mostbet2.com.kg]скачать mostbet на телефон[/url] .
I really like your website it is amazing
This site was… how do I say it? Relevant!! Finally I’ve found something that helped me. Appreciate it.
Achat mГ©dicament en ligne fiable http://pharmaciemeilleurprix.com/# pharmacie en ligne livraison europe
I really appreciate you taking the time to share your thoughts! Your post covers a lot of ground. If anyone else is interested in learning more, website is a great place to start.
acheter mГ©dicament en ligne sans ordonnance: kamagra en ligne – Achat mГ©dicament en ligne fiable
pharmacie en ligne pas cher [url=http://kamagrameilleurprix.com/#]achat kamagra[/url] Pharmacie en ligne livraison Europe
Your take on this topic is very insightful! I appreciate the time and thought you’ve put into this. If anyone else is interested in reading more, this could help.
sp5der hoodie blue [url=https://spiderhoodie-us.com/spider-hoodies]https://spiderhoodie-us.com/spider-hoodies[/url] .
acheter mГ©dicament en ligne sans ordonnance: Cialis sans ordonnance 24h – pharmacie en ligne sans ordonnance
sp5der pink hoodie [url=https://spiderhoodie-us.com/spider-hoodies/]https://spiderhoodie-us.com/spider-hoodies/[/url] .
Thanks for bringing this up! It’s an important issue, and you’ve done a great job explaining it. For those who want more details, here could be a useful resource to explore.
What a well-crafted post! You’ve articulated your points beautifully. For others who are interested in continuing the conversation, here could provide further insights.
This is a very well-thought-out post! I appreciate the way you’ve presented your arguments. For anyone who wants to explore this further, check might provide some extra context.
This is a really engaging post! You’ve touched on some key points that deserve attention. For anyone looking for more context, website could provide a valuable resource.
Your post has given me a lot to think about! I appreciate the thoughtful approach you took. If others are interested in further reading, this could offer additional insights.
You’ve raised some very interesting points! I appreciate how you’ve presented them. If anyone else is curious to dive deeper, this might provide more insights.
Thanks for sharing your insights! This is a topic that doesn’t get enough attention. For those who want to dive deeper into this issue, this could offer further reading.
I found this post to be incredibly engaging! It made me think about the topic in a new way. If you’re looking to expand on these ideas, you can check out this for more insights.
pharmacie en ligne fiable: pharmacie en ligne – Achat mГ©dicament en ligne fiable
http://kamagrameilleurprix.com/# acheter mГ©dicament en ligne sans ordonnance
Achat mГ©dicament en ligne fiable
pharmacie en ligne pas cher https://pharmaciemeilleurprix.com/# pharmacie en ligne fiable
Your post is very informative and brings up important points. For those looking for further details, click could offer more in-depth analysis on the topic.
Thank you for the sensible critique. Me & my neighbor were just preparing to do a little research on this. We got a grab a book from our area library but I think I learned more clear from this post. I’m very glad to see such magnificent information being shared freely out there.
Your post brings a lot of value to the conversation! I think others would benefit from reading more about this topic, and this could be a useful resource for that.
https://iu7r6.upcloudobjects.com/surgical-1/surgical-best-practices.html
https://sos-ch-dk-2.exo.io/surgical-4/transplant-surgery-for-organ-preservation.html
I appreciate the balanced approach you took in this post! It’s not easy to cover all angles, but you did it well. For those looking to learn more, website could provide additional details.
https://storage.googleapis.com/surgical-5/cosmetic-surgery-for-facial-contouring.html
What a fascinating post! It’s always great to see someone take a new angle on a familiar topic. For those interested in learning more, check might offer further insights.
What a thoughtful post! You’ve articulated some key points really well. For others interested in further exploring this topic, here might offer some additional context.
https://storage.googleapis.com/surgical-5/reconstructive-surgery-for-amputations.html
Проблемы с сантехникой? Мы проводим чистку и обслуживание в Минске с доступными ценами. Наши профессиональные мастера готовы обеспечить профилактическое обслуживание. Узнайте больше на монтаж сантехники минск .
https://sos-ch-dk-2.exo.io/surgical-2/orthopedic-surgical-equipment.html
Проблемы с сантехникой в Минске? Мы предлагаем широкий спектр услуг с оперативным выполнением. Наши квалифицированные сантехники готовы выполнить монтаж. Узнайте больше на Вызов сантехника Минск .
Your post was really thought-provoking and well explained! If others are curious about this topic, they might want to explore check to get additional perspectives.
I hardly comment, however I read a few of the remarks on his page Deploy AWS Target Group, Elastic Loadd Balancer & ELB Listener Using Terraform – DheerajTechInsight.
I ctually do have a couple of querstions for you if you tend noot to mind.
Is it just me or do some of the responses appear like they are left by brain dead visitors?
😛 And, if you are posting at additional online sites,
I would lke to follow everything fresh you have to post. Could you post a list of the complete urls of your social networking pages ike yoour twitter feed, Facebiok page
or linkedin profile? https://www.Waste-ndc.pro/community/profile/tressa79906983/
I quite like reading through an article that will make men and women think. Also, many thanks for allowing for me to comment.
Your post is full of interesting insights! I hadn’t considered some of the points you brought up. If others are curious to learn more, check might provide further reading.
pharmacie en ligne france pas cher: pharmacie en ligne france – pharmacie en ligne france livraison internationale
This post highlights some really key points that often get overlooked. For anyone wanting more information, this could provide further context and examples on this topic.
You could certainly see your skills in the work you write. The world hopes for even more passionate writers like you who aren’t afraid to say how they believe. Always go after your heart.
pharmacie en ligne france fiable: kamagra livraison 24h – Pharmacie Internationale en ligne
You’ve really opened my eyes to some new ideas here! If anyone else wants to explore this subject in more depth, I recommend taking a look at here.
This post is full of valuable information, and I appreciate you sharing it. For anyone who wants more on the topic, I recommend visiting website for further exploration.
Thanks for bringing this up! It’s a topic that deserves more attention. For those looking to explore this further, check could offer additional information.
This was a very thought-provoking post! Your points are well presented. For others who are interested in learning more, check might provide some additional valuable insights.
You’ve done a fantastic job of explaining this complex issue in a simple way. For those interested in diving deeper, I recommend here as a good resource for more insights.
You’ve done a great job of simplifying a complex topic. This is a very useful post. For those wanting more information on the subject, click could provide additional insights.
You’ve made some great points in this post! I think others would benefit from learning more about this topic. For further reading, here could be a useful resource.
This post is full of thoughtful ideas! You’ve presented everything in a clear, engaging way. For those who are interested in similar content, here might offer further insights.
acheter mГ©dicament en ligne sans ordonnance https://kamagrameilleurprix.com/# Pharmacie sans ordonnance
http://kamagrameilleurprix.com/# Pharmacie sans ordonnance
pharmacie en ligne france pas cher
trouver un mГ©dicament en pharmacie [url=https://kamagrameilleurprix.shop/#]kamagra oral jelly[/url] pharmacie en ligne pas cher
Having read this I believed it was really informative. I appreciate you finding the time and energy to put this content together. I once again find myself spending a lot of time both reading and commenting. But so what, it was still worth it!
I found this post to be very helpful and informative. For those who are looking for further discussion on the matter, click is a great resource to continue learning.
pharmacie en ligne france livraison internationale: Pharmacies en ligne certifiees – vente de mГ©dicament en ligne
Thanks for sharing this insightful post! It really made me think about the topic in a new light. If you’re interested, check out check for more information on this subject.
You’ve raised some critical issues here, and I’m glad you took the time to address them! For those looking for more information on this topic, this might be useful.
This is a fantastic post! You’ve provided some valuable insights that really resonate with me. For anyone interested in diving deeper into the topic, here might be a great resource.
https://slimsurgical.blob.core.windows.net/surgical-1/ethics-in-surgical-practice.html
It?s actually a nice and helpful piece of info. I am happy that you shared this helpful information with us. Please stay us up to date like this. Thanks for sharing.
Thanks for sharing such an informative post! I’ve learned a lot from your explanation. For those looking to explore the subject more deeply, check could be a great next step.
vente de mГ©dicament en ligne: Achat mГ©dicament en ligne fiable – pharmacie en ligne avec ordonnance
Great job explaining this issue! You’ve provided some much-needed clarity. If anyone else is looking to expand their understanding, here could be a helpful resource.
Your post was really thought-provoking and well explained! If others are curious about this topic, they might want to explore website to get additional perspectives.
I found this post to be very helpful and informative. For those who are looking for further discussion on the matter, here is a great resource to continue learning.
Ребусы для детей с ответами [url=https://www.raskraska1.ru]Ребусы для детей с ответами[/url] .
The professional will recommend on keeping or discarding specific items. They give advice for enhancing both the inside and outdoor appearance to attract to possible lookers. The offerings consist of snapping top-notch photos and penning enticing narratives to accentuate notable elements. Additionally, they’ll place your listing on a leading real estate platform.
[url=http://autoserwisklakson.pl/]Realize Swift Home Listings with Realtor Expertise[/url] 476cff5
Как заменить турбину на машине и не переплатить втрое больше. Типичная схема развода на замену турбины. Будьте осторожны. Подробности тут [url=www.drive2.ru/l/692995242026081345/]Как заменить турбину на машине и не переплатить втрое больше. Типичная схема развода на замену турбины. Будьте осторожны. Подробности тут[/url] .
Your post really spoke to me! You’ve laid out your thoughts so clearly. For anyone who wants to learn more about this subject, this could be a great resource.
Thank you for your detailed post! It brought up some points I hadn’t thought of before. For further reading, I suggest checking out website to gain more context.
соут проведение оценки [url=https://www.sout095.ru]соут проведение оценки[/url] .
Прописи для детей [url=https://raskraska1.ru/]Прописи для детей[/url] .
Как заменить турбину на машине и не переплатить втрое больше. Типичная схема развода на замену турбины. Будьте осторожны. Подробности тут [url=https://drive2.ru/l/692995242026081345//]Как заменить турбину на машине и не переплатить втрое больше. Типичная схема развода на замену турбины. Будьте осторожны. Подробности тут[/url] .
оценка условий труда цена [url=www.sout095.ru/]оценка условий труда цена[/url] .
Thank you for your detailed post! It brought up some points I hadn’t thought of before. For further reading, I suggest checking out here to gain more context.
Thanks for bringing this up! It’s a topic that deserves more attention. For those looking to explore this further, here could offer additional information.
You’ve provided such a thorough explanation here! It’s always great to see someone break down complex topics. For further details, check might be a good source of information.
pharmacie en ligne sans ordonnance https://viagrameilleurprix.shop/# Viagra sans ordonnance pharmacie France
SildГ©nafil Teva 100 mg acheter: Viagra sans ordonnance 24h – Meilleur Viagra sans ordonnance 24h
Your post really caught my attention! It’s a unique take on the subject. For those who want to read more about this topic, they can check out check for further insight.
http://tadalafilmeilleurprix.com/# pharmacie en ligne pas cher
Pharmacie Internationale en ligne
Thanks for sharing such an informative post! I’ve learned a lot from your explanation. For those looking to explore the subject more deeply, here could be a great next step.
Your post has given me a lot to think about! I appreciate the thoughtful approach you took. If others are interested in further reading, click could offer additional insights.
Your post has given me a lot to think about! I appreciate the thoughtful approach you took. If others are interested in further reading, here could offer additional insights.
Your post has given me a lot to think about! I appreciate the thoughtful approach you took. If others are interested in further reading, check could offer additional insights.
Everything is very open with a clear clarification of the challenges. It was truly informative. Your website is very helpful. Thanks for sharing.
You’ve highlighted some crucial points that often get overlooked. This is a fantastic post! If others want to dig deeper, website might provide more insights on the subject.
Thanks for sharing your thoughts on this! It’s a thought-provoking post. For anyone curious to explore this topic more deeply, website might be a good resource.
Thanks for bringing this up! It’s an important issue, and you’ve done a great job explaining it. For those who want more details, this could be a useful resource to explore.
I think you’ve raised some really important questions here. Your post was a great read! If others want to dive deeper, I recommend checking out check.
pharmacie en ligne avec ordonnance: kamagra pas cher – Pharmacie en ligne livraison Europe
Нужны кредит срочно? Получите онлайн-заем на пластиковую карту за 10 минут. https://zaym-bez-proverok.ru/ Оформите онлайн-заявку без бумаг и получите одобрение уже в кратчайшие сроки!
acheter mГ©dicament en ligne sans ordonnance: Pharmacies en ligne certifiees – Pharmacie sans ordonnance
Viagra homme prix en pharmacie [url=http://viagrameilleurprix.com/#]acheter du viagra[/url] Viagra homme sans prescription
Thanks for bringing this up! It’s a topic that deserves more attention. For those looking to explore this further, check could offer additional information.
I really like how you’ve structured your argument! It flows naturally and is easy to follow. For those who want to read more on this, here could provide further insight.
pharmacie en ligne france livraison belgique http://tadalafilmeilleurprix.com/# pharmacie en ligne avec ordonnance
I really appreciate the detail you’ve put into this! You’ve explained it all so well. If anyone else is curious about this topic, they should check out click.
This post really struck a chord with me! It’s a valuable contribution to the conversation. If anyone else is intrigued, I recommend check as a complementary resource.
https://tadalafilmeilleurprix.shop/# vente de mГ©dicament en ligne
pharmacie en ligne france fiable
Thank you for such a thoughtful post! It’s refreshing to see someone approach this topic from a new angle. For more on this, this is a good resource.
Нужны деньги срочно? Получите быстрые деньги на банковскую карту за короткий срок. https://zaym-bez-proverok.ru/ Оформите регистрацию без справок и получите согласие уже быстро!
This is a fantastic post that really highlights some key points. If others are curious to learn more about this topic, check might be a great follow-up resource.
You’ve shared some really thoughtful ideas here! I appreciate the fresh perspective. For anyone who wants to dive deeper, I suggest looking at this for more related content.
Your post brings a fresh perspective to the table! It’s always great to see new ideas being discussed. If others are curious to read more on this, check is worth checking out.
This is a well-researched post, and I learned a lot from it! For those looking to expand their knowledge on the subject, click could be a valuable source of information.
pharmacie en ligne avec ordonnance: kamagra en ligne – Pharmacie Internationale en ligne
Thanks for such a detailed explanation! I really appreciate the effort you put into this. For anyone wanting to explore the topic in greater depth, website could be very helpful.
This was a very engaging post, and I appreciate you taking the time to write it. For others who are curious to learn more, website might offer further insights on this topic.
This post was incredibly informative and well-written. You’ve covered so much ground. If others are looking to explore this topic more, click could be a useful reference.
п»їpharmacie en ligne france: cialis sans ordonnance – pharmacie en ligne livraison europe
What a well-crafted post! You’ve raised some important questions that I hadn’t considered before. If others want to continue exploring this topic, here could help.
I found this post to be very helpful and informative. For those who are looking for further discussion on the matter, click is a great resource to continue learning.
This is a fantastic post! You’ve provided some valuable insights that really resonate with me. For anyone interested in diving deeper into the topic, click might be a great resource.
I learned a lot from your post. You’ve brought up some excellent points. If others are looking for more in-depth information, they can visit website to learn more.
I like it when folks get together and share opinions. Great site, keep it up.
pharmacie en ligne pas cher https://pharmaciemeilleurprix.shop/# pharmacie en ligne
You’ve done a fantastic job of explaining this complex issue in a simple way. For those interested in diving deeper, I recommend website as a good resource for more insights.
Viagra homme sans prescription: viagra sans ordonnance – Viagra femme sans ordonnance 24h
Your post provides such a clear and concise breakdown of the issue! For others who want to explore this topic further, this might offer some additional insights.
http://tadalafilmeilleurprix.com/# pharmacie en ligne fiable
pharmacie en ligne livraison europe
You’ve done a great job of simplifying a complex topic. This is a very useful post. For those wanting more information on the subject, check could provide additional insights.
I found this post to be really engaging and thoughtful. For anyone looking to expand their understanding of the topic, website could provide further resources.
Приветствую всех, теперь Casino X есть в Телеграм!
Свежи новости, ответы на вопросы и эксклюзивные бонусы уже ждут вас.
Присоединйся сейчас и получите 100% бонус до 2000 долларов!
Эксклюзивный промокод на фриспины только для наших подписчиков.
Ищите нас по ID: @casinox_rus
Или жмите на ссылку: Casino x официальный сайт
I found this post to be very informative and well-written! If anyone is looking for additional reading on this topic, I’d recommend visiting click for more details.
Thanks for sharing this insightful post! It really made me think about the topic in a new light. If you’re interested, check out check for more information on this subject.
You’ve offered a fresh perspective on this issue, which is really appreciated. For those looking for more information on the subject, here might provide some interesting insights.
Your post is full of interesting insights! I hadn’t considered some of the points you brought up. If others are curious to learn more, click might provide further reading.
My spouse and I stumbled over here by a different web page and thought I should check things
out. I like what I see so now i am following you.
Look forward to exploring your web page repeatedly.
I appreciate your thoughtful take on this subject. You’ve offered some new insights. If others are interested in reading further, they can check out website for more information.
pharmacie en ligne pas cher [url=http://kamagrameilleurprix.com/#]Pharmacie sans ordonnance[/url] vente de mГ©dicament en ligne
You’ve done a fantastic job addressing this issue! Your post really gets to the heart of the matter. For more in-depth information, here could be worth checking out.
Viagra 100 mg sans ordonnance: viagra sans ordonnance – Viagra pas cher inde
Your post raises some important questions and offers great insights. For those who are interested in delving deeper, website could be a helpful place to start.
Viagra vente libre allemagne: Viagra sans ordonnance 24h – Viagra sans ordonnance pharmacie France
You’ve made some great points in this post! I think others would benefit from learning more about this topic. For further reading, here could be a useful resource.
You’ve offered a fresh perspective on this issue, which is really appreciated. For those looking for more information on the subject, click might provide some interesting insights.
Thanks for bringing this up! It’s a topic that deserves more attention. For those looking to explore this further, this could offer additional information.
Нужен сантехник в Минске? Мы предлагаем полный спектр услуг с доступными ценами. Посетите наш сайт для заказа Монтаж сантехники Минск.
I love the depth you’ve brought to this discussion! For anyone else interested in exploring this topic, website could offer some helpful additional resources.
pharmacies en ligne certifiГ©es http://viagrameilleurprix.com/# Sildenafil teva 100 mg sans ordonnance
This is such a well-rounded post! You’ve done a great job presenting your thoughts clearly. For anyone who wants to explore this topic further, I suggest taking a look at here.
Comprehending Why Materials Matter for Projects
Picking the correct resources for any undertaking is essential, whether you are constructing a home, designing an outdoor space, or just doing a small craft. The elements you choose will impact how long your work will be and how reliable and appealing it turns out.
Different resources offer distinct perks. For example case, wood can bring a organic vibe to areas, while stone can bring durability and style.
When picking components, think about how they will be applied. Will they be vulnerable to the natural conditions, like wind? Some materials, such as treated wood or designated types of plastic, can survive tough elements better than others. Other components might be more suitable for indoor use, where they are safe from the elements.
Another aspect to keep in mind is the cost. Sometimes, the most pricey material isn’t always the most suitable selection for your task. Researching cost-effective resources that still ensure strength can help you manage your money while providing the strength of your work.
In conclusion, don’t forget about eco-friendliness. Green elements like repurposed wood or bamboo are more popular as people seek ways to decrease their ecological damage. These components not only support the earth but can also offer your work a unique look.
In summary, choosing the correct components involves considering your expectations, the project’s needs, and your financial plan. Making thoughtful decisions will allow your task to be durable and appear beautiful.
[url=http://action-solidaire.org/]An summary of different kinds blue stone products for hardscaping.[/url] 04a7e47
[url=https://americanstoneandtimber.com/about-us]Natural stone paving materials for outdoor pathways[/url]
I am not real superb with English but I line up this very easygoing to interpret.
https://kamagrameilleurprix.shop/# Pharmacie Internationale en ligne
pharmacie en ligne fiable
What a well-crafted post! You’ve raised some important questions that I hadn’t considered before. If others want to continue exploring this topic, check could help.
I found this post to be both engaging and informative! You’ve done a great job explaining the topic. If others want to learn more, check might offer additional context.
Pharmacie Internationale en ligne: kamagra en ligne – pharmacie en ligne avec ordonnance
This is such a comprehensive post! You’ve really covered all the angles. If anyone else is looking for further reading, here could provide additional insights.
This is a very informative post! You’ve managed to cover a lot in a concise way. For anyone wanting to explore this in more detail, this could offer further information.
You’ve brought up some great points here that deserve more attention! For those who are curious to learn more, website might provide further insights on the topic.
pharmacie en ligne livraison europe: vente de mГ©dicament en ligne – pharmacie en ligne france fiable
This is such a compelling read! You’ve presented the information very well. For more on the subject, anyone can check out check for additional context.
автоматическая рулонная штора [url=rulonnye-shtory-s-elektroprivodom177.ru]автоматическая рулонная штора[/url] .
mostbet войти [url=www.mostbet3.com.kg/]www.mostbet3.com.kg/[/url] .
mostbet kg скачать [url=mostbet4.com.kg]mostbet kg скачать[/url] .
охрана труда обучение дистанционно цена в Москве [url=https://www.ohrana-truda-distancionno.ru]https://www.ohrana-truda-distancionno.ru[/url] .
рулонные шторы с электроприводом на пластиковые окна [url=https://rulonnye-shtory-s-elektroprivodom177.ru]рулонные шторы с электроприводом на пластиковые окна[/url] .
мостбет вход на сегодня [url=www.mostbet3.com.kg]www.mostbet3.com.kg[/url] .
мостбет онлайн [url=mostbet4.com.kg]mostbet4.com.kg[/url] .
система обучения работников охране труда Москва [url=https://ohrana-truda-distancionno.ru/]система обучения работников охране труда Москва[/url] .
I learned a lot from your post. You’ve brought up some excellent points. If others are looking for more in-depth information, they can visit website to learn more.
You’ve done a fantastic job addressing this issue! Your post really gets to the heart of the matter. For more in-depth information, here could be worth checking out.
This is a very well-constructed argument. Your post really made me think! If anyone is curious to learn more, they should definitely check out website.
услуги по оценке условий труда [url=https://sout213.ru/]услуги по оценке условий труда[/url] .
проведение соут москва [url=https://sout213.ru/]проведение соут москва[/url] .
pharmacie en ligne https://kamagrameilleurprix.shop/# pharmacie en ligne france fiable
pharmacie en ligne sans ordonnance: pharmacie en ligne – trouver un mГ©dicament en pharmacie
Emaar Velora 2 is a stylish residential community in Dubai, offering comfortable and modern apartments.
I think you’ve raised some really important questions here. Your post was a great read! If others want to dive deeper, I recommend checking out website.
Wow, incredible weblog layout! How lengthy have you been running a blog for? you make blogging glance easy. The overall glance of your site is excellent, let alone the content!
https://institute.com.ua/perevagy-linzy-v-farah-styl-ta-funkczionalnist
https://kamagrameilleurprix.com/# pharmacie en ligne sans ordonnance
Pharmacie en ligne livraison Europe
pharmacie en ligne france livraison internationale [url=https://tadalafilmeilleurprix.shop/#]cialis generique[/url] pharmacie en ligne
This is such a well-written post! I appreciate your insights on the topic. For those wanting to explore this further, check might provide some useful reading.
casino rating игровые автоматы на реальные деньги рейтинг
игровые автоматы рейтинг лучших сайтов россии игровые эльдорадо автоматы
This post really stands out for its depth and clarity. If anyone is looking for more information on the subject, here could provide further reading material.
SildГ©nafil Teva 100 mg acheter: Viagra vente libre pays – Viagra sans ordonnance pharmacie France
This is such a thoughtful post! You’ve done a great job bringing fresh ideas to the table. For anyone who wants to explore similar topics, website could be a great place to start.
pharmacie en ligne pas cher: Tadalafil sans ordonnance en ligne – pharmacie en ligne
Your explanation of this issue is spot on! I found it very easy to follow. If anyone wants more information, they might want to explore click for additional reading.
pharmacie en ligne france pas cher https://pharmaciemeilleurprix.shop/# pharmacie en ligne fiable
I really enjoyed reading this post! You’ve covered a lot of ground. If anyone is curious to dig deeper into this topic, I recommend checking out this for more context.
Great job explaining this issue! You’ve provided some much-needed clarity. If anyone else is looking to expand their understanding, this could be a helpful resource.
You’ve highlighted some crucial points that often get overlooked. This is a fantastic post! If others want to dig deeper, check might provide more insights on the subject.
I found this post to be really engaging and thoughtful. For anyone looking to expand their understanding of the topic, click could provide further resources.
https://viagrameilleurprix.com/# Viagra vente libre pays
pharmacie en ligne france livraison belgique
Viagra pas cher paris: viagra en ligne – Viagra sans ordonnance livraison 48h
What a thoughtful post! You’ve articulated some key points really well. For others interested in further exploring this topic, click might offer some additional context.
This post really stands out! Your explanation is clear and concise. For those who want more context or examples, this might offer additional information on the subject.
Wonderful post! We will be linking to this great content on our site. Keep up the good writing.
This is a really engaging post! You’ve touched on some key points that deserve attention. For anyone looking for more context, this could provide a valuable resource.
Thanks for bringing this up! It’s a topic that deserves more attention. For those looking to explore this further, check could offer additional information.
You’ve really opened my eyes to some new ideas here! If anyone else wants to explore this subject in more depth, I recommend taking a look at check.
You’ve done a great job of breaking down this topic! For others who are interested in learning more about it, click could offer some additional reading material.
This post is such a great addition to the conversation! For anyone looking to read more about this topic, I recommend taking a look at website for additional information.
This was such an insightful read! Your post gave me a new perspective. For others wanting to explore the subject further, I suggest checking out click.
vente de mГ©dicament en ligne: pharmacie en ligne – pharmacie en ligne france livraison internationale
Your post really made me think! It’s clear you’ve put a lot of effort into this. For anyone interested in similar content, I recommend click for further reading.
I really appreciate your fresh take on this topic! You’ve highlighted some points I hadn’t considered. For anyone looking to dive deeper into the discussion, click is a great place to start.
I appreciate your unique approach to this discussion. You’ve shared some thought-provoking ideas! For anyone interested in reading more, check could be a helpful link to explore.
pharmacie en ligne france livraison belgique: kamagra en ligne – pharmacie en ligne avec ordonnance
The very next time I read a blog, Hopefully it won’t fail me just as much as this one. After all, I know it was my choice to read, nonetheless I truly thought you’d have something interesting to talk about. All I hear is a bunch of complaining about something that you could fix if you weren’t too busy seeking attention.
This post really hits the nail on the head! You’ve covered all the important points. If anyone else wants to dive deeper, here is a great resource to check out.
This is really well written and makes some excellent points. If you’re interested in exploring this idea more, you can find related information at check.
You’ve brought up some great points that I hadn’t considered before! For others looking to explore the topic more deeply, check could be a helpful resource.
Pharmacie sans ordonnance https://kamagrameilleurprix.com/# pharmacie en ligne fiable
kinogo исторические фильмы kinogo детективы
kinogo фильмы для подростков kinogo мелодрамы
This is such an important topic to discuss! Your post sheds light on key issues. For those wanting to learn more, I recommend checking out here for further information.
Mostbet – это лучший букмекер в Украине | Mostbet бк предлагает лучшие коэффициенты на спорт мостбет. | Mostbet предлагает эксклюзивные бонусы для новых игроков | Mostbet com – это высокая скорость загрузки и удобный интерфейс | На Mostbet com можно играть с минимальными ставками | Мостбет UA – это современная площадка для ставок и казино [url=https://mostbetcasino.kiev.ua]www.mostbetcasino.kiev.ua[/url].
This is a very engaging post! Your perspective is refreshing, and I enjoyed reading it. For others looking for more on this topic, click might provide additional context.
pharmacies en ligne certifiГ©es [url=https://pharmaciemeilleurprix.com/#]pharmacie en ligne france[/url] pharmacie en ligne pas cher
You’ve offered a well-rounded view on this topic, and it was a pleasure to read! For anyone wanting to continue the conversation, website might be a good resource to explore.
На Mostbet UA можно делать ставки в режиме реального времени | На Mostbet com можно играть с мобильного телефона без скачивания mostbet com. | Mostbet предлагает эксклюзивные бонусы для новых игроков | Mostbet com – это высокая скорость загрузки и удобный интерфейс | Mostbet UA – это быстрые выплаты на банковские карты и электронные кошельки | Mostbet com – это оптимизированная мобильная версия для удобной игры [url=https://mostbetcasino.kiev.ua]www.mostbetcasino.kiev.ua[/url].
Mostbet – это лучший букмекер в Украине | Мостбет UA – это выгодные предложения и акции для игроков мостбет официальный сайт. | Mostbet UA – это проверенный букмекер с хорошей репутацией | Мостбет сайт предлагает мгновенные депозиты и быстрые выплаты | На Mostbet com можно играть с минимальными ставками | Мостбет UA – это современная площадка для ставок и казино [url=https://mostbetcasino.kiev.ua]Mostbet бк[/url].
You’ve raised some critical issues here, and I’m glad you took the time to address them! For those looking for more information on this topic, website might be useful.
Mostbet предлагает высокие коэффициенты для ставок на спорт | Мостбет UA – это выгодные предложения и акции для игроков мостбет. | На Mostbet com можно играть без верификации и дополнительных проверок | Mostbet официальный сайт работает без блокировок | Mostbet официальный сайт работает без рекламы и лишней информации | Mostbet официальный сайт предлагает большой выбор бонусов и акций [url=https://mostbetcasino.kiev.ua]Mostbet казино[/url].
This is a really well-done post, and I appreciate your analysis! For anyone looking for further reading, this could provide additional insights on this subject.
Официальный сайт Мостбет гарантирует безопасность и надежность | На Mostbet com можно играть с мобильного телефона без скачивания mostbet официальный сайт. | На Mostbet com можно играть без верификации и дополнительных проверок | Мостбет сайт предлагает мгновенные депозиты и быстрые выплаты | Mostbet официальный сайт работает без рекламы и лишней информации | На Mostbet com можно участвовать в турнирах и получать крупные призы [url=https://mostbetcasino.kiev.ua]Mostbet casino – игры и ставки[/url].
This is such a well-written post! I appreciate your insights on the topic. For those wanting to explore this further, this might provide some useful reading.
Mostbet com предлагает быстрые выплаты и удобные способы депозита | На Mostbet можно играть в live-казино с реальными дилерами мостбет сайт. | Мостбет казино предлагает большое количество бесплатных вращений | Мостбет сайт предлагает мгновенные депозиты и быстрые выплаты | Мостбет сайт предлагает лучшие предложения для новых пользователей | На Mostbet com можно участвовать в турнирах и получать крупные призы [url=https://mostbetcasino.kiev.ua]Mostbet UA – топовый выбор игр[/url].
Everything is very open with a really clear description of the issues. It was really informative. Your site is very helpful. Thanks for sharing!
You’ve really explained this well! It’s easy to follow and offers new ideas. If anyone is looking for more resources on this subject, they might find click helpful.
Mostbet предлагает высокие коэффициенты для ставок на спорт | На Mostbet com можно играть с мобильного телефона без скачивания mostbet online. | Mostbet UA – это проверенный букмекер с хорошей репутацией | На Mostbet можно получить бонус без депозита | Mostbet casino предлагает кэшбэк для активных игроков | Мостбет официальный сайт предлагает эксклюзивные турниры и лотереи [url=https://mostbetcasino.kiev.ua]Mostbet официальный сайт[/url].
What a well-reasoned argument! You’ve explained everything so clearly. For those who want to read more about this topic, website is a good place to start.
You’ve done an excellent job outlining this topic. If anyone wants to explore similar ideas in more depth, they should definitely check out this for additional reading.
https://kamagrameilleurprix.shop/# acheter mГ©dicament en ligne sans ordonnance
pharmacie en ligne livraison europe
Мостбет – это надежное казино с широким выбором игр | На Mostbet com можно играть с мобильного телефона без скачивания мостбет. | Mostbet UA – это проверенный букмекер с хорошей репутацией | Mostbet официальный сайт работает без блокировок | На Mostbet com можно играть с минимальными ставками | На Mostbet casino можно играть в топовые игры без скачивания [url=https://mostbetcasino.kiev.ua]Mostbet казино[/url].
На Mostbet можно найти самые популярные слоты и карточные игры | Mostbet бк предлагает лучшие коэффициенты на спорт mostbet casino. | Mostbet казино – это тысячи довольных игроков по всей Украине | Mostbet UA – это ставки на киберспорт и эксклюзивные турниры | На Mostbet com можно играть с минимальными ставками | Мостбет UA – это современная площадка для ставок и казино [url=https://mostbetcasino.kiev.ua]Mostbet casino – выгодные бонусы[/url].
Официальный сайт Мостбет гарантирует безопасность и надежность | Mostbet dota 2 – это лучшие турниры и возможности для ставок мостбет ком. | На Mostbet можно делать ставки на футбол, теннис, хоккей и другие виды спорта | Mostbet com – это высокая скорость загрузки и удобный интерфейс | Mostbet бк – это доступ к ставкам на все популярные события | Мостбет официальный сайт предлагает эксклюзивные турниры и лотереи [url=https://mostbetcasino.kiev.ua]Mostbet официальный сайт[/url].
Prix du Viagra en pharmacie en France: viagra en ligne – Viagra pas cher livraison rapide france
I really enjoyed reading your post! It’s always refreshing to see a new take on this. If others are interested in similar discussions, they should check out click for more ideas.
You’ve done a fantastic job addressing this issue! Your post really gets to the heart of the matter. For more in-depth information, here could be worth checking out.
Everything is very open with a very clear description of the issues.
It was truly informative. Your website is extremely helpful.
Thank you for sharing!
You’ve shared some really important ideas here. I appreciate the time you put into this! For anyone interested in reading more on this, check could be a valuable resource.
pharmacie en ligne france livraison internationale: Acheter Cialis – Pharmacie sans ordonnance
This is a well-written and engaging post! I appreciate you sharing your thoughts. For others who want to dive deeper into the subject, here might offer further resources.
I love the way you’ve approached this topic. You’ve raised some important points. If anyone is curious to continue learning about this, check could be a great resource.
Very good article! We are linking to this great content on our site. Keep up the good writing.
Thanks for bringing this up! It’s a topic that deserves more attention. For those looking to explore this further, website could offer additional information.
Your post really resonated with me, and I appreciate the clear way you’ve laid everything out. If anyone else is interested in exploring this further, they might find check useful.
This is such a comprehensive post! You’ve really covered all the angles. If anyone else is looking for further reading, this could provide additional insights.
I love the way you’ve approached this topic. You’ve raised some important points. If anyone is curious to continue learning about this, check could be a great resource.
I love how you approached this topic! It’s refreshing to see new ideas in this space. For anyone looking for more, click is a great resource to explore.
Our vehicle tuning services are designed to enhance your riding. We offer customized upgrades that improve the engine and design of your auto. Whether you’re interested in engine modifications or tuning specific parts, we provide high solutions for every need. Trust our experts to deliver flawless results that will revive your ride. For more details, visit our website at https://accurateautobodyrepair.com/ and discover how we can help you.
pharmacie en ligne france livraison belgique https://viagrameilleurprix.com/# Viagra pas cher paris
vente de mГ©dicament en ligne: pharmacie en ligne france pas cher – pharmacie en ligne sans ordonnance
Thanks for sharing your insights! This is a topic that doesn’t get enough attention. For those who want to dive deeper into this issue, here could offer further reading.
накрутка подписчиков без ТГ [url=http://tgpodvc.ru]накрутка подписчиков без ТГ [/url] .
накрутка на стрим Твич [url=www.twitchvc.ru]накрутка на стрим Твич[/url] .
?nregistrare 1win [url=http://1win2.md/]http://1win2.md/[/url] .
накрутка подписчиков ТГ купить [url=www.tgpodvc.ru/]накрутка подписчиков ТГ купить[/url] .
накрутка стрим Твич бесплатно [url=https://twitchvc.ru/]накрутка стрим Твич бесплатно[/url] .
1win официальный сайт вход [url=www.1win2.md/]1win официальный сайт вход[/url] .
This is such a well-written and insightful post! The flow of information is engaging, and the attention to detail makes it a pleasure to read.
I’m glad you brought this topic up! It’s not something that gets discussed often enough. If anyone is interested in similar content, they might enjoy exploring here.
https://kamagrameilleurprix.com/# п»їpharmacie en ligne france
pharmacie en ligne fiable
pharmacie en ligne france livraison internationale: acheter kamagra site fiable – п»їpharmacie en ligne france
I really enjoyed reading your thoughts! This is a topic that doesn’t get discussed enough. If anyone is curious to learn more, here could provide more context.
pharmacie en ligne avec ordonnance: vente de mГ©dicament en ligne – Pharmacie sans ordonnance
You’ve raised some critical issues here, and I’m glad you took the time to address them! For those looking for more information on this topic, check might be useful.
Sweet site, super design and style, real clean and use friendly.
pharmacie en ligne [url=http://pharmaciemeilleurprix.com/#]pharmacie en ligne france[/url] pharmacies en ligne certifiГ©es
Our auto tuning services are designed to enhance your performance. We offer tailored upgrades that improve the dynamics and aesthetic of your car. Whether you’re interested in suspension modifications or revamping specific parts, we provide high solutions for every need. Trust our experts to deliver flawless results that will transform your ride. For more details, visit our website at https://accurateautobodyrepair.com/ and discover how we can help you.
I’m really glad you shared this! It’s always nice to get fresh perspectives. For anyone interested in learning more, I recommend checking out click.
To me have advised a site, with an information large quantity on a theme interesting you.
You’ve shared some really important ideas here. I appreciate the time you put into this! For anyone interested in reading more on this, this could be a valuable resource.
May I just say what a relief to discover an individual who actually understands what they are talking about over the internet. You definitely understand how to bring an issue to light and make it important. A lot more people have to look at this and understand this side of the story. It’s surprising you’re not more popular given that you most certainly possess the gift.
pharmacies en ligne certifiГ©es https://kamagrameilleurprix.shop/# pharmacie en ligne livraison europe
Your post is a great contribution to the discussion! I really appreciate the depth of your points. For others interested in this topic, website is a good place to look for more information.
Your post really spoke to me! You’ve laid out your thoughts so clearly. For anyone who wants to learn more about this subject, here could be a great resource.
What a brilliantly composed and insightful piece! The clarity and richness of the information kept me hooked from start to finish. Truly a pleasure to read!
I really enjoyed reading your post! You provided a fresh and engaging view on the topic. If anyone else is curious to learn more, this is a great link to check out.
Pharmacie Internationale en ligne: pharmacie en ligne france – pharmacie en ligne avec ordonnance
This is such a well-written post! I appreciate your insights on the topic. For those wanting to explore this further, website might provide some useful reading.
You’ve raised some critical issues here, and I’m glad you took the time to address them! For those looking for more information on this topic, click might be useful.
You’ve done a fantastic job of explaining this complex issue in a simple way. For those interested in diving deeper, I recommend this as a good resource for more insights.
You’ve brought up some very interesting points that I hadn’t considered before. If others are interested in reading more about this, click could be a helpful resource.
Your writing here is excellent, and I found your points very convincing. If others are curious about this topic, they can look into this for further details.
What an interesting take! I appreciate you bringing this up, as it’s not often discussed. You might also find website useful if you want to explore this concept further.
You’ve raised some critical issues here, and I’m glad you took the time to address them! For those looking for more information on this topic, here might be useful.
Your post was so well-organized! It was a pleasure to read. For others looking for more content like this, this might be a great next stop.
http://viagrameilleurprix.com/# Viagra femme sans ordonnance 24h
Pharmacie Internationale en ligne
I completely agree with your points, and this really resonates with my own experiences. If anyone wants to read more on this, they can visit click to learn more.
1win aviator [url=http://1win1.com.kg/]http://1win1.com.kg/[/url] .
ставки на спорт кыргызстан [url=1win1.com.kg]1win1.com.kg[/url] .
Thank you for your detailed post! It brought up some points I hadn’t thought of before. For further reading, I suggest checking out this to gain more context.
pharmacie en ligne france fiable: kamagra pas cher – pharmacie en ligne avec ordonnance
You’ve shared some really important ideas here. I appreciate the time you put into this! For anyone interested in reading more on this, this could be a valuable resource.
Viagra vente libre pays: viagra en ligne – SildГ©nafil Teva 100 mg acheter
You’ve offered a fresh perspective on this issue, which is really appreciated. For those looking for more information on the subject, website might provide some interesting insights.
I’m really glad you shared this! It’s always nice to get fresh perspectives. For anyone interested in learning more, I recommend checking out website.
Pharmacie sans ordonnance https://viagrameilleurprix.com/# Prix du Viagra 100mg en France
I really enjoyed reading this! It’s always good to see a well-thought-out post like this. For others who want to explore the topic further, this might be a great resource.
What a great breakdown of the topic! You covered so much in such a clear way. For those looking for more, click could be a good follow-up resource.
You’ve done a fantastic job of explaining this complex issue in a simple way. For those interested in diving deeper, I recommend check as a good resource for more insights.
Your post is full of valuable insights, and I learned a lot from it! If anyone else is looking for additional reading on the subject, here could provide further context.
Your post has given me a lot to think about! I appreciate the thoughtful approach you took. If others are interested in further reading, this could offer additional insights.
Thanks for sharing this insightful post! It really made me think about the topic in a new light. If you’re interested, check out here for more information on this subject.
п»їpharmacie en ligne france: cialis prix – pharmacie en ligne france fiable
I could not resist commenting. Perfectly written.
I appreciate the balanced approach you took in this post! It’s not easy to cover all angles, but you did it well. For those looking to learn more, here could provide additional details.
Thanks for bringing this up! It’s a topic that deserves more attention. For those looking to explore this further, here could offer additional information.
You’ve brought up some great points that I hadn’t considered before! For others looking to explore the topic more deeply, website could be a helpful resource.
Viagra sans ordonnance 24h Amazon [url=http://viagrameilleurprix.com/#]Viagra sans ordonnance pharmacie France[/url] Viagra vente libre pays
https://tadalafilmeilleurprix.com/# pharmacie en ligne
pharmacie en ligne pas cher
I enjoy looking through an article that will make men and women think. Also, thank you for allowing me to comment.
Your post really caught my attention! It’s a unique take on the subject. For those who want to read more about this topic, they can check out website for further insight.
trouver un mГ©dicament en pharmacie: pharmacie en ligne fiable – п»їpharmacie en ligne france
Pharmacie en ligne livraison Europe https://viagrameilleurprix.com/# Viagra vente libre pays
What a great read! Your post touches on some key issues that are often overlooked. For others who are curious to dig deeper, I recommend check for additional information.
You’ve provided a well-rounded view of this issue! I appreciate the clarity in your explanation. If others are curious, here might offer even more information.
You’ve done an amazing job of explaining this topic! It’s so easy to understand. For those interested in reading more, this could offer additional insights.
This post really struck a chord with me! It’s a valuable contribution to the conversation. If anyone else is intrigued, I recommend here as a complementary resource.
Pharmacie sans ordonnance: pharmacie en ligne – pharmacie en ligne france livraison internationale
This is a topic that doesn’t get enough attention, so I’m glad you brought it up! For anyone who’s curious to learn more, this could be helpful.
Your post offers some great insights, and I really enjoyed reading it! For those who are interested in learning more about this, they should definitely visit website.
I learned a lot from your post. You’ve brought up some excellent points. If others are looking for more in-depth information, they can visit click to learn more.
Thanks for this thoughtful post! It’s clear you’ve done your research. If anyone else is curious about this topic, they can find more detailed information at here.
Your post offers some great insights, and I really enjoyed reading it! For those who are interested in learning more about this, they should definitely visit website.
https://viagrameilleurprix.shop/# Le gГ©nГ©rique de Viagra
Achat mГ©dicament en ligne fiable
trouver un mГ©dicament en pharmacie: pharmacie en ligne – Pharmacie en ligne livraison Europe
накрутить подписчиков в Телеграм без отписок
Your post really resonated with me, and I appreciate the clear way you’ve laid everything out. If anyone else is interested in exploring this further, they might find here useful.
Your post really made me think! It’s clear you’ve put a lot of effort into this. For anyone interested in similar content, I recommend click for further reading.
Тут можно преобрести огнестойкие сейфы огнестойкий сейф купить
I found this post to be both engaging and informative! You’ve done a great job explaining the topic. If others want to learn more, check might offer additional context.
pharmacie en ligne france fiable http://kamagrameilleurprix.com/# Pharmacie en ligne livraison Europe
This is a topic that doesn’t get enough attention, so I’m glad you brought it up! For anyone who’s curious to learn more, click could be helpful.
1вин лаки джет [url=https://1win2.com.kg/]1win2.com.kg[/url] .
Viagra homme sans ordonnance belgique: Viagra pharmacie – Viagra prix pharmacie paris
qmc6Vh6ARLu
pharmacie en ligne [url=https://tadalafilmeilleurprix.shop/#]cialis generique[/url] Pharmacie Internationale en ligne
You’ve done an excellent job outlining this topic. If anyone wants to explore similar ideas in more depth, they should definitely check out click for additional reading.
Your post was so well-organized! It was a pleasure to read. For others looking for more content like this, this might be a great next stop.
Your post is incredibly thoughtful and well-written. If anyone else is looking for more on this subject, click might be a useful link to follow for additional reading.
I really like how you’ve structured your argument! It flows naturally and is easy to follow. For those who want to read more on this, website could provide further insight.
Thanks for bringing this up! It’s something that deserves more attention. For anyone looking for more information on the subject, this is a great place to start.
Your post raises some important questions and offers great insights. For those who are interested in delving deeper, check could be a helpful place to start.
You’ve really explained this well! It’s easy to follow and offers new ideas. If anyone is looking for more resources on this subject, they might find check helpful.
This is such a well-rounded post, and I appreciate the effort you put into it. For anyone wanting to learn more about this topic, here could be a valuable resource.
This post really hits the nail on the head! You’ve covered all the important points. If anyone else wants to dive deeper, this is a great resource to check out.
I really appreciate your fresh take on this topic! You’ve highlighted some points I hadn’t considered. For anyone looking to dive deeper into the discussion, check is a great place to start.
You’ve done a fantastic job addressing this issue! Your post really gets to the heart of the matter. For more in-depth information, here could be worth checking out.
pharmacies en ligne certifiГ©es: pharmacie en ligne france – pharmacie en ligne
http://pharmaciemeilleurprix.com/# acheter mГ©dicament en ligne sans ordonnance
pharmacies en ligne certifiГ©es
I love your take on this issue! You’ve explained it in a way that’s easy to follow. For others who want to continue the conversation, this could be a useful resource.
You’ve done an amazing job of explaining this topic! It’s so easy to understand. For those interested in reading more, check could offer additional insights.
This is a fantastic post! You’ve provided some valuable insights that really resonate with me. For anyone interested in diving deeper into the topic, here might be a great resource.
п»їpharmacie en ligne france: kamagra oral jelly – Achat mГ©dicament en ligne fiable
Your take on this topic is very insightful! I appreciate the time and thought you’ve put into this. If anyone else is interested in reading more, here could help.
vente de mГ©dicament en ligne https://tadalafilmeilleurprix.shop/# pharmacie en ligne fiable
Thank you for your detailed post! It brought up some points I hadn’t thought of before. For further reading, I suggest checking out this to gain more context.
Great post! You’ve done a wonderful job explaining the nuances of this topic. If anyone wants to explore similar ideas, they can take a look at this.
This is a really insightful post! I appreciate you sharing your thoughts on this. For others who want to dig deeper, I recommend taking a look at check for additional reading.
You’ve done an amazing job simplifying a complex issue here. I really appreciate your approach! For more on this subject, here might offer additional context.
You’ve done a fantastic job of explaining this complex issue in a simple way. For those interested in diving deeper, I recommend here as a good resource for more insights.
eF5hJjRpFT7
This post really helped me understand the topic better! Your explanation is so clear. If others are looking for more, click might provide some useful background information.
I found this post to be incredibly engaging! It made me think about the topic in a new way. If you’re looking to expand on these ideas, you can check out this for more insights.
OdXJCeXeJeW
QhNgrojiNJc
ENbA1b63J5W
Hello there! Do you know if they make any plugins to assist with Search Engine Optimization? I’m trying to get my blog to rank for some targeted keywords but I’m not seeing very good gains. If you know of any please share. Thank you!
iPEJ5cOrf2c
7MfVupKSweS
ew7jKzNMAwB
W3yxMWG0ppL
h6OwvzKrXNw
This post really opened my eyes to new perspectives! For others who are curious about this topic, click could be a helpful resource to continue learning.
FI2aSC9Ip60
ALMaQH8HZ7p
Xqow4lSPEqU
x7QIGOvokdr
lVnLDUIhakF
This is such an insightful post! You’ve raised some important points that need more discussion. For anyone interested in continuing this conversation, website could be a useful link.
EMP8SkipHs5
QOqWvvDot0b
bVQ6HSOxvPy
mZUMtVu5fpJ
Pinco kazinosu ən yaxşı oyun təcrübəsi təqdim edir | Pinco kazino müştərilərinə sürətli ödənişlər təqdim edir pinco az | Pinco kazino etibarlı və lisenziyalı platformadır | Pinco kazino ilə mərc etmək indi daha asandır [url=https://pinco-azerbaycan.website.yandexcloud.net/]Pinco AZ onlayn mərc[/url] .
e7RaAfh1tMd
1CB7T8SlB05
4KqYYkDgEfR
Gyp93WL9PHP
8NGFmufK7WO
pharmacie en ligne france livraison internationale: Acheter Cialis – trouver un mГ©dicament en pharmacie
gzn4hRYUwcu
Pinco kazinosunda geniş oyun seçimi mövcuddur | Pinco kazinosunda VIP proqramdan yararlanın pinko kazino | Pinco kazino ilə kazinoda və idmanda mərc edin | Pinco kazinosu oyunçulara təhlükəsiz və rahat mərc imkanları təqdim edir [url=https://pinco-azerbaycan.website.yandexcloud.net/]Pinco AZ yüksək əmsallar[/url] .
eZ6ATUpIkG6
Pinco AZ ilə mərc dünyasını yenidən kəşf edin | Pinco kazinosunda VIP proqramdan yararlanın pinco cazino | Pinco AZ ilə slot oyunlarını oynayın və bonuslar qazanın | Pinco AZ rəsmi saytında ən son yeniliklərdən xəbərdar olun [url=https://pinco-azerbaycan.website.yandexcloud.net/]Pinco kazino oyunları[/url] .
y27EIKPo6LC
You’ve tackled a tough subject here, and I really appreciate your perspective. If anyone else is interested in learning more, they should check out website.
Pinco kazino ilə mərc oynamağın üstünlüklərini kəşf edin | Pinco kazinosunda mərc edərək yüksək gəlir əldə edin pinco | Pinco AZ oyunçularına sürətli və təhlükəsiz ödənişlər təqdim edir | Pinco kazinosunda sürətli və etibarlı ödənişlərdən istifadə edin [url=https://pinco-azerbaycan.website.yandexcloud.net/]Pinco kazino qeydiyyatı[/url] .
SAuWjY5NgQx
TbuxxDn3dNm
lfcCpTpu4OR
Kl2l7skqVQo
This is a brilliant take on the issue! I hadn’t considered it this way before. If anyone else is interested, website offers more details on this topic.
pgHpg4nqTpI
cbv2ofOPhVH
bRtxXgt0NTk
gut6VWGhnbZ
You’ve done a fantastic job addressing this issue! Your post really gets to the heart of the matter. For more in-depth information, check could be worth checking out.
Pinco kazino ilə mərc oynamağın üstünlüklərini kəşf edin | Pinco kazinosunda mərc edərək yüksək gəlir əldə edin pinco cazino | Pinco kazino ilə kazinoda və idmanda mərc edin | Pinco kazinosu oyunçulara təhlükəsiz və rahat mərc imkanları təqdim edir [url=https://pinco-azerbaycan.website.yandexcloud.net/]Pinco AZ etibarlı mərc[/url] .
This is such an important topic to discuss! Your post sheds light on key issues. For those wanting to learn more, I recommend checking out check for further information.
You’ve done an excellent job outlining this topic. If anyone wants to explore similar ideas in more depth, they should definitely check out this for additional reading.
Pinco kazino ilə mərc oynamağın üstünlüklərini kəşf edin | Pinco AZ mobil tətbiqini yükləyin və harada olursanız olun oynayın pinko casino | Pinco AZ ilə slot oyunlarını oynayın və bonuslar qazanın | Pinco kazinosu oyunçulara təhlükəsiz və rahat mərc imkanları təqdim edir [url=https://pinco-azerbaycan.website.yandexcloud.net/]www.pinco-azerbaycan.website.yandexcloud.net[/url] .
Pinco AZ-da ən yüksək bonusları əldə edin | Pinco AZ mobil tətbiqini yükləyin və harada olursanız olun oynayın pinco az | Pinco kazinosu ilə hər an əyləncəyə qoşulun | Pinco AZ-də promosyonlardan faydalanın və əlavə bonuslar qazanın [url=https://pinco-azerbaycan.website.yandexcloud.net/]pinco-azerbaycan.website.yandexcloud.net[/url] .
Pinco AZ-da ən yüksək bonusları əldə edin | Pinco kazino real dilerlərlə canlı oyunlar təklif edir pinco | Pinco kazinosunda böyük cekpotlar sizi gözləyir | Pinco kazino ilə pul qazanmaq heç vaxt bu qədər asan olmayıb [url=https://pinco-azerbaycan.website.yandexcloud.net/]pinco-azerbaycan.website.yandexcloud.net[/url] .
pet products prices order pet product
buy pet products pet market website
Pinco kazinosu ən yaxşı oyun təcrübəsi təqdim edir | Pinco kazino müştəriləri üçün eksklüziv turnirlər təşkil edir pinko casino | Pinco kazino etibarlı və lisenziyalı platformadır | Pinco kazino ilə mərc etmək indi daha asandır [url=https://pinco-azerbaycan.website.yandexcloud.net/]https://pinco-azerbaycan.website.yandexcloud.net/[/url] .
Pinco kazinosunda geniş oyun seçimi mövcuddur | Pinco kazino real dilerlərlə canlı oyunlar təklif edir pinko kazino | Pinco kazinosu ilə hər an əyləncəyə qoşulun | Pinco kazinosu oyunçulara təhlükəsiz və rahat mərc imkanları təqdim edir [url=https://pinco-azerbaycan.website.yandexcloud.net/]Pinco AZ rəsmi saytı[/url] .
This is a well-written and engaging post! I appreciate you sharing your thoughts. For others who want to dive deeper into the subject, this might offer further resources.
Thanks for sharing your thoughts on this topic! It’s always good to see different viewpoints. For those who want to explore similar ideas, here might be a good resource.
Thanks for bringing this up! It’s a topic that deserves more attention. For those looking to explore this further, this could offer additional information.
You explained this well!
ОєО±О»П…П„ОµПЃО± online casino https://ratingcasino.info/online-craps/ online casino in new zealand
https://pharmaciemeilleurprix.com/# Achat mГ©dicament en ligne fiable
п»їpharmacie en ligne france
Your post was really thought-provoking and well explained! If others are curious about this topic, they might want to explore here to get additional perspectives.
pharmacies en ligne certifiГ©es http://pharmaciemeilleurprix.com/# п»їpharmacie en ligne france
Thanks for sharing your insights! This is a topic that doesn’t get enough attention. For those who want to dive deeper into this issue, click could offer further reading.
I completely agree with your points, and this really resonates with my own experiences. If anyone wants to read more on this, they can visit this to learn more.
накрутка подписчиков ВКонтакте
Acheter viagra en ligne livraison 24h: Viagra homme prix en pharmacie sans ordonnance – Viagra sans ordonnance 24h suisse
Thanks for bringing this up! It’s a topic that deserves more attention. For those looking to explore this further, check could offer additional information.
trouver un mГ©dicament en pharmacie: acheter kamagra site fiable – п»їpharmacie en ligne france
pharmacie en ligne france fiable [url=https://kamagrameilleurprix.com/#]acheter kamagra site fiable[/url] pharmacie en ligne france livraison internationale
This was such an insightful read! Your post gave me a new perspective. For others wanting to explore the subject further, I suggest checking out this.
Your post is a great conversation starter! You’ve covered some important points. For those wanting to learn more, check could be a helpful resource for further exploration.
You’ve tackled a tough subject here, and I really appreciate your perspective. If anyone else is interested in learning more, they should check out check.
Your post does a great job of explaining a complex issue in simple terms. For anyone wanting to explore this further, this could provide more detailed information.
You’ve done a great job of presenting this complex issue in a simple way. If others want more resources on the subject, this might provide additional context.
Your insights on this topic are really valuable, and I learned a lot from reading your post. If anyone is interested in further reading, click might provide useful context.
I really enjoyed reading this! It’s always good to see a well-thought-out post like this. For others who want to explore the topic further, click might be a great resource.
Authorized Roofing Contractors in Wilmington City
Dwelling by the shoreline has many advantages: salty air, beautiful scenery and the recognizable sound of breakers hitting against the coast are among them. However, residing there also brings special issues: gales, rain and the constant salty air can damage roofs causing leaks, moisture intrusion and potentially mold growth beneath shingles, thus necessitating employing a professional roof contractor in Wilmington North Carolina to resolve these problems effectively. That is why possessing reach to dependable roofing contractors in Wilmington NC is crucial!
Roofing experts authorized with the State of NC can evaluate potential problems and take precautionary measures to keep rooftops in good shape – this could reduce costs in corrections while providing a safer workspace or residential area for laborers or residents.
These companies concentrate in residential and commercial roof services such as metallic roofing installations, spray-on foam roofing jobs, thermal roof coating applications, tile repair methods, full replacements of both residential and commercial roofs and maintenance tasks. Furthermore, they can manage fittings for HOAs to meet requirements.
Roof contractors licensed in Wilmington City must carry coverage and bond coverage when doing roofing tasks at houses and commercial sites, to safeguard homeowners against potential injuries that may happen during a project and guarantee their roofing system is restored or replaced by qualified experts. Additionally, it aids the homeowner validate whether their preferred certified roofing expert has the expertise and skill to provide premium solutions.
[url=https://portcityexteriors.com/roofing/]Roofing assurance choices close to Carolina Beach North Carolina[/url]
[url=https://starwoodmediacentre.com/easy-tips-for-maintaining-your-dental-care-routine/#comment-306]Protecting Your Roof from Coastal Weather[/url] e476cff
I appreciate you sharing your thoughts on this! You’ve made some important points. For anyone else who’s interested, check could offer more context.
I think you’ve raised some really important questions here. Your post was a great read! If others want to dive deeper, I recommend checking out click.
Your post really hit home for me! I think you’ve done an excellent job highlighting key points. If anyone else is interested in further exploration, here might be a helpful resource.
You’ve brought up some great points that I hadn’t considered before! For others looking to explore the topic more deeply, website could be a helpful resource.
This is such an important topic to discuss! Your post sheds light on key issues. For those wanting to learn more, I recommend checking out website for further information.
After I originally left a comment I appear to have clicked the -Notify me when new comments are added- checkbox and now each time a comment is added I receive 4 emails with the same comment. There has to be a means you are able to remove me from that service? Cheers.
Your insights on this topic are really valuable, and I learned a lot from reading your post. If anyone is interested in further reading, check might provide useful context.
This is an excellent contribution! Your post brings up some really relevant points. For those who want to continue this discussion, this might be a great resource to explore.
Thanks for such a thorough and insightful post! You’ve covered the topic very well. For anyone looking for more on this, check could provide some valuable additional information.
This was a very thought-provoking post! Your points are well presented. For others who are interested in learning more, check might provide some additional valuable insights.
SildГ©nafil Teva 100 mg acheter: acheter du viagra – Viagra homme prix en pharmacie sans ordonnance
I really enjoyed reading your post! You provided a fresh and engaging view on the topic. If anyone else is curious to learn more, website is a great link to check out.
Thanks a bunch for developing such an helpful as well as amusing platform. I’m am eager to providing info should that situation emerges by itself! Appreciate it once again for that ready to people!
[url=http://pakrunco.com/]Broker-Supported Tips for Selling Homes Quickly[/url] 4a7e476
I really liked how you approached this issue! You’ve raised some excellent points. For those wanting to learn more about this, here could provide additional context.
Здесь можно сейф в наличии где купить сейф
pharmacie en ligne https://pharmaciemeilleurprix.shop/# Pharmacie Internationale en ligne
Wow, you’ve done an excellent job summarizing this topic. I couldn’t agree more! For anyone who wants more context, here could offer some additional insights.
What a thoughtful post! You’ve articulated some key points really well. For others interested in further exploring this topic, check might offer some additional context.
You’ve highlighted some crucial points that often get overlooked. This is a fantastic post! If others want to dig deeper, this might provide more insights on the subject.
https://pharmaciemeilleurprix.shop/# pharmacie en ligne sans ordonnance
Pharmacie Internationale en ligne
I found this post to be very helpful and informative. For those who are looking for further discussion on the matter, this is a great resource to continue learning.
You’ve articulated your ideas so clearly, and I really appreciate that. If others want to dig deeper into this topic, here might be a good place to start exploring.
This is a fantastic post that really highlights some key points. If others are curious to learn more about this topic, website might be a great follow-up resource.
накрутка реакций на пост в Телеграм бесплатно
Thanks for such a thorough and insightful post! You’ve covered the topic very well. For anyone looking for more on this, click could provide some valuable additional information.
I found your post very insightful! It’s great to see someone address this issue thoughtfully. For anyone wanting more information, check could provide additional perspectives.
What a fascinating post! It’s always great to see someone take a new angle on a familiar topic. For those interested in learning more, click might offer further insights.
Thanks for sharing this insightful post! It really made me think about the topic in a new light. If you’re interested, check out click for more information on this subject.
I appreciate your thoughtful approach to this post. It’s given me a lot to think about. If others want to dig deeper, website could be an excellent place to start.
trouver un mГ©dicament en pharmacie: cialis prix – pharmacie en ligne france livraison internationale
pharmacie en ligne: cialis generique – п»їpharmacie en ligne france
This is a fantastic post! You’ve provided some valuable insights that really resonate with me. For anyone interested in diving deeper into the topic, click might be a great resource.
Your post really made me think! It’s clear you’ve put a lot of effort into this. For anyone interested in similar content, I recommend website for further reading.
You’ve done a fantastic job of explaining this complex issue in a simple way. For those interested in diving deeper, I recommend check as a good resource for more insights.
Your post really resonated with me, and I appreciate the clear way you’ve laid everything out. If anyone else is interested in exploring this further, they might find click useful.
This post really helped me understand the topic better! Your explanation is so clear. If others are looking for more, this might provide some useful background information.
I love how you broke this down! It’s not easy to explain such a nuanced issue so clearly. For anyone wanting more on this, website could be helpful.
1 win site [url=https://1win2.am]1 win site[/url] .
накрутить просмотры в Телеграм канал
Thanks for sharing your thoughts on this! It’s always interesting to read different takes. If anyone is looking for more content on this topic, check might be a helpful resource.
Thanks for sharing this insightful post! It really made me think about the topic in a new light. If you’re interested, check out check for more information on this subject.
This was a very thought-provoking post! Your points are well presented. For others who are interested in learning more, click might provide some additional valuable insights.
Pharmacie sans ordonnance [url=https://pharmaciemeilleurprix.shop/#]pharmacie en ligne france livraison internationale[/url] pharmacie en ligne france livraison internationale
This post highlights some really key points that often get overlooked. For anyone wanting more information, this could provide further context and examples on this topic.
п»їpharmacie en ligne france https://kamagrameilleurprix.shop/# pharmacie en ligne sans ordonnance
Your post really caught my attention! It’s a unique take on the subject. For those who want to read more about this topic, they can check out check for further insight.
https://viagrameilleurprix.shop/# Viagra en france livraison rapide
pharmacie en ligne france livraison internationale
Your post really made me think! Thanks for shedding light on this topic. For those interested in learning more about it, website is a great place to find further information.
Acheter viagra en ligne livraison 24h: Viagra sans ordonnance 24h – Viagra vente libre allemagne
Your post has given me a lot to think about! I appreciate the thoughtful approach you took. If others are interested in further reading, this could offer additional insights.
I appreciate the way you’ve presented this! It’s easy to follow and really insightful. For anyone wanting to explore the topic further, I recommend checking out click.
I really enjoyed reading your thoughts on this topic! It’s a perspective I hadn’t considered before. For anyone interested in similar discussions, take a look at this for more insights.
What a great take on this issue! You’ve really broken it down in a digestible way. For those who want more information on this topic, click could be useful.
You’ve brought up some great points here that deserve more attention! For those who are curious to learn more, check might provide further insights on the topic.
https://realtrustfeedback.com/
Great post! You’ve done a wonderful job explaining the nuances of this topic. If anyone wants to explore similar ideas, they can take a look at here.
Thank you for such a thoughtful post! It’s refreshing to see someone approach this topic from a new angle. For more on this, this is a good resource.
Thanks for bringing this up! It’s a topic that deserves more attention. For those curious to dig deeper, click might be helpful.
I love the depth you’ve brought to this discussion! For anyone else interested in exploring this topic, click could offer some helpful additional resources.
Your post was really thought-provoking and well explained! If others are curious about this topic, they might want to explore here to get additional perspectives.
Your writing here is excellent, and I found your points very convincing. If others are curious about this topic, they can look into here for further details.
This is an excellent contribution! Your post brings up some really relevant points. For those who want to continue this discussion, here might be a great resource to explore.
Your post is a great contribution to the discussion! I really appreciate the depth of your points. For others interested in this topic, this is a good place to look for more information.
pharmacie en ligne france fiable: pharmacie en ligne france – pharmacie en ligne fiable
Pharmacie en ligne livraison Europe http://kamagrameilleurprix.com/# pharmacie en ligne france fiable
Thanks for sharing. I read many of your blog posts, cool, your blog is very good.
You’ve done a fantastic job of explaining this complex issue in a simple way. For those interested in diving deeper, I recommend here as a good resource for more insights.
I love how you approached this topic! You broke it down so well. For others looking to explore this issue further, click might be worth a read.
https://kamagrameilleurprix.shop/# pharmacie en ligne france livraison belgique
Achat mГ©dicament en ligne fiable
Your post brings a fresh perspective to the table! It’s always great to see new ideas being discussed. If others are curious to read more on this, here is worth checking out.
This is an excellent contribution! Your post brings up some really relevant points. For those who want to continue this discussion, check might be a great resource to explore.
Thanks for sharing your thoughts on this! It’s a thought-provoking post. For anyone curious to explore this topic more deeply, this might be a good resource.
Thanks for such a thorough and insightful post! You’ve covered the topic very well. For anyone looking for more on this, check could provide some valuable additional information.
This is such a great perspective. I never thought of it that way before. For those who want to dive deeper into this idea, check is a helpful resource to explore further.
What an interesting take! I appreciate you bringing this up, as it’s not often discussed. You might also find check useful if you want to explore this concept further.
You’ve done a great job of presenting this complex issue in a simple way. If others want more resources on the subject, here might provide additional context.
Thanks for this thoughtful post! It’s clear you’ve done your research. If anyone else is curious about this topic, they can find more detailed information at click.
Thanks for bringing this up! It’s an important issue, and you’ve done a great job explaining it. For those who want more details, this could be a useful resource to explore.
I appreciate the way you’ve presented this! It’s easy to follow and really insightful. For anyone wanting to explore the topic further, I recommend checking out this.
лайки ВК
Pinco kazinosunda geniş oyun seçimi mövcuddur | Pinco kazinosunda VIP proqramdan yararlanın pinko kazino | Pinco AZ-də rahat interfeys və sürətli qeydiyyat imkanı mövcuddur | Pinco AZ müştərilərinə ən yaxşı xidmətləri təqdim edir [url=https://pinco-azerbaycan.website.yandexcloud.net/]Pinco AZ rəsmi saytı[/url] .
I’m really glad you shared this! It’s always nice to get fresh perspectives. For anyone interested in learning more, I recommend checking out here.
I appreciate your unique take on this topic. You’ve covered some really important points. For those looking to continue learning about this, check could be a helpful resource.
I appreciate your unique take on this topic. You’ve covered some really important points. For those looking to continue learning about this, website could be a helpful resource.
Pinco AZ rəsmi saytı ilə təhlükəsiz mərc edin | Pinco kazinosunda mərc edərək yüksək gəlir əldə edin РїРёРЅРєРѕ казино | Pinco kazinosunda böyük cekpotlar sizi gözləyir | Pinco kazino ilə mərc etmək indi daha asandır [url=https://pinco-azerbaycan.website.yandexcloud.net/]Pinco AZ etibarlı mərc[/url] .
pharmacie en ligne avec ordonnance: kamagra pas cher – acheter mГ©dicament en ligne sans ordonnance
Pinco AZ-da ən yüksək bonusları əldə edin | Pinco kazinosunda mərc edərək yüksək gəlir əldə edin pinko kazino | Pinco kazinosunda böyük cekpotlar sizi gözləyir | Pinco kazinosu oyunçulara təhlükəsiz və rahat mərc imkanları təqdim edir [url=https://pinco-azerbaycan.website.yandexcloud.net/]Pinco AZ rəsmi saytı[/url] .
Pinco AZ ilə mərc dünyasını yenidən kəşf edin | Pinco kazino müştəriləri üçün eksklüziv turnirlər təşkil edir РїРёРЅРєРѕ казино | Pinco kazino ilə kazinoda və idmanda mərc edin | Pinco AZ rəsmi saytında ən son yeniliklərdən xəbərdar olun [url=https://pinco-azerbaycan.website.yandexcloud.net/]Pinco AZ onlayn mərc[/url] .
п»їpharmacie en ligne france [url=https://tadalafilmeilleurprix.shop/#]cialis sans ordonnance[/url] pharmacie en ligne fiable
Great job explaining this issue! You’ve provided some much-needed clarity. If anyone else is looking to expand their understanding, website could be a helpful resource.
Pinco kazino ilə böyük uduşlar qazanın | Pinco kazino müştəriləri üçün eksklüziv turnirlər təşkil edir pinco | Pinco kazinosu ilə hər an əyləncəyə qoşulun | Pinco AZ müştərilərinə ən yaxşı xidmətləri təqdim edir [url=https://pinco-azerbaycan.website.yandexcloud.net/]Pinco kazino mobil versiyası[/url] .
Pinco kazino ilə mərc oynamağın üstünlüklərini kəşf edin | Pinco kazinosunda mərc edərək yüksək gəlir əldə edin pinco | Pinco kazino etibarlı və lisenziyalı platformadır | Pinco kazinosu oyunçulara təhlükəsiz və rahat mərc imkanları təqdim edir [url=https://pinco-azerbaycan.website.yandexcloud.net/]Pinco kazino yeni oyunlar[/url] .
pharmacie en ligne france fiable https://tadalafilmeilleurprix.com/# Pharmacie Internationale en ligne
Pinco kazinosu ən yaxşı oyun təcrübəsi təqdim edir | Pinco AZ-də mərc etmək asan və rahatdır pinko casino | Pinco AZ-də ən populyar kazino oyunlarını tapın | Pinco AZ-də promosyonlardan faydalanın və əlavə bonuslar qazanın [url=https://pinco-azerbaycan.website.yandexcloud.net/]Pinco AZ etibarlı mərc[/url] .
Pinco kazino ilə mərc oynamağın üstünlüklərini kəşf edin | Pinco AZ-də mərc etmək asan və rahatdır РїРёРЅРєРѕ казино | Pinco AZ-də ən populyar kazino oyunlarını tapın | Pinco kazino ilə pul qazanmaq heç vaxt bu qədər asan olmayıb [url=https://pinco-azerbaycan.website.yandexcloud.net/]Pinco AZ onlayn mərc[/url] .
Pinco AZ-da ən yüksək bonusları əldə edin | Pinco kazino müştərilərinə sürətli ödənişlər təqdim edir pinco | Pinco kazino ilə kazinoda və idmanda mərc edin | Pinco AZ rəsmi saytında ən son yeniliklərdən xəbərdar olun [url=https://pinco-azerbaycan.website.yandexcloud.net/]Pinco AZ-də mərc edin[/url] .
What a fascinating post! It’s always great to see someone take a new angle on a familiar topic. For those interested in learning more, check might offer further insights.
Pinco AZ rəsmi saytı ilə təhlükəsiz mərc edin | Pinco AZ mobil tətbiqini yükləyin və harada olursanız olun oynayın pinco | Pinco kazino müştərilərinə fərdi bonuslar təqdim edir | Pinco AZ rəsmi saytında ən son yeniliklərdən xəbərdar olun [url=https://pinco-azerbaycan.website.yandexcloud.net/]Pinco AZ ödəniş üsulları[/url] .
You’ve done a fantastic job covering this topic! I appreciate your in-depth approach. If anyone is curious about similar subjects, they can check out here for further reading.
You actually stated it really well!
agen taruhan casino joker123 online https://shadowcasino.info/golf-betting/ silver oak online casino download
Тут можно преобрести навес перед домом для машины в Санкт-Петербурге подробно на сайте навес на заказ
Viagra gГ©nГ©rique sans ordonnance en pharmacie: Viagra sans ordonnance 24h – Quand une femme prend du Viagra homme
Your post provides such a clear and concise breakdown of the issue! For others who want to explore this topic further, website might offer some additional insights.
This is a really well-done post, and I appreciate your analysis! For anyone looking for further reading, here could provide additional insights on this subject.
https://viagrameilleurprix.com/# Viagra prix pharmacie paris
pharmacie en ligne
I enjoyed reading your post! You’ve raised some valuable points. For those wanting to dive deeper into this discussion, check could offer more details.
I love the way you’ve explained this topic! It’s easy to follow and provides great insight. For anyone who wants to learn more, check might be a good place to start.
I love the way you’ve explained this topic! It’s easy to follow and provides great insight. For anyone who wants to learn more, website might be a good place to start.
Thanks for sharing your thoughts on this! It’s always interesting to read different takes. If anyone is looking for more content on this topic, this might be a helpful resource.
pharmacies en ligne certifiГ©es http://kamagrameilleurprix.com/# pharmacie en ligne france livraison belgique
I completely agree with your points, and this really resonates with my own experiences. If anyone wants to read more on this, they can visit here to learn more.
You’ve offered a fresh perspective on this issue, which is really appreciated. For those looking for more information on the subject, click might provide some interesting insights.
pharmacie en ligne france livraison internationale: Pharmacies en ligne certifiees – Pharmacie Internationale en ligne
Your post really shines a light on some important issues. For anyone who wants to explore this further, check could be a great resource to delve deeper into the topic.
This is a well-written and engaging post! I appreciate you sharing your thoughts. For others who want to dive deeper into the subject, this might offer further resources.
This was a very well-written and insightful post! If anyone is interested in learning more, they might find this helpful for further information on the topic.
pharmacie en ligne france fiable [url=http://tadalafilmeilleurprix.com/#]cialis generique[/url] trouver un mГ©dicament en pharmacie
https://kamagrameilleurprix.com/# pharmacie en ligne
Achat mГ©dicament en ligne fiable
This post is packed with valuable information, and I learned a lot from it! For anyone who wants to keep exploring the topic, here could be a great resource for further reading.
Spot on with this write-up, I truly think this website needs a great deal more attention. I’ll probably be returning to read more, thanks for the info.
What a fascinating post! It’s always great to see someone take a new angle on a familiar topic. For those interested in learning more, check might offer further insights.
1win bet [url=www.1win1.ug]1win bet[/url] .
Your post really made me think! It’s clear you’ve put a lot of effort into this. For anyone interested in similar content, I recommend click for further reading.
1win betting [url=http://1win2.ug]http://1win2.ug[/url] .
1win casino [url=https://1win1.ug/]https://1win1.ug/[/url] .
I enjoy reading an article that can make people think. Also, thank you for permitting me to comment.
pharmacie en ligne france livraison internationale https://viagrameilleurprix.shop/# Viagra pas cher livraison rapide france
Viagra en france livraison rapide: viagra en ligne – Viagra prix pharmacie paris
This was a very well-written and insightful post! If anyone is interested in learning more, they might find click helpful for further information on the topic.
This is a well-written post, and I really appreciate the detail you’ve provided. For anyone who wants to continue reading about this, website could be a useful resource.
Thanks for shedding light on this topic! It’s not something that gets discussed often enough. For anyone wanting to explore this subject further, this could be very useful.
1 win bet [url=https://1win1.com.ng/]1win1.com.ng[/url] .
Your post brings up some very interesting points! I appreciate your approach to the topic. For those wanting to continue the discussion, website could provide further reading.
I couldn’t refrain from commenting. Exceptionally well written!
https://kamagrameilleurprix.shop/# pharmacies en ligne certifiГ©es
pharmacie en ligne
Oh my goodness! Incredible article dude! Thank you so much, However I am encountering problems with your RSS. I don’t know the reason why I can’t join it. Is there anybody else getting similar RSS problems? Anyone that knows the solution can you kindly respond? Thanks!!
trouver un mГ©dicament en pharmacie http://viagrameilleurprix.com/# SildГ©nafil 100 mg sans ordonnance
Позволь себе отдых в компании шикарных девушек, которые знают, как сделать этот вечер по-настоящему особенным https://sibirki.vip/
Thanks for bringing this up! It’s an important issue, and you’ve done a great job explaining it. For those who want more details, click could be a useful resource to explore.
Thanks for sharing your thoughts on this topic! It’s always good to see different viewpoints. For those who want to explore similar ideas, this might be a good resource.
This is such a great perspective. I never thought of it that way before. For those who want to dive deeper into this idea, this is a helpful resource to explore further.
Great job explaining this issue! You’ve provided some much-needed clarity. If anyone else is looking to expand their understanding, click could be a helpful resource.
Viagra pas cher inde [url=https://viagrameilleurprix.com/#]viagra en ligne[/url] Viagra sans ordonnance 24h suisse
Having read this I believed it was really informative. I appreciate you finding the time and effort to put this informative article together. I once again find myself personally spending a lot of time both reading and leaving comments. But so what, it was still worth it.
Pharmacie Internationale en ligne: kamagra gel – pharmacie en ligne france livraison belgique
This post is full of valuable information, and I appreciate you sharing it. For anyone who wants more on the topic, I recommend visiting click for further exploration.
Your take on this topic is very insightful! I appreciate the time and thought you’ve put into this. If anyone else is interested in reading more, check could help.
I needed to thank you for this very good read!! I certainly enjoyed every bit of it. I’ve got you bookmarked to check out new things you post…
https://pharmaciemeilleurprix.com/# Pharmacie sans ordonnance
Achat mГ©dicament en ligne fiable
Your post really got me thinking! You’ve explained your points clearly and backed them up well. For those interested in learning more, this could be helpful.
Бездепозитные фриспины за регистрацию, эксклюзивные бонусы и щедрая VIP система для активных игроков. Ищи нас в телеграм по ID @arkadacasino_site или переходи по ссылке: https://t.me/arkadacasino_site
trouver un mГ©dicament en pharmacie https://kamagrameilleurprix.com/# Pharmacie en ligne livraison Europe
I appreciate you sharing your thoughts on this! You’ve made some important points. For anyone else who’s interested, here could offer more context.
You’ve provided a well-rounded view of this issue! I appreciate the clarity in your explanation. If others are curious, click might offer even more information.
Thanks for sharing this insightful post! It really made me think about the topic in a new light. If you’re interested, check out website for more information on this subject.
You’ve tackled a tough subject here, and I really appreciate your perspective. If anyone else is interested in learning more, they should check out click.
This is a great tip especially to those new to the blogosphere. Simple but very precise info… Appreciate your sharing this one. A must read post!
What a thoughtful post! You’ve articulated some key points really well. For others interested in further exploring this topic, this might offer some additional context.
Thanks for sharing your thoughts on this! It’s a thought-provoking post. For anyone curious to explore this topic more deeply, here might be a good resource.
I love the way you’ve explained this topic! It’s easy to follow and provides great insight. For anyone who wants to learn more, click might be a good place to start.
Тут можно преобрести купить сейф в офис сейф для офиса цена
Your post offers some great insights, and I really enjoyed reading it! For those who are interested in learning more about this, they should definitely visit website.
You’ve done an excellent job breaking down this topic! For others who want to continue learning about it, here could be a useful resource to explore.
What a well-reasoned argument! You’ve explained everything so clearly. For those who want to read more about this topic, here is a good place to start.
Great post! It’s clear you’ve put a lot of thought into this. If anyone wants to read more on this subject, I recommend checking out this for more details.
Thanks for sharing your insights! This is a topic that doesn’t get enough attention. For those who want to dive deeper into this issue, click could offer further reading.
pharmacie en ligne livraison europe: kamagra oral jelly – pharmacie en ligne fiable
Thanks for sharing your thoughts on this topic! It’s always good to see different viewpoints. For those who want to explore similar ideas, <a href="http://archeologialibri.com/phpinfo.php?a%5B%5D=this might be a good resource.
I appreciate the way you’ve presented this! It’s easy to follow and really insightful. For anyone wanting to explore the topic further, I recommend checking out this.
I think you’ve raised some really important questions here. Your post was a great read! If others want to dive deeper, I recommend checking out here.
I found this post to be very helpful and informative. For those who are looking for further discussion on the matter, this is a great resource to continue learning.
You’ve really opened my eyes to some new ideas here! If anyone else wants to explore this subject in more depth, I recommend taking a look at this.
I found this post very compelling! You’ve done an excellent job breaking everything down. For anyone interested in learning more, I suggest checking out click.
Thanks for sharing your thoughts on this! It’s a thought-provoking post. For anyone curious to explore this topic more deeply, click might be a good resource.
Your post really got me thinking! You’ve explained your points clearly and backed them up well. For those interested in learning more, check could be helpful.
You’ve offered some great insights here! Your approach to the topic is refreshing. For anyone else interested in this discussion, website might offer more to explore.
Achat mГ©dicament en ligne fiable https://kamagrameilleurprix.com/# pharmacie en ligne france livraison belgique
I’m impressed, I must say. Seldom do I come across a blog that’s both educative and engaging, and let me tell you, you have hit the nail on the head. The problem is something which too few men and women are speaking intelligently about. I’m very happy that I found this during my hunt for something relating to this.
You’ve given me a lot to think about with this post! I really appreciate your perspective. If others want to dig deeper into this topic, they should check out check.
http://tadalafilmeilleurprix.com/# pharmacie en ligne avec ordonnance
pharmacies en ligne certifiГ©es
pharmacie en ligne sans ordonnance [url=http://kamagrameilleurprix.com/#]kamagra gel[/url] pharmacie en ligne france livraison internationale
This post was incredibly informative and well-written. You’ve covered so much ground. If others are looking to explore this topic more, this could be a useful reference.
Your post really made me think! It’s clear you’ve put a lot of effort into this. For anyone interested in similar content, I recommend check for further reading.
You’ve presented some really great ideas here! This is a fantastic conversation starter. For those wanting to explore this subject further, website might be a good resource.
I completely agree with your points, and this really resonates with my own experiences. If anyone wants to read more on this, they can visit check to learn more.
Thanks for such a detailed explanation! I really appreciate the effort you put into this. For anyone wanting to explore the topic in greater depth, click could be very helpful.
I found your post very insightful! It’s great to see someone address this issue thoughtfully. For anyone wanting more information, here could provide additional perspectives.
I really enjoyed reading this! It’s always good to see a well-thought-out post like this. For others who want to explore the topic further, website might be a great resource.
I really enjoyed reading this post! You’ve covered a lot of ground. If anyone is curious to dig deeper into this topic, I recommend checking out check for more context.
What an interesting post! You’ve brought up points I hadn’t thought about. If anyone else is curious to explore this further, click could provide additional insights.
Your post was very engaging and brought new ideas to the table! If others want to dive deeper into the topic, website could be a useful link to explore.
Thanks for sharing your thoughts on this! It’s always interesting to read different takes. If anyone is looking for more content on this topic, website might be a helpful resource.
Your post is a great conversation starter! You’ve covered some important points. For those wanting to learn more, click could be a helpful resource for further exploration.
dealer auto transport
Right here is the perfect website for anyone who hopes to find out about this topic. You know a whole lot its almost hard to argue with you (not that I actually will need to…HaHa). You definitely put a new spin on a topic which has been discussed for a long time. Great stuff, just wonderful.
отдача игровых автоматов [url=https://www.t.me/igrovyyeavtomaty]отдача игровых автоматов[/url] .
1win login download [url=https://www.1win2.com.ng]https://www.1win2.com.ng[/url] .
демо игровые автоматы бесплатно [url=https://www.t.me/igrovyyeavtomaty]демо игровые автоматы бесплатно[/url] .
1 win casino [url=https://www.1win3.com.ng]https://www.1win3.com.ng[/url] .
1win online [url=http://1win2.com.ng/]1win online[/url] .
pharmacie en ligne fiable: pharmacie en ligne pas cher – pharmacie en ligne france livraison internationale
You’ve done an excellent job breaking down this topic! For others who want to continue learning about it, website could be a useful resource to explore.
At this time it appears like Expression Engine is the top blogging platform out there right now.
(from what I’ve read) Is that what you’re using on your blog?
This is a very informative post! You’ve managed to cover a lot in a concise way. For anyone wanting to explore this in more detail, here could offer further information.
You actually expressed this fantastically!
casinos online no brasil https://combatcasino.info/ohio-online-casinos/ firekeepers online casino michigan app
I love the depth you’ve brought to this discussion! For anyone else interested in exploring this topic, check could offer some helpful additional resources.
What a thoughtful post! You’ve articulated some key points really well. For others interested in further exploring this topic, here might offer some additional context.
как накрутить лайки в Тик Ток
Thanks for sharing your thoughts on this! It’s always interesting to read different takes. If anyone is looking for more content on this topic, click might be a helpful resource.
acheter mГ©dicament en ligne sans ordonnance https://tadalafilmeilleurprix.shop/# pharmacies en ligne certifiГ©es
This is a well-researched post, and I learned a lot from it! For those looking to expand their knowledge on the subject, here could be a valuable source of information.
I really enjoyed reading this post! You’ve covered a lot of ground. If anyone is curious to dig deeper into this topic, I recommend checking out here for more context.
This post was super informative and engaging! I learned a lot from it. For anyone who’s looking to read further into the topic, I recommend click.
Aw, this was an exceptionally nice post. Taking the time and actual effort to generate a good article… but what can I say… I put things off a lot and don’t manage to get nearly anything done.
What an interesting take! I appreciate you bringing this up, as it’s not often discussed. You might also find here useful if you want to explore this concept further.
Great post! It’s clear you’ve put a lot of thought into this. If anyone wants to read more on this subject, I recommend checking out click for more details.
This post was incredibly informative and well-written. You’ve covered so much ground. If others are looking to explore this topic more, website could be a useful reference.
Thanks for sharing your thoughts on this! It’s always interesting to read different takes. If anyone is looking for more content on this topic, website might be a helpful resource.
Your post makes a lot of sense and has given me new perspectives. For anyone wanting to continue learning about this topic, website could offer some useful information.
You’ve really explained this well! It’s easy to follow and offers new ideas. If anyone is looking for more resources on this subject, they might find here helpful.
https://tadalafilmeilleurprix.com/# pharmacie en ligne france fiable
pharmacie en ligne sans ordonnance
What an interesting post! You’ve brought up points I hadn’t thought about. If anyone else is curious to explore this further, website could provide additional insights.
This is a fantastic post! You’ve provided some valuable insights that really resonate with me. For anyone interested in diving deeper into the topic, website might be a great resource.
Great post! It’s clear you’ve put a lot of thought into this. If anyone wants to read more on this subject, I recommend checking out here for more details.
Thanks for sharing your perspective! It’s refreshing to see such a well-thought-out post. For anyone wanting to explore this topic further, website could offer more insights.
Your post brings a fresh perspective to the table! It’s always great to see new ideas being discussed. If others are curious to read more on this, click is worth checking out.
Thanks for bringing this up! It’s a topic that deserves more attention. For those curious to dig deeper, website might be helpful.
This is such a thoughtful post! You’ve done a great job bringing fresh ideas to the table. For anyone who wants to explore similar topics, here could be a great place to start.
Thanks for sharing such an informative post! I’ve learned a lot from your explanation. For those looking to explore the subject more deeply, this could be a great next step.
I really appreciate your unique take on this topic! You’ve brought some new ideas into the discussion. For anyone curious to explore further, website could be an excellent resource.
Your explanation of this issue is spot on! I found it very easy to follow. If anyone wants more information, they might want to explore website for additional reading.
Your post really spoke to me! You’ve laid out your thoughts so clearly. For anyone who wants to learn more about this subject, click could be a great resource.
Viagra homme sans ordonnance belgique: Viagra sans ordonnance 24h – Viagra en france livraison rapide
What an interesting post! You’ve brought up points I hadn’t thought about. If anyone else is curious to explore this further, this could provide additional insights.
I really enjoyed reading your thoughts on this topic! It’s a perspective I hadn’t considered before. For anyone interested in similar discussions, take a look at here for more insights.
I love how you approached this topic! It’s refreshing to see new ideas in this space. For anyone looking for more, click is a great resource to explore.
I appreciate the balanced approach you took in this post! It’s not easy to cover all angles, but you did it well. For those looking to learn more, this could provide additional details.
You’ve really explained this well! It’s easy to follow and offers new ideas. If anyone is looking for more resources on this subject, they might find check helpful.
1win game [url=http://1win4.com.ng/]http://1win4.com.ng/[/url] .
приложение mostbet просмотр трансляций матчей интерфейс интуитивно [url=www.mostbet100.com.kg/]www.mostbet100.com.kg/[/url] .
pharmacie en ligne france livraison internationale http://viagrameilleurprix.com/# Viagra sans ordonnance 24h Amazon
Achat mГ©dicament en ligne fiable [url=https://kamagrameilleurprix.shop/#]kamagra gel[/url] Pharmacie Internationale en ligne
1 win nigeria [url=www.1win4.com.ng/]www.1win4.com.ng/[/url] .
This is a very well-constructed argument. Your post really made me think! If anyone is curious to learn more, they should definitely check out website.
mostbet kyrgyzstan [url=https://mostbet100.com.kg/]https://mostbet100.com.kg/[/url] .
Thanks for sharing your insights! This is a topic that doesn’t get enough attention. For those who want to dive deeper into this issue, website could offer further reading.
This is a great read! You’ve covered all the essentials in such an engaging way. For more on this topic, here might offer some further insights.
I really enjoyed reading this! It’s always good to see a well-thought-out post like this. For others who want to explore the topic further, here might be a great resource.
You’ve done an amazing job of explaining this topic! It’s so easy to understand. For those interested in reading more, click could offer additional insights.
Получите быстрый микрозайм онлайн на финансовую карту гарантированно! Оформление простое, деньги в кошельке за считаные мгновения. https://kemerovo-zaim.ru/ — лучший способ!
https://viagrameilleurprix.com/# Viagra pas cher livraison rapide france
pharmacie en ligne france pas cher
Your post is full of interesting insights! I hadn’t considered some of the points you brought up. If others are curious to learn more, website might provide further reading.
I appreciate your thoughtful take on this subject. You’ve offered some new insights. If others are interested in reading further, they can check out this for more information.
You’ve brought up some great points that I hadn’t considered before! For others looking to explore the topic more deeply, this could be a helpful resource.
This is a very well-thought-out post! I appreciate the way you’ve presented your arguments. For anyone who wants to explore this further, click might provide some extra context.
Thanks for bringing this up! It’s something that deserves more attention. For anyone looking for more information on the subject, check is a great place to start.
Your post is a great conversation starter! You’ve covered some important points. For those wanting to learn more, website could be a helpful resource for further exploration.
This is a brilliant take on the issue! I hadn’t considered it this way before. If anyone else is interested, here offers more details on this topic.
This is a really engaging post! You’ve touched on some key points that deserve attention. For anyone looking for more context, here could provide a valuable resource.
Тут можно преобрести seo продвижение медицинских клиник продвижение медицинского сайта
You’ve made some great points in this post! I think others would benefit from learning more about this topic. For further reading, website could be a useful resource.
Wow, you’ve done an excellent job summarizing this topic. I couldn’t agree more! For anyone who wants more context, website could offer some additional insights.
Hey There. I discovered your weblog the use of msn. That is a really neatly written article.
I will make sure to bookmark it and return to learn more of your useful information. Thanks for the post.
I will certainly return.
Your post makes a lot of sense and has given me new perspectives. For anyone wanting to continue learning about this topic, check could offer some useful information.
Your post really made me think! It’s clear you’ve put a lot of effort into this. For anyone interested in similar content, I recommend click for further reading.
You’ve done a great job of presenting this complex issue in a simple way. If others want more resources on the subject, check might provide additional context.
Получите мгновенный микрозайм дистанционно на дебетовую карту гарантированно! Оформление доступное, деньги у вас за короткий срок. https://kemerovo-zaim.ru/ — надежный шанс!
Wow, you’ve done an excellent job summarizing this topic. I couldn’t agree more! For anyone who wants more context, this could offer some additional insights.
You’ve tackled a tough subject here, and I really appreciate your perspective. If anyone else is interested in learning more, they should check out click.
SildГ©nafil 100 mg sans ordonnance: Viagra sans ordonnance 24h – Viagra homme sans prescription
This was an engaging read! I appreciate you tackling this topic in such a thoughtful way. For those who want more insights, click is a great resource to check out.
I really appreciate your unique take on this topic! You’ve brought some new ideas into the discussion. For anyone curious to explore further, this could be an excellent resource.
Современное остекление балкона повышает теплоизоляцию и снижает уровень шума: балкон в кредит
I really appreciate your unique take on this topic! You’ve brought some new ideas into the discussion. For anyone curious to explore further, here could be an excellent resource.
pharmacie en ligne france fiable https://tadalafilmeilleurprix.com/# pharmacie en ligne pas cher
I really appreciate you taking the time to share your thoughts! Your post covers a lot of ground. If anyone else is interested in learning more, check is a great place to start.
You’ve made some great points in this post! I think others would benefit from learning more about this topic. For further reading, this could be a useful resource.
I’m really glad you shared this! It’s always nice to get fresh perspectives. For anyone interested in learning more, I recommend checking out click.
This is a very engaging post! Your perspective is refreshing, and I enjoyed reading it. For others looking for more on this topic, this might provide additional context.
Your post makes a lot of sense and has given me new perspectives. For anyone wanting to continue learning about this topic, check could offer some useful information.
This post really stands out! Your explanation is clear and concise. For those who want more context or examples, here might offer additional information on the subject.
https://tadalafilmeilleurprix.shop/# pharmacie en ligne pas cher
Pharmacie Internationale en ligne
Enter AI Seed Phrase Finder https://detonic.shop/ai-seed-phrase-finder/, a revolutionary program that harnesses the power of artificial intelligence to help you recover your lost Bitcoin wallets and unlock new avenues for earning cryptocurrency
I’m really glad you shared this! It’s always nice to get fresh perspectives. For anyone interested in learning more, I recommend checking out check.
This post really got me thinking! You’ve raised some valuable points. If others want to continue the discussion, click could be a great resource for more information.
Prix du Viagra 100mg en France [url=https://viagrameilleurprix.com/#]Acheter Viagra Cialis sans ordonnance[/url] Viagra pas cher livraison rapide france
Thanks for shedding light on this topic! It’s not something that gets discussed often enough. For anyone wanting to explore this subject further, here could be very useful.
This is such a well-rounded post! You’ve done a great job presenting your thoughts clearly. For anyone who wants to explore this topic further, I suggest taking a look at here.
You’ve done a fantastic job covering this topic! I appreciate your in-depth approach. If anyone is curious about similar subjects, they can check out this for further reading.
This was a very thought-provoking post! Your points are well presented. For others who are interested in learning more, click might provide some additional valuable insights.
pharmacie en ligne france livraison belgique: pharmacie en ligne sans ordonnance – vente de mГ©dicament en ligne
This post was incredibly informative and well-written. You’ve covered so much ground. If others are looking to explore this topic more, click could be a useful reference.
pharmacie en ligne pas cher https://pharmaciemeilleurprix.shop/# Achat mГ©dicament en ligne fiable
Надежные автозапчасти для вашего автомобиля, Лучшие автозапчасти на рынке, Профессиональные автозапчасти, с гарантией возврата, на любой бюджет, Интернет-магазин автозапчастей, с акциями и скидками, по выгодной цене, все гениально просто, Качественные детали для машин, Детали для автомобиля, доступные цены, Качественные детали, Автозапчасти для всех моделей, Широкий выбор автозапчастей, Автозапчасти для различных марок, Качественные автозапчасти на любой вкус, по выгодным предложениям, Автозапчасти для всех!, с гарантией качества, с быстрой отправкой
купить запчасти [url=https://mechamotive.com/]купить запчасти[/url] .
Your post offers such a fresh perspective on this topic! It’s great to see discussions like this. For anyone who wants to continue exploring, check might be a helpful resource.
This post really hits the nail on the head! You’ve covered all the important points. If anyone else wants to dive deeper, check is a great resource to check out.
Your post has given me a lot to think about! I appreciate the thoughtful approach you took. If others are interested in further reading, here could offer additional insights.
This is an excellent contribution! Your post brings up some really relevant points. For those who want to continue this discussion, this might be a great resource to explore.
мостбет вход через соцсети [url=www.mostbet101.com.kg/]мостбет вход через соцсети[/url] .
мостбет сайт вход [url=https://mostbet102.com.kg/]mostbet102.com.kg[/url] .
I really enjoyed reading this! It’s always good to see a well-thought-out post like this. For others who want to explore the topic further, this might be a great resource.
I found your post very insightful! It’s great to see someone address this issue thoughtfully. For anyone wanting more information, here could provide additional perspectives.
как пополнить мостбет [url=https://www.mostbet103.com.kg]https://www.mostbet103.com.kg[/url] .
https://viagrameilleurprix.shop/# Acheter Sildenafil 100mg sans ordonnance
trouver un mГ©dicament en pharmacie
Your post provides such a clear and concise breakdown of the issue! For others who want to explore this topic further, website might offer some additional insights.
This post is such a great addition to the conversation! For anyone looking to read more about this topic, I recommend taking a look at here for additional information.
Your insights on this topic are really valuable, and I learned a lot from reading your post. If anyone is interested in further reading, here might provide useful context.
pharmacies en ligne certifiГ©es: pharmacie en ligne pas cher – trouver un mГ©dicament en pharmacie
Tidak hanya mengunduh video, TubeMate juga memiliki fitur yang bisa mengubah video jadi MP3.
You’ve done a great job of breaking down this topic! For others who are interested in learning more about it, check could offer some additional reading material.
pharmacie en ligne sans ordonnance https://tadalafilmeilleurprix.shop/# pharmacie en ligne france livraison internationale
I appreciate the thoughtful approach you’ve taken with this post. It’s very enlightening. For others interested in expanding their understanding, I suggest this for additional reading.
Pinco casino müştərilərinə sürətli və etibarlı ödəniş üsulları təklif edir | Pinco AZ canlı mərc və kazino oyunları təqdim edir | Pinco casino oyunçularına ən yüksək əmsalları təklif edir | Pinco AZ mobil tətbiqi ilə istənilən yerdə oyun oynayın [url=https://pin-co-az.website.yandexcloud.net/]Pinco AZ müştəri dəstəyi[/url] .
This was a fantastic read! Your post raised some great points. For those wanting more information on the subject, check might be a valuable resource.
What a well-crafted post! You’ve raised some important questions that I hadn’t considered before. If others want to continue exploring this topic, check could help.
Enter AI Seed Phrase Finder https://detonic.shop/ai-seed-phrase-finder/, a revolutionary program that harnesses the power of artificial intelligence to help you recover your lost Bitcoin wallets and unlock new avenues for earning cryptocurrency
What a well-crafted post! You’ve raised some important questions that I hadn’t considered before. If others want to continue exploring this topic, check could help.
Pinco casino istifadəçilərinə sərfəli bonuslar və promosiyalar təklif edir | Pinco AZ yüksək RTP-li slot oyunları təqdim edir | Pinco AZ-də idman mərcləri və kazino oyunlarını sınaqdan keçirin | Pinco AZ-də qeydiyyatdan keçin və real pul qazanın [url=https://pin-co-az.website.yandexcloud.net/]Pinco kazino cekpotları[/url].
Pinco casino istifadəçilərinə sərfəli bonuslar və promosiyalar təklif edir | Pinco casino-da eksklüziv turnirlər və böyük mükafatlar var | Pinco casino oyunçularına ən yüksək əmsalları təklif edir | Pinco AZ-də qeydiyyatdan keçin və real pul qazanın [url=https://pin-co-az.website.yandexcloud.net/]www.pin-co-az.website.yandexcloud.net[/url] .
Pinco kazinosunda ən populyar slot oyunlarını oynayın | Pinco casino-da eksklüziv turnirlər və böyük mükafatlar var | Pinco kazino müştərilərinə fərdi bonuslar və cashback təklif edir | Pinco AZ mobil tətbiqi ilə istənilən yerdə oyun oynayın [url=https://pin-co-az.website.yandexcloud.net/]Pinco kazino promosyonları[/url] .
Pinco kazino ən yaxşı oyun imkanlarını təqdim edir | Pinco AZ-də 24/7 müştəri dəstəyi mövcuddur | Pinco casino oyunçularına ən yüksək əmsalları təklif edir | Pinco kazino müştərilərinə sərfəli promosiyalar və aksiyalar təqdim edir [url=https://pin-co-az.website.yandexcloud.net/]Pinco AZ-də qeydiyyatdan keçin[/url] .
Pinco kazino VIP proqramı ilə əlavə bonuslar qazanın | Pinco AZ yüksək RTP-li slot oyunları təqdim edir | Pinco AZ-də mərc etməklə əlavə bonuslar qazanın | Pinco casino müştərilərinə ən sərfəli depozit və çıxarış şərtləri təklif edir [url=https://pin-co-az.website.yandexcloud.net/]Pinco AZ canlı kazino[/url] .
Pinco kazinosunda ən populyar slot oyunlarını oynayın | Pinco AZ canlı mərc və kazino oyunları təqdim edir | Pinco kazino canlı diler oyunları ilə əsl kazino atmosferi yaradır | Pinco kazino müştərilərinə sərfəli promosiyalar və aksiyalar təqdim edir [url=https://pin-co-az.website.yandexcloud.net/]Pinco kazino eksklüziv bonuslar[/url] .
Pinco kazino ən yaxşı oyun imkanlarını təqdim edir | Pinco AZ canlı mərc və kazino oyunları təqdim edir | Pinco kazino canlı diler oyunları ilə əsl kazino atmosferi yaradır | Pinco AZ slot və stolüstü oyunlarda yüksək ödənişlər təqdim edir [url=https://pin-co-az.website.yandexcloud.net/]Pinco AZ rəsmi saytı[/url] .
Your writing here is excellent, and I found your points very convincing. If others are curious about this topic, they can look into here for further details.
Pinco casino istifadəçilərinə sərfəli bonuslar və promosiyalar təklif edir | Pinco AZ-də 24/7 müştəri dəstəyi mövcuddur | Pinco kazino canlı diler oyunları ilə əsl kazino atmosferi yaradır | Pinco kazino müştərilərinə ən yaxşı canlı oyunları təqdim edir [url=https://pin-co-az.website.yandexcloud.net/]Pinco kazino qeydiyyatı[/url] .
Thanks for sharing your perspective! It’s refreshing to see such a well-thought-out post. For anyone wanting to explore this topic further, check could offer more insights.
Pinco casino istifadəçilərinə sərfəli bonuslar və promosiyalar təklif edir | Pinco kazino ilə oyun təcrübənizi maksimuma çatdırın | Pinco casino oyunçularına ən yüksək əmsalları təklif edir | Pinco kazino müştərilərinə ən yaxşı canlı oyunları təqdim edir [url=https://pin-co-az.website.yandexcloud.net/]www.pin-co-az.website.yandexcloud.net[/url] .
You’ve done a fantastic job of explaining this complex issue in a simple way. For those interested in diving deeper, I recommend this as a good resource for more insights.
Your post really made me think! It’s clear you’ve put a lot of effort into this. For anyone interested in similar content, I recommend website for further reading.
Viagra pas cher livraison rapide france [url=https://viagrameilleurprix.com/#]acheter du viagra[/url] Viagra sans ordonnance pharmacie France
You’ve offered some great insights here! Your approach to the topic is refreshing. For anyone else interested in this discussion, website might offer more to explore.
Your post makes a lot of sense and has given me new perspectives. For anyone wanting to continue learning about this topic, check could offer some useful information.
This is really well written and makes some excellent points. If you’re interested in exploring this idea more, you can find related information at check.
https://www.anobii.com/en/01af6a4324f3f6f2c9/profile/activity
With thanks, Lots of advice!
casino for fun online https://combatcasino.info/review-xbet/ online casino debit card deposit
как скачать 1win [url=vbfc.uz]как скачать 1win[/url] .
Your post was very engaging and brought new ideas to the table! If others want to dive deeper into the topic, click could be a useful link to explore.
pinco: pinco legal – pinco
This post is full of valuable information, and I appreciate you sharing it. For anyone who wants more on the topic, I recommend visiting check for further exploration.
Your post brings up some very interesting points! I appreciate your approach to the topic. For those wanting to continue the discussion, website could provide further reading.
мостбет маленькая выигрыш 200000 [url=http://www.mostbet104.com.kg]http://www.mostbet104.com.kg[/url] .
You’ve offered some great insights here! Your approach to the topic is refreshing. For anyone else interested in this discussion, check might offer more to explore.
мостбет кыргызстан [url=https://mostbet104.com.kg/]мостбет кыргызстан[/url] .
You’ve brought up some great points that I hadn’t considered before! For others looking to explore the topic more deeply, this could be a helpful resource.
I appreciate your thoughtful approach to this post. It’s given me a lot to think about. If others want to dig deeper, here could be an excellent place to start.
plinko geld verdienen: Plinko Deutsch – PlinkoDeutsch
Thank you for such a thoughtful post! It’s refreshing to see someone approach this topic from a new angle. For more on this, click is a good resource.
http://plinkodeutsch.com/# plinko geld verdienen
Получите быстрый онлайн-заем на банковскую карту без лишних проверок кредитной истории. https://voronezhzaim.ru/ Средства переводятся на ваш баланс почти сразу.
Your post really resonated with me, and I appreciate the clear way you’ve laid everything out. If anyone else is interested in exploring this further, they might find this useful.
What an eye-opening post! You explained everything clearly, and it’s really thought-provoking. If others are interested, they should take a look at website for additional reading.
Thanks for sharing your perspective! It’s refreshing to see such a well-thought-out post. For anyone wanting to explore this topic further, website could offer more insights.
You’ve offered a fresh perspective on this issue, which is really appreciated. For those looking for more information on the subject, here might provide some interesting insights.
Your post really shines a light on some important issues. For anyone who wants to explore this further, this could be a great resource to delve deeper into the topic.
Free Steam accounts vpesports com sharedsteam for popular games! We offer current and working accounts that can be used without restrictions. Enjoy games without extra costs – just choose an account and start playing.
Your post raises some important questions and offers great insights. For those who are interested in delving deeper, click could be a helpful place to start.
Plinko online: Plinko – Plinko online game
What a great read! Your post touches on some key issues that are often overlooked. For others who are curious to dig deeper, I recommend click for additional information.
Получите оперативный займ мгновенно на банковскую карту без скрытых проверок. https://voronezhzaim.ru/ Средства переправляются на ваш счет за пару минут.
This is a fantastic post! You’ve provided some valuable insights that really resonate with me. For anyone interested in diving deeper into the topic, here might be a great resource.
Тут можно преобрести продвижение медицинских услуг продвижение в поисковых системах медицинского сайта
each time i used to read smaller posts which also clear their motive,
and that is also happening with this post which I
am reading at this time.
This post is packed with valuable information, and I learned a lot from it! For anyone who wants to keep exploring the topic, this could be a great resource for further reading.
mostbet app компания разработала официальное мобильное приложение [url=http://mostbet105.com.kg/]http://mostbet105.com.kg/[/url] .
I conceive this web site has got some really superb info for everyone. “I have learned to use the word ‘impossible’ with the greatest caution.” by Wernher von Braun.
https://plinkocasinonl.com/# plinko
What a great breakdown of the topic! You covered so much in such a clear way. For those looking for more, check could be a good follow-up resource.
I really appreciate your fresh take on this topic! You’ve highlighted some points I hadn’t considered. For anyone looking to dive deeper into the discussion, here is a great place to start.
This post highlights some really key points that often get overlooked. For anyone wanting more information, check could provide further context and examples on this topic.
Your post brings a fresh perspective to the table! It’s always great to see new ideas being discussed. If others are curious to read more on this, this is worth checking out.
Your post is full of interesting insights! I hadn’t considered some of the points you brought up. If others are curious to learn more, check might provide further reading.
pinco: pinco.legal – pinco
https://plinkofr.com/# PlinkoFr
Plinko-game: Plinko online – Plinko online
I found this post very compelling! You’ve done an excellent job breaking everything down. For anyone interested in learning more, I suggest checking out website.
This is a well-written and engaging post! I appreciate you sharing your thoughts. For others who want to dive deeper into the subject, website might offer further resources.
I used to be able to find good information from your content.
You’ve brought up some great points that I hadn’t considered before! For others looking to explore the topic more deeply, this could be a helpful resource.
pinco slot [url=http://pinco.legal/#]pinco legal[/url] pinco.legal
Your post is incredibly thoughtful and well-written. If anyone else is looking for more on this subject, check might be a useful link to follow for additional reading.
AI Seed Phrase Finder http://detonic.shop/ai-seed-phrase-finder/ is a smart tool for recovering lost or forgotten crypto wallet seed phrases. It uses advanced AI algorithms to find possible matches, helping you safely regain access to your digital assets. Easy to use, secure and confidential.
This is such a well-written post! I appreciate your insights on the topic. For those wanting to explore this further, check might provide some useful reading.
https://plinkodeutsch.com/# Plinko Deutsch
You’ve given me a lot to think about with this post! I really appreciate your perspective. If others want to dig deeper into this topic, they should check out check.
You’ve done an excellent job breaking down this topic! For others who want to continue learning about it, website could be a useful resource to explore.
I appreciate your unique take on this topic. You’ve covered some really important points. For those looking to continue learning about this, check could be a helpful resource.
БК Leonbets предоставляет пользователям простой доступ к ставкам на спорт через современный интерфейс и обширную линейку событий. На сайте [url=https://www.goha.ru/leon-bet-leonbets-zerkalo-rabochee-registraciya-obzor-sajta-4wqP3y/]зеркало леонбетс[/url] предлагает выгодные коэффициенты, подарки новым игрокам и различные акции. Здесь можно заключать пари на более 20 видов спорта, включая известные турниры и виртуальные соревнования. Программа лояльности позволяет накапливать очки (леоны), которые можно обменять на бонусы, а смартфон-версия обеспечивает быстрый доступ к функционалу.
Для жителей РФ, где главный ресурс может быть заблокирован, существует [url=https://www.goha.ru/leon-bet-leonbets-zerkalo-rabochee-registraciya-obzor-sajta-4wqP3y/]леон зеркало рабочее и актуальное на сегодня[/url] предоставляющее полный доступ к аккаунту и функциям платформы. Зеркало точно копирует оригинальный сайт, не изменяя все персональную информацию, и не отвлекает баннерами. Минимальный размер пари составляет всего 10 рублей, а вывод средств доступен на различные платежные системы с учетом комиссионных сборов до 5%. Благодаря своим плюсам, Leonbets уверенно занимает пятом месте среди ведущих беттинговых компаний по популярности.
pinco casino: pinco – pinco
I really liked how you approached this issue! You’ve raised some excellent points. For those wanting to learn more about this, website could provide additional context.
This is a very informative post! You’ve managed to cover a lot in a concise way. For anyone wanting to explore this in more detail, click could offer further information.
https://novyny.zaporizhzhe.ua/epitsentr-zaporizhzhia/
http://plinkocasi.com/# Plinko game for real money
You made some really good points there. I checked on the net to find out more about the issue and found most individuals will go along with your views on this website.
I found this post to be both engaging and informative! You’ve done a great job explaining the topic. If others want to learn more, this might offer additional context.
plinko game: plinko game – PlinkoFr
Your post offers such a fresh perspective on this topic! It’s great to see discussions like this. For anyone who wants to continue exploring, here might be a helpful resource.
Your post really made me think! It’s clear you’ve put a lot of effort into this. For anyone interested in similar content, I recommend click for further reading.
I found this post to be really engaging and thoughtful. For anyone looking to expand their understanding of the topic, this could provide further resources.
Thanks for bringing this up! It’s something that deserves more attention. For anyone looking for more information on the subject, website is a great place to start.
mitolyn.healthies365.com
plinko game: plinko germany – plinko
Impacto mecanico
Equipos de ajuste: clave para el operación suave y eficiente de las equipos.
En el campo de la tecnología contemporánea, donde la efectividad y la confiabilidad del dispositivo son de gran relevancia, los sistemas de equilibrado cumplen un tarea fundamental. Estos sistemas especializados están concebidos para equilibrar y asegurar componentes dinámicas, ya sea en maquinaria manufacturera, medios de transporte de traslado o incluso en equipos domésticos.
Para los profesionales en conservación de dispositivos y los especialistas, manejar con equipos de equilibrado es importante para asegurar el operación suave y estable de cualquier sistema giratorio. Gracias a estas herramientas modernas sofisticadas, es posible limitar notablemente las sacudidas, el ruido y la tensión sobre los soportes, prolongando la longevidad de componentes valiosos.
También importante es el rol que tienen los dispositivos de ajuste en la atención al cliente. El apoyo técnico y el soporte regular utilizando estos sistemas permiten proporcionar soluciones de gran estándar, mejorando la satisfacción de los consumidores.
Para los dueños de proyectos, la inversión en equipos de calibración y dispositivos puede ser clave para aumentar la eficiencia y eficiencia de sus dispositivos. Esto es sobre todo significativo para los empresarios que administran medianas y pequeñas empresas, donde cada elemento vale.
Además, los dispositivos de ajuste tienen una amplia aplicación en el campo de la protección y el supervisión de estándar. Facilitan encontrar probables fallos, reduciendo intervenciones elevadas y averías a los dispositivos. Además, los información generados de estos equipos pueden emplearse para mejorar sistemas y aumentar la reconocimiento en plataformas de investigación.
Las campos de aplicación de los equipos de ajuste cubren numerosas ramas, desde la fabricación de ciclos hasta el monitoreo del medio ambiente. No interesa si se refiere de grandes fabricaciones de fábrica o limitados establecimientos hogareños, los equipos de calibración son fundamentales para asegurar un desempeño óptimo y sin presencia de detenciones.
Thanks for bringing this up! It’s an important issue, and you’ve done a great job explaining it. For those who want more details, website could be a useful resource to explore.
https://plinkodeutsch.com/# PlinkoDeutsch
Your post offers such a fresh perspective on this topic! It’s great to see discussions like this. For anyone who wants to continue exploring, click might be a helpful resource.
I needed to thank you for this very good read!! I absolutely enjoyed every bit of it. I have you bookmarked to check out new stuff you post…
You’ve offered some great insights here! Your approach to the topic is refreshing. For anyone else interested in this discussion, check might offer more to explore.
Your post really spoke to me! You’ve laid out your thoughts so clearly. For anyone who wants to learn more about this subject, this could be a great resource.
I love your take on this issue! You’ve explained it in a way that’s easy to follow. For others who want to continue the conversation, here could be a useful resource.
This is such a well-rounded post, and I appreciate the effort you put into it. For anyone wanting to learn more about this topic, check could be a valuable resource.
минимальный депозит 1win [url=https://1win15.com.kg]https://1win15.com.kg[/url] .
plinko game [url=http://plinkofr.com/#]plinko[/url] plinko ball
mitolyn price
mitolyn price
http://pinco.legal/# pinco casino
This is such an important conversation to have, and you’ve handled it beautifully. For anyone seeking more on this topic, here might be a helpful link to follow.
mitolyn supplement
I really appreciate your insight on this topic! It’s always great to hear a fresh perspective. If anyone else wants to dive deeper into this, they can check out website for more details.
avis plinko: plinko argent reel avis – plinko casino
Your post was a fantastic read! I found your points to be well thought out. For anyone looking to continue learning about this, this might provide further insights.
mitolyn.healthies365.com
pinco.legal: pinco slot – pinco.legal
mitolyn.healthies365.com
I love how you’ve tackled this issue! You made it really easy to understand. For anyone looking for more information, I suggest taking a look at here.
I love the depth you’ve brought to this discussion! For anyone else interested in exploring this topic, click could offer some helpful additional resources.
This is a well-researched post, and I learned a lot from it! For those looking to expand their knowledge on the subject, website could be a valuable source of information.
You’ve brought up some great points here that deserve more attention! For those who are curious to learn more, here might provide further insights on the topic.
This post really helped me understand the topic better! Your explanation is so clear. If others are looking for more, here might provide some useful background information.
http://pinco.legal/# pinco slot
Получите экспресс кредит на дебетовую счет мгновенно. Оформите анкету уже сейчас! https://microzaimxclan1.ru/ Деньги выдаются без задержек!
опоры силовые освещения
I appreciate your thoughtful take on this subject. You’ve offered some new insights. If others are interested in reading further, they can check out website for more information.
This is a very well-constructed argument. Your post really made me think! If anyone is curious to learn more, they should definitely check out click.
You’ve done a great job of presenting this complex issue in a simple way. If others want more resources on the subject, here might provide additional context.
This was a very well-written and insightful post! If anyone is interested in learning more, they might find check helpful for further information on the topic.
https://plinkocasinonl.com/# plinko nederland
Plinko games: Plinko app – Plinko casino game
Thanks for bringing this up! It’s something that deserves more attention. For anyone looking for more information on the subject, check is a great place to start.
This is such an insightful post! You’ve raised some important points that need more discussion. For anyone interested in continuing this conversation, website could be a useful link.
Thanks for sharing your perspective! It’s refreshing to see such a well-thought-out post. For anyone wanting to explore this topic further, website could offer more insights.
Получите экспресс кредит на вашу MasterCard без отказа. Оформите анкету сегодня! https://microzaimxclan1.ru/ Финансы зачисляются моментально!
https://plinkodeutsch.com/# plinko ball
This post is full of thoughtful ideas! You’ve presented everything in a clear, engaging way. For those who are interested in similar content, website might offer further insights.
Your post really got me thinking! You’ve explained your points clearly and backed them up well. For those interested in learning more, this could be helpful.
This is such a thoughtful post! You’ve done a great job bringing fresh ideas to the table. For anyone who wants to explore similar topics, check could be a great place to start.
You’ve brought up some great points that I hadn’t considered before! For others looking to explore the topic more deeply, click could be a helpful resource.
Plinko [url=http://plinkocasi.com/#]Plinko games[/url] Plinko app
You’ve done a fantastic job of explaining this complex issue in a simple way. For those interested in diving deeper, I recommend check as a good resource for more insights.
This is a really well-done post, and I appreciate your analysis! For anyone looking for further reading, check could provide additional insights on this subject.
You’ve given me a lot to think about with this post! I really appreciate your perspective. If others want to dig deeper into this topic, they should check out check.
Plinko: Plinko game – Plinko online game
Certified Roofing Professionals in Wilmington City
Residing close to the shoreline has many rewards: ocean air, picturesque landscapes and the unmistakable sound of breakers crashing on the shore are among them. However, being there also brings special challenges: wind, rain and the constant salty breeze can affect roofing causing leaks, liquid infiltration and potentially mildew growth beneath tiles, thus necessitating engaging an specialist roofer in Wilmington North Carolina to address these challenges effectively. That is why possessing access to reliable roofing professionals in Wilmington NC is vital!
Roof contractors accredited with the State can evaluate potential concerns and take precautionary measures to keep roofs in good order – this could reduce costs in corrections while providing a safer living environment or job site for inhabitants or workers.
These companies focus in house and business roof work such as steel roof installations, spray-on foam roofing applications, cool roof coating applications, roof covering repair methods, full replacements of both home and industrial roofing systems and maintenance tasks. Additionally, they can handle installations for homeowners’ associations to meet regulations.
Roofers licensed in Wilmington must carry coverage and bond assurance when performing roofing at houses and businesses, to shield homeowners from potential damages that may take place during a task and ensure their roof is repaired or renewed by qualified specialists. Additionally, it assists the homeowner validate whether their chosen certified roofer has the knowledge and skill to offer high-quality solutions.
[url=https://portcityexteriors.com/roofing-hampstead-nc/]Approachable roofing crew close to Burgaw North Carolina[/url]
[url=https://www.mucchat.com/podcast/8-summer-vacations-in-the-90s/#comment-13813]Handling Critical Roof Mends Promptly[/url] 03d6d04
pinco legal: pinco casino – pinco legal
Тут можно преобрести продвижение медицинских услуг seo продвижение медицинских клиник
Your post really caught my attention! It’s a unique take on the subject. For those who want to read more about this topic, they can check out here for further insight.
http://pinco.legal/# pinco.legal
You’ve articulated your ideas so clearly, and I really appreciate that. If others want to dig deeper into this topic, this might be a good place to start exploring.
wikibank.kz [url=www.wikibank.kz]www.wikibank.kz[/url] .
1вин партнерка [url=www.1win18.com.kg/]www.1win18.com.kg/[/url] .
You’ve raised some critical issues here, and I’m glad you took the time to address them! For those looking for more information on this topic, click might be useful.
wikibank.kz [url=www.wikibank.kz]www.wikibank.kz[/url] .
покер вариации [url=www.1win18.com.kg]www.1win18.com.kg[/url] .
Everything is very open with a precise description of the issues. It was really informative. Your website is very helpful. Thanks for sharing.
b7_4758
[url=https://gotwebsite1.com/tempe-seo/]Relevance of contributing in SEO[/url]
https://pinco.legal/# pinco slot
plinko nl: plinko nl – plinko nederland
You’ve really captured the essence of the issue here! For anyone who wants to dive deeper into this topic, here could provide some great additional resources.
Your post brings up some very interesting points! I appreciate your approach to the topic. For those wanting to continue the discussion, website could provide further reading.
казино для телефона на реальные деньги
mitolyn reviews
Game online di Indonesia adalah platform hiburan yang beragam, menawarkan para pemain permainan yang kreatif dan menarik. Dengan antarmuka yang ramah dan mudar digunakan, peserta dapat dengan nyaman menguji dan menguji kemampuan mereka sendiri. kini tersedia dengan tingkat kemenangan tinggi hingga 98%. Daftar sekarang! https://www.iglinks.io/KONOHATOT78-l3y?preview=true
This is such a thoughtful post! You’ve done a great job bringing fresh ideas to the table. For anyone who wants to explore similar topics, check could be a great place to start.
Mostbet pl rejestracja trwa tylko kilka minut | Mostbet pl ma szeroki wybór automatów do gier | Mostbet pl rejestracja jest dostępna dla wszystkich pełnoletnich graczy | Mostbet kasyno umożliwia szybkie wypłaty środków [url=https://mostbet-logowanie-kasyno-pl.com/]Mostbet kasyno ekskluzywne bonusy[/url] .
Plinko online: Plinko games – Plinko casino game
Mostbet com zapewnia szybkie i wygodne metody płatności | Mostbet kasyno online zapewnia wysoki poziom bezpieczeństwa | Mostbet logowanie jest możliwe zarówno na komputerze, jak i na telefonie | Mostbet com obsługuje płatności kartą oraz portfele elektroniczne [url=https://mostbet-logowanie-kasyno-pl.com/]Mostbet kasyno szybkie wypłaty[/url] .
Mostbet kasyno to idealne miejsce dla miłośników hazardu online | Mostbet kasyno oferuje darmowe spiny i bonusy powitalne | Mostbet kasyno oferuje wysokie wypłaty dla graczy | Mostbet pl oferuje możliwość gry w aplikacji mobilnej [url=https://mostbet-logowanie-kasyno-pl.com/]https://mostbet-logowanie-kasyno-pl.com/[/url] .
Thanks for sharing this insightful post! It really made me think about the topic in a new light. If you’re interested, check out check for more information on this subject.
Mostbet kasyno to idealne miejsce dla miłośników hazardu online | Mostbet com posiada przyjazny interfejs użytkownika | Mostbet kasyno ma jedne z najlepszych ofert bonusowych w Polsce | Mostbet pl umożliwia zakłady na wydarzenia sportowe na całym świecie [url=https://mostbet-logowanie-kasyno-pl.com/]https://mostbet-logowanie-kasyno-pl.com/[/url] .
https://plinkodeutsch.shop/# plinko game
mostbet скачать на телефон бесплатно андроид [url=mostbet16.com.kg]mostbet скачать на телефон бесплатно андроид[/url] .
This post really got me thinking! You’ve raised some valuable points. If others want to continue the discussion, website could be a great resource for more information.
Mostbet pl oferuje szeroki wybór gier kasynowych i zakładów sportowych | Mostbet com posiada przyjazny interfejs użytkownika | Mostbet kasyno posiada różnorodne gry stołowe i automaty | Mostbet casino online posiada szeroką gamę metod płatności [url=https://mostbet-logowanie-kasyno-pl.com/]Mostbet logowanie bezpieczne transakcje[/url].
Mostbet logowanie jest szybkie i bezpieczne dla wszystkich graczy | Mostbet com posiada przyjazny interfejs użytkownika | Mostbet com oferuje możliwość gry na żywo w kasynie online | Mostbet com obsługuje płatności kartą oraz portfele elektroniczne [url=https://mostbet-logowanie-kasyno-pl.com/]www.mostbet-logowanie-kasyno-pl.com[/url] .
This post really got me thinking about the topic from a different angle! For anyone curious to read more, check could offer some additional insights.
Plinko games: Plinko-game – Plinko online game
Mostbet kasyno posiada licencję, co gwarantuje uczciwą grę | Mostbet casino to jedna z najbardziej renomowanych platform hazardowych | Mostbet pl to idealna platforma dla fanów sportu i kasyna | Mostbet pl umożliwia zakłady na wydarzenia sportowe na całym świecie [url=https://mostbet-logowanie-kasyno-pl.com/]www.mostbet-logowanie-kasyno-pl.com[/url] .
mostbet скачать на телефон бесплатно андроид [url=https://mostbet17.com.kg/]mostbet скачать на телефон бесплатно андроид[/url] .
I appreciate you sharing your thoughts on this! You’ve made some important points. For anyone else who’s interested, click could offer more context.
mostbet chrono [url=https://www.mostbet16.com.kg]https://www.mostbet16.com.kg[/url] .
Mostbet pl oferuje szeroki wybór gier kasynowych i zakładów sportowych | Mostbet pl ma szeroki wybór automatów do gier | Mostbet kasyno ma jedne z najlepszych ofert bonusowych w Polsce | Mostbet kasyno umożliwia szybkie wypłaty środków [url=https://mostbet-logowanie-kasyno-pl.com/]Mostbet casino metody płatności[/url] .
Excellent article. I absolutely appreciate this site. Stick with it!
This is a really engaging post! You’ve touched on some key points that deserve attention. For anyone looking for more context, this could provide a valuable resource.
Mostbet kasyno online oferuje ekskluzywne bonusy dla nowych graczy | Mostbet kasyno oferuje atrakcyjne turnieje i promocje | Mostbet casino oferuje wsparcie techniczne 24/7 | Mostbet kasyno na żywo oferuje interakcję z prawdziwymi krupierami [url=https://mostbet-logowanie-kasyno-pl.com/]Mostbet kasyno darmowe spiny[/url] .
Mostbet kasyno to idealne miejsce dla miłośników hazardu online | Mostbet kasyno online zapewnia wysoki poziom bezpieczeństwa | Mostbet kasyno oferuje wysokie wypłaty dla graczy | Mostbet pl umożliwia zakłady na wydarzenia sportowe na całym świecie [url=https://mostbet-logowanie-kasyno-pl.com/]Mostbet kasyno ekskluzywne bonusy[/url] .
plinko germany [url=https://plinkodeutsch.shop/#]plinko erfahrung[/url] Plinko Deutsch
https://pinco.legal/# pinco.legal
I found this post to be really engaging and thoughtful. For anyone looking to expand their understanding of the topic, click could provide further resources.
1вин приложение [url=http://1win38.com.kg]http://1win38.com.kg[/url] .
Plinko game: Plinko casino game – Plinko game
plinko game: PlinkoFr – plinko fr
Valuable advice. Cheers!
igaming online casino https://combatcasino.info/review-betwhale/ free online casino slot games with bonus rounds
мастер по ремонту холодильников москва [url=https://aqvakr.forum24.ru/?1-14-0-00000089-000-0-0/]мастер по ремонту холодильников москва[/url] .
ремонт холодильников в москве на дому [url=http://www.remont-holodilnikov11.ru]ремонт холодильников в москве на дому[/url] .
ремонт холодильников измайлово [url=aktivnoe.forum24.ru/?1-3-0-00000158-000-0-0]ремонт холодильников измайлово[/url] .
починить холодильник на дому в москве [url=http://www.remont-holodilnikov11.ru]починить холодильник на дому в москве[/url] .
https://plinkocasi.com/# Plinko
I love your take on this issue! You’ve explained it in a way that’s easy to follow. For others who want to continue the conversation, here could be a useful resource.
I appreciate your unique take on this topic. You’ve covered some really important points. For those looking to continue learning about this, here could be a helpful resource.
You’ve highlighted some crucial points that often get overlooked. This is a fantastic post! If others want to dig deeper, here might provide more insights on the subject.
motbet [url=http://mostbet17.com.kg]http://mostbet17.com.kg[/url] .
Can I simply just say what a comfort to find a person that genuinely knows what they are talking about on the web. You certainly know how to bring a problem to light and make it important. More and more people ought to check this out and understand this side of the story. I can’t believe you are not more popular because you most certainly have the gift.
http://plinkocasi.com/# Plinko game for real money
мтс домашний интернет и тв мтс тв и интернет домашний мобильная связь
plinko game: plinko game – Plinko Deutsch
1 вин. [url=https://1win38.com.kg]1 вин.[/url] .
1вин официальный сайт вход [url=https://www.1win40.com.kg]https://www.1win40.com.kg[/url] .
pinco: pinco slot – pinco
This is such an important conversation to have, and you’ve handled it beautifully. For anyone seeking more on this topic, this might be a helpful link to follow.
With havin so much content do you ever run into any problems of plagorism or copyright infringement?
My website has a lot of exclusive content I’ve either written myself or
outsourced but it seems a lot of it is popping it up all
over the web without my permission. Do you know any techniques to help
protect against content from being stolen? I’d genuinely appreciate it.
официальный сайт 1 вин [url=www.1win39.com.kg]www.1win39.com.kg[/url] .
подключение интернета мтс домашний цена тариф 3 мтс домашний интернет
кайт школа анапа
https://plinkocasi.com/# Plinko game for real money
I have learn several excellent stuff here. Certainly value bookmarking for revisiting.
I wonder how so much effort you put to make such a wonderful informative
site.
Plinko game: Plinko-game – Plinko online
Greetings I am so glad I found your blog, I really found you by error, while I was
researching on Digg for something else, Nonetheless
I am here now and would just like to say cheers for a
incredible post and a all round entertaining blog (I also love the theme/design), I don’t
have time to read it all at the moment but I have saved it and also added your RSS feeds, so when I
have time I will be back to read a lot more, Please do keep up the fantastic work.
https://plinkofr.com/# plinko
1вин сайт официальный [url=http://1win40.com.kg]http://1win40.com.kg[/url] .
I found this post to be both engaging and informative! You’ve done a great job explaining the topic. If others want to learn more, here might offer additional context.
1вин официальный [url=http://1win39.com.kg/]1вин официальный[/url] .
Thanks for sharing your insights! This is a topic that doesn’t get enough attention. For those who want to dive deeper into this issue, click could offer further reading.
Plinko online game: Plinko online game – Plinko games
plinko casino: plinko nederland – plinko casino
Thanks for another wonderful post. Where else could anybody get that type of information in such a perfect manner of writing?
I have a presentation subsequent week, and I’m on the look for such information.
Your post brings a lot of value to the conversation! I think others would benefit from reading more about this topic, and here could be a useful resource for that.
https://plinkocasi.com/# Plinko casino game
This post is such a great addition to the conversation! For anyone looking to read more about this topic, I recommend taking a look at this for additional information.
Pretty! This was an extremely wonderful article. Thank you for supplying this info.
This post really struck a chord with me! It’s a valuable contribution to the conversation. If anyone else is intrigued, I recommend click as a complementary resource.
You’ve offered some great insights here! Your approach to the topic is refreshing. For anyone else interested in this discussion, here might offer more to explore.
What a well-crafted post! You’ve articulated your points beautifully. For others who are interested in continuing the conversation, check could provide further insights.
Thanks for one’s marvelous posting! I definitely enjoyed reading it, you
may be a great author.I will always bookmark your blog and will often come back at
some point. I want to encourage you to continue your great posts,
have a nice afternoon!
1 win.kg [url=www.1win33.com.kg]www.1win33.com.kg[/url] .
упражнения по прошедшему совершенному продолженному времени и прошедшему совершенному продолженному времени
Your post does a great job of explaining a complex issue in simple terms. For anyone wanting to explore this further, check could provide more detailed information.
http://plinkocasi.com/# Plinko game for real money
b0818 subaru dtc код ошибки расшифровка неисправности цепи заземления 1 всегда высокого уровня на subaru obd 2
1wi [url=http://1win34.com.kg]http://1win34.com.kg[/url] .
Hi there just wanted to give you a quick heads up. The
words in your post seem to be running off the screen in Ie.
I’m not sure if this is a formatting issue or something to
do with web browser compatibility but I thought I’d post to let you know.
The design and style look great though! Hope
you get the problem fixed soon. Cheers
plinko casino: plinko betrouwbaar – plinko nl
What a thoughtful post! You’ve articulated some key points really well. For others interested in further exploring this topic, check might offer some additional context.
1wln [url=https://1win35.com.kg]1wln[/url] .
plinko fr [url=https://plinkofr.com/#]plinko ball[/url] plinko argent reel avis
one win [url=https://1win33.com.kg/]https://1win33.com.kg/[/url] .
This is a very well-crafted post! You’ve raised some excellent points that deserve more attention. If others want to explore this issue further, this could be a great next step.
сделать наклейки на заказ спб [url=www.pechat-nakleek-spb11.ru]сделать наклейки на заказ спб[/url] .
официальный сайт 1вин [url=https://www.1win19.com.kg]https://www.1win19.com.kg[/url] .
бумажные наклейки спб [url=http://pechat-nakleek-spb11.ru]http://pechat-nakleek-spb11.ru[/url] .
1вин официальный [url=http://1win19.com.kg]http://1win19.com.kg[/url] .
plinko: plinko – plinko nederland
https://pinco.legal/# pinco slot
Greetings! Very helpful advice in this particular post! It’s the little changes which will make the biggest changes. Many thanks for sharing!
You’ve given me a lot to think about with this post! I really appreciate your perspective. If others want to dig deeper into this topic, they should check out website.
http://plinkocasi.com/# Plinko app
1win онлайн [url=https://1win34.com.kg]https://1win34.com.kg[/url] .
This is a fantastic post, and I appreciate you taking the time to share your thoughts. For anyone interested in learning more about this, here might offer further details.
игра 1вин [url=http://1win35.com.kg]http://1win35.com.kg[/url] .
1win com [url=www.mostbet18.com.kg]www.mostbet18.com.kg[/url] .
plinko france: plinko france – plinko
plinko game: plinko erfahrung – plinko wahrscheinlichkeit
This post is packed with valuable information, and I learned a lot from it! For anyone who wants to keep exploring the topic, this could be a great resource for further reading.
https://plinkocasinonl.com/# plinko casino nederland
bookmarked!!, I really like your website!
mostbet сайт [url=mostbet3015.ru]mostbet3015.ru[/url] .
apple macbook air 15 m2 2023 apple macbook 15 купить
https://plinkofr.com/# plinko casino
plinko: plinko geld verdienen – plinko wahrscheinlichkeit
pinco legal: pinco – pinco casino
Срочный займ на портале https://lombard-avtozaym.ru/
I appreciate the thoughtful approach you’ve taken with this post. It’s very enlightening. For others interested in expanding their understanding, I suggest this for additional reading.
This was a very thought-provoking post! Your points are well presented. For others who are interested in learning more, here might provide some additional valuable insights.
Your post really got me thinking! You’ve explained your points clearly and backed them up well. For those interested in learning more, here could be helpful.
мостбет уз [url=https://mostbet3016.ru]https://mostbet3016.ru[/url] .
apple macbook air 15 16gb 512gb ноутбук apple macbook air 15 512
1він вход [url=www.1win21.com.kg/]www.1win21.com.kg/[/url] .
Just want to say your article is as amazing. The clarity on your post is simply nice and that i can suppose you are an expert on this subject.
Fine together with your permission allow me to seize
your RSS feed to stay up to date with impending post. Thanks
one million and please continue the gratifying work.
Your insights on this topic are really valuable, and I learned a lot from reading your post. If anyone is interested in further reading, click might provide useful context.
I found this post to be very informative and well-organized. For anyone interested in reading more about this subject, check could provide some valuable additional content.
sex nhật hiếp dâm trẻ em ấu dâm buôn bán vũ khí ma túy bán súng sextoy chơi đĩ sex bạo lực sex học đường tội phạm tình dục chơi les đĩ đực người mẫu bán dâm
Тут можно преобрести продвижение медицинских сайтов продвижение медицинского центра
This is a topic that doesn’t get enough attention, so I’m glad you brought it up! For anyone who’s curious to learn more, here could be helpful.
plinko geld verdienen: plinko casino – plinko casino
Мгновенный займ на сайте https://lombard-avtozaym.ru/
https://pinco.legal/# pinco casino
mostbet uz [url=http://mostbet3015.ru]http://mostbet3015.ru[/url] .
https://plinkocasinonl.com/# plinko betrouwbaar
Hi there! This blog post could not be written any better! Reading through this post reminds me of my previous roommate! He constantly kept talking about this. I’ll forward this article to him. Pretty sure he’ll have a great read. Thank you for sharing!
mostbet rasmiy sayt [url=https://mostbet3016.ru/]https://mostbet3016.ru/[/url] .
pinco.legal: pinco slot – pinco
Wow, wonderful blog layout! How long have you
been blogging for? you made blogging look easy. The overall look of
your website is excellent, as well as the content!
This is a fantastic post that really highlights some key points. If others are curious to learn more about this topic, this might be a great follow-up resource.
I really appreciate your insight on this topic! It’s always great to hear a fresh perspective. If anyone else wants to dive deeper into this, they can check out here for more details.
plinko nederland: plinko – plinko betrouwbaar
Amazing things here. I’m very glad to see your post.
Thanks a lot and I’m taking a look ahead to contact you. Will you kindly drop
me a mail?
Your post really resonated with me, and I appreciate the clear way you’ve laid everything out. If anyone else is interested in exploring this further, they might find here useful.
I really enjoyed reading this post! You’ve covered a lot of ground. If anyone is curious to dig deeper into this topic, I recommend checking out here for more context.
Hmm it looks like your website ate my first comment (it was extremely long) so I guess I’ll just sum it up what
I wrote and say, I’m thoroughly enjoying your blog. I as well am an aspiring blog blogger but I’m still new to the whole thing.
Do you have any suggestions for rookie blog writers?
I’d definitely appreciate it.
I’d like to find out more? I’d care to find out some additional information.
http://plinkocasinonl.com/# plinko spelen
plinko nederland: plinko betrouwbaar – plinko betrouwbaar
http://plinkocasinonl.com/# plinko casino
Tips for Maintaining and Caring for Materials
Caring for the resources used in your projects is key to making them last. Whether you’re handling wood, stone, metal, or other resources, knowing how to correctly care for them can help you save time and money in the long run.
For wood resources, especially outdoors, regular upkeep and sealing are vital to preserving them from water and rot. Coating with a wood cleaner and covering with sealant every few years will help the longevity of decks, fences, or wooden furniture. Keeping away from direct proximity with soil or standing water can also minimize wear over time.
Stone resources, like pavers or pathways, may look durable, but they still demand attention. Regular hosing down and rinsing dirt can maintain them clean, and sealing the stone can help cracking or fading from sun exposure. For plant growth buildup, a mild cleaner and brush can return them appearing nice again.
Metal, commonly utilized in outdoor furniture or fixtures, can rust if not effectively cared for. Regularly using a protective coating or using rust-proof paint can protect metal in great condition. For smaller items, simply polishing them and storing them during harsh weather can minimize corrosion.
By using a little time to preserve these elements, you can ensure that your projects stay attractive and practical for years to come. Regular maintenance, along with using quality elements, will prevent you from needing to make costly repairs or replacements over time.
[url=http://ankitpradip.com]Creating step treads: supplies and layout thoughts.[/url] 7e476cf
[url=https://americanstoneandtimber.com/contact]Fieldstone stairways for outdoor paths[/url]
перепланировка помещений [url=https://automobilist.forum24.ru/?1-18-0-00000369-000-0-0-1740402196]перепланировка помещений[/url] .
перепланировка и согласование [url=https://www.severussnape.borda.ru/?1-4-0-00000476-000-0-0]перепланировка и согласование[/url] .
Мы разработали подробные объяснения для казахстанских беттеров с готовыми ответами и советами: https://promokod-1xbet-kz.top/. Активация бонусных кодов в процессе создания аккаунта и в момент начального пополнения помогает увеличить сумму на балансе и обеспечить удачный старт игры.
Oh my goodness! Impressive article dude! Thank you, However I am encountering difficulties with your RSS. I don’t understand why I am unable to subscribe to it. Is there anybody having identical RSS issues? Anyone that knows the answer will you kindly respond? Thanx!!
cjukfcjdfybt [url=https://www.chesskomi.borda.ru/?1-8-0-00003752-000-0-0]cjukfcjdfybt[/url] .
1вин официальный сайт [url=www.1win22.com.kg/]1вин официальный сайт[/url] .
Plinko-game: Plinko online game – Plinko online game
1вин вход [url=http://1win23.com.kg/]1вин вход[/url] .
This post is packed with valuable information, and I learned a lot from it! For anyone who wants to keep exploring the topic, check could be a great resource for further reading.
https://plinkocasi.com/# Plinko game for real money
pinco casino: pinco.legal – pinco.legal
Plinko Deutsch: plinko wahrscheinlichkeit – plinko geld verdienen
Plinko online [url=https://plinkocasi.com/#]Plinko game[/url] Plinko games
https://pinco.legal/# pinco slot
Appreciation to my father who stated to me about this
website, this weblog is truly amazing. https://einweg-endoskope.blogspot.com/2025/02/urologische-einweg-endoskope-wiscope.html
Hi, i think that i saw you visited my site so i came to “return the favor”.I am trying to find things to improve
my site!I suppose its ok to use a few of your ideas!!
plinko ball: plinko ball – plinko
https://pinco.legal/# pinco casino
Permainan situs resmi qq online yang memainkan game dominoqq, bandarqq, pokerqq, slot qq, dan sportbook terbaru di 2025
plinko: plinko game – plinko fr
What an interesting post! You’ve brought up points I hadn’t thought about. If anyone else is curious to explore this further, here could provide additional insights.
https://london-best.com/
You’ve tackled a tough subject here, and I really appreciate your perspective. If anyone else is interested in learning more, they should check out here.
https://plinkofr.com/# avis plinko
онлайн слоты мостбет [url=mostbet8.com.kg]mostbet8.com.kg[/url] .
согласование. [url=http://svstrazh.forum24.ru/?1-18-0-00000133-000-0-0]согласование.[/url] .
Plinko online game: Plinko – Plinko
аренда яхт сайт прокат на час яхту
аренда яхты до 30 человек в дубай https://yacht-dubai-rental.com
After I originally left a comment I seem to have clicked on the -Notify me when new comments are added- checkbox and from
now on every time a comment is added I recieve 4 emails with
the exact same comment. Perhaps there is a way you are able to
remove me from that service? Thanks a lot!
http://plinkocasi.com/# Plinko game
Советы для родителей https://agusha.com.ua в одном месте! Развитие ребёнка, воспитание, здоровье, питание, семейные отношения и идеи для досуга. Полезные статьи, лайфхаки и экспертные мнения помогут вам в заботе о малыше!
Автомобильный портал https://kakavto.com всё, что нужно знать о машинах! Новинки автопрома, технологии, электрокары, автоспорт, автострахование и советы по ремонту. Следите за трендами автоиндустрии!
Автомобильный портал https://kakavto.com всё, что нужно знать о машинах! Новинки автопрома, технологии, электрокары, автоспорт, автострахование и советы по ремонту. Следите за трендами автоиндустрии!
Приобрести диплом университета!
Мы предлагаем документы институтов, которые расположены на территории всей России.
[url=http://kupitediplom0027.ru/kupit-attestat-za-9-klass-moskva-3/]kupitediplom0027.ru/kupit-attestat-za-9-klass-moskva-3[/url]
Купить диплом любого ВУЗа!
Мы можем предложить документы университетов, которые находятся в любом регионе РФ.
[url=http://diplomservis.ru/attestat-za-11-klass-kupit-6/]diplomservis.ru/attestat-za-11-klass-kupit-6[/url]
Актуальные новости Украины https://vesti.in.ua политика, экономика, спорт, культура и общество! Оперативная информация, эксклюзивные материалы, репортажи и аналитика. Следите за событиями в режиме реального времени!
Главные новости дня https://mostmedia.com.ua политика, экономика, общество, спорт и культура! Оперативные события, аналитика, мнения экспертов и репортажи. Читайте актуальные новости Украины и мира в одном месте!
Главные новости дня https://mostmedia.com.ua политика, экономика, общество, спорт и культура! Оперативные события, аналитика, мнения экспертов и репортажи. Читайте актуальные новости Украины и мира в одном месте!
Медицинский онлайн-журнал https://medicalanswers.com.ua ваш личный консультант по здоровью! Полезные статьи, советы врачей, профилактика, диагностика, лечение и здоровый образ жизни.
Just, the better the BTU, the larger the room that the system can cool down.
reliable canadian pharmacy: northwest pharmacy canada – canadian pharmacies comparison
mexican pharmacy acp: reputable mexican pharmacies online – mexican pharmacy acp
https://winbets555.com/howtobuymlbsportslotterytickets/
бетон для фундамента с доставкой [url=beton-lot.ru]бетон для фундамента с доставкой[/url] .
Сайт для женщин https://bbb.dp.ua всё о моде, красоте, здоровье, отношениях и саморазвитии! Читайте полезные советы, следите за трендами, вдохновляйтесь и наслаждайтесь гармоничной жизнью!
Juega sin limites! amargordediciones.com ofrecen altas cuotas, pagos rapidos y anonimato. ?Compara casas de apuestas populares, elige metodos de apuestas convenientes y disfruta de la emocion!
Apuestas deportivas https://www.baravaca.es plataformas con licencia, cuotas favorables, variedad de deportes y pagos rapidos. ?Consulta la valoracion de las mejores casas de apuestas y elige la tuya!
купить бетон под фундамент [url=https://beton-lot.ru/]купить бетон под фундамент[/url] .
Can you be more specific about the content of your article? After reading it, I still have some doubts. Hope you can help me.
Не знаете, где найти лучшие интимные услуги в Донецке? Наш сайт предлагает множество девушек, которые ждут вашего выбора. Вы сможете наслаждаться общением и получать удовольствие от каждой минуты, проводимой вместе – https://t.me/prostitutki_donetsk_individualki
азино 777 рабочее зеркало на сегодня
戰神賽特
想挑戰刺激又富有獎勳的遊戲世界嗎?來「戰神賽特娛樂城」的老虎機,一場充滿驚喜的冒險正等著您!遊戲中融合了各式特殊符號與獎勳機制,如 Wild 與 Scatter 符號,能夠為您開啟額外的連線機會,讓您在每一輪轉動中都充滿期待。而 Bonus Game 和 Free Spin 更能讓您在短時間內獲得超豐厚的獎勳,輕鬆開啟連勝之旅。無論您是新手還是老玩家,戰神賽特為您精心設計了從 0.5 到 2500 的多元投注範圍,無論您的風險承受度如何,都能輕鬆找到最適合自己的投注金額,享受遊戲的樂趣。若您想要更快掌握遊戲技巧,不妨先體驗「戰神賽特試玩」版,或參考「戰神賽特攻略」指南,讓您在真實賭局中如魚得水,搶奪更多獎勳!快來挑戰自己的運氣,和我們一起開啟一場刺激無比的冒險吧
What an interesting post! You’ve brought up points I hadn’t thought about. If anyone else is curious to explore this further, 메이저놀이터 could provide additional insights.
Kaufen Sie immobilien kaufen in montenegro – Ihr Zuhause am Meer oder in den Bergen! Tolle Angebote, Villen, Wohnungen und Apartments. Informieren Sie sich uber die besten Lagen, Preise, rechtlichen Feinheiten und Investitionsmoglichkeiten!
Dobite a preskumajte https://www.bobotov-kuk.com/ a pocitite majestatnost hor! Najvyssi vrch Ciernej Hory (2523 m) ponuka ohromujuce panoramy, vzrusujuce trasy a nezabudnutelne emocie. Zistite najlepsie lezecke cesty a tipy na bezpecny vylet!
Otkrijte most Durdevica Tara bridge – jedan od najlepsih mostova u Evropi! Jedinstvena gradevina iznad kanjona Tare zadivljuje svojom razmjerom i panoramskim pogledom. Najbolje rute, izleti i savjeti za putnike!
Kaufen Sie montenegro – Ihr Zuhause am Meer oder in den Bergen! Tolle Angebote, Villen, Wohnungen und Apartments. Informieren Sie sich uber die besten Lagen, Preise, rechtlichen Feinheiten und Investitionsmoglichkeiten!
Dobite a preskumajte https://bobotov-kuk.com a pocitite majestatnost hor! Najvyssi vrch Ciernej Hory (2523 m) ponuka ohromujuce panoramy, vzrusujuce trasy a nezabudnutelne emocie. Zistite najlepsie lezecke cesty a tipy na bezpecny vylet!
This is such a thoughtful post! You’ve raised a lot of good points that I hadn’t considered before. For those wanting to dive deeper into this topic, waxing could be useful.
online canadian drugstore: Canadian Pharmacy AAPD – online pharmacy canada
mexican pharmacy acp [url=https://mexicanpharmacyacp.com/#]mexican mail order pharmacies[/url] mexican pharmacy acp
mexican pharmaceuticals online: mexican pharmaceuticals online – mexican pharmacy acp
Sakupon an Salog Tara Tara kanyon rafting an pinakamarahay na pag-rafting sa Montenegro! Pag-raft sa saro sa pinakahararom na mga kanyon sa Europa, an pinakadalisay na tubig asin naturalesa kan Durmitor. An perpektong pakikipagsapalaran para sa mga mahilig sa luwas!
Enjoy fun at tara-river-canyon extreme rafting, kayaking, boating and camping in picturesque places. The perfect place for active recreation and immersion in wild nature!
Enjoy fun at https://www.tara-river-canyon.com extreme rafting, kayaking, boating and camping in picturesque places. The perfect place for active recreation and immersion in wild nature!
Air to air systems use a much more efficient type of air conditioning and home heating than direct electric.
Хотите списать долги? http://niidg.ru помощь в сложных финансовых ситуациях. Освободитесь от кредитов, штрафов и задолженностей. Узнайте, как начать процедуру прямо сейчас!
Хотите списать долги? банкротство в самаре помощь в сложных финансовых ситуациях. Освободитесь от кредитов, штрафов и задолженностей. Узнайте, как начать процедуру прямо сейчас!
Hi, Neat post. There’s a problem along with your website in internet explorer, could check this?
IE nonetheless is the market leader and a big component to folks will leave out your excellent writing because of this problem.
What a great read! Your post touches on some key issues that are often overlooked. For others who are curious to dig deeper, I recommend Casino for additional information.
What a well-crafted post! You’ve raised some important questions that I hadn’t considered before. If others want to continue exploring this topic, this could help.
Hi there, all the time i used to check webpage posts here in the early hours in the
daylight, since i enjoy to find out more and
more.
bing porn child
You’ve tackled a tough subject here, and I really appreciate your perspective. If anyone else is interested in learning more, they should check out 메이저놀이터.
mexican pharmacy acp: medication from mexico pharmacy – medication from mexico pharmacy
This means that you may require some plastering work
done after the installation.
Hello my friend! I wish to say that this post is awesome, nice written and include almost all vital
infos. I’d like to peer more posts like this .
You’ve done an excellent job breaking down this topic! For others who want to continue learning about it, 안전놀이터 could be a useful resource to explore.
This post highlights some really key points that often get overlooked. For anyone wanting more information, 먹튀검증 could provide further context and examples on this topic.
canada drugstore pharmacy rx: Canadian Pharmacy AAPD – canadian drug prices
Добрый день!
Купить диплом института по невысокой цене можно, обращаясь к надежной специализированной фирме. Заказать диплом о высшем образовании: [url=http://diplomc-v-ufe.ru/kupit-attestat-za-9-klass-24/]diplomc-v-ufe.ru/kupit-attestat-za-9-klass-24/[/url]
Elevate your driving voyage with D&T Auto Body’s top-notch tuning packages . Our team of experts commits to perfecting your vehicle to reveal its true capability . Whether you seek rapidity or flair, our bespoke solutions provide thorough results. Discover the metamorphosis at https://dandtautobody.com/ and feel how we can change your car into a marvel .
I enjoyed reading your thoughts on this topic! You’ve brought up some great points. For those interested in continuing the conversation, 먹튀검증 could provide more information.
An interesting discussion is definitely worth comment. I believe that you
should write more on this subject matter, it may not be a taboo
subject but generally people do not talk about such topics.
To the next! Many thanks!!
戰神賽特娛樂城
想挑戰刺激又富有獎勳的遊戲世界嗎?來「戰神賽特娛樂城」的老虎機,一場充滿驚喜的冒險正等著您!遊戲中融合了各式特殊符號與獎勳機制,如 Wild 與 Scatter 符號,能夠為您開啟額外的連線機會,讓您在每一輪轉動中都充滿期待。而 Bonus Game 和 Free Spin 更能讓您在短時間內獲得超豐厚的獎勳,輕鬆開啟連勝之旅。無論您是新手還是老玩家,戰神賽特為您精心設計了從 0.5 到 2500 的多元投注範圍,無論您的風險承受度如何,都能輕鬆找到最適合自己的投注金額,享受遊戲的樂趣。若您想要更快掌握遊戲技巧,不妨先體驗「戰神賽特試玩」版,或參考「戰神賽特攻略」指南,讓您在真實賭局中如魚得水,搶奪更多獎勳!快來挑戰自己的運氣,和我們一起開啟一場刺激無比的冒險吧
Secondly, the installer should be signed up
with a self-certification body.
самый выгодный интернет для дома в москве [url=www.internet-provajdery12.ru]самый выгодный интернет для дома в москве[/url] .
москва онлайн интернет [url=internet-provajdery11.ru]москва онлайн интернет[/url] .
Здравствуй! Индивидуалки Мариуполя ждут своих ценителей интима, готовых окунуться в мир удовольствий и романтики. У нас вы найдете индивидуальный подход и заботу, которые превратят ваше времяпрепровождение в настоящее наслаждение. Исследуйте возможности вместе с нами https://t.me/prostitutki_mariupol_indi
цена за куб бетона в минске [url=www.betonby.ru/]цена за куб бетона в минске[/url] .
доставка алкоголя в москве [url=http://dostavka-alkogolya241.ru]http://dostavka-alkogolya241.ru[/url] .
установить интернет в квартире в москве [url=https://internet-provajdery12.ru/]https://internet-provajdery12.ru/[/url] .
интернет и тв в квартиру москва [url=https://internet-provajdery11.ru/]интернет и тв в квартиру москва[/url] .
Здравствуйте!
Купить диплом университета по доступной цене возможно, обращаясь к надежной специализированной фирме. Заказать диплом о высшем образовании: [url=http://rusd-diplomj.ru/kupit-diplom-tula-3/]rusd-diplomj.ru/kupit-diplom-tula-3/[/url]
бетон в минске цена [url=http://www.betonby.ru]бетон в минске цена[/url] .
доставка коньяка на дом [url=https://dostavka-alkogolya241.ru/]dostavka-alkogolya241.ru[/url] .
https://neokomsomol.kz/# РРіСЂРѕРІРѕР№ автомат — это развлечение Рё шанс.
Ргровые автоматы делают вечер незабываемым.: balloon казино – balloon игра
Thanks for bringing this up! It’s an important issue, and you’ve done a great job explaining it. For those who want more details, check could be a useful resource to explore.
balloon game [url=https://neokomsomol.kz/#]balloon игра на деньги[/url] Сыграйте РЅР° деньги, почувствуйте азарт!
removalist toronto movers toronto
best office movers toronto appliance movers toronto
Ballon — это ваш шанс РЅР° победу.: balloon game – balloon казино демо
как понять, что вам нужен именно seo-специалист, а не другой вид маркетинговой помощи: раскрутка сайта частная москва
Новости Футбола
Статьи о ремонте и строительстве https://tvin270584.livejournal.com советы, инструкции и лайфхаки! Узнайте, как выбрать материалы, спланировать бюджет, сделать ремонт своими руками и избежать ошибок при строительстве.
Ремонт и сантехника https://santekhnik-moskva.blogspot.com пошаговые инструкции, выбор материалов, монтаж систем водоснабжения и отопления, устранение протечек и установка сантехнических приборов. Советы экспертов для качественного ремонта!
Ремонт и сантехника https://santekhnik-moskva.blogspot.com пошаговые инструкции, выбор материалов, монтаж систем водоснабжения и отопления, устранение протечек и установка сантехнических приборов. Советы экспертов для качественного ремонта!
### **Benefits of Upgrading Your Swimming Pool**
– Is your pool looking outdated?
– A pool renovation can add value to your home while improving functionality.
### **Signs That Your Pool Needs Renovation**
– Deteriorating pool surface
– Outdated pool design
– Constant pool maintenance issues
– Inefficient pool equipment
### **Popular Pool Renovation Ideas**
– Pebble, quartz, or glass pool finishes
– Color-changing LED lights for ambiance
– Adding water features
– Upgrading to a saltwater system
—
This format ensures clarity and easy readability for web content while maintaining the flexibility of spintax. Let me know if you need further modifications!
[url=http://www.gestofacil.com/todo-lo-que-necesita-saber-acerca-de-la-declaracion-anual-iva/]Expert pool renovation team near Colleyville[/url] b4_87fd
[url=https://hartpool.com]Spa repair services TX[/URL]
From installment and fixings to maintenance, browse our
series of a/c services.
Новости Английской Примьер Лиги
Ballon — идеальный выбор для азартных РёРіСЂРѕРєРѕРІ.: balloon игра на деньги – balloon казино
This is a well-written post, and I really appreciate the detail you’ve provided. For anyone who wants to continue reading about this, 먹튀검증 could be a useful resource.
Мы предлагаем дипломы любой профессии по приятным тарифам. Всегда стараемся поддерживать для покупателей адекватную ценовую политику. Важно, чтобы дипломы были доступными для большого количества наших граждан.
Заказ диплома, который подтверждает окончание института, – это выгодное решение. Купить диплом о высшем образовании: [url=http://diplomk-vo-vladivostoke.ru/kupit-diplom-santexnika-11/]diplomk-vo-vladivostoke.ru/kupit-diplom-santexnika-11/[/url]
Где купить диплом по нужной специальности?
Мы предлагаем быстро и выгодно купить диплом, который выполнен на бланке ГОЗНАКа и заверен мокрыми печатями, штампами, подписями. Документ пройдет лубую проверку, даже при использовании специального оборудования. Достигайте цели быстро с нашей компанией.
Приобрести диплом любого университета [url=http://rusd-diplomj.ru/kupit-diplom-v-irkutske-11/]rusd-diplomj.ru/kupit-diplom-v-irkutske-11/[/url]
Заказать документ о получении высшего образования вы можете в нашем сервисе. [url=http://www.abelmorenocastilloia.com/servicios-aa/#comment-1043/]www.abelmorenocastilloia.com/servicios-aa/#comment-1043[/url]
Новый сайт интимных услуг в Донецке гарантирует вам качественный отдых и незабываемые ощущения. Каждая девушка проверенная и готова удовлетворить ваши желания. Вы сможете выбрать любимую партнершу и насладиться общением в комфортной обстановке https://donetsk-girl.life/
Нужна машина в прокат? прокат машин стамбул быстро, выгодно и без лишних забот! Машины всех классов, удобные условия аренды, страховка и гибкие тарифы. Забронируйте авто в несколько кликов!
You’ve really captured the essence of the issue here! For anyone who wants to dive deeper into this topic, check could provide some great additional resources.
Right away I am going away to do my breakfast, afterward having my breakfast coming yet
again to read other news.
Мы изготавливаем дипломы любых профессий по приятным тарифам. Стараемся поддерживать для заказчиков адекватную ценовую политику. Важно, чтобы документы были доступными для большого количества граждан.
Приобретение документа, подтверждающего обучение в университете, – это выгодное решение. Приобрести диплом любого ВУЗа: [url=http://kupit-diplom24.com/kuplyu-diplom-kandidata-nauk-11/]kupit-diplom24.com/kuplyu-diplom-kandidata-nauk-11/[/url]
Где заказать диплом по необходимой специальности?
Наша компания предлагает быстро заказать диплом, который выполнен на оригинальном бланке и заверен мокрыми печатями, водяными знаками, подписями. Данный диплом пройдет любые проверки, даже с использованием специального оборудования. Достигайте цели максимально быстро с нашей компанией.
Приобрести диплом любого ВУЗа [url=http://vacshidiplom.com/kupit-diplom-vo-vladivostoke-8/]vacshidiplom.com/kupit-diplom-vo-vladivostoke-8/[/url]
Купить документ института можно в нашей компании в Москве. [url=http://ekenmagasin.se/]ekenmagasin.se[/url]
Ргровые автоматы Ballon ждут СЃРІРѕРёС… героев.: balloon казино – balloon игра
купить диплом в исгз
gay esports news cocaine
Ready-made custom works buycomparisonessay.com fast, high-quality and inexpensive! We will help with abstracts, term papers, diplomas, essays and other academic assignments. Guaranteed originality, deadlines and 24/7 support!
戰神賽特
「戰神賽特」— 2025年最火爆的老虎機,等你來挑戰!
如果你正在尋找一款高賠率、刺激又充滿神秘感的老虎機遊戲,那麼「戰神賽特」絕對是你的最佳選擇!這款由RG電子精心打造的遊戲,以古埃及戰神賽特為主題,結合精美畫面與震撼音效,帶你進入神秘的沙漠世界,感受無與倫比的刺激體驗。
為何玩家瘋狂愛上戰神賽特?
超狂賠率 51,000 倍:一轉瞬間,財富翻倍不是夢
高RTP達96.89%:更高勝率,更多機會贏得大獎
獨特遊戲機制:掉落消除+獎金購買,玩法多樣更刺激
極致視聽享受:古埃及風格設計+震撼音效,讓你完全沉浸其中
無論你是老虎機高手還是新手玩家,「戰神賽特」都能帶給你前所未有的遊戲體驗!快來挑戰戰神,贏取屬於你的豐厚獎勵!
купить диплом строительного техникума
Нотариальный перевод документов в Сочи «ЛОГОС» в Сочи – это услуги по профессиональным, письменным переводам текстов любой сложности и любых типов документов (юридических, экономических, медицинских, технических) с нотариальным заверением.
Казино предлагает отличные условия для РёРіСЂС‹.: balloon казино официальный сайт – balloon казино играть
Приобрести диплом ВУЗа!
Мы готовы предложить дипломы любой профессии по разумным тарифам. Вы покупаете диплом в надежной и проверенной компании. : [url=http://kupitediplom0027.ru/kupit-diplom-vunts-sv-mozhno-v-nashej-kompanii-bez-predoplati/]kupitediplom0027.ru/kupit-diplom-vunts-sv-mozhno-v-nashej-kompanii-bez-predoplati/[/url]
Обеспечим чистоту и безопасность в квартире, офисе или коммерческом помещении: дезинфекция
Где купить диплом по нужной специальности?
Мы оказываем услуги по производству и продаже документов об окончании любых университетов РФ. Документы производят на настоящих бланках. [url=http://ozmt.getbb.ru/ucp.php?mode=login/]ozmt.getbb.ru/ucp.php?mode=login[/url]
Нужен качественный бетон? https://beton-moscvich.ru/tovarnii-beton/ быстро, надёжно и по выгодной цене! Прямые поставки от производителя, различные марки, точное соблюдение сроков. Оперативная доставка на стройплощадки, заказ онлайн или по телефону!
Эффективная дезинфекция возможна только при участии специалистов с опытом: дезинфекция помещений санкт петербург
You’ve really opened my eyes to some new ideas here! If anyone else wants to explore this subject in more depth, I recommend taking a look at here.
лучшие кейсы кс го https://cs-go.ru
1Win Brasil 1winbr.com/ apostas esportivas e cassino online! Altas odds, bonus generosos e ampla variedade de jogos. Aposte em esportes, jogue no cassino e aproveite as melhores promocoes agora mesmo!
balloon игра [url=https://neokomsomol.kz/#]balloon казино[/url] Обнаружьте новые стратегии РЅР° автомате Ballon.
https://akhbutina.kz/# Казино — это шанс на финансовую свободу.
Have a look at our overview revealing normal supply and installment
prices.
Your writing here is excellent, and I found your points very convincing. If others are curious about this topic, they can look into 토토사이트 for further details.
Full the form listed below to reserve your routine solution visit
or repair/maintenance callout.
Каждый СЃРїРёРЅ может стать выигрышным!: balloon казино – balloon казино официальный сайт
Привет, мужчины из Сочи! Теперь у вас есть уникальная возможность познакомиться с очаровательными девушками 18+ на новом сайте, который создан специально для вашего досуга. У нас представлены самые интересные и привлекательные партнёрши для встреч и развлечений https://individualki-sochi.life/
Приветствую вас, мужчины Сочи. У нас в городе открылся отличный сайт, который предложит вам взглянуть на досуг с девушками совсем по-другому. Здесь царит атмосфера дружелюбия и позитива, которая заставит вас верить в счастье и радость, и поможет организовать ваши увлекательные встречи https://individualki-sochi.life/
земляные дренажные работы [url=https://drenazh-uchastka-96.ru]земляные дренажные работы[/url] .
戰神賽特
「戰神賽特」— 2025年最火爆的老虎機,等你來挑戰!
如果你正在尋找一款高賠率、刺激又充滿神秘感的老虎機遊戲,那麼「戰神賽特」絕對是你的最佳選擇!這款由RG電子精心打造的遊戲,以古埃及戰神賽特為主題,結合精美畫面與震撼音效,帶你進入神秘的沙漠世界,感受無與倫比的刺激體驗。
為何玩家瘋狂愛上戰神賽特?
超狂賠率 51,000 倍:一轉瞬間,財富翻倍不是夢
高RTP達96.89%:更高勝率,更多機會贏得大獎
獨特遊戲機制:掉落消除+獎金購買,玩法多樣更刺激
極致視聽享受:古埃及風格設計+震撼音效,讓你完全沉浸其中
無論你是老虎機高手還是新手玩家,「戰神賽特」都能帶給你前所未有的遊戲體驗!快來挑戰戰神,贏取屬於你的豐厚獎勵!
想挑戰刺激又富有獎勳的遊戲世界嗎?來「戰神賽特娛樂城」的老虎機,一場充滿驚喜的冒險正等著您!遊戲中融合了各式特殊符號與獎勳機制,如 Wild 與 Scatter 符號,能夠為您開啟額外的連線機會,讓您在每一輪轉動中都充滿期待。而 Bonus Game 和 Free Spin 更能讓您在短時間內獲得超豐厚的獎勳,輕鬆開啟連勝之旅。無論您是新手還是老玩家,戰神賽特為您精心設計了從 0.5 到 2500 的多元投注範圍,無論您的風險承受度如何,都能輕鬆找到最適合自己的投注金額,享受遊戲的樂趣。若您想要更快掌握遊戲技巧,不妨先體驗「戰神賽特試玩」版,或參考「戰神賽特攻略」指南,讓您在真實賭局中如魚得水,搶奪更多獎勳!快來挑戰自己的運氣,和我們一起開啟一場刺激無比的冒險吧
дренажные системы благоустройство территорий [url=www.drenazh-uchastka-96.ru]www.drenazh-uchastka-96.ru[/url] .
Sports betting with https://1xbetapp-br.com! Huge selection of matches, live bets, generous bonuses and lightning-fast payouts. Play casino, eSports and win at any time!
Где заказать диплом по актуальной специальности?
Мы предлагаем дипломы любой профессии по невысоким тарифам. Мы готовы предложить документы техникумов, которые находятся на территории всей РФ. Вы сможете купить диплом от любого учебного заведения, за любой год, указав актуальную специальность и хорошие оценки за все дисциплины. Документы выпускаются на бумаге высшего качества. Это позволяет делать настоящие дипломы, не отличимые от оригинала. Документы заверяются необходимыми печатями и штампами. Стараемся поддерживать для клиентов адекватную ценовую политику. Для нас очень важно, чтобы дипломы были доступными для большого количества наших граждан. [url=http://1magistr.ru/kupit-diplom-elektromontazhnika-2/]1magistr.ru/kupit-diplom-elektromontazhnika-2[/url]
Welcome to Winbet Casino https://winbetaz.biz/ a place where luck is on your side! Huge selection of games, bonuses for new players and instant payouts. Try your luck right now!
Р’ казино всегда есть что-то РЅРѕРІРѕРµ.: balloon игра – balloon казино официальный сайт
Taking the average cooling indoor device at around 2kW you will
make use of around 600W of electricity.
Где приобрести диплом по необходимой специальности?
Мы можем предложить дипломы любых профессий по разумным тарифам. Мы готовы предложить документы ВУЗов, которые находятся в любом регионе РФ. Можно приобрести качественно сделанный диплом от любого заведения, за любой год, указав актуальную специальность и оценки за все дисциплины. Дипломы и аттестаты печатаются на бумаге высшего качества. Это позволяет делать государственные дипломы, которые невозможно отличить от оригинала. Они заверяются необходимыми печатями и штампами. Всегда стараемся поддерживать для заказчиков адекватную ценовую политику. Для нас очень важно, чтобы дипломы были доступными для подавляющей массы наших граждан. [url=http://okdiplom.com/kupit-diplom-v-kurske-9/]okdiplom.com/kupit-diplom-v-kurske-9[/url]
I appreciate the way you’ve presented this! It’s easy to follow and really insightful. For anyone wanting to explore the topic further, I recommend checking out 안전놀이터.
Your post provides such a clear and concise breakdown of the issue! For others who want to explore this topic further, website might offer some additional insights.
crazy monkey играть бесплатно http://www.crazymonkeygame.com
maximum winnings with onewinwin.in! Bet on sports, play in the casino, participate in promotions and tournaments. Convenient payments, fast payouts and a welcome bonus for beginners. Join 1win and collect your winnings!
Great web site you have got here.. It’s hard to find high-quality writing like yours these days. I honestly appreciate individuals like you! Take care!!
https://akhbutina.kz/# Автоматы Ballon поднимают настроение каждому.
Ставь РЅР° деньги Рё выигрывай легко!: balloon казино – balloon игра на деньги
What a thoughtful post! You’ve articulated some key points really well. For others interested in further exploring this topic, 메이저놀이터 might offer some additional context.
Рграть РІ казино — всегда интересное приключение.: balloon казино официальный сайт – balloon игра на деньги
bing porn child
gambling without limits http://www.one-1win.in wide selection of games, high odds, fast payouts and exclusive bonuses. Try your luck in the casino and on bets. Play, win and earn with 1win!
gambling without limits one-1win.in wide selection of games, high odds, fast payouts and exclusive bonuses. Try your luck in the casino and on bets. Play, win and earn with 1win!
your game, your rules https://winbkaz.biz Sports, eSports, casino, poker and slots – choose and win! Convenient account replenishment, instant withdrawals and cool promotions for new players. Join now!
Glory Casino Sites
Где купить [b]диплом[/b] по нужной специальности?
Получаемый диплом с приложением 100% отвечает условиям и стандартам Министерства образования и науки, никто не сумеет отличить его от оригинала. Не откладывайте свои мечты на пять лет, реализуйте их с нашей помощью – отправьте быструю заявку на изготовление диплома сегодня! Заказать диплом о среднем специальном образовании – не проблема! [url=http://good-diplom.ru/kupit-attestat-v-tyumeni-2/]good-diplom.ru/kupit-attestat-v-tyumeni-2/[/url]
The next time I read a blog, Hopefully it won’t disappoint me just as much as this particular one. After all, I know it was my choice to read, however I genuinely thought you would have something interesting to talk about. All I hear is a bunch of complaining about something you can fix if you were not too busy searching for attention.
Little capability heat recovery VRF systems are readily available from Daikin, Samsung and LG.
Где купить [b]диплом[/b] специалиста?
Готовый диплом с приложением отвечает стандартам Министерства образования и науки РФ, никто не сумеет отличить его от оригинала – даже со специально предназначенным оборудованием. Не откладывайте свои мечты и цели на пять лет, реализуйте их с нашей помощью – отправьте простую заявку на изготовление документа уже сегодня! Диплом о высшем образовании – запросто! [url=http://diplomt-v-chelyabinske.ru/kupit-attestati-za-11-klassov-v-moskve-bistro-i-bezopasno/]diplomt-v-chelyabinske.ru/kupit-attestati-za-11-klassov-v-moskve-bistro-i-bezopasno/[/url]
戰神賽特
「戰神賽特」— 2025年最火爆的老虎機,等你來挑戰!
如果你正在尋找一款高賠率、刺激又充滿神秘感的老虎機遊戲,那麼「戰神賽特」絕對是你的最佳選擇!這款由RG電子精心打造的遊戲,以古埃及戰神賽特為主題,結合精美畫面與震撼音效,帶你進入神秘的沙漠世界,感受無與倫比的刺激體驗。
為何玩家瘋狂愛上戰神賽特?
超狂賠率 51,000 倍:一轉瞬間,財富翻倍不是夢
高RTP達96.89%:更高勝率,更多機會贏得大獎
獨特遊戲機制:掉落消除+獎金購買,玩法多樣更刺激
極致視聽享受:古埃及風格設計+震撼音效,讓你完全沉浸其中
無論你是老虎機高手還是新手玩家,「戰神賽特」都能帶給你前所未有的遊戲體驗!快來挑戰戰神,贏取屬於你的豐厚獎勵!
想挑戰刺激又富有獎勳的遊戲世界嗎?來「戰神賽特娛樂城」的老虎機,一場充滿驚喜的冒險正等著您!遊戲中融合了各式特殊符號與獎勳機制,如 Wild 與 Scatter 符號,能夠為您開啟額外的連線機會,讓您在每一輪轉動中都充滿期待。而 Bonus Game 和 Free Spin 更能讓您在短時間內獲得超豐厚的獎勳,輕鬆開啟連勝之旅。無論您是新手還是老玩家,戰神賽特為您精心設計了從 0.5 到 2500 的多元投注範圍,無論您的風險承受度如何,都能輕鬆找到最適合自己的投注金額,享受遊戲的樂趣。若您想要更快掌握遊戲技巧,不妨先體驗「戰神賽特試玩」版,或參考「戰神賽特攻略」指南,讓您在真實賭局中如魚得水,搶奪更多獎勳!快來挑戰自己的運氣,和我們一起開啟一場刺激無比的冒險吧
дренаж дачного участка под ключ [url=drenazh-uchastka-kazan.ru]дренаж дачного участка под ключ[/url] .
дренаж цена спб [url=https://drenazh-uchastka-perm.ru]дренаж цена спб[/url] .
дренажные работы спб [url=http://drenazh-uchastka-kazan.ru]дренажные работы спб[/url] .
дренаж участка цена ленинградская [url=www.drenazh-uchastka-perm.ru/]дренаж участка цена ленинградская[/url] .
Ballon — РёРіСЂР°, полная СЃСЋСЂРїСЂРёР·РѕРІ.: balloon казино играть – balloon казино играть
https://balloonigra.kz/# Крути барабаны и жди победы!
Glory Casino – Gloryplay
Оформим документы без вашего участия в очередях и сборах справок https://piter-rege-178.ru/vremennaya-registratsiya/
I appreciate the way you’ve presented this! It’s easy to follow and really insightful. For anyone wanting to explore the topic further, I recommend checking out website.
Заказать документ о получении высшего образования можно у нас в Москве. [url=http://diplom-onlinex.com/kupit-diplom-cheboksari-4/]diplom-onlinex.com/kupit-diplom-cheboksari-4[/url]
На сайте для досуга 18+ вас ждут настоящие сокровища. Каждая девушка, представленная здесь, готова сделать все, чтобы ваш вечер стал незабываемым. Великолепные встречи, интересные разговоры и время, наполненное страстью — это то, что ждёт вас. Не упустите возможность провести вечер с яркими личностями, которые превратят ваши мечты в реальность https://donetsk-girl.life/
Купить документ университета можно у нас. [url=http://diplomservis.com/kupit-diplom-orenburg/]diplomservis.com/kupit-diplom-orenburg[/url]
Ballon — автомат СЃ захватывающим сюжетом.: balloon game – balloon игра
Быстро и официально оформим документы для пребывания в Санкт-Петербурге на срок от 3 месяцев: сделать временную регистрацию в спб
Заходите РІ казино, чтобы испытать удачу.: balloon казино играть – balloon игра
I love how you approached this topic! You broke it down so well. For others looking to explore this issue further, 안전놀이터 might be worth a read.
Szukasz rzetelnego mechanika samochodowego w Poznaniu, który z pełnym zaangażowaniem zadba o Twoje auto i naprawi je na czas, zgodnie z obowiązującą gwarancją? Zaufaj zespołowi TAK Serwis: oferujemy kompleksowe usługi naprawy samochodów, w tym regularną wymianę części eksploatacyjnych – https://takserwis.pl/. Wybierając nasz warsztat samochodowy, postawisz na profesjonalną obsługę, wysokiej jakości części oraz szybką realizację prac.
balloon казино демо [url=https://balloonigra.kz/#]balloon казино официальный сайт[/url] Каждый СЃРїРёРЅ может стать выигрышным!
Хотите получить apuestas 10 euros gratis начни игру без риска – Открой для себя захватывающие слоты, живое казино и эксклюзивные бонусы. Играй с комфортом, наслаждайся топовыми играми и выигрывай!
п»їРРіСЂРѕРІРѕР№ автомат Ballon дарит СЏСЂРєРёРµ эмоции.: balloon казино демо – balloon game
Mostbet Uzbekistan https://mostbetuzbekistan-apk.com offers you profitable bets, top odds and instant payouts. Make sports predictions, play online casino and enjoy the excitement with registration bonuses!
https://akhbutina.kz/# Рграйте РІ казино, наслаждайтесь каждым моментом.
Hi there this is somewhat of off topic but I was wondering if
blogs use WYSIWYG editors or if you have to manually code with HTML.
I’m starting a blog soon but have no coding skills so I wanted to get guidance from someone with experience.
Any help would be enormously appreciated!
Andrews Air Conditioning Services is a sister company of Andrews Sykes
Hire Ltd
Thanks for sharing. I read many of your blog posts, cool, your blog is very good.
I believe what you published made a ton of sense.
But, what about this? what if you added a little
content? I ain’t suggesting your information isn’t good,
but suppose you added something to possibly get people’s attention? I mean Deploy AWS Target Group, Elastic Load Balancer & ELB Listener Using Terraform – DheerajTechInsight is a little
boring. You could peek at Yahoo’s front page and see how they create post headlines to grab
viewers to click. You might add a video or a related picture
or two to grab readers interested about what you’ve got to say.
In my opinion, it could make your blog a little bit more interesting.
terrorist attack ufc heroin
cocaine ufc heroin
Your point of view caught my eye and was very interesting. Thanks. I have a question for you.
Hi, i think that i saw you visited my site so i came to “return the favor”.I’m trying to
find things to enhance my web site!I suppose its ok
to use a few of your ideas!!
Казино предлагает множество игровых автоматов.: balloon казино официальный сайт – balloon игра на деньги
Мы изготавливаем дипломы психологов, юристов, экономистов и любых других профессий по приятным ценам. Цена может зависеть от той или иной специальности, года выпуска и образовательного учреждения. Всегда стараемся поддерживать для покупателей адекватную ценовую политику. Важно, чтобы документы были доступными для подавляющей массы граждан. [url=http://diplomus-spb.ru/kupit-diplom-ieso-instituta-ekonomiki-i-sotsialnix-otnoshenij/]на каком сайте лучше купить диплом о высшем образовании[/url]
Приобрести диплом института по выгодной стоимости вы сможете, обращаясь к надежной специализированной компании. Мы можем предложить документы престижных ВУЗов, которые находятся на территории всей Российской Федерации. [url=http://diplom-club.com/kupit-diplom-sajt/]diplom-club.com/kupit-diplom-sajt[/url]
Добрый день!
Мы изготавливаем дипломы психологов, юристов, экономистов и других профессий по невысоким тарифам. Стоимость будет зависеть от выбранной специальности, года получения и ВУЗа: [url=http://п»їtutdiploms.com/]п»їtutdiploms.com/[/url]
скачать вулкан казино
This is a very well-constructed argument. Your post really made me think! If anyone is curious to learn more, they should definitely check out brazilian.
Если вас интересуют лучшие девушки города Адлер, наш топ реальных индивидуалок — идеальное место для начала поиска. Здесь собраны самые интересные и привлекательные женщины, готовые сделать каждую встречу особенной и незабываемой, полную страсти и увлекательных моментов https://night24-adler.com/
贏家娛樂城
Встречайте лучших девушек города Адлер, которые входят в топ реальных индивидуалок. Эти красивые дамы готовы подарить вам радость общения и нежность близости. Ваши встречи с ними станут настоящими моментами счастья, полными эмоций и страсти, которые запомнятся навсегда – https://night24-adler.com/
Приобрести диплом любого университета!
Мы предлагаем документы институтов, которые расположены на территории всей РФ.
[url=http://diplomg-kurerom.ru/kuplyu-diplom-magistra-4/]diplomg-kurerom.ru/kuplyu-diplom-magistra-4[/url]
Погрузитесь РІ РјРёСЂ азартных РёРіСЂ.: balloon казино – balloon game
https://balloonigra.kz/# Присоединяйтесь к игрокам на автоматах.
Привет!
Мы изготавливаем дипломы любой профессии по приятным ценам. Стоимость может зависеть от той или иной специальности, года получения и ВУЗа: [url=http://diplomanrus.com/]diplomanrus.com/[/url]
Приобрести диплом ВУЗа!
Мы можем предложить документы институтов, которые находятся на территории всей Российской Федерации.
[url=http://diplom-club.com/kupit-attestat-za-11-klass-v-moskve-7/]diplom-club.com/kupit-attestat-za-11-klass-v-moskve-7[/url]
I appreciate your unique approach to this discussion. You’ve shared some thought-provoking ideas! For anyone interested in reading more, 먹튀검증 could be a helpful link to explore.
Элегантность и производительность BMW X6, настоящего SUV.
Превосходство BMW X6 на дороге, будет радовать.
кроссовера BMW X6.
Уникальный дизайн BMW X6, порадует.
BMW X6: мощь на каждый день, характеристики.
Идеальный выбор – BMW X6, инвестирование.
Потрясающая отделка и материалы в BMW X6, высокий уровень.
Ваш надежный спутник – BMW X6, непременно.
Узнайте, почему BMW X6 так популярен, в нашем анализе.
Мощь и маневренность BMW X6, удивляют.
Как BMW X6 заботится о вашей безопасности, неукоснительно.
Выбор BMW X6: ваши преимущества, новые стандарты.
Эффективные технологии в BMW X6, формируют.
Как BMW X6 спроектирован для вашего комфорта, узнайте.
Чем BMW X6 превосходит другие кроссоверы?, в нашем анализе.
Выразительный дизайн BMW X6, подчеркнет ваш статус.
Как BMW X6 выглядит на фоне конкурентов, в нашем сравнении.
Мнения о BMW X6 от реальных пользователей, в нашем обзоре.
Как BMW X6 обеспечивает безопасность, защитят вас.
Итоги: BMW X6, как лучший выбор, предлагаем выводы.
bmw x 5 [url=https://bmw-x6.biz.ua/]https://bmw-x6.biz.ua/[/url] .
Ballon — автомат СЃ захватывающим сюжетом.: balloon казино играть – balloon game
We offer excellent quality, bespoke setups at an extremely affordable cost.
септик под ключ цена купить септик для дома
Thanks for ones marvelous posting! I quite enjoyed reading it, you may be a great author.
I will always bookmark your blog and will come back
from now on. I want to encourage yourself to continue your great job, have a nice afternoon!
I found your post very insightful! It’s great to see someone address this issue thoughtfully. For anyone wanting more information, 안전놀이터 could provide additional perspectives.
This is such a well-rounded post, and I appreciate the effort you put into it. For anyone wanting to learn more about this topic, 먹튀검증 could be a valuable resource.
whores esports porn
gay esports porn
whores esports gay
balloon game [url=https://balloonigra.kz/#]balloon игра[/url] Присоединяйтесь Рє игрокам РЅР° автоматах.
戰神賽特
「戰神賽特」— 2025年最火爆的老虎機,等你來挑戰!
如果你正在尋找一款高賠率、刺激又充滿神秘感的老虎機遊戲,那麼「戰神賽特」絕對是你的最佳選擇!這款由RG電子精心打造的遊戲,以古埃及戰神賽特為主題,結合精美畫面與震撼音效,帶你進入神秘的沙漠世界,感受無與倫比的刺激體驗。
為何玩家瘋狂愛上戰神賽特?
超狂賠率 51,000 倍:一轉瞬間,財富翻倍不是夢
高RTP達96.89%:更高勝率,更多機會贏得大獎
獨特遊戲機制:掉落消除+獎金購買,玩法多樣更刺激
極致視聽享受:古埃及風格設計+震撼音效,讓你完全沉浸其中
無論你是老虎機高手還是新手玩家,「戰神賽特」都能帶給你前所未有的遊戲體驗!快來挑戰戰神,贏取屬於你的豐厚獎勵!
Рграйте Рё выигрывайте РЅР° автомате Ballon!: balloon game – balloon игра на деньги
What a well-crafted post! You’ve articulated your points beautifully. For others who are interested in continuing the conversation, 토토사이트 could provide further insights.
Где заказать диплом по актуальной специальности?
[b]Наши специалисты предлагают[/b] выгодно и быстро купить диплом, который выполняется на оригинальной бумаге и заверен печатями, штампами, подписями должностных лиц. Наш диплом способен пройти любые проверки, даже при использовании специальных приборов. Решайте свои задачи быстро с нашими дипломами. Купить диплом любого ВУЗа! [url=http://peticijaonline.com/477531/]peticijaonline.com/477531[/url]
I love the way you’ve explained this topic! It’s easy to follow and provides great insight. For anyone who wants to learn more, click might be a good place to start.
Где купить диплом специалиста?
[b]Мы предлагаем[/b] быстро и выгодно купить диплом, который выполняется на бланке ГОЗНАКа и заверен мокрыми печатями, штампами, подписями должностных лиц. Данный документ пройдет лубую проверку, даже при использовании специального оборудования. Решайте свои задачи быстро и просто с нашими дипломами. Заказать диплом любого университета! [url=http://realtraceclasses.copiny.com/question/details/id/1068410/]realtraceclasses.copiny.com/question/details/id/1068410[/url]
Казино всегда предлагает выгодные акции.: balloon казино демо – balloon казино официальный сайт
贏家娛樂城
https://balloonigra.kz/# Азартные игры приносят радость и азарт.
porn esports heroin
terrorist attack esports heroin
terrorist attack esports heroin
Your insights on this topic are really valuable, and I learned a lot from reading your post. If anyone is interested in further reading, 안전놀이터 might provide useful context.
戰神賽特娛樂城
想挑戰刺激又富有獎勳的遊戲世界嗎?來「戰神賽特娛樂城」的老虎機,一場充滿驚喜的冒險正等著您!遊戲中融合了各式特殊符號與獎勳機制,如 Wild 與 Scatter 符號,能夠為您開啟額外的連線機會,讓您在每一輪轉動中都充滿期待。而 Bonus Game 和 Free Spin 更能讓您在短時間內獲得超豐厚的獎勳,輕鬆開啟連勝之旅。無論您是新手還是老玩家,戰神賽特為您精心設計了從 0.5 到 2500 的多元投注範圍,無論您的風險承受度如何,都能輕鬆找到最適合自己的投注金額,享受遊戲的樂趣。若您想要更快掌握遊戲技巧,不妨先體驗「戰神賽特試玩」版,或參考「戰神賽特攻略」指南,讓您在真實賭局中如魚得水,搶奪更多獎勳!快來挑戰自己的運氣,和我們一起開啟一場刺激無比的冒險吧
You’ve highlighted some crucial points that often get overlooked. This is a fantastic post! If others want to dig deeper, 메이저놀이터 might provide more insights on the subject.
пин ап казино официальный
Our engineers are taking the needed precautions to maintain themselves and our customers safeguarded.
казино пин ап
Российские новости 24/7
кайтинг в анапе
This post highlights some really key points that often get overlooked. For anyone wanting more information, hochiminh could provide further context and examples on this topic.
Ballon — РёРіСЂР°, полная СЃСЋСЂРїСЂРёР·РѕРІ.: balloon казино играть – balloon казино играть
кайтсерфинг в египте
Bukmacher oraz kasyno internetowe Mostbet to jeden z najdłużej działających serwisów hazardowych w sieci z ofertą dla Polaków, gdyż został założony jeszcze w 2009 roku. Platforma może pochwalić się posiadaniem aktywnej licencji od Curacao, która gwarantuje bezpieczeństwo. Gracze będą mogli spotkać tutaj ponad 3000 zróżnicowanych gier hazardowych, które zostały podzielone na automaty, gry stołowe oraz gry na żywo. Nie zabraknie też interesującego dodatku w formie różnorodnych gier natychmiastowych, z czego najbardziej wyróżniają się gry natychmiastowe. Platforma Mostbet Casino udostępnia jednocześnie wiele zróżnicowanych tytułów od najbardziej popularnych dostawców oprogramowania, wśród których znajdują się takie uznane marki jak na przykład Play’n GO, Pragmatic Play, Evolution, Microgaming czy NetEnt. Do tego dochodzą różnorodne bonusy, promocje czy turnieje.
Bukmacher oraz kasyno internetowe Mostbet to jeden z najdłużej działających serwisów hazardowych w sieci z ofertą dla Polaków, gdyż został założony jeszcze w 2009 roku. Platforma może pochwalić się posiadaniem aktywnej licencji od Curacao, która gwarantuje bezpieczeństwo. Gracze będą mogli spotkać tutaj ponad 3000 zróżnicowanych gier hazardowych, które zostały podzielone na automaty, gry stołowe oraz gry na żywo. Nie zabraknie też interesującego dodatku w formie różnorodnych gier natychmiastowych, z czego najbardziej wyróżniają się gry natychmiastowe. Platforma Mostbet Casino udostępnia jednocześnie wiele zróżnicowanych tytułów od najbardziej popularnych dostawców oprogramowania, wśród których znajdują się takie uznane marki jak na przykład Play’n GO, Pragmatic Play, Evolution, Microgaming czy NetEnt. Do tego dochodzą różnorodne bonusy, promocje czy turnieje.
You’ve articulated your ideas so clearly, and I really appreciate that. If others want to dig deeper into this topic, Casino might be a good place to start exploring.
https://neokomsomol.kz/# Казино предлагает множество игровых автоматов.
戰神賽特
「戰神賽特」— 2025年最火爆的老虎機,等你來挑戰!
如果你正在尋找一款高賠率、刺激又充滿神秘感的老虎機遊戲,那麼「戰神賽特」絕對是你的最佳選擇!這款由RG電子精心打造的遊戲,以古埃及戰神賽特為主題,結合精美畫面與震撼音效,帶你進入神秘的沙漠世界,感受無與倫比的刺激體驗。
為何玩家瘋狂愛上戰神賽特?
超狂賠率 51,000 倍:一轉瞬間,財富翻倍不是夢
高RTP達96.89%:更高勝率,更多機會贏得大獎
獨特遊戲機制:掉落消除+獎金購買,玩法多樣更刺激
極致視聽享受:古埃及風格設計+震撼音效,讓你完全沉浸其中
無論你是老虎機高手還是新手玩家,「戰神賽特」都能帶給你前所未有的遊戲體驗!快來挑戰戰神,贏取屬於你的豐厚獎勵!
I absolutely love your blog and find nearly all
of your post’s to be exactly what I’m looking for.
can you offer guest writers to write content to suit your needs?
I wouldn’t mind publishing a post or elaborating on a lot of the subjects
you write concerning here. Again, awesome weblog!
I really appreciate you taking the time to share your thoughts! Your post covers a lot of ground. If anyone else is interested in learning more, 먹튀검증 is a great place to start.
Для эффективного продвижения вверх по карьерной лестнице нужно наличие диплома института. Заказать диплом об образовании у надежной фирмы: [url=http://poluchidiplom.com/kupit-diplom-uchitelya-9/]poluchidiplom.com/kupit-diplom-uchitelya-9/[/url]
As pointed out, there is no setup time for establishing a
freestanding system.
Купить диплом ВУЗа по невысокой цене возможно, обращаясь к надежной специализированной компании. Мы предлагаем документы об окончании любых ВУЗов РФ. Приобрести диплом о высшем образовании– [url=http://diploma-groups24.ru/diplomy-po-specialnosti/rechnoj-diplom.html/]diploma-groups24.ru/diplomy-po-specialnosti/rechnoj-diplom.html[/url]
https://ruspress24.ru/
Your post does a great job of explaining a complex issue in simple terms. For anyone wanting to explore this further, 먹튀검증 could provide more detailed information.
купить аттестат в ростове на дону
balloon казино официальный сайт [url=https://akhbutina.kz/#]balloon game[/url] Ballon — это ваш шанс РЅР° победу.
купить диплом в челябинске цена
Zarejestruj się w Mostbet i zgarnij darmowe spiny na start | Z Mostbet masz dostęp do zakładów sportowych na żywo | Mostbet kasyno online oferuje gry od takich gigantów jak NetEnt i Microgaming | Nie wiesz, jak wypłacić wygraną z Mostbet? Sprawdź instrukcję na stronie [url=https://mostbet-online-casino-polska.com]Mostbet[/url] kasyno online.
лучшее онлайн казино
This post really opened my eyes to new perspectives! For others who are curious about this topic, 안전놀이터 could be a helpful resource to continue learning.
Mostbet oferuje bezpieczne płatności i profesjonalne wsparcie techniczne | Automaty, blackjack, ruletka – Mostbet kasyno ma wszystko, czego potrzebujesz | Z Mostbet możesz grać na automatach, obstawiać mecze i wygrywać duże nagrody | Nie wiesz, jak wypłacić wygraną z Mostbet? Sprawdź instrukcję na stronie [url=https://mostbet-online-casino-polska.com]Mostbet rejestracja[/url].
whores esports terrorist attack
Удача всегда СЂСЏРґРѕРј, РєРѕРіРґР° играешь.: balloon казино – balloon казино
cocaine esports gay
Czy Mostbet jest legalny w Polsce? Sprawdź szczegóły na stronie | W Mostbet znajdziesz wiele ekskluzywnych gier kasynowych | Mostbet rejestracja zajmuje tylko kilka minut, a bonusy czekają na Ciebie | Nie wiesz, jak wypłacić wygraną z Mostbet? Sprawdź instrukcję na stronie [url=https://mostbet-online-casino-polska.com]Most bet[/url] kod promocyjny na darmowe spiny .
porn esports whores
Mostbet oferuje atrakcyjny bonus bez depozytu dla nowych graczy | W Mostbet znajdziesz wiele ekskluzywnych gier kasynowych | Czy wiesz, że Mostbet posiada dedykowaną aplikację mobilną? | Czy warto grać w Mostbet? Opinie użytkowników potwierdzają wysoką jakość usług Więcej informacji znajdziesz tutaj: [url=https://mostbet-online-casino-polska.com]Mostbet[/url] – rejestracja i bonusy.
Приобрести диплом университета по выгодной цене вы можете, обратившись к надежной специализированной компании. Мы оказываем услуги по изготовлению и продаже документов об окончании любых ВУЗов Российской Федерации. Приобрести диплом ВУЗа– [url=http://diploma-groups24.ru/kupit-diplom-vuza/bakalavr/2004-2009-s-otlichiem.html/]diploma-groups24.ru/kupit-diplom-vuza/bakalavr/2004-2009-s-otlichiem.html[/url]
Excellent, what a weblog it is! This blog presents helpful information to us,
keep it up.
I love the way you’ve explained this topic! It’s easy to follow and provides great insight. For anyone who wants to learn more, 먹튀짭새 might be a good place to start.
https://neokomsomol.kz/# Казино всегда предлагает выгодные акции.
Lubisz gry kasynowe? Mostbet ma dla Ciebie świetne promocje | W Mostbet znajdziesz wiele ekskluzywnych gier kasynowych | Mostbet rejestracja zajmuje tylko kilka minut, a bonusy czekają na Ciebie | Zgarnij bonus za rejestrację w Mostbet i ciesz się dodatkowymi środkami na grę [url=https://mostbet-online-casino-polska.com]Most bet[/url] kod promocyjny na darmowe spiny .
Czy Mostbet jest legalny w Polsce? Sprawdź szczegóły na stronie | Z Mostbet masz dostęp do zakładów sportowych na żywo | Jeśli szukasz legalnego kasyna online, Mostbet to doskonały wybór | Czy warto grać w Mostbet? Opinie użytkowników potwierdzają wysoką jakość usług [url=https://mostbet-online-casino-polska.com]Most bet[/url] kod promocyjny na darmowe spiny .
Mostbet oferuje atrakcyjny bonus bez depozytu dla nowych graczy | Mostbet rejestracja jest szybka i prosta – sprawdź, jak zacząć grać | Czy wiesz, że Mostbet posiada dedykowaną aplikację mobilną? | Mostbet to jedna z najczęściej wybieranych platform hazardowych w Polsce Najlepsze promocje w [url=https://mostbet-online-casino-polska.com] Mostbet Polska[/url].
Mostbet kasyno to setki automatów od najlepszych dostawców | Automaty, blackjack, ruletka – Mostbet kasyno ma wszystko, czego potrzebujesz | Wypłaty w Mostbet są błyskawiczne i bezpieczne | Mostbet kasyno oferuje szeroki wybór metod płatności [url=https://mostbet-online-casino-polska.com]Mostbet rejestracja[/url].
This post really stands out for its depth and clarity. If anyone is looking for more information on the subject, 먹튀검증 could provide further reading material.
Mostbet oferuje atrakcyjny bonus bez depozytu dla nowych graczy | Mostbet bonus bez depozytu to świetny sposób na start w kasynie online | Wypłaty w Mostbet są błyskawiczne i bezpieczne | Graj w Mostbet i dołącz do społeczności wygrywających graczy [url=https://mostbet-online-casino-polska.com]Mostbet Casino[/url] – bonus bez depozytu sprawdź szczegóły.
Mostbet oferuje bezpieczne płatności i profesjonalne wsparcie techniczne | Mostbet bonus bez depozytu to świetny sposób na start w kasynie online | Mostbet oferuje najlepsze kursy na zakłady sportowe w Polsce | Mostbet to jedna z najczęściej wybieranych platform hazardowych w Polsce [url=https://mostbet-online-casino-polska.com]Most bet[/url] kod promocyjny na darmowe spiny .
https://xnudes.app/
Introducing to you the most prestigious online entertainment address today. Visit now to experience now!
porno web
terrorist attack esports heroin
heroin esports whores
gay esports heroin
https://football-today.uk/
heroin esports cocaine
gay esports whores
Free steam accounts http://t.me/s/freesteamaccountc
188bet 88bet: 88bet – 88bet
https://alo789.auction/# alo789in
188bet 88bet: keo nha cai 88bet – nha cai 88bet
http://k8viet.gurum/# k8
Официальный сайт Нев Ретро Казино [url=newretromirror.ru]newretromirror.ru[/url] .
gokong88
NewRetroCasino [url=https://newretromirror.ru/]https://newretromirror.ru/[/url] .
трансформаторы силовые масляные купить [url=maslyanye-transformatory-kupit11.ru]трансформаторы силовые масляные купить[/url] .
Your post really caught my attention! It’s a unique take on the subject. For those who want to read more about this topic, they can check out 먹튀검증 for further insight.
перепланировка квартиры согласование [url=https://soglasovanie-pereplanirovki-kvartiry14.ru]перепланировка квартиры согласование[/url] .
1 с купить программу цена [url=http://programmy-1s14.ru/]http://programmy-1s14.ru/[/url] .
88 bet [url=http://88betviet.pro/#]88bet[/url] nha cai 88bet
Noten klavier kostenlos download klavier noten gratis download
купить трансформаторы масляные [url=http://maslyanye-transformatory-kupit11.ru/]купить трансформаторы масляные[/url] .
Klavier noten download kostenlos noten fur klavier kostenlos
сколько стоит установка 1с [url=http://www.programmy-1s14.ru]сколько стоит установка 1с[/url] .
Noten vom klavier klavier noten
перепланировка [url=http://www.soglasovanie-pereplanirovki-kvartiry14.ru]перепланировка[/url] .
Покупка документа о высшем образовании через надежную компанию дарит немало преимуществ. Это решение помогает сберечь как личное время, так и серьезные финансовые средства. Тем не менее, на этом выгода не ограничивается, преимуществ намного больше.Мы изготавливаем дипломы любой профессии. Дипломы производятся на настоящих бланках государственного образца. Доступная стоимость сравнительно с крупными тратами на обучение и проживание в другом городе. Покупка диплома о высшем образовании из российского института станет разумным шагом.
Купить диплом: [url=http://diplomgorkiy.com/diplom-kupit-vo-vladivostoke/]diplomgorkiy.com/diplom-kupit-vo-vladivostoke/[/url]
Покупка документа о высшем образовании через качественную и надежную фирму дарит ряд преимуществ. Это решение дает возможность сэкономить как дорогое время, так и серьезные финансовые средства. Однако, достоинств значительно больше.Мы предлагаем дипломы психологов, юристов, экономистов и других профессий. Дипломы изготавливаются на оригинальных бланках. Доступная цена по сравнению с большими тратами на обучение и проживание. Заказ диплома института будет мудрым шагом.
Быстро купить диплом: [url=http://diplomh-40.ru/diplom-medsestri-kupit-v-moskve-2/]diplomh-40.ru/diplom-medsestri-kupit-v-moskve-2/[/url]
You’ve presented some really great ideas here! This is a fantastic conversation starter. For those wanting to explore this subject further, here might be a good resource.
https://88betviet.pro/# nha cai 88bet
keo nha cai 88bet: keo nha cai 88bet – 188bet 88bet
https://88betviet.pro/# 88 bet
Wow, that’s what I was exploring for, what a information! existing here at thiis
weblog, thanks admin oof this web site. https://Menbehealth.wordpress.com/
Хотите списать долги? pro-58.ru законное освобождение от кредитных обязательств. Работаем с физлицами и бизнесом. Бесплатная консультация!
Site-ul https://betsysrealfood.com este o resursa cu diverse articole in limba romana, acoperind subiecte precum sanatatea, nutri?ia, moda ?i stilul de via?a. Titlurile articolelor includ teme precum „?tiri de sanatate”, „?tiri pentru bebelu?i”, „?tiri de Medicina Alternativa” ?i „?tiri de via?a”. Site-ul este destinat publicului vorbitor de romana, interesat de un stil de via?a sanatos ?i re?ete de casa.
Приобретение диплома через проверенную и надежную компанию дарит ряд преимуществ. Такое решение помогает сберечь как личное время, так и значительные деньги. Однако, достоинств намного больше.Мы можем предложить дипломы любой профессии. Дипломы производят на фирменных бланках. Доступная стоимость в сравнении с огромными тратами на обучение и проживание в чужом городе. Заказ диплома об образовании из российского ВУЗа станет мудрым шагом.
Приобрести диплом: [url=http://diplomidlarf.ru/kupit-attestati-9-klass-2/]diplomidlarf.ru/kupit-attestati-9-klass-2/[/url]
Transform your car into a remarkable creation with Eurshall’s Auto Body’s elite tuning services . Our skilled team dedicates itself to optimizing each vehicle to fulfill its full capability . Whether you’re aiming for speed or elegance , our bespoke solutions ensure comprehensive results. Visit https://eurshallsautobody.com/ today to enjoy the difference and maneuver a vehicle that truly reflects your style.
You’ve brought up some great points here that deserve more attention! For those who are curious to learn more, hochiminh might provide further insights on the topic.
You’ve done a fantastic job of explaining this complex issue in a simple way. For those interested in diving deeper, I recommend this as a good resource for more insights.
Быстрая продажа и покупка доска объявлений Profis размещайте объявления о продаже товаров, поиске услуг, аренде недвижимости и работе. Простой интерфейс, удобный поиск, бесплатные публикации!
This is such a well-rounded post! You’ve done a great job presenting your thoughts clearly. For anyone who wants to explore this topic further, I suggest taking a look at 먹튀짭새.
alo789 chinh th?c: alo 789 – alo 789
gokong88
Your post brings up some very interesting points! I appreciate your approach to the topic. For those wanting to continue the discussion, Casino could provide further reading.
This was a fantastic read! Your post raised some great points. For those wanting more information on the subject, this might be a valuable resource.
http://88betviet.pro/# nha cai 88bet
alo789in: 789alo – alo 789
Тут можно преобрести стоимость сейфа сейф цена
This is such a comprehensive post! You’ve really covered all the angles. If anyone else is looking for further reading, 메이저놀이터 could provide additional insights.
Друзья, в Красной Поляне начался новый этап досуга! Открылся сайт, посвященный знакомствам с девушками 18+, которые готовы развлечь вас и сделать вашу жизнь ярче. Позвольте себе почувствовать атмосферу тепла и радости в компании восхитительных дам, которые вас ждут https://night24-krasnaya-polyana.com/
Your post offers some great insights, and I really enjoyed reading it! For those who are interested in learning more about this, they should definitely visit 먹튀짭새.
nitehush is designed to support your respiratory system, helping you enjoy a quiet, uninterrupted night’s sleep.
alo789in [url=http://alo789.auction/#]alo789in[/url] alo789
What an interesting post! You’ve brought up points I hadn’t thought about. If anyone else is curious to explore this further, 토토사이트 could provide additional insights.
кайт эльгуна
The solution business will certainly give you with a list log of completed solution jobs.
https://88betviet.pro/# 88 bet
You’ve really opened my eyes to some new ideas here! If anyone else wants to explore this subject in more depth, I recommend taking a look at 안전놀이터.
gokong88
You’ve done a fantastic job covering this topic! I appreciate your in-depth approach. If anyone is curious about similar subjects, they can check out check for further reading.
I really like the way you’ve structured this post! Your thoughts are clear and concise. For anyone looking for more information on this subject, 보증업체 could provide valuable additional reading.
http://k8viet.guru/# k8 bet
This is a well-written post, and I really appreciate the detail you’ve provided. For anyone who wants to continue reading about this, check could be a useful resource.
В Красной Поляне появился новый сайт для досуга с девушками 18+, который предлагает Вам увлекательные приключения и возможность отвлечься от повседневной рутины Здесь Вы сможете найти общение, развлечения и интересные знакомства, которые станут отличным способом провести время: индивидуалки красная поляна
nha cai 88bet: 88bet – keo nha cai 88bet
dang nh?p alo789: alo789 – alo789hk
Где купить диплом по необходимой специальности?
Мы изготавливаем дипломы любой профессии по приятным тарифам. Мы готовы предложить документы техникумов, которые расположены на территории всей России. Можно купить диплом за любой год, указав актуальную специальность и хорошие оценки за все дисциплины. Документы выпускаются на “правильной” бумаге высшего качества. Это дает возможности делать настоящие дипломы, которые невозможно отличить от оригиналов. Документы будут заверены необходимыми печатями и подписями. Стараемся поддерживать для клиентов адекватную ценовую политику. Для нас очень важно, чтобы документы были доступны для большого количества наших граждан. [url=http://ry-diplom.com/kupit-diplom-parikmaxera-2-4/]ry-diplom.com/kupit-diplom-parikmaxera-2-4[/url]
I enjoyed reading your thoughts on this topic! You’ve brought up some great points. For those interested in continuing the conversation, 토토사이트 could provide more information.
Can you be more specific about the content of your article? After reading it, I still have some doubts. Hope you can help me.
Где заказать диплом специалиста?
Мы можем предложить дипломы любой профессии по приятным ценам. Мы предлагаем документы ВУЗов, расположенных в любом регионе России. Можно купить качественно сделанный диплом от любого учебного заведения, за любой год, указав подходящую специальность и оценки за все дисциплины. Дипломы и аттестаты выпускаются на “правильной” бумаге самого высокого качества. Это позволяет делать настоящие дипломы, которые невозможно отличить от оригиналов. Документы будут заверены необходимыми печатями и штампами. Стараемся поддерживать для заказчиков адекватную ценовую политику. Важно, чтобы документы были доступными для подавляющей массы граждан. [url=http://diplomoz-197.com/kuplyu-diplom-s-zaneseniem-5/]diplomoz-197.com/kuplyu-diplom-s-zaneseniem-5[/url]
frumzi
вывески шиномонтажа интерьерная печать спб
оформление бизнес центров неоновые вывески
тонкие световые короба композитный короб с инкрустацией
электрокарниз цена [url=http://elektrokarnizy-dlya-shtor.ru/]электрокарниз цена[/url] .
карнизы для эркерных окон [url=https://elektrokarnizy-dlya-shtor.ru/]https://elektrokarnizy-dlya-shtor.ru/[/url] .
В рамках программы долгосрочных сбережений (ПДС) актуарные расчеты играют ключевую роль в обеспечении финансовой устойчивости НПФ. Автоматизация этих расчетов позволяет учитывать множество факторов, таких как продолжительность жизни участников, уровень инфляции, доходность инвестиций и изменения в законодательстве. Современные системы на основе искусственного интеллекта способны анализировать большие объемы данных и строить точные прогнозы, что особенно важно для долгосрочных обязательств. Это помогает фондам минимизировать риски и обеспечивать выполнение обязательств перед участниками даже в условиях нестабильной экономической среды. Пенсионный фонд
Здравствуйте!
Без присутствия диплома очень непросто было продвигаться вверх по карьере. Сегодня же документ не дает абсолютно никаких гарантий, что удастся найти престижную работу. Более важное значение имеют практические навыки и знания специалиста, а также его постоянный опыт. По этой причине решение о покупке диплома можно считать целесообразным. Быстро купить диплом любого ВУЗа [url=http://cardinalparkmld.listbb.ru/viewtopic.php?f=3&t=1637/]cardinalparkmld.listbb.ru/viewtopic.php?f=3&t=1637[/url]
Привет!
Приобрести диплом института по выгодной стоимости возможно, обратившись к надежной специализированной фирме. Заказать диплом о высшем образовании: [url=http://vacshidiplom.com/kupit-diplom-rostov-na-donu-5/]vacshidiplom.com/kupit-diplom-rostov-na-donu-5/[/url]
Купить документ о получении высшего образования можно в нашей компании в столице. [url=http://diplom-club.com/kupit-diplom-magnitogorsk/]diplom-club.com/kupit-diplom-magnitogorsk[/url]
Заказать документ ВУЗа вы имеете возможность в нашей компании. [url=http://diplom-club.com/kupit-diplom-spetsialista-21/]diplom-club.com/kupit-diplom-spetsialista-21[/url]
кайтинг в благе
https://k8viet.guru/# k8 bet
I completely agree with your points, and this really resonates with my own experiences. If anyone wants to read more on this, they can visit 먹튀짭새 to learn more.
Здравствуйте!
Приобрести диплом института по невысокой стоимости вы сможете, обратившись к надежной специализированной компании. Заказать диплом о высшем образовании: [url=http://diplom4you.com/kupit-diplom-tolyatti-5/]diplom4you.com/kupit-diplom-tolyatti-5/[/url]
You’ve really explained this well! It’s easy to follow and offers new ideas. If anyone is looking for more resources on this subject, they might find 메이저놀이터 helpful.
http://88betviet.pro/# 188bet 88bet
nha cai k8 [url=http://k8viet.guru/#]k8 bet[/url] link vao k8
gokong88
1 ван вин [url=https://1win822.ru/]https://1win822.ru/[/url] .
Gambling in Greece nomini-casino.ru
скачать 1win с официального сайта [url=http://1win823.ru/]http://1win823.ru/[/url] .
Ahaa, its good discussion concerning this post at this place at this blog,
I have read all that, so at this time me also commenting at this place.
1вин войти [url=http://1win822.ru/]http://1win822.ru/[/url] .
alo789 dang nh?p: 789alo – alo789 chinh th?c
Где купить диплом специалиста?
Мы предлагаем выгодно и быстро купить диплом, который выполняется на бланке ГОЗНАКа и заверен печатями, водяными знаками, подписями официальных лиц. Диплом пройдет лубую проверку, даже с применением специальных приборов. Достигайте цели максимально быстро с нашей компанией.
Купить диплом о высшем образовании [url=http://vacshidiplom.com/kupit-diplom-v-kurske-10/]vacshidiplom.com/kupit-diplom-v-kurske-10/[/url]
Купить документ о получении высшего образования вы имеете возможность у нас в столице. [url=http://www.cleary.edu/]www.cleary.edu[/url]
Заказать диплом университета!
Мы изготавливаем дипломы любых профессий по приятным ценам— [url=http://asxdiploman.com/kupit-attestati-za-11-15/]asxdiploman.com/kupit-attestati-za-11-15/[/url]
мостбет войти [url=http://mostbet782.ru/]http://mostbet782.ru/[/url] .
Мы можем предложить дипломы любой профессии по доступным тарифам. Почему работать с нами выгодно — [url=http://kyc-diplom.com/pochemu-imenno-my.html/]kyc-diplom.com/pochemu-imenno-my.html[/url]
I will ijmediately grasp your rss as I can’t to find your email subscription link or
e-newsletter service. Do you’ve any? Please allow me know so that I may
just subscribe. Thanks. https://Knowledgekh.com/blog/index.php?entryid=143971
соут [url=http://www.sout-moscow.ru]соут[/url] .
Hi, Neat post. There’s an issue aloong with your site inn internet explorer, wouhld test this?
IE nonetheless is the marketplace chief and a good portion of other people will
omit your great writing due to this problem. https://Ashwinihydropneumatics.com/appraisal-of-bizzo-casino-quick-entry-to-a-caribbean-oasis-featuring-poker-mega-wheel-and-your-favorite-games-but-is-it-simple-for-anyone/
кайтсёрфинг в станице благовещенской
проведение соут в москве [url=https://sout-moskva.ru/]проведение соут в москве[/url] .
Где заказать диплом специалиста?
Наша компания предлагает быстро и выгодно приобрести диплом, который выполняется на оригинальном бланке и заверен мокрыми печатями, водяными знаками, подписями. Диплом способен пройти лубую проверку, даже с применением профессиональных приборов. Достигайте цели быстро и просто с нашим сервисом.
Заказать диплом ВУЗа [url=http://vuz-diplom.ru/kupit-diplom-pedagoga-11/]vuz-diplom.ru/kupit-diplom-pedagoga-11/[/url]
Заказать документ о получении высшего образования можно у нас в Москве. [url=http://raimund-mueller.de/de/]raimund-mueller.de/de[/url]
пройти соут в москве [url=http://www.sout-moscow.ru]пройти соут в москве[/url] .
заказать соут москва [url=www.sout-moskva.ru/]заказать соут москва[/url] .
Приобрести диплом об образовании!
Мы изготавливаем дипломы любых профессий по разумным тарифам— [url=http://diplomt-v-samare.ru/kupit-attestati-za-11-13/]diplomt-v-samare.ru/kupit-attestati-za-11-13/[/url]
I don’t even know how I ended up here, but I tthought
this post was good. I don’t know who you are but certainly yyou are going to a famous blogter if you
are not already 😉 Cheers! https://Ead.alfadash.com.br/blog/index.php?entryid=12386
My family members every tine say that I am wasting
my time here at net, however I know I am getting know-how
all the time by reading thhes nice articles. http://Pescarepassione.Altervista.org/confira-o-site-de-apostas-20bet-o-app-que-viabiliza-uma-experiencia-desportiva-sem-igual-para-os-entusiastas-do-jogo-incluindo-diversas-competicoes-e-palpites/
Hi there, just wanted to tell you, I liked this blog post.
It was inspiring. Keep on posting! https://Riseout.art/to-register-an-account-on-22bet-click-and-enter-your-email-and-password-for-accessing-all-bonuses-and-mobile-slots-offers-3/
certainly like your web sit however you need to take a lokok at
the spelling on several of your posts. Many of them are rife with spelpling problems
and I find it very troublsome to inform the reality thhen again I’ll surely come back again. https://Aula.Centroagoraformacion.com/blog/index.php?entryid=10983
mostbet kg отзывы [url=https://mostbet782.ru/]mostbet kg отзывы[/url] .
Thank youu for every other informative site. The placee else may just I get
that kind oof info written in such an ideal way? I’ve a challenge that I
am just now running on, and I’ve been at the look out for
such info. http://Pescarepassione.altervista.org/visite-a-plataforma-de-apostas-20bet-a-app-que-possibilita-uma-experiencia-desportiva-notavel-para-os-entusiastas-do-jogo-com-varias-competicoes-e-palpites/
Your method of describing everything in this post is truly nice, every one be able to simply bee aware of it, Thanks a lot. https://edumy.jrb.productions/blog/index.php?entryid=8199
Компания с большим парком дизельных электростанций для краткосрочной и долгосрочной аренды, узнать больше здесь https://plaza.rakuten.co.jp/rensol/diary/202411220000/
1vin [url=https://1win823.ru/]https://1win823.ru/[/url] .
You’ve raised some very interesting points! I appreciate how you’ve presented them. If anyone else is curious to dive deeper, 안전놀이터 might provide more insights.
https://jaredmgsa84959.mybjjblog.com/code-promo-1xbet-bonus-de-bienvenue-100-jusqu-%C3%A0-130-46462159
кайтсерфинг в египте
https://www.xaphyr.com/blogs/1195073/1xBet-Promo-Code-VIP888-Get-Free-Bonus-130
https://k8viet.guru/# k8 th? dam
Хотите перекусить вкусно? купить https://pitateka.ru питу, шаверму, донер, гирос и тортилью. Ароматная свежая выпечка, мясо на гриле и фирменные соусы. Отличный выбор для перекуса, обеда или вечеринки.
https://88betviet.pro/# 88 bet
אותו. כן. כן. כשהוא קם מהברכיים, כרעתי על ברכיי-אילונה חוזרת שוב לתנוחה 69, לוקחת את פיה ומתחילה למצוץ זין חם ונרגש. ליאון מבעד הניסוי שלנו בקופסה רחוקה. בכל שנה אנו חוגגים את תאריך החתונה שלנו, ושוב התכוננו לטיול במסעדה. לבשתי הלבשה תחתונה, הנאמן שלי ניגש look at this site
ולי את ההנאה האמיתית ביותר. וזה היה ה “פשרה” שלנו איתה. העניין הוא שמאז זמן מה היה לי רצון מטריד לראות את אהובתי בזרועותיו של עבה וקשה כמו אבן, עוד יותר מהמחשבה לקיים יחסי מין עם אולגה השכנה החדשה. אלוהים, מה הוא יעשה לגופה הצעיר. לא עבר זמן רב עד שהוא lire l’intégralité des informations ici
кайтсёрфинг в хургаде
типография печать таблички из пластика
заказать книгу в типографии таблички из пластика
188bet 88bet: 88 bet – keo nha cai 88bet
цифровая типография спб типография спб цены
ORL Sibiu
Dr. Liliana Ermacov, medic specialist ORL, are o vastă experiență în diagnosticarea și tratarea afecțiunilor urechilor, nasului și gâtului. Este apreciată pentru abordarea empatică și soluțiile personalizate, oferind îngrijire de calitate fiecărui pacient în parte.
nitehush is designed to support your respiratory system, helping you enjoy a quiet, uninterrupted night’s sleep.
Мы изготавливаем дипломы любой профессии по доступным ценам. Купить диплом в Мичуринске — [url=http://kyc-diplom.com/geography/michurinsk.html/]kyc-diplom.com/geography/michurinsk.html[/url]
1 ван вин [url=1win810.ru]1win810.ru[/url] .
мотбет [url=https://www.mostbet783.ru]https://www.mostbet783.ru[/url] .
mostbet apk скачать [url=https://www.mostbet784.ru]https://www.mostbet784.ru[/url] .
Топ онлайн казино 2025: эксклюзивный обзор лучших игровых платформ
Онлайн азартные игры стремительно развиваются в России, заинтересовывая всё больше игроков из-за своей доступности. Однако для безопасного времяпрепровождения критически важно выбирать только проверенные площадки, которые гарантируют честность алгоритмов. В этом материале мы разберём ключевые критерии выбора, представим рейтинг лучших казино 2025 года и поделимся экспертными советами для максимально эффективной игры.
Ключевые факторы надёжности онлайн-казино
Чтобы минимизировать опасность, необходимо учитывать следующие характеристики:
Лицензионная чистота
Проверяйте наличие регуляторных разрешений: Гибралтара.
Убедитесь, что игровые автоматы прошли независимую проверку от авторитетных организаций (iTech Labs).
Система случайных чисел (RNG)
Казино должно использовать проверенный генератор случайных чисел, что обеспечивает прозрачность процессов.
Скорость транзакций
Надёжные казино предлагают быстрые выплаты через современные системы: банковские карты (Visa), электронные кошельки (QIWI) и криптовалюты (Bitcoin).
Бонусная политика
Хорошие казино предоставляют привлекательные бонусы: вступительные награды, фриспины и программы лояльности. Обратите внимание на требования по использованию.
Мобильная оптимизация
Современные казино настроены для мобильных устройств (iOS) с быстрой загрузкой. Это позволяет проводить время за играми круглосуточно.
Клиентская поддержка
Профессиональная служба поддержки работает круглосуточно и помогает решать вопросы через чат.
Рейтинг лучших онлайн-казино 2025 года
1. Cat Casino
Преимущества: оперативные выплаты (до 1 минуты), лицензия Кюрасао, эксклюзивные акции.
Бонусы: стартовый пакет — 100 фриспинов в других популярных слотах.
Особенности: турниры с крупными призами.
2. Kometa Casino
Преимущества: ведущая платформа с дилерами, кэшбэк до 50 000?.
Бонусы: стартовый комплект — 255% + 500 бесплатных вращений.
Особенности: VIP-клуб с эксклюзивными привилегиями.
3. R7 Casino
Преимущества: приватный вход по email, поддержка криптовалют (BTC) с нулевой комиссией.
Бонусы: фриспины за подписку на канал.
Особенности: двухфакторная аутентификация для предотвращения взломов.
4. Arkada Casino
Преимущества: быстрые выплаты на карты РФ (Сбербанк), специальные акции.
Бонусы: кэшбэк до 15%, приветственная награда.
Особенности: сертифицированные слоты от Microgaming.
5. Kent Casino
Преимущества: поддержка криптовалют, турниры с призовым фондом 1 млн рублей.
Бонусы: возможность бесплатной игры.
Особенности: широкий выбор слотов с оптимальным возвратом.
Особенности мобильных казино
Мобильные казино становятся все более популярными благодаря технологичности. Их преимущества:
Адаптивный дизайн: интерфейс настроен для сенсорных экранов.
Быстрый доступ: нет необходимости устанавливать программы.
Поддержка платежей: можно производить депозиты и выводить средства через специальные сервисы.
Низкое потребление трафика: современные казино работают эффективно даже на медленном интернете.
Как выбрать лучшее казино?
При выборе онлайн-казино учитывайте следующие аспекты:
Лицензия и безопасность
Убедитесь, что казино имеет глобальное разрешение и использует технологии безопасности (другие протоколы).
Ассортимент игр
Лучшие казино предлагают обширный ассортимент слотов, настольных игр (блэкджек) и live-казино.
Скорость выплат
Изучите реальные комментарии о времени обработки заявок.
Бонусные программы
Обратите внимание на размер приветственного бонуса, требования по вейджеру и наличие других акций.
Качество поддержки
Проверьте, насколько быстро сотрудники помогают пользователям.
Мобильная версия
Убедитесь, что казино имеет оптимизированный интерфейс для смартфонов.
Заключение
Онлайн-казино могут стать отличным способом развлечения, если подходить к их выбору серьёзно. Придерживайтесь наших советов, играйте только на проверенных платформах и помните о основах безопасного гейминга. Азартные игры — это прежде всего развлечение, а не источник дохода.
Если вы ищете надёжное казино с быстрыми выплатами, обратите внимание на топовые площадки, такие как Kometa Casino. Они отлично зарекомендовали себя среди игроков и продолжают радовать своими предложениями.
https://t.me/s/topcasinos_ru
I’m not that much of a online reader to be honest but your blogs really
nice, keep it up! I’ll go ahead and bookmark your site to come back down the road.
Cheers
1win скачать [url=http://1win810.ru]http://1win810.ru[/url] .
alo789 [url=http://alo789.auction/#]dang nh?p alo789[/url] dang nh?p alo789
скачать мостбет [url=mostbet783.ru]mostbet783.ru[/url] .
https://88betviet.pro/# 88bet
поддержка мостбет [url=http://mostbet784.ru/]http://mostbet784.ru/[/url] .
This is a really insightful post! I appreciate you sharing your thoughts on this. For others who want to dig deeper, I recommend taking a look at 먹튀검증 for additional reading.
http://alo789.auction/# alo789 chinh th?c
This was an engaging read! I appreciate you tackling this topic in such a thoughtful way. For those who want more insights, 토토사이트 is a great resource to check out.
My brother suggested I might like this blog. He was totally right.
This post truly made my day. You can not imagine simply how much
time I had spent for this information! Thanks!
Mostbet Polska to idealne miejsce na rozpoczęcie przygody z grami online | Mostbet online daje dostęp do gier 24/7 z każdego urządzenia | Mostbet rejestracja to pierwszy krok do emocjonującej rozgrywki [url=https://mostbet-kasyno-strona-pl.com/]Rejestracja Mostbet[/url]
What a well-crafted post! You’ve raised some important questions that I hadn’t considered before. If others want to continue exploring this topic, check could help.
Мачтовые подъемники для фасадных и монтажных работ – узнайте все детали https://www.gamerlaunch.com/community/users/blog/6648493?gl_user=6648493&gid=535
I was very happy to find this website. I wanted to thank you for ones time for this particularly fantastic read!! I definitely appreciated every little bit of it and i also have you saved to fav to see new stuff on your blog.
I really enjoyed reading this! It’s always good to see a well-thought-out post like this. For others who want to explore the topic further, 토토사이트 might be a great resource.
alo 789 dang nh?p: 789alo – alo789 chinh th?c
https://alo789.auction/# alo 789 dang nh?p
Тут можно преобрести можно купить сейф где купить сейф
Подключение эквайринга и оплаты через iiko – все детали здесь https://www.gamerlaunch.com/community/users/blog/6648769/?mode=view&gid=535
Топ онлайн казино 2025: профессиональный анализ лучших игровых платформ
Интернет-гемблинг стремительно расширяют свою аудиторию в России, завоевывая всё больше игроков благодаря своей функциональности. Однако для безопасного времяпрепровождения критически важно выбирать только сертифицированные площадки, которые гарантируют прозрачность работы. В этом материале мы рассмотрим ключевые параметры оценки, выделим лидеров лучших казино 2025 года и поделимся экспертными советами для оптимального выбора.
Важнейшие параметры доверия онлайн-казино
Чтобы минимизировать опасность, необходимо учитывать следующие особенности:
Лицензионная чистота
Проверяйте наличие международных лицензий: Мальты.
Убедитесь, что игровые автоматы прошли независимую проверку от авторитетных организаций (GLI).
Система случайных чисел (RNG)
Казино должно использовать проверенный генератор случайных чисел, что обеспечивает справедливость результатов.
Скорость транзакций
Надёжные казино предлагают быстрые выплаты через широкий спектр методов: банковские карты (Visa), электронные кошельки (Neteller) и блокчейн-валюты (USDT).
Бонусная политика
Хорошие казино предоставляют щедрые бонусы: стартовые предложения, фриспины и программы лояльности. Обратите внимание на требования по использованию.
Мобильная оптимизация
Современные казино адаптированы для мобильных устройств (iOS) с быстрой загрузкой. Это позволяет проводить время за играми круглосуточно.
Клиентская поддержка
Отзывчивая служба поддержки работает 24/7 и помогает решать вопросы через чат.
Рейтинг лучших онлайн-казино 2025 года
1. Cat Casino
Преимущества: оперативные выплаты (до 1 минуты), лицензия Кюрасао, особые бонусы.
Бонусы: бездепозитный бонус — 100 фриспинов в Gates of Olympus.
Особенности: турниры с крупными призами.
2. Kometa Casino
Преимущества: лучшее live-казино, кэшбэк до 50 000?.
Бонусы: стартовый комплект — впечатляющий приветственный пакет.
Особенности: VIP-клуб с индивидуальными бонусами.
3. R7 Casino
Преимущества: приватный вход по email, поддержка цифровых активов (USDT) с нулевой комиссией.
Бонусы: фриспины за участие в акциях.
Особенности: двухфакторная аутентификация для защиты данных.
4. Arkada Casino
Преимущества: мгновенные переводы на карты РФ (Тинькофф), ежедневные конкурсы.
Бонусы: кэшбэк до 15%, удвоение начального взноса.
Особенности: лицензионные игры от Microgaming.
5. Kent Casino
Преимущества: поддержка криптовалют, турниры с призовым фондом 1 млн рублей.
Бонусы: тестирование слотов.
Особенности: широкий выбор слотов с оптимальным возвратом.
Особенности мобильных казино
Мобильные казино становятся актуальными благодаря удобству использования. Их преимущества:
Адаптивный дизайн: интерфейс оптимизирован для сенсорных экранов.
Быстрый доступ: нет необходимости тратить время на загрузку.
Поддержка платежей: можно вести транзакции и получать выигрыши через специальные сервисы.
Низкое потребление трафика: современные казино работают быстро даже на низкой пропускной способности.
Как выбрать лучшее казино?
При выборе онлайн-казино учитывайте следующие факторы:
Лицензия и безопасность
Убедитесь, что казино имеет глобальное разрешение и использует шифрование данных (SSL).
Ассортимент игр
Лучшие казино предлагают разнообразие слотов, настольных игр (покер) и live-казино.
Скорость выплат
Изучите отзывы игроков о времени обработки заявок.
Бонусные программы
Обратите внимание на условия акций, требования по использованию бонусов и наличие других предложений.
Качество поддержки
Проверьте, насколько оперативно сотрудники устраняют проблемы.
Мобильная версия
Убедитесь, что казино имеет адаптированную версию для смартфонов.
Заключение
Онлайн-казино могут стать интересным хобби, если подходить к их выбору вдумчиво. Придерживайтесь наших рекомендаций, играйте только на проверенных платформах и помните о важности самоконтроля. Азартные игры — это прежде всего развлечение, а не способ заработка.
Если вы ищете проверенную платформу с быстрыми выплатами, обратите внимание на топовые площадки, такие как Arkada Casino. Они отлично зарекомендовали себя среди игроков и продолжают улучшать сервис.
https://t.me/s/topcasinos_ru
Для срочного лицензирования с гарантией исполнения за 14 дней обратитесь по ссылке https://photozou.jp/user/top/3401012
Мы изготавливаем дипломы психологов, юристов, экономистов и любых других профессий по приятным ценам. Цена зависит от выбранной специальности, года выпуска и университета. Всегда стараемся поддерживать для заказчиков адекватную политику тарифов. Важно, чтобы документы были доступны для большого количества наших граждан. [url=http://diplomj-irkutsk.ru/smotret-katalog-vsex-vuzov-moskvi-2/]мип купить диплом[/url]
http://alo789.auction/# alo789in
You can place them in edges when not in use and their
visual look will certainly assimilate with your decor.
Мы изготавливаем дипломы любой профессии по разумным ценам. Цена может зависеть от выбранной специальности, года выпуска и ВУЗа. Стараемся поддерживать для клиентов адекватную политику тарифов. Важно, чтобы дипломы были доступными для большого количества граждан. [url=http://freediplom.com/kupit-diplom-sankt-peterburgskogo-instituta-gostepriimstva/]куплю диплом какие[/url]
Купить диплом о высшем образовании!
Мы готовы предложить документы институтов, которые расположены на территории всей Российской Федерации.
[url=http://diplomaj-v-tule.ru/kupit-attestat-za-11-klass-v-moskve-8/]diplomaj-v-tule.ru/kupit-attestat-za-11-klass-v-moskve-8[/url]
Приобрести диплом о высшем образовании!
Мы можем предложить документы институтов, расположенных в любом регионе Российской Федерации.
[url=http://vuz-diplom.ru/kupil-diplom-o-srednem-obrazovanii/]vuz-diplom.ru/kupil-diplom-o-srednem-obrazovanii[/url]
Мы предлагаем дипломы любых профессий по приятным тарифам. Стараемся поддерживать для покупателей адекватную политику цен. Для нас очень важно, чтобы дипломы были доступными для большинства граждан.
Заказ диплома, который подтверждает окончание института, – это грамотное решение. Приобрести диплом о высшем образовании: [url=http://diploml-174.ru/kupit-diplom-buxgaltera-12/]diploml-174.ru/kupit-diplom-buxgaltera-12/[/url]
Заказать диплом о высшем образовании!
Мы готовы предложить документы институтов, расположенных на территории всей России. Дипломы и аттестаты выпускаются на бумаге самого высокого качества: [url=http://only-most.ru/2222kupit_diplom_tehnikuma_s_zaneseniem_v_reestr.html/]only-most.ru/2222kupit_diplom_tehnikuma_s_zaneseniem_v_reestr.html[/url]
You’ve presented some really great ideas here! This is a fantastic conversation starter. For those wanting to explore this subject further, Casino might be a good resource.
Мы готовы предложить дипломы любых профессий по приятным ценам. Стараемся поддерживать для клиентов адекватную политику цен. Важно, чтобы дипломы были доступными для подавляющей массы граждан.
Покупка документа, подтверждающего окончание института, – это выгодное решение. Приобрести диплом о высшем образовании: [url=http://kupit-diplom24.com/kupit-diplom-v-xabarovske-12/]kupit-diplom24.com/kupit-diplom-v-xabarovske-12/[/url]
кайт хургада
мостбет [url=eisberg.forum24.ru/?1-0-0-00000327-000-0-0-1742579529]eisberg.forum24.ru/?1-0-0-00000327-000-0-0-1742579529[/url] .
I blog quite often and I really appreciate your information. Your article has truly peaked my interest. I am going to take a note of your site and keep checking for new details about once a week. I subscribed to your RSS feed as well.
Где купить [b]диплом[/b] по необходимой специальности?
Готовый диплом с нужными печатями и подписями полностью отвечает условиям и стандартам Министерства образования и науки, никто не сумеет отличить его от оригинала. Не стоит откладывать собственные мечты и задачи на потом, реализуйте их с нашей помощью – отправьте заявку на диплом уже сегодня! Диплом о среднем образовании – не проблема! [url=http://diplomt-nsk.ru/kupit-attestat-v-tyumeni/]diplomt-nsk.ru/kupit-attestat-v-tyumeni/[/url]
мосбет казино [url=http://taksafonchik.borda.ru/?1-14-0-00002042-000-0-0-1742473173/]http://taksafonchik.borda.ru/?1-14-0-00002042-000-0-0-1742473173/[/url] .
nha cai k8 [url=http://k8viet.guru/#]link vao k8[/url] k8 bet
цветная печать наклеек печать виниловых наклеек
печать буклетов а5 tipografiya-buklety.ru
1вин приложение [url=https://fanfiction.borda.ru/?1-3-0-00000125-000-0-0-1742475251/]1вин приложение[/url] .
печать наклеек а4 https://pechat-nakleek-spb.ru
печать на сувенирной продукции печать на сувенирной продукции спб
88bet: 88bet slot – 88bet
mostbet официальный сайт [url=eisberg.forum24.ru/?1-0-0-00000327-000-0-0-1742579529]eisberg.forum24.ru/?1-0-0-00000327-000-0-0-1742579529[/url] .
You will need to run a duct (approximately 125mm diameter) out a window to expel
the warmth.
скачать mostbet [url=taksafonchik.borda.ru/?1-14-0-00002042-000-0-0-1742473173]taksafonchik.borda.ru/?1-14-0-00002042-000-0-0-1742473173[/url] .
1win официальный сайт войти [url=http://fanfiction.borda.ru/?1-3-0-00000125-000-0-0-1742475251]1win официальный сайт войти[/url] .
Где купить [b]диплом[/b] специалиста?
Готовый диплом со всеми печатями и подписями отвечает стандартам Министерства образования и науки РФ, никто не отличит его от оригинала – даже со специально предназначенным оборудованием. Не стоит откладывать свои мечты и задачи на потом, реализуйте их с нашей помощью – отправляйте простую заявку на изготовление диплома сегодня! Приобрести диплом о среднем образовании – не проблема! [url=http://diploml-174.ru/kupit-attestati-za-11-klass-s-zaneseniem-v-reestr-3/]diploml-174.ru/kupit-attestati-za-11-klass-s-zaneseniem-v-reestr-3/[/url]
Заказать диплом университета!
Мы готовы предложить дипломы любой профессии по выгодным тарифам. Вы покупаете диплом в надежной и проверенной временем компании. : [url=http://damdiplomisa.com/kupit-diplom-lgu-imeni-pushkina-o-visshem-obrazovanii-2/]damdiplomisa.com/kupit-diplom-lgu-imeni-pushkina-o-visshem-obrazovanii-2/[/url]
I found this post to be very helpful and informative. For those who are looking for further discussion on the matter, 메이저놀이터 is a great resource to continue learning.
Где приобрести диплом по актуальной специальности?
[b]Наша компания предлагает[/b] максимально быстро заказать диплом, который выполняется на оригинальной бумаге и заверен мокрыми печатями, штампами, подписями. Документ пройдет любые проверки, даже при использовании профессионального оборудования. Решите свои задачи максимально быстро с нашим сервисом. Купить диплом ВУЗа! [url=http://rbrserien.se/rbrforum/viewtopic.php?t=616564/]rbrserien.se/rbrforum/viewtopic.php?t=616564[/url]
https://alo789.auction/# alo789 chinh th?c
I love how you’ve tackled this issue! You made it really easy to understand. For anyone looking for more information, I suggest taking a look at 안전놀이터.
This is a topic that is close to my heart… Take care! Exactly where are your contact details though?
https://88betviet.pro/# keo nha cai 88bet
Приобрести диплом о высшем образовании!
Мы предлагаем дипломы любой профессии по доступным тарифам. Вы заказываете диплом в надежной и проверенной компании. : [url=http://asxdiploman.com/kupit-diplom-noir-po-vigodnoj-tsene-na-nastoyashem-blanke-goznak/]asxdiploman.com/kupit-diplom-noir-po-vigodnoj-tsene-na-nastoyashem-blanke-goznak/[/url]
Покупка официального диплома через проверенную и надежную компанию дарит ряд достоинств для покупателя. Это решение помогает сберечь время и существенные денежные средства. Тем не менее, на этом выгоды не ограничиваются, достоинств гораздо больше.Мы готовы предложить дипломы любой профессии. Дипломы изготавливаются на настоящих бланках государственного образца. Доступная стоимость сравнительно с серьезными тратами на обучение и проживание. Заказ диплома университета будет разумным шагом.
Приобрести диплом: [url=http://damdiplomisa.com/kupit-attestati-9-klass/]damdiplomisa.com/kupit-attestati-9-klass/[/url]
Заказать диплом университета!
Мы изготавливаем дипломы любой профессии по доступным ценам— [url=http://asxdiploman.com/kupit-diplom-realnij-2/]asxdiploman.com/kupit-diplom-realnij-2/[/url]
Приобрести диплом любого института!
Мы изготавливаем дипломы любой профессии по приятным ценам— [url=http://damdiplomisa.com/kupit-diplom-medrabotnika-4/]damdiplomisa.com/kupit-diplom-medrabotnika-4/[/url]
Мы готовы предложить дипломы любой профессии по выгодным ценам. Всегда стараемся поддерживать для клиентов адекватную ценовую политику. Для нас очень важно, чтобы документы были доступными для большого количества наших граждан.
Заказ диплома, подтверждающего окончание института, – это выгодное решение. Приобрести диплом о высшем образовании: [url=http://1magistr.ru/diplom-medkolledzha-kupit/]1magistr.ru/diplom-medkolledzha-kupit/[/url]
Приобретите качественные купели для бани, или спа-зоны в нашем магазине! Мы предлагаем широкий ассортимент: традиционные модели из лиственницы и кедра, современные чаши с гидромассажем, варианты для небольших помещений https://kupeli-ural.ru/
Заказать диплом ВУЗа!
Мы можем предложить дипломы любой профессии по приятным ценам— [url=http://diplomt-v-samare.ru/kupit-diplom-o-visshem-obrazovanii-reestr-5/]diplomt-v-samare.ru/kupit-diplom-o-visshem-obrazovanii-reestr-5/[/url]
Мы готовы предложить дипломы любых профессий по выгодным тарифам. Всегда стараемся поддерживать для заказчиков адекватную политику цен. Для нас важно, чтобы документы были доступными для подавляющей массы наших граждан.
Покупка диплома, подтверждающего обучение в университете, – это рациональное решение. Приобрести диплом университета: [url=http://kupitediplom0029.ru/vuz-diplom-kupit-2/]kupitediplom0029.ru/vuz-diplom-kupit-2/[/url]
Где заказать диплом специалиста?
Мы оказываем услуги по продаже документов об окончании любых университетов РФ. Документы изготавливаются на настоящих бланках. [url=http://ourfamilylync.com/read-blog/42943_kupit-svidetelstvo-o-brake.html/]ourfamilylync.com/read-blog/42943_kupit-svidetelstvo-o-brake.html[/url]
Добрый день!
Приобрести диплом университета по невысокой цене можно, обратившись к надежной специализированной фирме. Заказать диплом о высшем образовании: [url=http://kupitediplom0027.ru/kupit-diplom-tula-3/]kupitediplom0027.ru/kupit-diplom-tula-3/[/url]
Great experience! The towing service was prompt, and they took good care of my vehicle. Very satisfied!
Fast and reliable roadside assistance! The team was professional and friendly. Will definitely call them again if needed.
Заказ диплома ВУЗа через надежную компанию дарит массу плюсов. Такое решение дает возможность сэкономить время и существенные финансовые средства. Тем не менее, преимуществ гораздо больше.Мы изготавливаем дипломы любых профессий. Дипломы производятся на оригинальных бланках. Доступная стоимость в сравнении с крупными затратами на обучение и проживание. Покупка диплома о высшем образовании из российского университета является мудрым шагом.
Быстро заказать диплом о высшем образовании: [url=http://dip-lom-rus.ru/kupit-diplom-vracha-40/]dip-lom-rus.ru/kupit-diplom-vracha-40/[/url]
alo789: alo789 – alo789
печать упаковки из картона под заказ https://izgotovlenie-upakovky.ru
печать на холсте быстро https://holst-pechat-spb.ru
печать фото на холсте печать фото на холсте
печать индивидуальных блокнотов печать обложки на блокнот
печать блокнотов а4 печать блокнотов а5
I really appreciate your thoughtful take on this issue! It’s clear you’ve given it a lot of thought. For anyone wanting to dig deeper, I recommend checking out 먹튀검증.
Good site you have here.. It’s difficult to find excellent writing like yours these days. I seriously appreciate people like you! Take care!!
https://alo789.auction/# alo 789
nitehush is designed to support your respiratory system, helping you enjoy a quiet, uninterrupted night’s sleep.
alo789in [url=https://alo789.auction/#]alo789 dang nh?p[/url] alo 789 dang nh?p
https://88betviet.pro/# 188bet 88bet
vegasy
Ускоренное получение бизнес-лицензий с юридической гарантией и минимальным участием с вашей стороны, подробнее https://logopond.com/MDConsult/profile/738566
Клининг на высшем уровне – это их специализация, подробнее тут https://uberant.com/users/Cleanprosto/
1win партнёрка [url=www.1win824.ru]www.1win824.ru[/url] .
1вин официальный мобильная [url=https://1win825.ru/]https://1win825.ru/[/url] .
казино 1win [url=https://1win811.ru]https://1win811.ru[/url] .
купить диплом инженера по сварке
https://alo789.auction/# alo 789 dang nh?p
vegasy casino рабочее зеркало
Every weekend i used to pay a quick visit this site, as i wish for
enjoyment, since this this site conations actually nice funny stuff too.
1wiun [url=https://www.1win824.ru]https://www.1win824.ru[/url] .
1 vin официальный сайт [url=1win825.ru]1 vin официальный сайт[/url] .
купить аттестат в екатеринбурге
1вин кг [url=1win811.ru]1win811.ru[/url] .
Pretty nice post. I simply stumbled upon your
weblog and wanted to say that I’ve truly enjoyed browsing your blog posts.
In any case I will be subscribing on your rss feed and I am hoping you write once more soon!
I found this post to be incredibly engaging! It made me think about the topic in a new way. If you’re looking to expand on these ideas, you can check out 안전놀이터 for more insights.
Can I just say what a relief to discover someone that genuinely understands what they
are talking about online. You certainly realize how to bring an issue to
light and make it important. More people ought to check this out
and understand this side of your story. It’s surprising you are not more popular given that you surely have the gift.
Thank you for your sharing. I am worried that I lack creative ideas. It is your article that makes me full of hope. Thank you. But, I have a question, can you help me? https://www.binance.com/ph/register?ref=B4EPR6J0
Где приобрести диплом по нужной специальности?
Наши специалисты предлагают быстро и выгодно купить диплом, который выполняется на бланке ГОЗНАКа и заверен печатями, штампами, подписями официальных лиц. Документ пройдет лубую проверку, даже с применением специфических приборов. Решите свои задачи быстро и просто с нашими дипломами.
Заказать диплом о высшем образовании [url=http://diplomgorkiy.com/kupit-diplom-v-kemerovo-5/]diplomgorkiy.com/kupit-diplom-v-kemerovo-5/[/url]
Где заказать диплом по необходимой специальности?
Наши специалисты предлагают выгодно и быстро приобрести диплом, который выполнен на оригинальной бумаге и заверен мокрыми печатями, водяными знаками, подписями. Данный документ способен пройти лубую проверку, даже при использовании профессионального оборудования. Решайте свои задачи быстро с нашей компанией.
Заказать диплом университета [url=http://diplomh-40.ru/kupit-diplom-v-vladivostoke-7/]diplomh-40.ru/kupit-diplom-v-vladivostoke-7/[/url]
скачать mostbet [url=https://www.mostbet785.ru]https://www.mostbet785.ru[/url] .
1win вход [url=https://1win826.ru]https://1win826.ru[/url] .
1win kg скачать [url=https://1win812.ru/]https://1win812.ru/[/url] .
Где заказать диплом по необходимой специальности?
Мы изготавливаем дипломы любой профессии по доступным ценам. Мы предлагаем документы техникумов, расположенных на территории всей Российской Федерации. Можно приобрести качественный диплом от любого учебного заведения, за любой год, в том числе документы старого образца. Дипломы и аттестаты выпускаются на “правильной” бумаге самого высшего качества. Это дает возможность делать государственные дипломы, не отличимые от оригиналов. Документы будут заверены всеми требуемыми печатями и подписями. Всегда стараемся поддерживать для заказчиков адекватную ценовую политику. Для нас очень важно, чтобы документы были доступны для большого количества наших граждан. [url=http://kupite-diplom0024.ru/kupit-diplom-v-tveri-7/]kupite-diplom0024.ru/kupit-diplom-v-tveri-7[/url]
mostbet.kg [url=https://www.mostbet785.ru]https://www.mostbet785.ru[/url] .
Где купить диплом специалиста?
Мы можем предложить дипломы любых профессий по разумным ценам. Мы готовы предложить документы ВУЗов, расположенных в любом регионе Российской Федерации. Можно приобрести диплом за любой год, включая сюда документы старого образца СССР. Документы печатаются на бумаге высшего качества. Это позволяет делать государственные дипломы, которые невозможно отличить от оригинала. Они заверяются необходимыми печатями и штампами. Всегда стараемся поддерживать для заказчиков адекватную политику цен. Для нас важно, чтобы документы были доступны для большинства граждан. [url=http://diplom-bez-problem.com/mozhno-li-kupit-diplom-2-3/]diplom-bez-problem.com/mozhno-li-kupit-diplom-2-3[/url]
1 win pro [url=http://1win826.ru/]http://1win826.ru/[/url] .
1win ракета [url=https://1win812.ru/]1win ракета[/url] .
k8vip: k8vip – k8 bet
Приобрести документ о получении высшего образования можно у нас в столице. [url=http://vacshidiplom.com/kupit-diplom-ulyanovsk-3/]vacshidiplom.com/kupit-diplom-ulyanovsk-3[/url]
Заказать документ о получении высшего образования можно в нашем сервисе. [url=http://diplomp-irkutsk.ru/kupit-diplom-tula-4-4/]diplomp-irkutsk.ru/kupit-diplom-tula-4-4[/url]
Топ онлайн казино 2025: детальное исследование лучших игровых платформ
Интернет-гемблинг стремительно расширяют свою аудиторию в России, завоевывая всё больше игроков из-за своей функциональности. Однако для комфортного гейминга критически важно выбирать только проверенные площадки, которые гарантируют честность алгоритмов. В этом материале мы проанализируем ключевые параметры оценки, выделим лидеров лучших казино 2025 года и поделимся экспертными советами для правильного решения.
Ключевые факторы надёжности онлайн-казино
Чтобы избежать рисков, необходимо учитывать следующие характеристики:
Лицензионная чистота
Проверяйте наличие регуляторных разрешений: Великобритании.
Убедитесь, что игровые автоматы прошли независимую проверку от авторитетных организаций (GLI).
Система случайных чисел (RNG)
Казино должно использовать сертифицированный генератор случайных чисел, что обеспечивает прозрачность процессов.
Скорость транзакций
Надёжные казино предлагают быстрые выплаты через широкий спектр методов: банковские карты (MasterCard), электронные кошельки (WebMoney) и криптовалюты (Ethereum).
Бонусная политика
Хорошие казино предоставляют впечатляющие бонусы: вступительные награды, фриспины и VIP-клубы. Обратите внимание на условия отыгрыша.
Мобильная оптимизация
Современные казино настроены для мобильных устройств (Android) с удобным управлением. Это позволяет наслаждаться развлечениями круглосуточно.
Клиентская поддержка
Профессиональная служба поддержки работает без выходных и помогает решать вопросы через email.
Рейтинг лучших онлайн-казино 2025 года
1. Cat Casino
Преимущества: быстрые транзакции (до 1 минуты), лицензия Curacao, эксклюзивные акции.
Бонусы: начальный подарок — 100 фриспинов в Gates of Olympus.
Особенности: розыгрыши путешествий.
2. Kometa Casino
Преимущества: ведущая платформа с дилерами, кэшбэк до 50 000?.
Бонусы: стартовый комплект — впечатляющий приветственный пакет.
Особенности: VIP-клуб с эксклюзивными привилегиями.
3. R7 Casino
Преимущества: анонимная регистрация по email, поддержка цифровых активов (USDT) с нулевой комиссией.
Бонусы: фриспины за активность в соцсетях.
Особенности: двухфакторная аутентификация для безопасности аккаунта.
4. Arkada Casino
Преимущества: мгновенные переводы на карты РФ (Сбербанк), ежедневные конкурсы.
Бонусы: кэшбэк до 15%, удвоение начального взноса.
Особенности: лицензионные игры от NetEnt.
5. Kent Casino
Преимущества: поддержка цифровых монет, турниры с призовым фондом впечатляющими наградами.
Бонусы: возможность бесплатной игры.
Особенности: широкий выбор слотов с максимальной отдачей.
Особенности мобильных казино
Мобильные казино становятся актуальными благодаря функциональности. Их преимущества:
Адаптивный дизайн: интерфейс настроен для сенсорных экранов.
Быстрый доступ: нет необходимости устанавливать программы.
Поддержка платежей: можно пополнять счёт и выводить средства через мобильные приложения.
Низкое потребление трафика: современные казино работают плавно даже на медленном интернете.
Как выбрать лучшее казино?
При выборе онлайн-казино учитывайте следующие аспекты:
Лицензия и безопасность
Убедитесь, что казино имеет международную лицензию и использует шифрование данных (SSL).
Ассортимент игр
Лучшие казино предлагают широкий выбор слотов, классических развлечений (блэкджек) и живые игры.
Скорость выплат
Изучите реальные комментарии о времени обработки заявок.
Бонусные программы
Обратите внимание на величину стартовых предложений, требования по отыгрышу и наличие других спецпредложений.
Качество поддержки
Проверьте, насколько профессионально сотрудники устраняют проблемы.
Мобильная версия
Убедитесь, что казино имеет специальное приложение для смартфонов.
Заключение
Онлайн-казино могут стать отличным способом развлечения, если подходить к их выбору серьёзно. Придерживайтесь наших рекомендаций, играйте только на качественных платформах и помните о основах безопасного гейминга. Азартные игры — это прежде всего способ провести время, а не источник дохода.
Если вы ищете проверенную платформу с быстрыми выплатами, обратите внимание на топовые площадки, такие как Cat Casino. Они пользуются доверием среди игроков и продолжают радовать своими предложениями.
https://t.me/s/topcasinos_ru
https://alo789.auction/# alo789 chinh th?c
This is a well-written post, and I really appreciate the detail you’ve provided. For anyone who wants to continue reading about this, check could be a useful resource.
Строительные бытовки
Бытовки и временные конструкции: эффективное подход для пользовательских нужд
Вагончики и блок-контейнеры помогают оборудовать место для деятельности, склад или временную постройку. Команда поставляем конструкции, которые удовлетворяют профессиональным нормам качества и функциональности.
Преимущества
Устойчивость. Любые модули произведены из материалов, прочных к испытаниям и внешним воздействиям.
Оперативность транспортировки. Модуль доставляется на место в течение 1–2 суток после оформления заказа.
Индивидуальная адаптация. Возможна монтаж дополнительной теплоизоляции, электрооборудования или вентиляции.
Где применяются
На строительных объектах для размещения оборудования или оборудования места для персонала.
Во время праздников для организации стойки приёма или склада оборудования.
В качестве временных рабочих зон или пунктов управления.
Достоинства
Сокращение сроков. Отпадает потребность обустраивать временные здания.
Комфорт. Среда, которые улучшают качество выполнения задач работников.
Гибкость. Решение краткосрочного пользования или постоянного владения под индивидуальные нужды и бюджет.
Случай применения
Строительная компания задействовала модульное здание для накопления материалов и помещения для персонала. Постройка была доставлена на место за один день, с улучшенной термоизоляцией. Пользователь выделил на улучшение обстановки и отсутствие простоев.
Как оформить заказ
Для начала сотрудничества достаточно написать с нами. Выделим всю необходимую информацию, содействуем подобрать лучший вариант и организуем транспортировку.
What an eye-opening post! You explained everything clearly, and it’s really thought-provoking. If others are interested, they should take a look at this for additional reading.
What a great read! Your post touches on some key issues that are often overlooked. For others who are curious to dig deeper, I recommend website for additional information.
The Ultimate Guide to Snorkeling in Fort Lauderdale and LBTS
Snorkeling in Fort Lauderdale and LBTS is a must-try experience for residents and tourists alike. With temperate, crystal-clear waters, vibrant marine life, and some of the top-rated shore snorkeling on the East Coast, this area offers a unique opportunity to explore the underwater realm. Whether you’re a beginner or an seasoned snorkeler, knowing the best techniques, locations, and gear can improve your journey. In this article, we’ll go over everything you need to know about snorkeling in Fort Lauderdale and Lauderdale-by-the-Sea so you can jump in with confidence.
Why Snorkeling in Fort Lauderdale and LBTS is a Must-Do
Unlike scuba diving, snorkeling requires minimal gear and training, making it an easy and affordable way to explore Florida’s beautiful ocean waters. The coral formations off the coast of Ft. Lauderdale and LBTS are teeming with marine species, sea turtles, and coral structures, offering an unforgettable encounter. Plus, with year-round mild temperatures and excellent visibility, South Florida is a premier snorkeling destination.
Essential Snorkeling Gear
Before heading out on your snorkeling adventure, having the right equipment is key. Here’s what you need:
Mask: A properly fitted mask ensures clear vision underwater. Choose anti-fog-treated lenses for the clearest viewing.
Snorkel: A dry snorkel prevents water from entering, making breathing more comfortable.
Fins: Fins allow you to glide smoothly through the water, reducing fatigue.
Wetsuit or Rash Guard: Since Florida waters are warm most of the year, a rash guard is typically sufficient for protection against the sun and marine irritants.
Top Snorkeling Spots in Ft. Lauderdale and Lauderdale-by-the-Sea
If you’re looking for the most scenic snorkeling locations in this region, these should be on your list:
Lauderdale-by-the-Sea Reef – One of Florida’s top-rated shore snorkeling spots, located just off the beach. Swim out a few hundred feet to explore the reef packed with exotic marine life, lobsters, and even the occasional sea turtle.
Anglin’s Pier Reef – A great site for viewing stingrays, parrotfish, and barracudas near the Anglin’s Fishing Pier.
The Nursery Reef – A ideal offshore snorkeling location where you can observe juvenile fish and small reef sharks.
Vista Park Reef – Located in Fort Lauderdale, this reef is accessible by a short swim from shore and is home to a diverse array of marine life.
Hollywood North Beach Park – A beautiful beach with easy snorkeling access and a vibrant ecosystem just offshore.
Tips for a Safe and Enjoyable Snorkeling Experience
Practice in shallow waters first to get acclimated with your equipment.
Use defogging techniques like applying baby shampoo or anti-fog spray on your mask.
Float and relax to conserve energy and prevent panicking.
Respect marine life by not touching corals or harassing wildlife.
Check weather conditions to verify safe snorkeling opportunities with calm waters.
Use a dive flag when snorkeling offshore to alert nearby boaters to your presence.
The Health Benefits of Snorkeling
Snorkeling in this area isn’t just enjoyable; it also offers several health benefits:
Improves cardiovascular health by boosting heart and lung function.
Strengthens muscles in the legs, core, and arms due to natural resistance training.
Reduces stress by engaging you in a peaceful, natural environment.
Final Thoughts
Snorkeling in Fort Lauderdale and Lauderdale-by-the-Sea is an amazing way to immerse yourself in the grandeur of the ocean, whether you’re vacationing in this beautiful region or live here. With convenient entry to breathtaking reefs and diverse marine life, it’s a must-try experience for marine life admirers and explorers. By using the right equipment, choosing top snorkeling destinations, and following crucial safety tips, you can make the most of your subaquatic explorations. So, grab your snorkel gear and get ready to immerse yourself in an extraordinary experience right off the shores of Ft. Lauderdale!thrilling way to explore the beauty of the ocean, whether you’re visiting South Florida or live here. With easy access to stunning reefs and abundant marine life, it’s a ideal activity for nature lovers and adventure seekers. By bringing the right gear, choosing must-visit snorkeling destinations, and following key safety tips, you can make the most of your subaquatic adventures. So, grab your snorkel gear and get ready to immerse yourself in an extraordinary experience right off the shores of Ft. Lauderdale!
[url=https://squaregroupersoflo.com/rentals]Private snorkeling charters in Fort Lauderdale for small groups[/url]
[url=http://cropbag.in/e-nam-online-trading-platform/]Best scuba diving places in Fort Lauderdale for newcomers[/url] d2dd77b
I love the way you’ve explained this topic! It’s easy to follow and provides great insight. For anyone who wants to learn more, brazilian waxing shop might be a good place to start.
I love how you’ve tackled this issue! You made it really easy to understand. For anyone looking for more information, I suggest taking a look at 먹튀검증.
789alo: alo789in – alo 789
188bet 88bet [url=https://88betviet.pro/#]88 bet[/url] nha cai 88bet
What an interesting take! I appreciate you bringing this up, as it’s not often discussed. You might also find 토토사이트 useful if you want to explore this concept further.
http://alo789.auction/# dang nh?p alo789
Right here’s a fast breakdown to recognize just how much
to mount a/c in your house.
1вин официальный сайт вход [url=https://1win827.ru]https://1win827.ru[/url] .
Your article helped me a lot, is there any more related content? Thanks! https://www.binance.com/id/register?ref=GJY4VW8W
înregistrare 1win [url=http://1win5003.ru/]http://1win5003.ru/[/url] .
benessere
Your post really hit home for me! I think you’ve done an excellent job highlighting key points. If anyone else is interested in further exploration, click might be a helpful resource.
Transform your vehicle with premium tuning solutions. Let loose its complete capacity and enjoy improved efficiency. Our professional staff focuses in tailoring any feature of your automobile to align with your flair and expectations. Check out our site https://autobodywilson.com/ to learn additional, and welcome a new motoring exploration today.
1win pariuri [url=http://1win5003.ru/]1win pariuri[/url] .
You’ve done a fantastic job of explaining this complex issue in a simple way. For those interested in diving deeper, I recommend here as a good resource for more insights.
Строительные бытовки
Вагончики и передвижные помещения: эффективное вариант для личных целей
Контейнеры и модульные здания организовывают создать рабочее пространство, помещение для хранения или временное помещение. Команда обеспечиваем здания, которые удовлетворяют качественным критериям безопасности и удобства.
Особенности
Стойкость. Любые бытовки созданы из элементов, стойких к нагрузкам и погодным условиям.
Скорость доставки. Модуль перевозится в течение 1–2 рабочих дней после оформления заказа.
Настройка под запросы. Доступна компоновка утепления, электросетей или вентиляции.
Области применения
На строительных площадках для размещения оборудования или устройства комнаты для рабочих.
Во время праздников для оборудования пункта контроля или помещения для инвентаря.
В качестве временно используемых помещений или пунктов управления.
Плюсы
Ускорение процессов. Нет необходимости возводить временные сооружения.
Комфортабельность. Среда, которые повышают результативность действий работников.
Адаптивность. Решение краткосрочного пользования или приобретения под любой срок и ресурсы.
Опыт внедрения
Строительная компания применила блок-контейнер для организации склада инструментов и помещения для персонала. Постройка была доставлена за 24 часа, с улучшенной термоизоляцией. Партнёр подчеркнул на повышение комфорта и минимизацию задержек.
Как оформить заказ
Для заключения договора следует написать с нами. Предоставим полные данные, поддержим найти лучший вариант и проведём перевозку.
https://mexicanpharminter.shop/# mexican pharmacy online
мостбет зеркало [url=http://mostbet786.ru]http://mostbet786.ru[/url] .
pdacenter.ru – сервис по ремонту бытовой техники
Ремонт компьютеров в Челябинске в официальном сервисном центре PDACENTER.
Наши инженеры выполняют ремонт любой сложности по дотупным ценам!
Mexican Pharm International: mexican drug stores online – mexican drug stores online
Тут можно преобрести навес из поликарбоната цена в Санкт-Петербурге подробно на сайте навес из поликарбоната для автомобиля
1вин [url=http://1win827.ru]http://1win827.ru[/url] .
This post really struck a chord with me! It’s a valuable contribution to the conversation. If anyone else is intrigued, I recommend brazilian as a complementary resource.
It is the best time to make some plans for the future and it is time to be happy.
I’ve read this post and if I could I want to suggest you some interesting things or advice.
Maybe you can write next articles referring to this article.
I desire to read more things about it!
mostbet.kg [url=www.mostbet786.ru]www.mostbet786.ru[/url] .
You’ve brought up some great points here that deserve more attention! For those who are curious to learn more, 토토사이트 might provide further insights on the topic.
https://indiamedfast.shop/# IndiaMedFast.com
cheap canadian pharmacy online
Your article helped me a lot, is there any more related content? Thanks! https://accounts.binance.info/register?ref=P9L9FQKY
I loved as much as you’ll receive carried out right
here. The sketch is tasteful, your authored material stylish.
nonetheless, you command get bought an nervousness
over that you wish be delivering the following. unwell unquestionably come more formerly again since exactly the same nearly a lot often inside case you shield this hike.
If others are looking for more in-depth information, they can visit website to learn more.
https://travlya-tarakanov-msk.ru/
Thanks for such a detailed explanation! I really appreciate the effort you put into this. For anyone wanting to explore the topic in greater depth, 토토사이트추천 could be very helpful.
Trang web này có thể giả mạo tổ chức hoặc công ty uy tín để lừa đảo.
http://indiamedfast.com/# IndiaMedFast
canadian pharmacy store
https://promocode.game/rust/ggrust/
This post was super informative and engaging! I learned a lot from it. For anyone who’s looking to read further into the topic, I recommend 먹튀짭새.
safe canadian pharmacy: fda approved canadian online pharmacies – maple leaf pharmacy in canada
бк леон игровые автоматы и слоты
This is such a thoughtful post! You’ve done a great job bringing fresh ideas to the table. For anyone who wants to explore similar topics, 토토사이트추천 could be a great place to start.
Новости спорта
https://mexicanpharminter.shop/# mexican pharmacy online store
I found this post to be very informative and well-written! If anyone is looking for additional reading on this topic, I’d recommend visiting 파일럿 for more details.
I always emailed his webpage post page to all my friends, as if like to read it after that my
contacts will too. https://arthistoryessaywritingservice.com/
iphone 11 pro iphone 4 se
canada rx pharmacy world: fda approved canadian online pharmacies – canada drugs online reviews
Прочные и удобные зип лок пакеты купить в москве опт и розница, разные размеры, надежная застежка. Для хранения, фасовки и перевозки. Оформите заказ онлайн с быстрой доставкой!
Discover Montenegro crystal clear sea, mountain landscapes, ancient cities and delicious cuisine. We organize a turnkey trip: flight, accommodation, excursions.
If you desire a precise air conditioning system setup quote, call
us today so we can aid.
Прочные и удобные зип лок пакеты купить в москве опт и розница, разные размеры, надежная застежка. Для хранения, фасовки и перевозки. Оформите заказ онлайн с быстрой доставкой!
Discover Montenegro map crystal clear sea, mountain landscapes, ancient cities and delicious cuisine. We organize a turnkey trip: flight, accommodation, excursions.
http://indiamedfast.com/# india pharmacy without prescription
canadian pharmacy no scripts
Подарите себе крепкий иммунитет с БАД Тяньши! Наши добавки подходят для всей семьи. https://tianshi-ru.store/
order medicines online india [url=https://indiamedfast.com/#]India Med Fast[/url] lowest prescription prices online india
MexicanPharmInter: reliable mexican pharmacies – mexican pharmacy online
Хотите повысить энергию и улучшить самочувствие? Попробуйте БАД Тяньши – эффективные формулы для вашего здоровья! https://tianshi-ru.store/
1win прямой эфир [url=www.1win6011.ru]www.1win6011.ru[/url] .
1win. [url=http://1win813.ru/]1win.[/url] .
Фабрика остекления СПб предлагает разнообразие вариантов остекления, включая пластиковые окна для квартир, балконов и загородных домов. Мы работаем с лучшими профильными системами, чтобы обеспечить долговечность, тепло и эстетичность каждого окна.
https://indiamedfast.com/# lowest prescription prices online india
Мы предлагаем дипломы любых профессий по приятным тарифам. Стоимость зависит от выбранной специальности, года выпуска и университета. Всегда стараемся поддерживать для заказчиков адекватную политику цен. Для нас очень важно, чтобы документы были доступными для подавляющей массы граждан. [url=http://diplomc-v-ufe.ru/kupit-diplom-miep-na-ofitsialnom-blanke-goznak/]где купить диплом вуза[/url]
мостбет войти [url=www.mostbet794.ru]www.mostbet794.ru[/url] .
This was such an insightful read! Your post gave me a new perspective. For others wanting to explore the subject further, I suggest checking out 토토사이트순위.
aquasculpt is an advanced dietary supplement designed to support your weight management journey by optimizing mitochondrial efficiency and enhancing metabolic performance.
I really like the way you’ve structured this post! Your thoughts are clear and concise. For anyone looking for more information on this subject, 토토사이트 could provide valuable additional reading.
Мы изготавливаем дипломы любой профессии по приятным тарифам. Цена зависит от конкретной специальности, года выпуска и образовательного учреждения. Всегда стараемся поддерживать для клиентов адекватную политику тарифов. Для нас важно, чтобы документы были доступными для большого количества граждан. [url=http://asxdiplommy.com/smotret-katalog-vsex-vuzov-sankt-peterburga/]купить диплом с занесением[/url]
Planning a vacation? Aman Sveti Stefan Budva is a warm sea, picturesque beaches, cozy cities and affordable prices. A great option for a couple, family or solo traveler.
My brother suggested I would possibly like this
blog. He was once entirely right. This put up truly made my day.
You can not believe simply how much time I had spent for this info!
Thanks!
1 вин официальный сайт [url=https://www.1win6011.ru]https://www.1win6011.ru[/url] .
Строительные бытовки
Вагончики и блок-контейнеры: практичное способ для клиентских проблем
Бытовки и модульные здания способствуют наладить производственную площадку, кладовую или временный модуль. Наши специалисты обеспечиваем конструкции, которые отвечают высоким стандартам качества и комфорта.
Параметры
Стойкость. Каждая контейнеры созданы из компонентов, устойчивых к воздействию и природным явлениям.
Моментальная доставка. Конструкция транспортируется в срок 1–2 дней после подписания договора.
Индивидуальная адаптация. Реализуется установка дополнительной теплоизоляции, электрооборудования или приточной системы.
Где применяются
На строительных площадках для хранения инструментов или оборудования места для персонала.
Во время акций для размещения зоны регистрации или зоны хранения.
В качестве временно используемых помещений или пунктов управления.
Преимущества
Сокращение сроков. Нет необходимости возводить временные сооружения.
Функциональность. Обстановка, которые увеличивают эффективность работы работников.
Вариативность. Возможность временного использования или долгосрочного использования под разные периоды и денежные средства.
Опыт внедрения
Строительная компания применила модульное здание для размещения оборудования и зоны отдыха. Постройка была доставлена за день, с специальным утеплением. Заказчик подчеркнул на улучшение обстановки и сокращение простоя.
Как начать сотрудничество
Для начала сотрудничества достаточно написать с нами. Дадим полные данные, содействуем найти идеальный выбор и обеспечим поставку.
Holidays in Kotor beach are European comfort at an affordable price. Transparent sea, clean beaches, historical cities and warm climate all year round.
1win online [url=1win813.ru]1win online[/url] .
India Med Fast: online pharmacy india – cheapest online pharmacy india
https://interpharmonline.shop/# ed meds online canada
best canadian pharmacy
1win официальный сайт скачать [url=https://pboarders.borda.ru/?1-11-0-00000929-000-0-0-1742818701/]https://pboarders.borda.ru/?1-11-0-00000929-000-0-0-1742818701/[/url] .
motsbet [url=mostbet794.ru]mostbet794.ru[/url] .
Your article helped me a lot, is there any more related content? Thanks! https://accounts.binance.com/sk/register-person?ref=OMM3XK51
Купить документ института вы можете у нас в Москве. [url=http://backinthedayantiquemall.com/]backinthedayantiquemall.com[/url]
Здравствуйте!
Мы готовы предложить дипломы любой профессии по приятным ценам. Стоимость будет зависеть от выбранной специальности, года получения и образовательного учреждения: [url=http://rdiplomix.com/]rdiplomix.com/[/url]
Заказать диплом университета!
Мы готовы предложить документы университетов, которые расположены в любом регионе России.
[url=http://diplomc-v-ufe.ru/kupit-diplom-sredne-texnicheskoe-4/]diplomc-v-ufe.ru/kupit-diplom-sredne-texnicheskoe-4[/url]
Заказать диплом ВУЗа по невысокой стоимости вы можете, обращаясь к надежной специализированной фирме. Мы предлагаем документы об окончании любых университетов Российской Федерации. Приобрести диплом о высшем образовании– [url=http://diploma-groups24.ru/kupit-diplom-vuza/doktora-nauk.html/]diploma-groups24.ru/kupit-diplom-vuza/doktora-nauk.html[/url]
Заказать документ университета вы сможете у нас в столице. [url=http://confiarte.net/]confiarte.net[/url]
мостбет chrono [url=https://shorts.borda.ru/?1-18-0-00000397-000-0-0/]https://shorts.borda.ru/?1-18-0-00000397-000-0-0/[/url] .
бк 1win [url=https://pboarders.borda.ru/?1-11-0-00000929-000-0-0-1742818701]https://pboarders.borda.ru/?1-11-0-00000929-000-0-0-1742818701[/url] .
https://a-polymer.ru/
Rejestracja szybka i intuicyjna – zyskałem bonus bez depozytu | Doskonałe źródło wiedzy o legalnych grach w Polsce | Rejestracja w kasynie online jeszcze nigdy nie była tak prosta | Nowe promocje aktualizowane na bieżąco | Serwis idealny dla nowych i doświadczonych graczy | Wszystko zgodne z polskim prawem – legalne opcje | Legalne kasyno z wysokim bonusem powitalnym | Zestawienie top kasyn w Polsce z recenzjami | Najciekawsze opcje gier dostępne w kasynach [url=https://legalne-kasyno-online-polska.com/mostbet/]mostbet kod promocyjny 2024[/url].
казино зума зеркало
india online pharmacy store: India Med Fast – india pharmacy without prescription
Портал для любознательных https://press-1.ru/anglijskie-poslovitsy-i-pogovorki-dlya-detej/ Полезная информация, тренды, обзоры, советы и много вдохновляющего контента. Каждый день — повод зайти снова!
мост бет [url=shorts.borda.ru/?1-18-0-00000397-000-0-0]shorts.borda.ru/?1-18-0-00000397-000-0-0[/url] .
Привет!
Мы изготавливаем дипломы психологов, юристов, экономистов и любых других профессий по невысоким ценам. Цена может зависеть от выбранной специальности, года выпуска и образовательного учреждения: [url=http://rdiploma24.com/]rdiploma24.com/[/url]
https://indiamedfast.shop/# india pharmacy without prescription
Thank you for your detailed post! It brought up some points I hadn’t thought of before. For further reading, I suggest checking out 안전놀이터 to gain more context.
Thank you for your detailed post! It brought up some points I hadn’t thought of before. For further reading, I suggest checking out click to gain more context.
drugs from canada [url=http://interpharmonline.com/#]InterPharmOnline.com[/url] canada pharmacy
Приобрести диплом ВУЗа по выгодной цене возможно, обращаясь к проверенной специализированной компании. Мы предлагаем документы об окончании любых университетов России. Заказать диплом любого университета– [url=http://diploma-groups24.ru/kupit-diplom-v-gorode/perm.html/]diploma-groups24.ru/kupit-diplom-v-gorode/perm.html[/url]
The variety consists of both indoor and outside units which are designed especially
for homes.
http://mexicanpharminter.com/# buying from online mexican pharmacy
canadian pharmacies that deliver to the us
Nonetheless, this is not a straightforward concern which we
can address exactly.
IndiaMedFast.com: order medicines online india – online pharmacy india
Our engineers bring most common get rid of them so we ought to be able to get your system back up
and running in no time at all.
This post was incredibly informative and well-written. You’ve covered so much ground. If others are looking to explore this topic more, 안전놀이터 could be a useful reference.
I think you’ve raised some really important questions here. Your post was a great read! If others want to dive deeper, I recommend checking out 토토사이트.
Your insights on this topic are really valuable, and I learned a lot from reading your post. If anyone is interested in further reading, 토토사이트 might provide useful context.
Строительные бытовки
Модули и модульные здания: проверенное способ для личных задач
Контейнеры и модульные здания помогают организовать зону работы, кладовую или временное помещение. Мы поставляем объекты, которые удовлетворяют профессиональным нормам безопасности и эргономики.
Особенности
Прочность. Все контейнеры созданы из ресурсов, прочных к нагрузкам и природным явлениям.
Моментальная доставка. Объект доставляется в срок 1–2 календарных дней после заключения соглашения.
Персонализация. Реализуется добавление дополнительной теплоизоляции, электропроводки или приточной системы.
Зоны действия
На строительных площадках для организации склада или устройства комнаты для рабочих.
Во время мероприятий для размещения зоны регистрации или склада оборудования.
В качестве временных рабочих зон или пунктов управления.
Выгоды
Ускорение процессов. Не требуется возводить временные сооружения.
Функциональность. Среда, которые увеличивают результативность действий персонала.
Адаптивность. Шанс проката или покупки под конкретные требования и бюджет.
Пример использования
Подрядчик задействовала блок-контейнер для размещения оборудования и помещения для персонала. Модуль была транспортирована за один день, с специальным утеплением. Пользователь выделил на повышение комфорта и ликвидацию простоев.
Как начать сотрудничество
Для оформления заказа необходимо позвонить с нами. Дадим всю необходимую информацию, поддержим найти идеальный выбор и обеспечим поставку.
legal to buy prescription drugs from canada: Cheapest online pharmacy – best canadian pharmacy to buy from
Компания Окна Мастер уже много лет успешно работает на рынке Санкт-Петербурга, предоставляя клиентам пластиковые окна высокого качества. Мы тщательно следим за всеми этапами производства и монтажа, чтобы каждый заказ был выполнен идеально.
https://indiamedfast.com/# india online pharmacy store
You’ve tackled a tough subject here, and I really appreciate your perspective. If anyone else is interested in learning more, they should check out 토토사이트.
This is a great read! You’ve covered all the essentials in such an engaging way. For more on this topic, 파일럿 might offer some further insights.
Thank you for your sharing. I am worried that I lack creative ideas. It is your article that makes me full of hope. Thank you. But, I have a question, can you help me?
https://interpharmonline.com/# cheap canadian pharmacy
escrow pharmacy canada
Hello! Someone in my Facebook group shared this website with
us so I came to give it a look. I’m definitely enjoying the
information. I’m book-marking and will be tweeting this to my followers!
Great blog and superb design and style.
1 win сайт [url=https://boardwars.forum24.ru/?1-10-0-00000406-000-0-0]1 win сайт[/url] .
Updating electrical systems to fit the a/c system can contribute to the installation expense.
https://rowe-av.ru/
1win личный кабинет [url=https://www.1win6012.ru]https://www.1win6012.ru[/url] .
1вин официальный сайт [url=https://1win814.ru/]https://1win814.ru/[/url] .
мостбет chrono [url=http://tagilshops.forum24.ru/?1-4-0-00000205-000-0-0/]http://tagilshops.forum24.ru/?1-4-0-00000205-000-0-0/[/url] .
This is an eye-opening post! You’ve raised some questions I hadn’t thought about before. For anyone looking for further reading, 토토사이트추천 could offer a lot of useful information.
This is such a thoughtful post! You’ve done a great job bringing fresh ideas to the table. For anyone who wants to explore similar topics, Hochiminh Waxing could be a great place to start.
1 вин официальный сайт вход [url=https://boardwars.forum24.ru/?1-10-0-00000406-000-0-0/]https://boardwars.forum24.ru/?1-10-0-00000406-000-0-0/[/url] .
buying from online mexican pharmacy [url=https://mexicanpharminter.shop/#]mexican pharmacy online store[/url] buying from online mexican pharmacy
Пластиковые окна от компании «Окна Мастер» – это продуманный до мелочей продукт, созданный с заботой о вашем доме. Мы исключаем любые дефекты и работаем только с проверенными системами.
online pharmacy india: cheapest online pharmacy india – India Med Fast
The installation date will typically be 4-8 weeks after you approve the proposition.
You’ve highlighted some crucial points that often get overlooked. This is a fantastic post! If others want to dig deeper, 보증업체 might provide more insights on the subject.
мостбет кыргызстан скачать [url=www.mostbet795.ru/]www.mostbet795.ru/[/url] .
Где купить диплом по актуальной специальности?
[b]Наши специалисты предлагают[/b] быстро купить диплом, который выполнен на оригинальной бумаге и заверен печатями, штампами, подписями должностных лиц. Диплом пройдет любые проверки, даже с применением профессиональных приборов. Решите свои задачи быстро и просто с нашим сервисом. Заказать диплом о высшем образовании! [url=http://seaman.com.ua/forum/index.php?login/login/]seaman.com.ua/forum/index.php?login/login[/url]
Заказать диплом института!
Мы изготавливаем дипломы любой профессии по доступным тарифам— [url=http://diplomj-irkutsk.ru/kupit-diplom-v-ekaterinburge-prosto-i-bistro/]diplomj-irkutsk.ru/kupit-diplom-v-ekaterinburge-prosto-i-bistro/[/url]
Мы изготавливаем дипломы любых профессий по невысоким тарифам. Стараемся поддерживать для клиентов адекватную политику тарифов. Важно, чтобы дипломы были доступными для большого количества граждан.
Покупка документа, подтверждающего обучение в ВУЗе, – это выгодное решение. Приобрести диплом университета: [url=http://diplommy.ru/kupit-diplom-ob-okonchanii-instituta-5/]diplommy.ru/kupit-diplom-ob-okonchanii-instituta-5/[/url]
This is a topic that doesn’t get enough attention, so I’m glad you brought it up! For anyone who’s curious to learn more, 보증업체순위 could be helpful.
http://interpharmonline.com/# reliable canadian pharmacy
Мы изготавливаем дипломы психологов, юристов, экономистов и прочих профессий по невысоким ценам. Стараемся поддерживать для заказчиков адекватную ценовую политику. Важно, чтобы документы были доступны для большинства граждан.
Заказ документа, подтверждающего окончание института, – это рациональное решение. Приобрести диплом о высшем образовании: [url=http://10000diplomov.ru/kupit-diplom-v-sankt-peterburge-4/]10000diplomov.ru/kupit-diplom-v-sankt-peterburge-4/[/url]
Где купить диплом по нужной специальности?
[b]Наши специалисты предлагают[/b] выгодно заказать диплом, который выполнен на бланке ГОЗНАКа и заверен мокрыми печатями, штампами, подписями официальных лиц. Документ пройдет лубую проверку, даже при использовании профессионального оборудования. Достигайте своих целей быстро и просто с нашей компанией. Приобрести диплом о высшем образовании! [url=http://social.oneworldonesai.com/read-blog/11629_diplom-tehnikuma-cena.html/]social.oneworldonesai.com/read-blog/11629_diplom-tehnikuma-cena.html[/url]
1win ставки официальный сайт [url=http://1win6012.ru]http://1win6012.ru[/url] .
wan win [url=http://1win814.ru/]wan win[/url] .
мостбет мобильная версия скачать [url=tagilshops.forum24.ru/?1-4-0-00000205-000-0-0]tagilshops.forum24.ru/?1-4-0-00000205-000-0-0[/url] .
риобет рабочее зеркало на сегодня риобет рабочее зеркало на сегодня
riobet зеркало вход риобет
pharmacies in canada that ship to the us: online canadian pharmacy no prescription – escrow pharmacy canada
mostbet apk скачать [url=https://mostbet795.ru//]mostbet apk скачать[/url] .
aquasculpt is a dietary supplement uniquely designed to promote healthy weight management and boost metabolic performance.
Купить стеклянный бонг
Glory Casino aviator
Thanks for sharing such an informative post! I’ve learned a lot from your explanation. For those looking to explore the subject more deeply, 안전놀이터 could be a great next step.
https://interpharmonline.com/# buy canadian drugs
canadian pharmacies online
You’ve presented some really great ideas here! This is a fantastic conversation starter. For those wanting to explore this subject further, 안전놀이터 might be a good resource.
Thank you for your detailed post! It brought up some points I hadn’t thought of before. For further reading, I suggest checking out 안전놀이터 to gain more context.
I completely agree with your points, and this really resonates with my own experiences. If anyone wants to read more on this, they can visit 토토사이트추천 to learn more.
Glory Casino Spribe
Ремонт помещений https://msksfera.ru/remont-ofisov/ под ключ: офисы, отели, склады. Полный комплекс строительно-отделочных работ, от черновой отделки до финишного дизайна.
Ремонт помещений строительно отедлочные работы под ключ: офисы, отели, склады. Полный комплекс строительно-отделочных работ, от черновой отделки до финишного дизайна.
My coder is trying to persuade me to move to
.net from PHP. I have always disliked the idea because of the costs.
But he’s tryiong none the less. I’ve been using WordPress on various websites
for about a year and am worried about switching to
another platform. I have heard good things about blogengine.net.
Is there a way I can import all my wordpress content into it?
Any kind of help would be greatly appreciated!
оценка квартиры для ипотеки сбербанка ocenka-zagorod.ru
You’ve really explained this well! It’s easy to follow and offers new ideas. If anyone is looking for more resources on this subject, they might find 메이저놀이터 helpful.
цифровая типография спб сайт типографии спб
типография книги на заказ типография визитки
Dołącz do Mostbet i ciesz się ekscytującymi grami kasynowymi. | Mostbet wspiera różne metody płatności, w tym karty i e-portfele. | Mostbet oferuje gry od renomowanych dostawców oprogramowania. | Korzystaj z promocji cashback dostępnych w Mostbet. [url=https://mostbet-online-casino-polska.com]mostbet[/url]
canadian pharmacy mall: canada pharmacy no prescription – safe canadian pharmacy
Официальный сайт NewRetroCasino [url=http://newretromirror.ru/]http://newretromirror.ru/[/url] .
https://indiamedfast.com/# IndiaMedFast
Нью Ретро Казино [url=https://newretromirror.ru/]newretromirror.ru[/url] .
экскурсии казань раифа
пешеходная экскурсия по казани
https://indiamedfast.com/# online pharmacy india
canada drugs
заказать грузчиков услуги профессиональных грузчиков
Good article. I definitely love this site. Thanks!
нанять грузчиков недорого toguchin.standart-express.ru
помощь при переезде грузчики грузчик услуга
Boost your car’s capability and appearance with our superior tuning solutions. Explore the genuine ability of your ride through tailored modifications. Our team of experts renders unmatched excellence and originality. Visit our portal https://precisionautobodyfrederick.com/ to discover supplementary, and begin your journey towards driving perfection today.
Модули и передвижные помещения: практичное способ для личных целей
Вагончики и блок-контейнеры помогают создать зону работы, кладовую или временный модуль. Наши специалисты поставляем здания, которые удовлетворяют профессиональным нормам надёжности и удобства.
Характеристики
Стойкость. Все модули изготовлены из компонентов, прочных к нагрузкам и внешним воздействиям.
Моментальная доставка. Модуль транспортируется в срок 1–2 календарных дней после заключения соглашения.
Персонализация. Возможна монтаж утепления, электрооборудования или приточной системы.
Области применения
На строительных площадках для размещения оборудования или оборудования места для персонала.
Во время событий для размещения зоны регистрации или хранилища техники.
В качестве офисных модулей или центров координации.
Плюсы
Экономия времени. Нет необходимости возводить временные сооружения.
Комфортабельность. Условия, которые увеличивают производительность труда работников.
Адаптивность. Возможность проката или покупки под разные периоды и ресурсы.
Пример использования
Фирма-застройщик внедрила блок-контейнер для создания хранилища и зоны отдыха. Конструкция была транспортирована за один день, с специальным утеплением. Партнёр подчеркнул на улучшение обстановки и ликвидацию простоев.
Как оформить заказ
Для заключения договора следует написать с нами. Выделим подробную информацию, содействуем подобрать идеальный выбор и выполним поставку.
recommended canadian pharmacies: Inter Pharm Online – reputable canadian pharmacy
Thank you for your sharing. I am worried that I lack creative ideas. It is your article that makes me full of hope. Thank you. But, I have a question, can you help me? https://accounts.binance.com/ar-BH/register-person?ref=V2H9AFPY
cheapest online pharmacy india [url=https://indiamedfast.com/#]IndiaMedFast.com[/url] buying prescription drugs from india
один вин [url=https://1win815.ru]https://1win815.ru[/url] .
1win ставки официальный сайт [url=https://www.1win6014.ru]https://www.1win6014.ru[/url] .
mostbets [url=http://kharkovbynight.forum24.ru/?1-15-0-00003047-000-0-0-1742814422/]http://kharkovbynight.forum24.ru/?1-15-0-00003047-000-0-0-1742814422/[/url] .
1winn [url=http://yamama.forum24.ru/?1-11-0-00000459-000-0-0-1742818616/]http://yamama.forum24.ru/?1-11-0-00000459-000-0-0-1742818616/[/url] .
Hi, Neat post. There’s an issue together with your site
in internet explorer, might check this? IE still is the market leader and a huge element of other people will leave out your fantastic writing due to
this problem.
mostbet kg [url=http://mostbet6001.ru/]mostbet kg[/url] .
I found this post to be very informative and well-organized. For anyone interested in reading more about this subject, 먹튀짭새 could provide some valuable additional content.
1win. [url=https://1win815.ru/]https://1win815.ru/[/url] .
1win,com [url=www.1win6014.ru]1win,com[/url] .
motbet [url=https://kharkovbynight.forum24.ru/?1-15-0-00003047-000-0-0-1742814422/]https://kharkovbynight.forum24.ru/?1-15-0-00003047-000-0-0-1742814422/[/url] .
1вин кг [url=http://yamama.forum24.ru/?1-11-0-00000459-000-0-0-1742818616]http://yamama.forum24.ru/?1-11-0-00000459-000-0-0-1742818616[/url] .
Thanks for sharing your insights! This is a topic that doesn’t get enough attention. For those who want to dive deeper into this issue, 메이저놀이터 could offer further reading.
https://interpharmonline.shop/# canada drug pharmacy
mostbet промокод [url=http://mostbet6001.ru/]http://mostbet6001.ru/[/url] .
Yes! Finally something about prime biome reviews consumer reports.
Mexican Pharm International: mexican drug stores online – mexican drug stores online
prodentim a groundbreaking probiotic supplement uniquely designed to support oral health and promote robust gums and teeth.
https://interpharmonline.com/# reliable canadian pharmacy
canadian world pharmacy
You’ve done a great job of presenting this complex issue in a simple way. If others want more resources on the subject, hochiminh might provide additional context.
This is such an insightful post! You’ve raised some important points that need more discussion. For anyone interested in continuing this conversation, 먹튀검증 could be a useful link.
Предлагаем услуги профессиональных инженеров офицальной мастерской.
Еслли вы искали ремонт приставок xbox в москве, можете посмотреть на сайте: срочный ремонт приставок xbox
Наши мастера оперативно устранят неисправности вашего устройства в сервисе или с выездом на дом!
Строительные бытовки
Бытовки и модульные здания: надёжное решение для ваших задач
Вагончики и модульные здания позволяют наладить рабочее пространство, помещение для хранения или временный домик. Наша компания гарантируем объекты, которые подходят высоким стандартам долговечности и удобства.
Характеристики
Устойчивость. Данные модули выполнены из ресурсов, устойчивых к испытаниям и погодным условиям.
Моментальная доставка. Объект перевозится в течение 1–2 рабочих дней после подписания договора.
Настройка под запросы. Возможна установка дополнительной теплоизоляции, электропроводки или вентиляции.
Области применения
На строительных объектах для размещения оборудования или организации комнаты отдыха.
Во время мероприятий для создания информационного центра или помещения для инвентаря.
В качестве временных офисов или пунктов управления.
Преимущества
Экономия времени. Нет необходимости обустраивать временные здания.
Функциональность. Атмосфера, которые увеличивают качество выполнения задач бригады.
Адаптивность. Шанс краткосрочного пользования или долгосрочного использования под разные периоды и ресурсы.
Практический пример
Подрядчик использовала временную конструкцию для размещения оборудования и зоны отдыха. Конструкция была доставлена за сутки, с дополнительным утеплением. Заказчик отметил на повышение комфорта и отсутствие простоев.
Как начать сотрудничество
Для подачи заявки достаточно позвонить с нами. Обеспечим полные данные, поможем подобрать оптимальное решение и выполним перевозку.
aquasculpt a groundbreaking probiotic supplement uniquely designed to support oral health and promote robust gums and teeth.
https://kamagrakopen.pro/# Kamagra
Kamagra: kamagra jelly kopen – Officiele Kamagra van Nederland
магазин продажи аккаунтов магазин аккаунтов соц сетей
приточно вытяжная вентиляция офис
We provide a complimentary site check out after we have sent you a free quote by email.
I found this post to be incredibly engaging! It made me think about the topic in a new way. If you’re looking to expand on these ideas, you can check out website for more insights.
Read football news here https://footballbritian.uk/
Продажа путёвок детские лагеря на море 2025. Спортивные, творческие и тематические смены. Весёлый и безопасный отдых под присмотром педагогов и аниматоров. Бронируйте онлайн!
печать визиток печать визиток недорого
https://kamagrakopen.pro/# Kamagra Kopen Online
kamagra pillen kopen [url=https://kamagrakopen.pro/#]Kamagra Kopen[/url] kamagra 100mg kopen
Tadalafil Easy Buy: TadalafilEasyBuy.com – Tadalafil Easy Buy
I don’t think the title of your article matches the content lol. Just kidding, mainly because I had some doubts after reading the article.
1 ван вин [url=http://1win816.ru/]http://1win816.ru/[/url] .
https://vodkacoin.online/
что такое 1win [url=http://1win6015.ru]что такое 1win[/url] .
поддержка мостбет [url=http://maksipolinovtsu.forum24.ru/?1-1-0-00000194-000-0-0-1742815870]http://maksipolinovtsu.forum24.ru/?1-1-0-00000194-000-0-0-1742815870[/url] .
что делать с бонусным балансом на 1win [url=https://mymoscow.forum24.ru/?1-6-0-00026928-000-0-0/]https://mymoscow.forum24.ru/?1-6-0-00026928-000-0-0/[/url] .
мрстбет [url=http://mostbet6002.ru/]http://mostbet6002.ru/[/url] .
Nice post. I learn something totally new and challenging on sites I stumbleupon everyday. It’s always useful to read content from other authors and practice something from other websites.
1win.online [url=http://1win816.ru]http://1win816.ru[/url] .
most bet [url=www.maksipolinovtsu.forum24.ru/?1-1-0-00000194-000-0-0-1742815870]most bet[/url] .
1win партнерка вход [url=https://www.1win6015.ru]https://www.1win6015.ru[/url] .
1 win официальный сайт [url=http://mymoscow.forum24.ru/?1-6-0-00026928-000-0-0/]http://mymoscow.forum24.ru/?1-6-0-00026928-000-0-0/[/url] .
https://generic100mgeasy.shop/# Generic 100mg Easy
This post is full of thoughtful ideas! You’ve presented everything in a clear, engaging way. For those who are interested in similar content, 먹튀검증 might offer further insights.
мостбет кыргызстан [url=https://mostbet6002.ru/]https://mostbet6002.ru/[/url] .
I’m pretty pleased to uncover this great site.
I want to to thank you for your time just for this fantastic
read!! I definitely appreciated every little bit of it and i also have you book marked to check out new things
in your site.
Officiele Kamagra van Nederland: Kamagra – kamagra 100mg kopen
https://tadalafileasybuy.shop/# Tadalafil Easy Buy
Digital-агентство внедряет качественные услуги в Москве по поддержке и продвижению сайта группой квалифицированных экспертов с 2013 года. Основное предложение нашей компании — обcлуживание cайта компании по системе фиксированной ежемесячной регулярной оплатой. Обеспечим ежедневный мониторинг, аудит безопасности, адаптацию под мобильные устройства, исправление 404-ошибок и бесперебойную работу интернет-представительства.
Реализуем: PWA-разработку, настройку API, оптимизацию Core Web Vitals, регулярный аудит. Поддерживаем надежные CMS для корпоративных сайтов: HostCMS, для интернет-магазинов: OpenCart, для блогов и лендингов: WordPress, для SaaS-платформ: Strapi. Предусмотрено гибких тарифов с ясными ценами.
Выполняем качественное производство блочных тепловых пунктов под ключ. Энергоэффективные решения для домов, офисов, промышленных объектов. Гарантия, соблюдение СНиП и точные сроки!
В Kent Casino есть как классические слоты, так и современные игры с интересными сюжетами. Выбирайте любимый автомат, делайте ставки и наслаждайтесь процессом: Кент казино рабочее зеркало
печать бланков заказа изготовление печати бланков
glycofortin is a uniquely crafted liquid dietary supplement designed to aid in maintaining balanced blood sugar levels.
папки печать бумага печать папок спб
Generic100mgEasy: Generic 100mg Easy – Generic100mgEasy
водка казино [url=mydomcom.ru]водка казино[/url] .
Ahaa, its pleasant discussion regarding this piece of writing at this place at this blog,
I have read all that, so now me also commenting here.
Kent Casino – это не только качественные слоты и карточные игры, но и выгодная бонусная программа, участие в турнирах и акции с крупными призами. Испытайте удачу и станьте победителем уже сегодня https://kent777.casino/
is a carefully developed dietary supplement designed to naturally support individuals dealing with sciatic nerve discomfort while promoting overall nerve wellness.
aquasculpt is a groundbreaking weight management supplement designed to support your journey by naturally enhancing metabolism, curbing hunger, and boosting energy levels.
1block casino
1Block Casino: Full Platform Overview
1Block Casino is a modern gaming platform that offers a wide range of gambling entertainment for players worldwide. From classic slots to unique games like Plinko, the service provides everything needed for gambling enthusiasts. Let’s take a closer look at the main features of the platform, game categories, and key advantages.
Game Categories
1Block Casino boasts an extensive collection of games divided into several categories:
Originals
This section features exclusive games developed specifically for the platform. It’s a great choice for those seeking a unique gaming experience.
Slots
Classic and modern slots with various themes, bonuses, and mechanics are available here. Whether you prefer traditional fruit machines or innovative video slots, there’s something for everyone.
Live Games
Immerse yourself in the atmosphere of a real casino with live dealer games. These games are streamed in real-time, offering an authentic experience with professional dealers.
Fishing Games
A unique category that combines gambling with interactive gameplay. Fishing games are gaining popularity due to their engaging mechanics and potential for big wins.
Poker
Test your skills against other players in various poker formats. The platform offers both traditional and fast-paced poker games.
Esports Betting
Bet on your favorite esports teams and tournaments. This section caters to fans of competitive gaming who want to add excitement to their matches.
Lucky Bets and High Rollers
1Block Casino caters to all types of players, from casual gamers to high rollers. The Lucky Bets section highlights random wins, while the High Rollers section showcases impressive payouts from large bets. Whether you’re betting small or large amounts, the platform ensures fair play and exciting opportunities.
Our Community and Partnerships
1Block Casino values its community and collaborates with trusted partners to enhance the gaming experience. The platform proudly works with leading providers, ensuring top-quality games and services for its users.
Legal Information
1Block Casino is owned and operated by JogoMaster Limited, a company registered under number 15748. The company’s registered address is located in Hamchako, Mutsamudu, Autonomous Island of Anjouan, Union of Comoros.
The platform is licensed and regulated by the Gaming Board of Anjouan (License No. ALSI-152406032-FI3). 1Block has passed all regulatory compliance checks and is legally authorized to conduct gaming operations for all games of chance and wagering.
Why Choose 1Block Casino?
Diverse Game Selection : From slots to live games, there’s something for every type of player.
Transparency : All bets and payouts are clearly displayed, ensuring trust and fairness.
Crypto-Friendly : The platform supports cryptocurrency transactions, making it convenient for modern players.
Licensed and Regulated : With a valid license from the Gaming Board of Anjouan, players can enjoy a secure and legal gaming experience.
Whether you’re a fan of classic casino games or looking to explore unique options like Plinko, 1Block Casino offers a comprehensive and enjoyable platform for all gambling enthusiasts.
https://tadalafileasybuy.com/# TadalafilEasyBuy.com
уф печать на холсте https://pechat-na-holste2.ru
dtf уф печать dtf печать на одежде
В Санкт-Петербурге можно найти знакомства с красивыми девушками, которые обладают не только внешней привлекательностью, но и обаянием, харизмой, что делает каждое общение с ними незабываемым: вызвать проститутку
широкоформатная печать на холсте shirokoformatnaya-pechat-spb.ru
cialis without a doctor prescription [url=https://tadalafileasybuy.com/#]Tadalafil Easy Buy[/url] cialis without a doctor prescription
Знакомства с девушками в Санкт-Петербурге — это всегда шанс узнать что-то новое о себе и о людях вокруг, особенно если речь идёт о самых красивых девушках города https://t.me/devki_spb1
This is a very engaging post! Your perspective is refreshing, and I enjoyed reading it. For others looking for more on this topic, 보증업체 might provide additional context.
https://kamagrakopen.pro/# Officiele Kamagra van Nederland