

Deploy AWS Cloudformation Template Using AWS CLI | Launch EC2 With Security Group & User Data & Mapping


Table of contents
- ❗️❗️❗️ Pre-Requisite ❗️❗️❗️
- 🎨 Diagrammatic Representation 🎨
- 🌟Launch EC2 Instance With Security Group🌟
- 👁🗨👁🗨 YouTube Tutorial 📽
- 🌟Launch EC2 Instance With Security Group & Userdata🌟
- 👁🗨👁🗨 YouTube Tutorial 📽
- 🌟Launch EC2 Instance With Security Group, Mappings & Parameters🌟
- ❗️❗️Important AWS Documentation To Be Viewed❗️❗️
- 🥁🥁 Conclusion 🥁🥁
- 💫Cloudformation Series Sequence💫
- ⌛️Realtime Usecases Cloudformation Templates⏳
- 👨🏻💻Cloudformation Github Repository👨🏻💻
Welcome back to the series of AWS Cloudformation For Beginners 👨🏻💻. In this blog I have covered 3 usecases in which we will create
✦ Ubuntu EC2 instance with security group.
✦ Ubuntu EC2 instance with Security group & Userdata.
✦ Ubuntu EC2 instance with Security group & Mappings.
If you are a beginner and want to start your journey towards infra-as-code developer as part of your devops role buckle up 🚴♂️ and lets get started and understand core cloudformation concepts by implementing it...🎬
❗️❗️❗️ Pre-Requisite ❗️❗️❗️
1️⃣ Add visual studio code extension [Mandatory]
2️⃣ Adding VS Code Indentation Extension For Cloudformation Templates [Optional]
3️⃣ Deploy VPC, IGW & Associate [Mandatory]
4️⃣ Deploy only public subnet template from below blog [Mandatory]
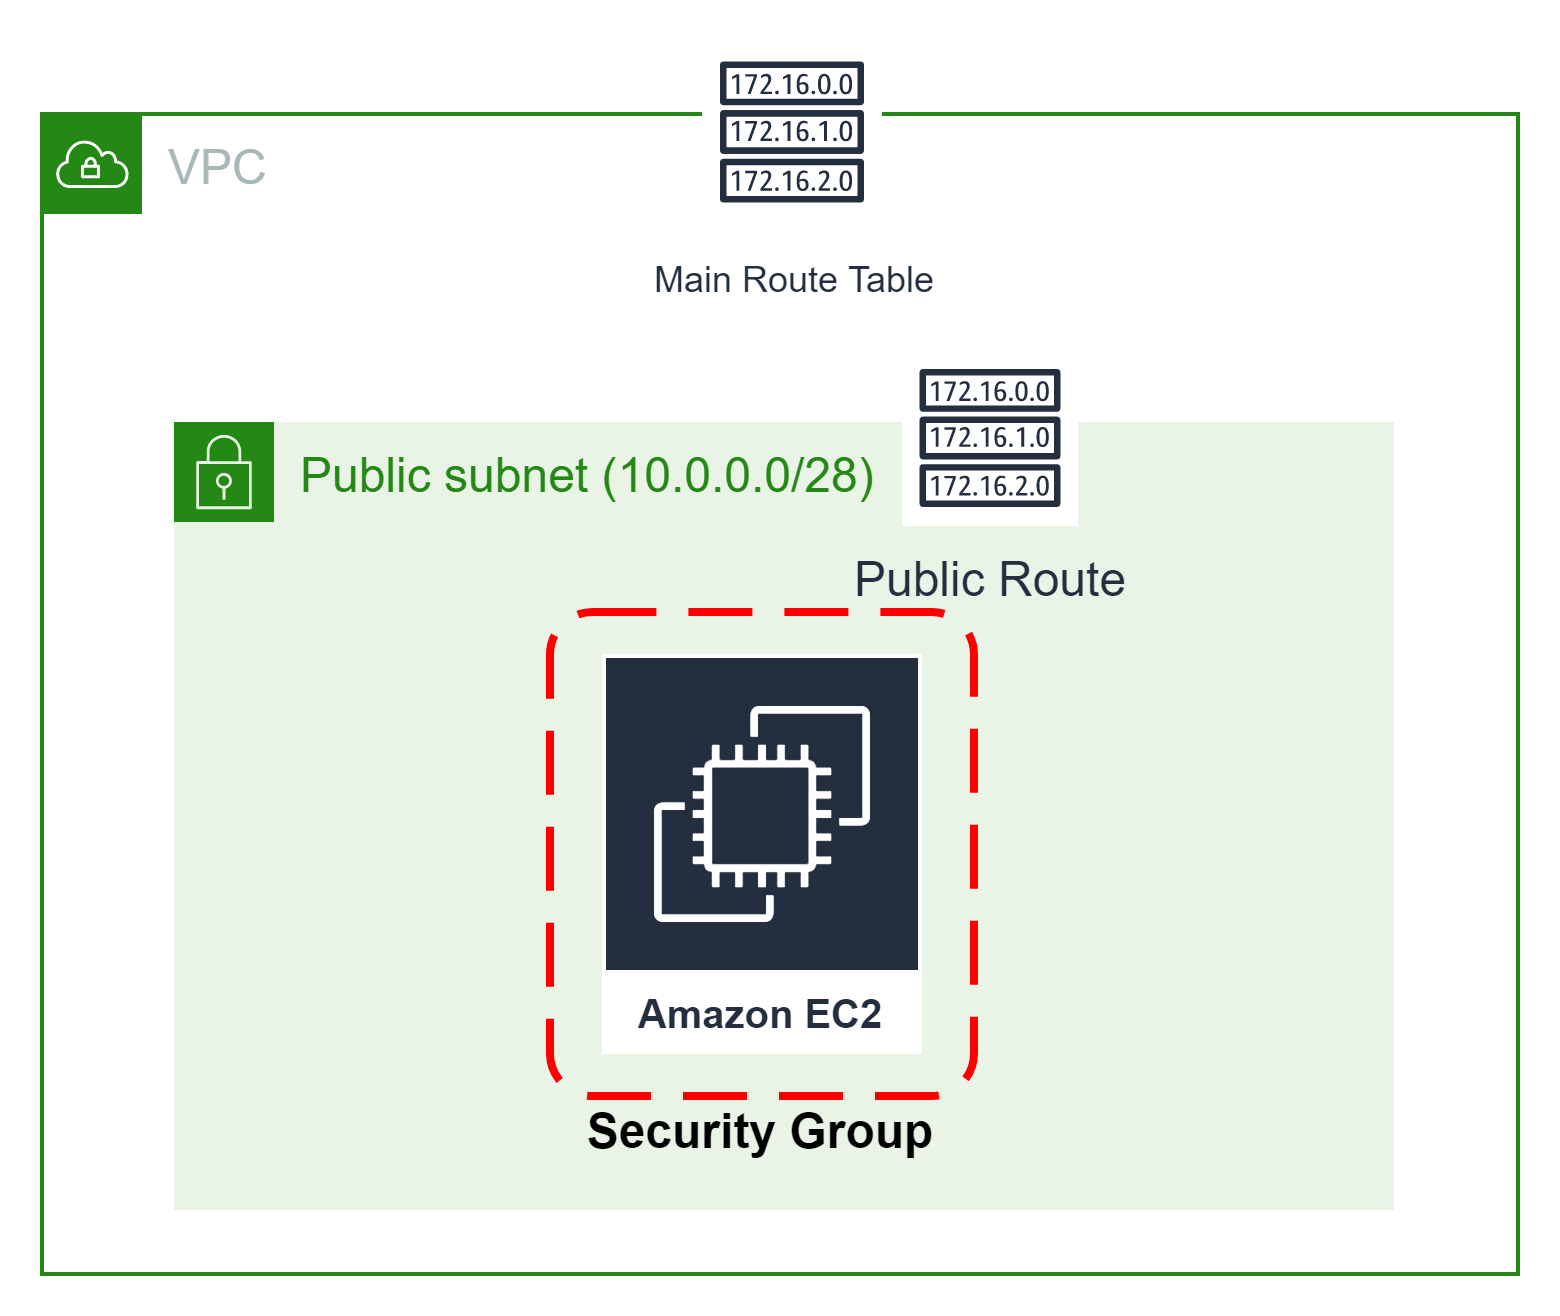
🎨 Diagrammatic Representation 🎨
🌟Launch EC2 Instance With Security Group🌟
🔳 Resources
✦ UbuntuInstance:- As part of this resource we use type "AWS::EC2::Instance".
➖ ImageId:- This property is used to mention EC2 image ID based on which you want to launch your EC2 Instance.
➖ KeyName:- This property is used to mention keynameby using which you can connect to your EC2 instance.
➖ InstanceType:- This property is used to mention which type of instance you want to launch smal/medium/large based on your requirement.
➖ SecurityGroupIds:- This property is used to add list of security group you want to attach to your EC2 instance for enabling access control based on your security requirements.
➖ Tags:- One of the most important property used in all resources. Always make sure to attach tags for all your resources.
✦ InstanceSecurityGroup:- Creating Security group and enabling ingress with http and ssh port.
➖ GroupName:- This property is used to mention security group name.
➖ GroupDescription:- This property is used to mention security group description and its mandatory property for this resource.
➖ SecurityGroupIngress:- This property is used to add ingress rules for [udp/tcp] ports enabled secured access to your resources.
➖ Tags:- One of the most important property used in all resources. Alaways make sure to attach tags for all your resources.
🔳 Outputs: Its always a best practice to print output for your resources.
✦ outputmyUbuntuInstance: A reference to the created EC2 Instance.
✦ outputInstanceSecurityGroup:- A reference to the created Security Group
Resources:
  InstanceSecurityGroup:
    Type: AWS::EC2::SecurityGroup
    Properties:
      GroupName: AllowEC2Traffic
      GroupDescription: Enable SSH access and HTTP access on the inbound port
      SecurityGroupIngress:
        - IpProtocol: tcp
          FromPort: 80
          ToPort: 80
          CidrIp: 0.0.0.0/0
        - IpProtocol: tcp
          FromPort: 22
          ToPort: 22
          CidrIp: 0.0.0.0/0
      Tags:
        - Key: Name
          Value: InstanceSecurityGroup
  UbuntuInstance:
    Type: AWS::EC2::Instance
    Properties:
      KeyName: "<Key Name>"
      ImageId: "ami-04505e74c0741db8d"
      InstanceType: <Instance Type>
      SecurityGroupIds:
        - !GetAtt "InstanceSecurityGroup.GroupId"
      Tags:
        - Key: Name
          Value: UbuntuInstance
Outputs:
 outputInstanceSecurityGroup:
  Description: A reference to the created security group
  Value: !Ref InstanceSecurityGroup
 outputUbuntuInstance:
  Description: A reference to the created EC2 Instance
  Value: !Ref UbuntuInstance
To view entire github code click here
1️⃣ Lets validate our template 👨💻
aws cloudformation validate-template --template-body file://<file path>
2️⃣ After successful template verification lets create stack using our template 👨💻
aws cloudformation create-stack --stack-name ec2 --template-body file://<file path>
3️⃣ Check if the stack we created via template is completed successfully 👨💻
aws cloudformation list-stack-resources --stack-name ec2
4️⃣ Describe stack and its resources to view its properties 👨💻
aws cloudformation describe-stacks --stack-name ec2
aws cloudformation describe-stack-resources --stack-name ec2
5️⃣ Check events for stack formation 👨💻
aws cloudformation describe-stack-events --stack-name ec2
👁🗨👁🗨 YouTube Tutorial 📽
🌟Launch EC2 Instance With Security Group & Userdata🌟
🔳 Resources
✦ UbuntuInstance:- As part of this resource we use type "AWS::EC2::Instance".
➖ ImageId:- This property is used to mention EC2 image ID based on which you want to launch your EC2 Instance.
➖ KeyName:- This property is used to mention keynameby using which you can connect to your EC2 instance.
➖ InstanceType:- This property is used to mention which type of instance you want to launch smal/medium/large based on your requirement.
➖ SecurityGroupIds:- This property is used to add list of security group you want to attach to your EC2 instance for enabling access control based on your security requirements.
➖ Tags:- One of the most important property used in all resources. Always make sure to attach tags for all your resources.
➖ User Data: User data is user data/commands that you can specify at the time of launching your instance. These data/command executes after your EC2 instance starts.
You don’t need to SSH into your EC2 instance and run those command one by one. Rather all you need is to specify the whole script in the user data section and they get executed once your instance boots up. You can use AWS CloudFormation to automatically install, configure, and start applications on Amazon EC2 instances. Doing so enables you to easily replicate deployments and update existing installations without connecting directly to the instance, which can save you a lot of time and effort.
✦ InstanceSecurityGroup:- Creating Security group and enabling ingress with http and ssh port.
➖ GroupName:- This property is used to mention security group name.
➖ GroupDescription:- This property is used to mention security group description and its mandatory property for this resource.
➖ SecurityGroupIngress:- This property is used to add ingress rules for [udp/tcp] ports enabled secured access to your resources.
➖ Tags:- One of the most important property used in all resources. Always make sure to attach tags for all your resources.
🔳 Outputs: Its always a best practice to print output for your resources.
✦ outputmyUbuntuInstance: A reference to the created EC2 Instance.
✦ outputInstanceSecurityGroup:- A reference to the created Security Group
Resources:
  InstanceSecurityGroup:
    Type: AWS::EC2::SecurityGroup
    Properties:
      GroupDescription: Enable SSH access and HTTP access on the inbound port
      GroupName: AllowAllTraffic
      SecurityGroupIngress:
        - IpProtocol: tcp
          FromPort: 80
          ToPort: 80
          CidrIp: 0.0.0.0/0
        - IpProtocol: tcp
          FromPort: 22
          ToPort: 22
          CidrIp: 0.0.0.0/0
  UbuntuInstance:
    Type: 'AWS::EC2::Instance'
    Properties:
      ImageId: "ami-04505e74c0741db8d"
      InstanceType: t2.micro
      KeyName: <Add your keyname>
      Tags:
        - Key: Name
          Value: "Ubuntu"
      SecurityGroupIds: !Ref InstanceSecurityGroup
      UserData:
        Fn::Base64:
          !Sub |
            #!/bin/bash
            sudo apt-get update -y
            sudo apt-get install -y apache2
            sudo ufw allow -y 'Apache'
            sudo systemctl start apache2
            sudo systemctl enable apache2
            echo Hello World from $(hostname -f) > /var/www/html/index.html
Outputs:
  outputInstanceSecurityGroup:
    Description: A reference to the created security group
    Value: !Ref InstanceSecurityGroup
  outputUbuntuInstance:
    Description: A reference to the created EC2 Instance
    Value: !Ref UbuntuInstance
To view entire github code click here
1️⃣ Lets validate our template 👨💻
aws cloudformation validate-template --template-body file://<file path>
2️⃣ After successful template verification lets create stack using our template 👨💻
aws cloudformation create-stack --stack-name ec2withuserdata --template-body file://<file path>
3️⃣ Check if the stack we created via template is completed successfully 👨💻
aws cloudformation list-stack-resources --stack-name ec2withuserdata
4️⃣ Describe stack and its resources to view its properties 👨💻
aws cloudformation describe-stacks --stack-name ec2withuserdata
aws cloudformation describe-stack-resources --stack-name ec2withuserdata
5️⃣ Check events for stack formation 👨💻
aws cloudformation describe-stack-events --stack-name ec2withuserdata
👁🗨👁🗨 YouTube Tutorial 📽
🌟Launch EC2 Instance With Security Group, Mappings & Parameters🌟
🔳 Parameters
✦ InstanceType :- Using this parameter we are going to provide list of instance type so that preferred instance type can be selected from the list.
🔳 Mappings:- The optional Mappings section matches a key to a corresponding set of named values. For example, if you want to set values based on a region, you can create a mapping that uses the region name as a key and contains the values you want to specify for each specific region. You use the Fn::FindInMap intrinsic function to retrieve values in a map.
➖ AWSInstanceType2Arch
➖ AWSInstanceType2NATArch
➖ AWSRegionArch2AMI
🔳 Resources
✦ UbuntuInstance:- As part of this resource we use type "AWS::EC2::Instance".
➖ ImageId:- This property is used to mention EC2 image ID based on which you want to launch your EC2 Instance.
➖ KeyName:- This property is used to mention keynameby using which you can connect to your EC2 instance.
➖ InstanceType:- This property is used to mention which type of instance you want to launch smal/medium/large based on your requirement.
➖ SecurityGroupIds:- This property is used to add list of security group you want to attach to your EC2 instance for enabling access control based on your security requirements.
➖ Tags:- One of the most important property used in all resources. Always make sure to attach tags for all your resources.
➖ User Data: User data is user data/commands that you can specify at the time of launching your instance. These data/command executes after your EC2 instance starts.
You don’t need to SSH into your EC2 instance and run those command one by one. Rather all you need is to specify the whole script in the user data section and they get executed once your instance boots up. You can use AWS CloudFormation to automatically install, configure, and start applications on Amazon EC2 instances. Doing so enables you to easily replicate deployments and update existing installations without connecting directly to the instance, which can save you a lot of time and effort.
✦ InstanceSecurityGroup:- Creating Security group and enabling ingress with http and ssh port.
➖ GroupName:- This property is used to mention security group name.
➖ GroupDescription:- This property is used to mention security group description and its mandatory property for this resource.
➖ SecurityGroupIngress:- This property is used to add ingress rules for [udp/tcp] ports enabled secured access to your resources.
➖ Tags:- One of the most important property used in all resources. Always make sure to attach tags for all your resources.
🔳 Outputs: Its always a best practice to print output for your resources.
✦ outputmyUbuntuInstance: A reference to the created EC2 Instance.
✦ outputInstanceSecurityGroup:- A reference to the created Security Group
✦ InstanceId:- InstanceId of the newly created EC2 instance.
✦ AZ :- Availability Zone of the newly created EC2 instance.
✦ PublicDNS:- Public DNSName of the newly created EC2 instance.
✦ PublicIP:- Public IP address of the newly created EC2 instance.
Parameters:
  InstanceType:
    Description: WebServer EC2 instance type
    Type: String
    Default: t2.small
    AllowedValues:
    - t1.micro
    - t2.nano
    - t2.micro
    - t2.small
    - t2.medium
    - t2.large
    - m1.small
    - m1.medium
    - m1.large
    - m1.xlarge
    - m2.xlarge
    - m2.2xlarge
    - m2.4xlarge
    - m3.medium
    - m3.large
    - m3.xlarge
    - m3.2xlarge
    - m4.large
    - m4.xlarge
    - m4.2xlarge
    - m4.4xlarge
    - m4.10xlarge
    - c1.medium
    - c1.xlarge
    - c3.large
    - c3.xlarge
    - c3.2xlarge
    - c3.4xlarge
    - c3.8xlarge
    - c4.large
    - c4.xlarge
    - c4.2xlarge
    - c4.4xlarge
    - c4.8xlarge
    - g2.2xlarge
    - g2.8xlarge
    - r3.large
    - r3.xlarge
    - r3.2xlarge
    - r3.4xlarge
    - r3.8xlarge
    - i2.xlarge
    - i2.2xlarge
    - i2.4xlarge
    - i2.8xlarge
    - d2.xlarge
    - d2.2xlarge
    - d2.4xlarge
    - d2.8xlarge
    - hi1.4xlarge
    - hs1.8xlarge
    - cr1.8xlarge
    - cc2.8xlarge
    - cg1.4xlarge
    ConstraintDescription: must be a valid EC2 instance type.
Mappings:
  AWSInstanceType2Arch:
    t1.micro:
      Arch: HVM64
    t2.nano:
      Arch: HVM64
    t2.micro:
      Arch: HVM64
    t2.small:
      Arch: HVM64
    t2.medium:
      Arch: HVM64
    t2.large:
      Arch: HVM64
    m1.small:
      Arch: HVM64
    m1.medium:
      Arch: HVM64
    m1.large:
      Arch: HVM64
    m1.xlarge:
      Arch: HVM64
    m2.xlarge:
      Arch: HVM64
    m2.2xlarge:
      Arch: HVM64
    m2.4xlarge:
      Arch: HVM64
    m3.medium:
      Arch: HVM64
    m3.large:
      Arch: HVM64
    m3.xlarge:
      Arch: HVM64
    m3.2xlarge:
      Arch: HVM64
    m4.large:
      Arch: HVM64
    m4.xlarge:
      Arch: HVM64
    m4.2xlarge:
      Arch: HVM64
    m4.4xlarge:
      Arch: HVM64
    m4.10xlarge:
      Arch: HVM64
    c1.medium:
      Arch: HVM64
    c1.xlarge:
      Arch: HVM64
    c3.large:
      Arch: HVM64
    c3.xlarge:
      Arch: HVM64
    c3.2xlarge:
      Arch: HVM64
    c3.4xlarge:
      Arch: HVM64
    c3.8xlarge:
      Arch: HVM64
    c4.large:
      Arch: HVM64
    c4.xlarge:
      Arch: HVM64
    c4.2xlarge:
      Arch: HVM64
    c4.4xlarge:
      Arch: HVM64
    c4.8xlarge:
      Arch: HVM64
    g2.2xlarge:
      Arch: HVMG2
    g2.8xlarge:
      Arch: HVMG2
    r3.large:
      Arch: HVM64
    r3.xlarge:
      Arch: HVM64
    r3.2xlarge:
      Arch: HVM64
    r3.4xlarge:
      Arch: HVM64
    r3.8xlarge:
      Arch: HVM64
    i2.xlarge:
      Arch: HVM64
    i2.2xlarge:
      Arch: HVM64
    i2.4xlarge:
      Arch: HVM64
    i2.8xlarge:
      Arch: HVM64
    d2.xlarge:
      Arch: HVM64
    d2.2xlarge:
      Arch: HVM64
    d2.4xlarge:
      Arch: HVM64
    d2.8xlarge:
      Arch: HVM64
    hi1.4xlarge:
      Arch: HVM64
    hs1.8xlarge:
      Arch: HVM64
    cr1.8xlarge:
      Arch: HVM64
    cc2.8xlarge:
      Arch: HVM64
  AWSInstanceType2NATArch:
    t1.micro:
      Arch: NATHVM64
    t2.nano:
      Arch: NATHVM64
    t2.micro:
      Arch: NATHVM64
    t2.small:
      Arch: NATHVM64
    t2.medium:
      Arch: NATHVM64
    t2.large:
      Arch: NATHVM64
    m1.small:
      Arch: NATHVM64
    m1.medium:
      Arch: NATHVM64
    m1.large:
      Arch: NATHVM64
    m1.xlarge:
      Arch: NATHVM64
    m2.xlarge:
      Arch: NATHVM64
    m2.2xlarge:
      Arch: NATHVM64
    m2.4xlarge:
      Arch: NATHVM64
    m3.medium:
      Arch: NATHVM64
    m3.large:
      Arch: NATHVM64
    m3.xlarge:
      Arch: NATHVM64
    m3.2xlarge:
      Arch: NATHVM64
    m4.large:
      Arch: NATHVM64
    m4.xlarge:
      Arch: NATHVM64
    m4.2xlarge:
      Arch: NATHVM64
    m4.4xlarge:
      Arch: NATHVM64
    m4.10xlarge:
      Arch: NATHVM64
    c1.medium:
      Arch: NATHVM64
    c1.xlarge:
      Arch: NATHVM64
    c3.large:
      Arch: NATHVM64
    c3.xlarge:
      Arch: NATHVM64
    c3.2xlarge:
      Arch: NATHVM64
    c3.4xlarge:
      Arch: NATHVM64
    c3.8xlarge:
      Arch: NATHVM64
    c4.large:
      Arch: NATHVM64
    c4.xlarge:
      Arch: NATHVM64
    c4.2xlarge:
      Arch: NATHVM64
    c4.4xlarge:
      Arch: NATHVM64
    c4.8xlarge:
      Arch: NATHVM64
    g2.2xlarge:
      Arch: NATHVMG2
    g2.8xlarge:
      Arch: NATHVMG2
    r3.large:
      Arch: NATHVM64
    r3.xlarge:
      Arch: NATHVM64
    r3.2xlarge:
      Arch: NATHVM64
    r3.4xlarge:
      Arch: NATHVM64
    r3.8xlarge:
      Arch: NATHVM64
    i2.xlarge:
      Arch: NATHVM64
    i2.2xlarge:
      Arch: NATHVM64
    i2.4xlarge:
      Arch: NATHVM64
    i2.8xlarge:
      Arch: NATHVM64
    d2.xlarge:
      Arch: NATHVM64
    d2.2xlarge:
      Arch: NATHVM64
    d2.4xlarge:
      Arch: NATHVM64
    d2.8xlarge:
      Arch: NATHVM64
    hi1.4xlarge:
      Arch: NATHVM64
    hs1.8xlarge:
      Arch: NATHVM64
    cr1.8xlarge:
      Arch: NATHVM64
    cc2.8xlarge:
      Arch: NATHVM64
  AWSRegionArch2AMI:
    af-south-1:
      HVM64: ami-064cc455f8a1ef504
      HVMG2: NOT_SUPPORTED
    ap-east-1:
      HVM64: ami-f85b1989
      HVMG2: NOT_SUPPORTED
    ap-northeast-1:
      HVM64: ami-0b2c2a754d5b4da22
      HVMG2: ami-09d0e0e099ecabba2
    ap-northeast-2:
      HVM64: ami-0493ab99920f410fc
      HVMG2: NOT_SUPPORTED
    ap-northeast-3:
      HVM64: ami-01344f6f63a4decc1
      HVMG2: NOT_SUPPORTED
    ap-south-1:
      HVM64: ami-03cfb5e1fb4fac428
      HVMG2: ami-0244c1d42815af84a
    ap-southeast-1:
      HVM64: ami-0ba35dc9caf73d1c7
      HVMG2: ami-0e46ce0d6a87dc979
    ap-southeast-2:
      HVM64: ami-0ae99b503e8694028
      HVMG2: ami-0c0ab057a101d8ff2
    ca-central-1:
      HVM64: ami-0803e21a2ec22f953
      HVMG2: NOT_SUPPORTED
    cn-north-1:
      HVM64: ami-07a3f215cc90c889c
      HVMG2: NOT_SUPPORTED
    cn-northwest-1:
      HVM64: ami-0a3b3b10f714a0ff4
      HVMG2: NOT_SUPPORTED
    eu-central-1:
      HVM64: ami-0474863011a7d1541
      HVMG2: ami-0aa1822e3eb913a11
    eu-north-1:
      HVM64: ami-0de4b8910494dba0f
      HVMG2: ami-32d55b4c
    eu-south-1:
      HVM64: ami-08427144fe9ebdef6
      HVMG2: NOT_SUPPORTED
    eu-west-1:
      HVM64: ami-015232c01a82b847b
      HVMG2: ami-0d5299b1c6112c3c7
    eu-west-2:
      HVM64: ami-0765d48d7e15beb93
      HVMG2: NOT_SUPPORTED
    eu-west-3:
      HVM64: ami-0caf07637eda19d9c
      HVMG2: NOT_SUPPORTED
    me-south-1:
      HVM64: ami-0744743d80915b497
      HVMG2: NOT_SUPPORTED
    sa-east-1:
      HVM64: ami-0a52e8a6018e92bb0
      HVMG2: NOT_SUPPORTED
    us-east-1:
      HVM64: ami-032930428bf1abbff
      HVMG2: ami-0aeb704d503081ea6
    us-east-2:
      HVM64: ami-027cab9a7bf0155df
      HVMG2: NOT_SUPPORTED
    us-west-1:
      HVM64: ami-088c153f74339f34c
      HVMG2: ami-0a7fc72dc0e51aa77
    us-west-2:
      HVM64: ami-01fee56b22f308154
      HVMG2: ami-0fe84a5b4563d8f27
Resources:
  InstanceSecurityGroup:
    Type: AWS::EC2::SecurityGroup
    Properties:
      GroupDescription: Enable SSH access and HTTP access on the inbound port
      GroupName: AllowAllTraffic
      SecurityGroupIngress:
        - IpProtocol: tcp
          FromPort: 80
          ToPort: 80
          CidrIp: 0.0.0.0/0
        - IpProtocol: tcp
          FromPort: 22
          ToPort: 22
          CidrIp: 0.0.0.0/0
  EC2Instance:
    Type: AWS::EC2::Instance
    Properties:
      InstanceType: !Ref: InstanceType
      SecurityGroups:
      KeyName: !Ref KeyName
      ImageId:
        Fn::FindInMap:
        - AWSRegionArch2AMI
        - Ref: AWS::Region
        - Fn::FindInMap:
          - AWSInstanceType2Arch
          - Ref: InstanceType
          - Arch
Outputs:
  outputInstanceSecurityGroup:
    Description: A reference to the created security group
    Value: !Ref InstanceSecurityGroup
  outputInstanceId:
    Description: InstanceId of the newly created EC2 instance
    Value:
      Ref: EC2Instance
  outputAZ:
    Description: Availability Zone of the newly created EC2 instance
    Value:
      Fn::GetAtt:
      - EC2Instance
      - AvailabilityZone
  outputPublicDNS:
    Description: Public DNSName of the newly created EC2 instance
    Value:
      Fn::GetAtt:
      - EC2Instance
      - PublicDnsName
  outputPublicIP:
    Description: Public IP address of the newly created EC2 instance
    Value:
      Fn::GetAtt:
      - EC2Instance
      - PublicIp
To view entire github code click here
1️⃣ Lets validate our template 👨💻
aws cloudformation validate-template --template-body file://<file path>
2️⃣ After successful template verification lets create stack using our template 👨💻
aws cloudformation create-stack --stack-name ec2withmapping --template-body file://<file path>
3️⃣ Check if the stack we created via template is completed successfully 👨💻
aws cloudformation list-stack-resources --stack-name ec2withmapping
4️⃣ Describe stack and its resources to view its properties 👨💻
aws cloudformation describe-stacks --stack-name ec2withmapping
aws cloudformation describe-stack-resources --stack-name ec2withmapping
5️⃣ Check events for stack formation 👨💻
aws cloudformation describe-stack-events --stack-name ec2withmapping
❗️❗️Important AWS Documentation To Be Viewed❗️❗️
⛔️ Fn::FindInMap
⛔️ Fn::GetAtt
⛔️ Fn::GetAZs
⛔️ Fn::Base64
⛔️ Mappings
⛔️ Condition functions
⛔️ Outputs
🥁🥁 Conclusion 🥁🥁
In this blog I have covered 3 usecases in which we will create
✦ Ubuntu EC2 instance with security group.
✦ Ubuntu EC2 instance with Security group & Userdata.
✦ Ubuntu EC2 instance with Security group, Userdata & Mappings.
I have used AWS CLI command to deploy these template and trust me AWS CLI is the realtime hero and I would suggest you to get acquainted towards it. Going forward I will be releasing further parts to this CloudFormation journey
📯Stay tuned for my next blog.....
🎊So, did you find my content helpful? If you did or like my other content, feel free to buy me a coffee. Thanks. 🎊

💫Cloudformation Series Sequence💫
🔰 Deploy VPC With Internet Gateway & Associate I
🔰 Public, Private Subnet & Route Table Creation & Association II
🔰 Private Subnet,Nat Gateway, Elastic Ip, Private Route Table & Associate III
🔰 NACL, Inbound & Outbound Routes, Security Group & Associate With Subnet IV
🔰 EC2 With Security Group & User Data & Mapping V
🔰 Target Group, Elastic Load Balancer & ELB Listener VI
🔰 Build Web Application Layer With AWS CloudFormation VII
⌛️Realtime Usecases Cloudformation Templates⏳
💨 Schedule Automatic Detection Of Unused AWS EBS Volumes & Notify
💨 Schedule Automatic Detection Of Non Associated AWS Elastic IP's In AWS Account On Weekly Basis And Notify
💨 Schedule Automatic Deregistration Of AWS AMI On Weekly Basis And Notify